

The average piece of lumber travels nearly 1,000 miles before reaching a workshop, a journey that often strips it of its inherent character and connection to its origin. However, a growing movement in woodworking defies this norm, celebrating the raw, untamed beauty of nature itself. This article provides an Introduction to Live Edge Slab Woodworking: From Sourcing to Finishing Unique Furniture Pieces, guiding enthusiasts and aspiring craftspeople through the essential steps of transforming a natural tree slab into a stunning, functional work of art. By retaining the tree’s natural edge, live edge woodworking preserves the organic contours and unique story of each piece of wood, creating furniture that is both visually striking and deeply connected to nature.
Key Takeaways
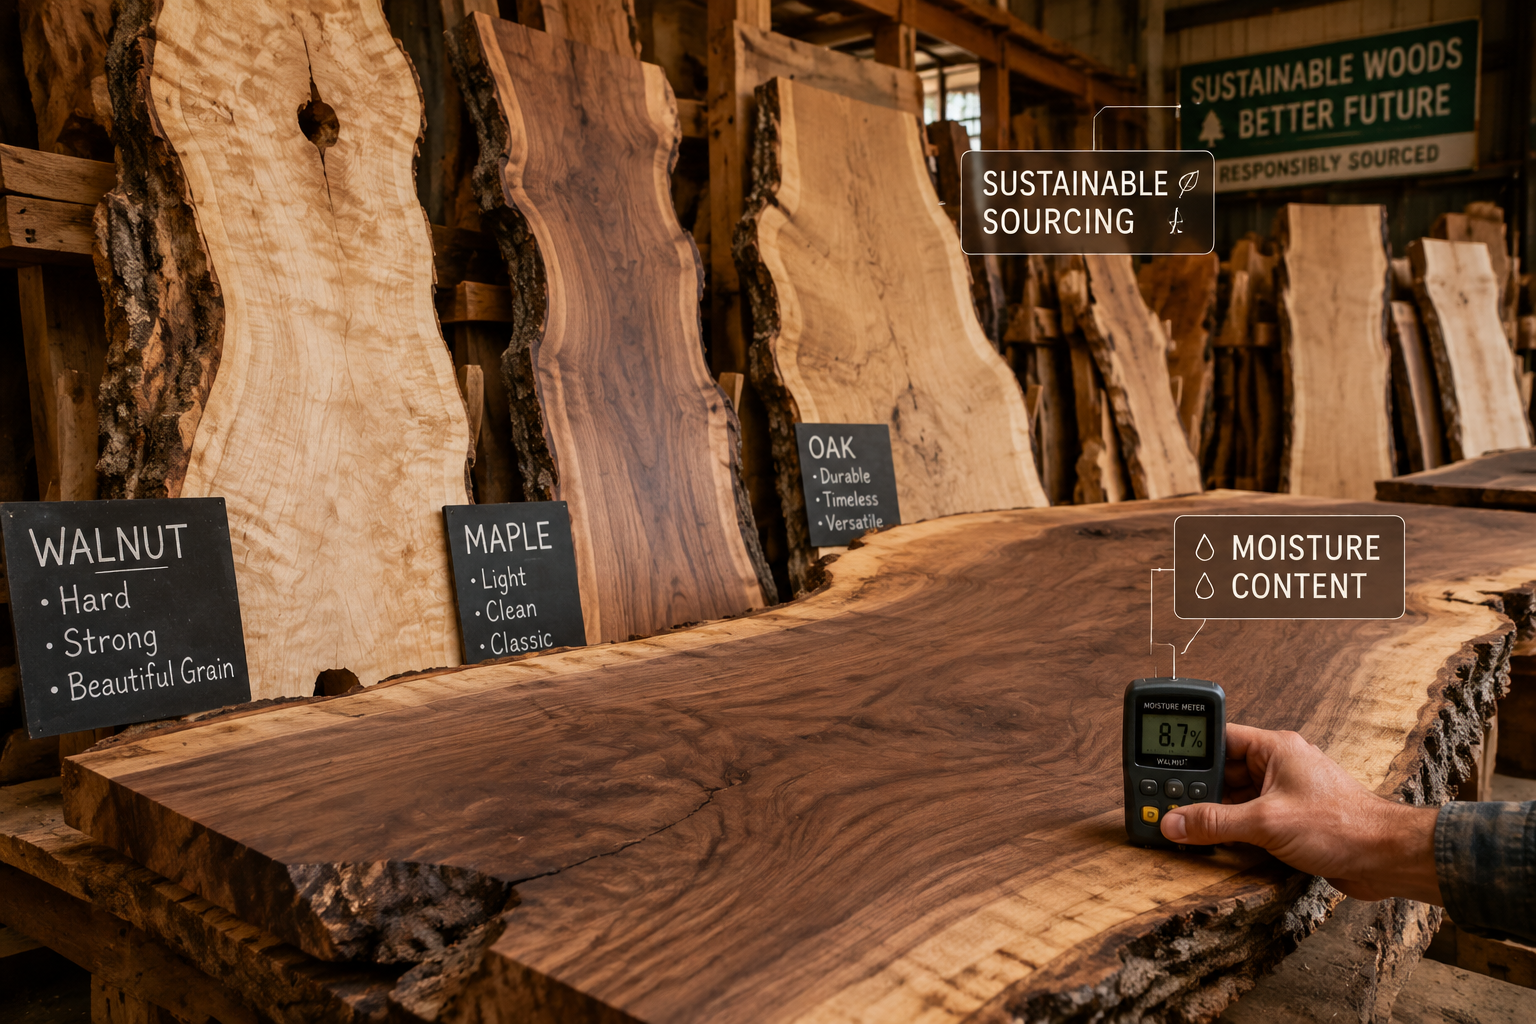
- Sourcing is Critical: The quality and character of your live edge slab depend heavily on careful sourcing, considering species, moisture content, and sustainability.
- Flattening is Essential: Achieving a stable, level surface is paramount for structural integrity and a professional finish, often requiring specialized techniques like router sleds.
- Stabilizing and Void Filling: Addressing cracks, checks, and voids with epoxy resin not only enhances durability but also adds aesthetic appeal, highlighting natural imperfections.
- Meticulous Finishing: Proper sanding, sealing, and applying a durable finish are crucial steps that protect the wood, deepen its natural beauty, and ensure longevity.
- Embrace the Natural: Live edge woodworking celebrates the unique, organic forms of wood, creating pieces that stand out with their inherent natural character.
Sourcing and Selecting Your Live Edge Slab
The journey into live edge slab woodworking begins with the slab itself. Far more than just a piece of wood, a live edge slab is a segment of a tree, often retaining its natural bark edge, telling a story of its growth and environment. Understanding how to source and select the right slab is foundational to creating a successful project.

Understanding Wood Species for Live Edge
Different wood species offer distinct aesthetic qualities, workability, and durability. Here’s a quick overview of popular choices for live edge projects:
- Walnut: Highly prized for its rich, dark color and dramatic grain patterns. It’s relatively stable and finishes beautifully. Often used for high-end dining tables and desks.
- Maple: Ranging from light cream to reddish-brown, maple offers subtle grain and can feature beautiful figure (e.g., curly, birdseye). It’s very durable and takes stains well.
- Oak (Red & White): Known for its prominent open grain and durability. White oak is particularly water-resistant, making it suitable for dining and kitchen surfaces.
- Cherry: Features a warm, reddish-brown hue that deepens with age. Its fine, uniform grain makes it a joy to work with, though it can be prone to warping if not properly dried.
- Elm: Often exhibits fascinating interlocked grain patterns and is surprisingly durable, though it can be challenging to work with due to its density.
Where to Find Quality Slabs
Sourcing plays a vital role in the character and sustainability of your project. Consider these options:
- Local Sawmills: Often the best source for freshly cut, kiln-dried, or air-dried slabs. You can inspect the slabs personally, discuss their origin, and often get better pricing.
- Specialty Wood Suppliers: These businesses focus on unique and exotic woods, including a wide selection of live edge slabs. They typically offer a higher level of preparation and grading.
- Arborists & Tree Removal Services: In 2026, many arborists are becoming more aware of the value of urban timber. You might find opportunities to acquire logs destined for firewood, then have them milled. This approach often aligns with sustainable practices. Learn more about sourcing and restoring urban harvested and reclaimed wood.
- Online Retailers: Offer convenience and a broad selection, but inspecting the slab in person is crucial to ensure quality and accurate representation. Always check return policies.

Assessing Slab Quality: What to Look For 👀
When selecting a slab, consider these critical factors:
- Moisture Content (MC): This is paramount. For indoor furniture, the MC should ideally be between 6-8%. High MC leads to warping, cracking, and movement after fabrication. A moisture meter is an indispensable tool.
- Flatness & Straightness: While live edge slabs are rarely perfectly flat, significant bows, twists, or cups will require extensive flattening.
- Cracks & Checks: Small cracks are common and can be filled, but large, deep checks might compromise structural integrity or require substantial repair.
- Inclusions & Voids: These natural features (knots, bark inclusions, decay pockets) contribute to the unique character. Decide if they align with your design vision.
- Bark Adhesion: If you plan to keep the bark, check its stability. Loosely attached bark can detach over time. Often, the bark is removed for durability and easier finishing.
- Thickness: Ensure the slab is thick enough for your intended use, accounting for material lost during flattening. Common thicknesses range from 2-3 inches for tabletops.
Preparing the Live Edge Slab: Flattening, Stabilizing, and Filling Voids
Once you’ve acquired your perfect slab, the real work begins. Preparation is arguably the most crucial phase in Introduction to Live Edge Slab Woodworking: From Sourcing to Finishing Unique Furniture Pieces, as it lays the groundwork for a stable, durable, and visually appealing final product.
Flattening Techniques
Live edge slabs are rarely perfectly flat. Flattening ensures a level surface, essential for furniture stability and proper joinery.
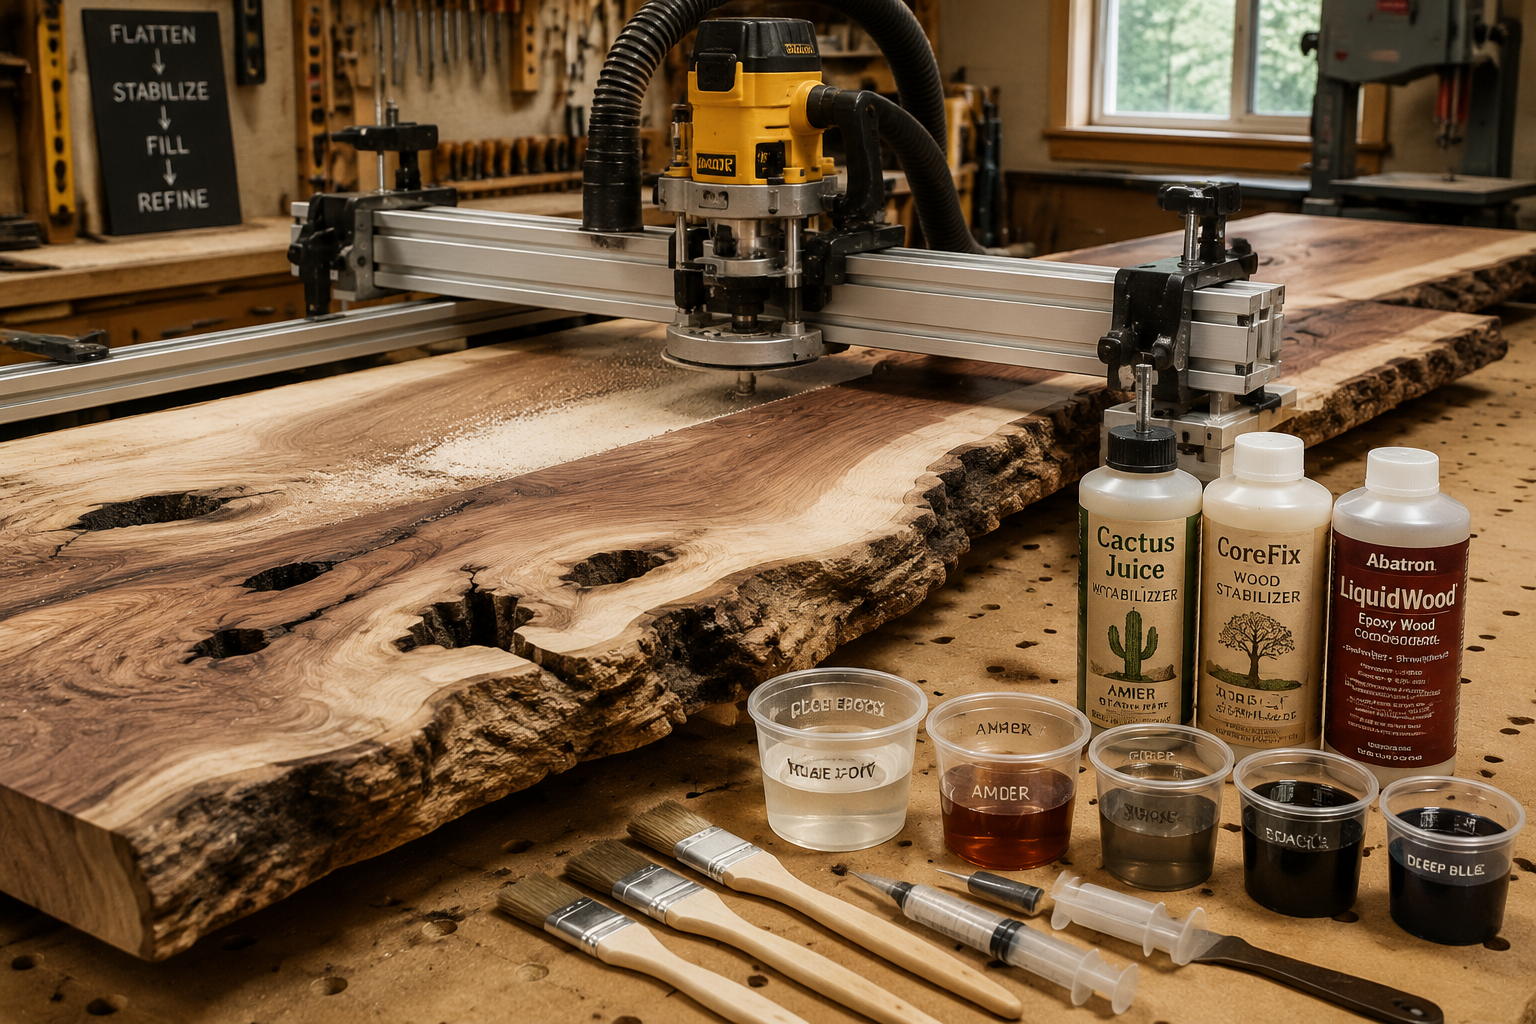
- Router Sled: This is the most common and accessible method for hobbyists and small shops. A large router with a surfacing bit is mounted to a sled that slides over parallel rails, systematically milling the slab surface. It’s precise but can be time-consuming.
- Large Planer/Drum Sander: Professional shops often have access to industrial-sized machines that can flatten slabs quickly and efficiently.
- Hand Planing: For smaller, less warped slabs, hand planes can be used, though this requires skill and significant physical effort.
Process Overview for Router Sled:
- Build or Buy a Sled: Construct a sturdy sled that holds your router and a pair of parallel rails that span the width of your slab.
- Shim the Slab: Place the slab on a stable surface and use shims to level its highest points. Secure it firmly to prevent movement.
- Mill One Face: Start routing one face, making shallow passes. Overlap each pass to ensure an even surface.
- Flip and Mill the Other Face: Once the first face is flat, flip the slab. The newly flattened face becomes your reference surface. Mill the second face, ensuring consistent thickness.
Stabilizing Cracks and Checks
Natural cracks and checks are part of a slab’s character, but they can propagate if not stabilized.
- Bowties/Butterfly Keys: These inlaid wood keys are decorative and functional, preventing cracks from spreading. They are typically cut across the crack and epoxied in place.
- Epoxy Resin: For smaller cracks, a thin, penetrating epoxy can be used to stabilize the wood fibers.
Filling Voids and Inclusions
Voids (such as knot holes, bark inclusions, or natural decay pockets) can be left open for a rustic look or filled for a smooth, continuous surface.
- Epoxy Resin: This is the go-to material for filling voids. Clear epoxy allows the natural wood or inclusions to show through, while tinted epoxy (using pigments) can add a striking visual element.
- Preparation: Clean out all loose material from the void. Tape the underside if the void goes all the way through.
- Mixing: Follow epoxy manufacturer instructions precisely for mixing ratios. Inaccurate mixing leads to improper curing.
- Pouring: Pour slowly to minimize bubbles. For deep voids, multiple pours might be necessary to control heat generation.
- Curing: Allow ample time for the epoxy to cure completely before sanding.

Remember, patience is a virtue in this stage. Rushing through flattening or epoxy work can lead to irreparable flaws.
Finishing Your Live Edge Masterpiece: Sanding, Sealing, and Protection
The finishing stage is where the true beauty of the wood is revealed and protected. It transforms a prepared slab into a unique furniture piece. This final step is paramount in your Introduction to Live Edge Slab Woodworking: From Sourcing to Finishing Unique Furniture Pieces.
Sanding: The Foundation of a Great Finish
Thorough sanding is non-negotiable for a professional finish.

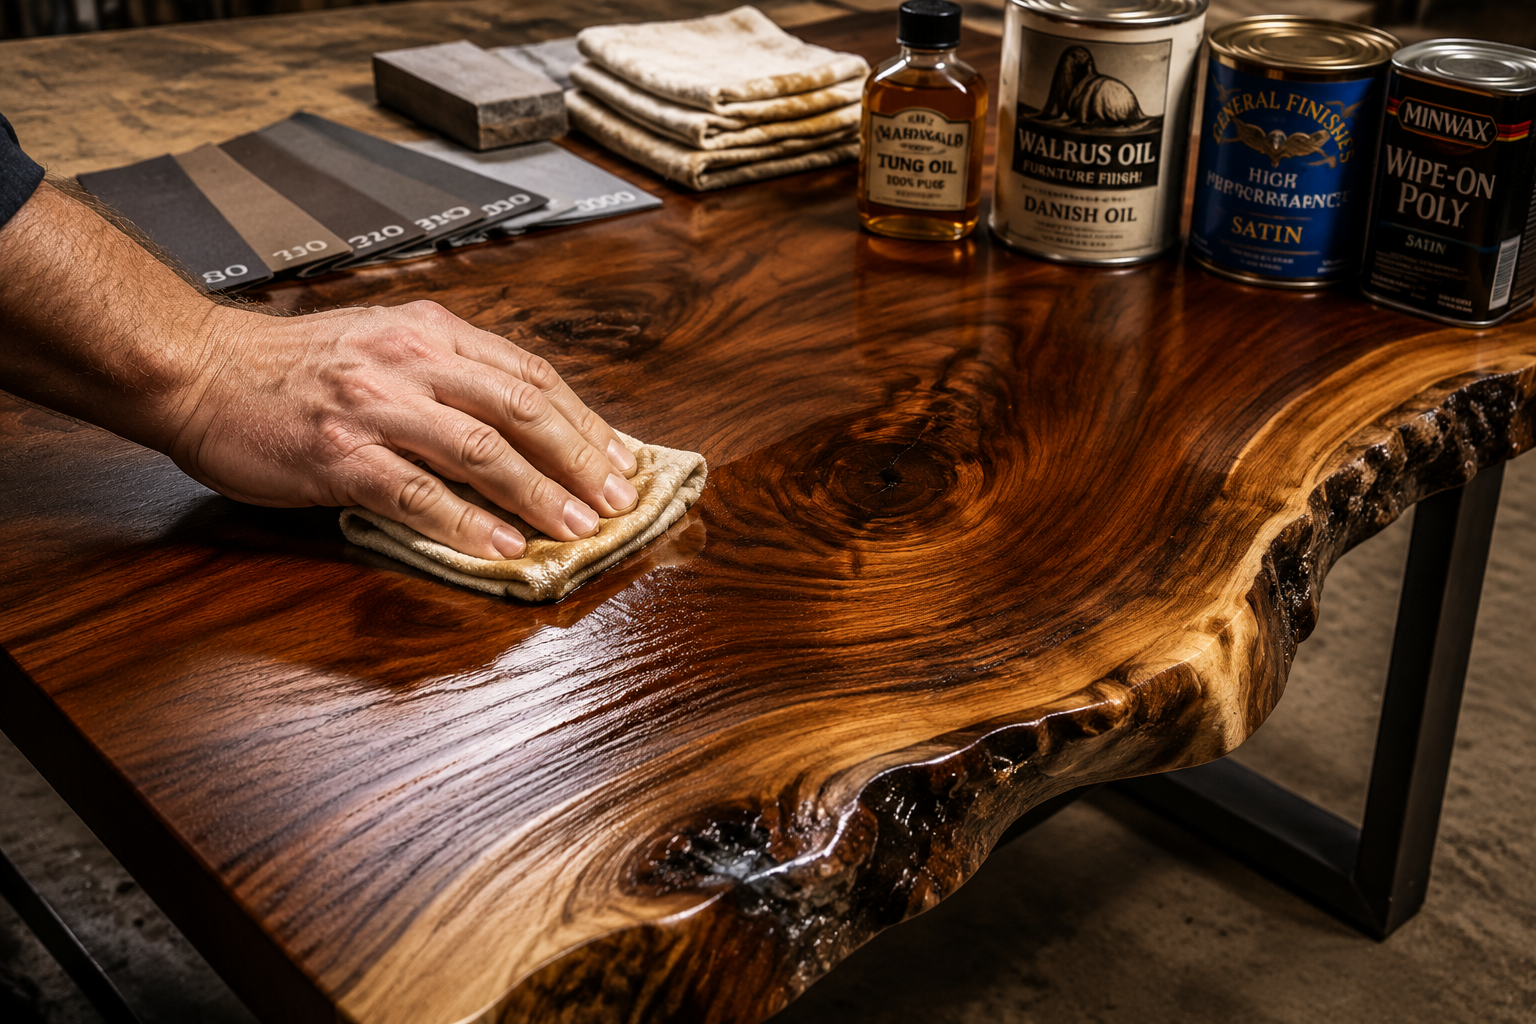
- Grit Progression: Start with a coarser grit (e.g., 80-100 grit) to remove milling marks or epoxy overflow. Gradually progress through finer grits (120, 150, 180, 220). Some might go up to 320 or 400 grit for an ultra-smooth feel, especially for tabletops.
- Consistent Pressure: Use an orbital sander for large surfaces, ensuring consistent pressure to avoid divots.
- Dust Removal: Between each grit, thoroughly clean the surface to remove dust particles. Dust from coarser grits can scratch the surface if carried over by finer sandpaper.
- Edge Sanding: Pay special attention to the live edge, removing any loose bark or sharp points. A wire brush can help clean the natural contours if you’re keeping the bark.
Sealing and Protection
Applying a finish not only enhances the wood’s appearance but also protects it from moisture, wear, and tear.
Types of Finishes
- Oil-Based Finishes (e.g., Tung Oil, Danish Oil): These penetrate the wood fibers, enhancing the natural grain and providing a warm, hand-rubbed look. They offer good water resistance but less abrasion resistance than film finishes. Reapplication is often needed. Explore Danish oil vs. linseed oil for more insight.
- Polyurethane (Oil-Based or Water-Based): A durable film-building finish that offers excellent protection against scratches, abrasion, and moisture. Oil-based polyurethanes provide a warm amber tone, while water-based versions dry clear. Available in various sheens (matte, satin, semi-gloss, gloss).
- Epoxy Finishes: For extreme durability and a glass-like surface, a flood coat of epoxy resin can be applied. This is particularly popular for bar tops and dining tables that require heavy protection.
- Hardwax Oils: A hybrid finish that penetrates like oil but offers increased protection like a wax. Easy to repair and maintain.
Application Tips
- Cleanliness: Ensure the environment is dust-free during application to prevent specks from settling in the wet finish.
- Even Coats: Apply thin, even coats, following the manufacturer’s instructions for drying times between coats.
- Rubbing Out: For film finishes like polyurethane, a final “rubbing out” process (using fine abrasives and polishing compounds) can achieve a supremely smooth, professional sheen.
- Care for the Live Edge: If the bark is retained, consider applying a stabilizing finish to it to prevent chipping and decay. If the bark is removed, thoroughly sand and finish the natural edge to prevent splinters. For more finishing options, check out unique wood finishing techniques.

By meticulously following these steps, your live edge slab will transform into a stunning piece of furniture that celebrates the tree’s natural beauty and showcases your craftsmanship. Whether it’s a dining table, a coffee table, or a desk, a well-executed live edge piece becomes a focal point, a conversation starter, and a testament to the enduring appeal of natural wood. If you’re looking to build something specific, consider our guide on building 2026’s hottest trend: DIY live edge dining tables for modern homes.
Conclusion
The journey through Introduction to Live Edge Slab Woodworking: From Sourcing to Finishing Unique Furniture Pieces reveals a craft that is as rewarding as it is challenging. By embracing the organic beauty of wood, from the careful selection of a raw slab to the meticulous application of a protective finish, woodworkers can create furniture that truly stands apart. Each crack, knot, and natural edge tells a part of the tree’s story, allowing us to bring a piece of the forest’s timeless artistry into our homes.
This discipline demands patience, attention to detail, and a respect for the material. However, the satisfaction of transforming a rough, imperfect slab into a functional, breathtaking piece of furniture is unparalleled. As you embark on your own live edge projects, remember that imperfections are not flaws, but rather unique characteristics that contribute to the piece’s identity. Embrace them, enhance them, and let the natural beauty of the wood shine through.
Actionable Next Steps:
- Research Local Suppliers: Start by identifying local sawmills or specialty wood suppliers in your area to understand available species and pricing.
- Invest in Tools: If you’re serious about live edge, consider investing in a good quality moisture meter, a router, and materials for a router sled.
- Start Small: Begin with a smaller project, like a live edge console table or a shelf, to practice flattening and finishing techniques before tackling a large dining table.
- Practice Epoxy Work: Get comfortable with mixing and pouring epoxy on scrap pieces of wood to understand its properties and working time.
- Experiment with Finishes: Try different finishes on test pieces to see how they interact with your chosen wood species and achieve your desired aesthetic.
Meta Title: Live Edge Woodworking: From Sourcing to Finishing Unique Furniture Meta Description: Dive into live edge slab woodworking in 2026. Learn sourcing, flattening, stabilizing, and finishing techniques for stunning furniture pieces.
