

The average wood joint, when properly glued, can often be stronger than the surrounding wood itself, a testament to the remarkable capabilities of modern adhesives. However, achieving this pinnacle of structural integrity and aesthetic seamlessness goes far beyond merely applying a bead of glue. It demands a nuanced understanding of materials, techniques, and the science behind the bond. This article delves into Mastering the Art of Wood Gluing: Advanced Techniques for Stronger Joints and Seamless Assemblies, equipping woodworkers with the knowledge to elevate their craft from functional to flawless in 2026.
Beyond the basic squeeze-and-clamp, advanced wood gluing involves critical considerations for joint preparation, adhesive selection, clamping strategies, and post-gluing refinement. Whether you are building fine furniture, intricate cabinetry, or robust outdoor pieces, the principles outlined here will guide you toward joints that not only endure but also disappear into the beauty of your finished work.

Key Takeaways
- Joint Preparation is Paramount: Achieve maximum bond strength by ensuring perfectly flat, clean, and appropriately textured surfaces before applying any adhesive.
- Select the Right Glue: Different projects demand different glues; understand the properties of PVA, hide glue, epoxy, and polyurethane for optimal results in specific applications.
- Master Clamping Strategies: Even pressure and proper alignment are crucial. Utilize diverse clamping tools and techniques for various joint types, including complex curved assemblies.
- Optimize Glue Application: Apply the correct amount of glue to avoid starved or overly messy joints, ensuring complete coverage and appropriate squeeze-out.
- Troubleshoot Common Issues: Learn to identify and correct problems like starved joints, creep, and poor adhesion to prevent structural failures and aesthetic flaws.
The Foundation of Strength: Surface Preparation and Glue Selection
The journey to Mastering the Art of Wood Gluing: Advanced Techniques for Stronger Joints and Seamless Assemblies begins long before the glue bottle is opened. The quality of your bond is fundamentally determined by how well you prepare the surfaces to be joined and your choice of adhesive.
Perfecting Joint Surfaces for Optimal Adhesion
A strong glue joint relies on intimate contact between the adhesive and the wood fibers. Any imperfections, dust, or oils will compromise this contact, leading to a weaker bond.
- Flatness and Squareness: For butt joints, edge joints, and face joints, surfaces must be perfectly flat and square. Use a jointer, planer, or a precisely guided saw to achieve this. Hand planes can also provide exceptional flatness. Uneven surfaces create gaps that the glue cannot effectively bridge, resulting in a weak spot.
- Cleanliness: Dust, sawdust, grease, and even fingerprints can act as bond breakers. Always wipe down joint surfaces with a clean, dry cloth immediately before gluing. For oily woods or stubborn residues, a solvent like denatured alcohol can be used, ensuring it evaporates completely before glue application.
- Roughness (Microscopic): While surfaces should be visually smooth, a microscopic roughness is beneficial for mechanical interlocking with the glue. Planed or jointed surfaces are generally ideal. Excessively fine sanding (above 220 grit) can sometimes “polish” the wood, reducing the mechanical grip.
- Grain Direction: When possible, glue long grain to long grain. This orientation offers the strongest bond because the wood fibers are oriented parallel to the glue line, allowing for maximum penetration and mechanical keying. End grain gluing is notoriously weak due to the open capillary structure rapidly absorbing glue, leading to a starved joint. If end grain to long grain is unavoidable, consider using dowels, tenons, or a specialized glue designed for end grain.
Choosing the Right Adhesive for Your Project
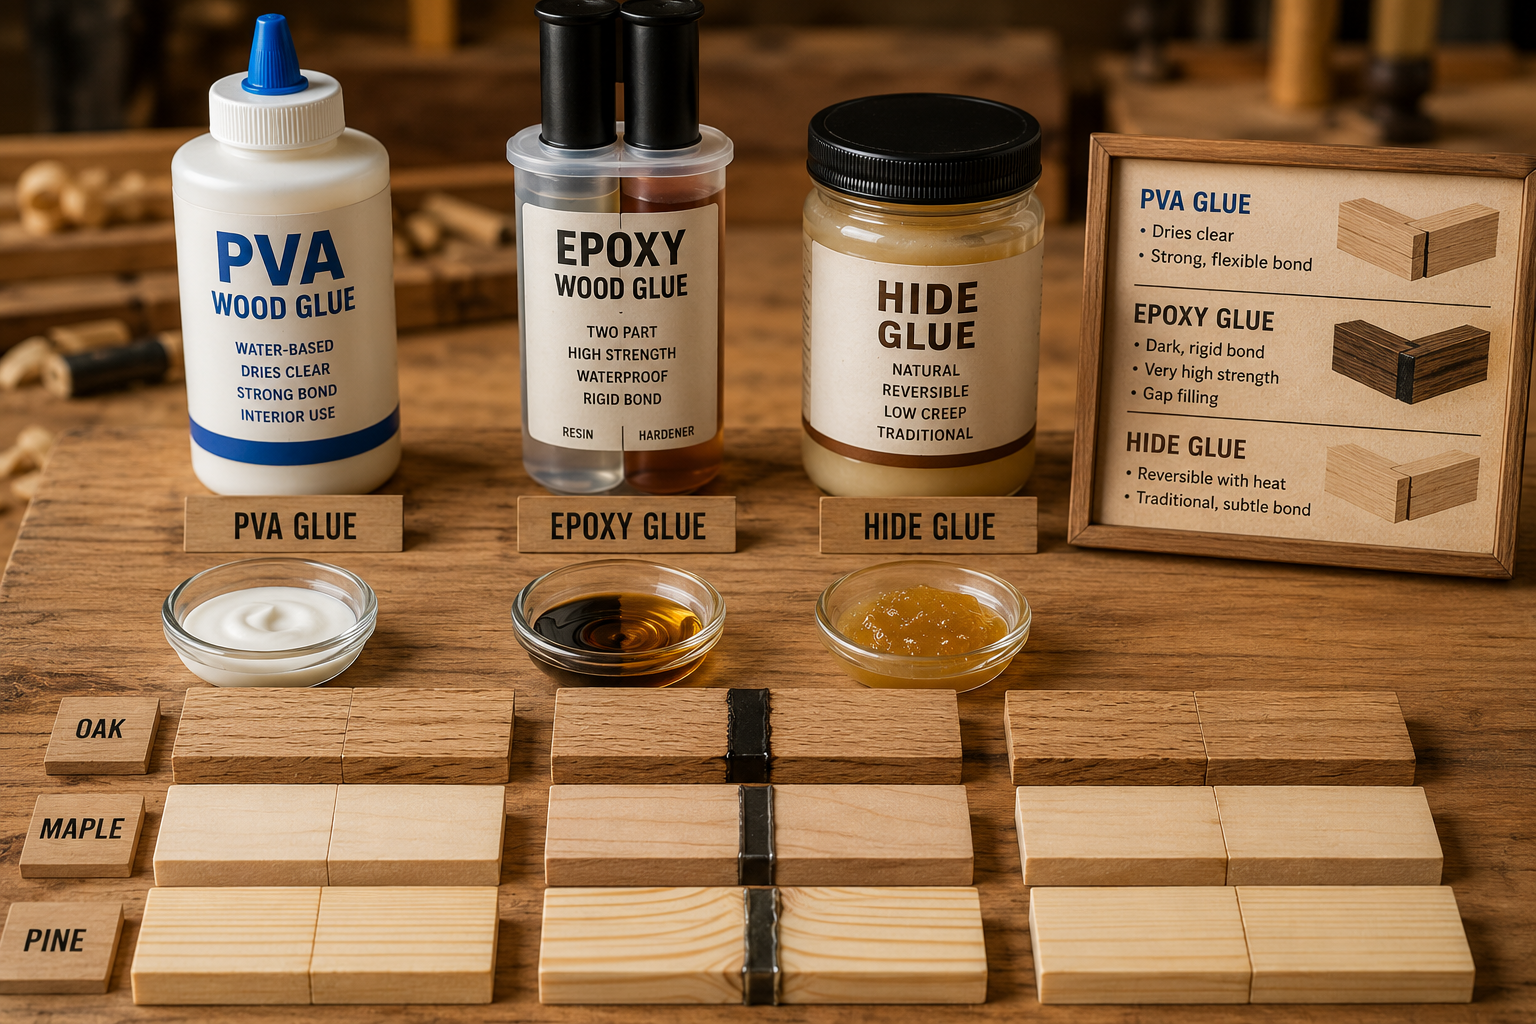
The market offers a diverse array of wood glues, each with unique properties suited for specific applications. Understanding these differences is crucial for Mastering the Art of Wood Gluing.
%20image%20featuring%20a%20close-up%20of%20various%20wood%20glue%20types%20(PVA%2C%20epoxy%2C%20hide%20glue)%20clearly%20labeled%20and%20arranged%20on%20a%20clean%20wooden%20surface%2C%20alongside%20small%20swatches%20of%20different%20wood%20species%20(oak%2C%20maple%2C%20pine)%20with%20cured%20glue%20joints%20demonstrating%20their%20specific%20bond%20characteristics%2C%20including%20a%20clear%2C%20strong%20bond%20for%20PVA%2C%20a%20dark%2C%20rigid%20bond%20for%20epoxy%2C%20and%20a%20more%20subtle%2C%20reversible%20bond%20for%20hide%20glue.%20The%20composition%20should%20highlight%20the%20textures%20of%20the%20wood%20and%20the%20different%20glue%20consistencies%2C%20with%20warm%2C%20natural%20lighting.)
| Glue Type | Characteristics | Best Use Cases | Considerations |
|---|---|---|---|
| PVA (Polyvinyl Acetate) | Common woodworking glues (e.g., Titebond I, II, III). Strong, easy to clean up with water. Varying water resistance. | General indoor woodworking, furniture, cabinetry. Titebond II/III for outdoor projects or increased water resistance. | Standard PVA (Titebond I) is not waterproof. Titebond III offers excellent water resistance. Can be prone to “creep” under constant stress. |
| Hide Glue | Traditional, reversible, long open time, excellent for repairs and antique restoration. Available as liquid or granules. | Fine furniture, antique restoration, veneering, joinery where reversibility is desired. Can be used for restoring antique wooden furniture. | Not waterproof. Requires careful application and can be more difficult to work with for beginners. Granular hide glue requires heating. |
| Epoxy | Two-part adhesive (resin + hardener). Extremely strong, fills gaps, waterproof, excellent for dissimilar materials. | Structural applications, boat building, outdoor furniture, filling voids, attaching metal to wood, or projects requiring extreme durability. | Longer cure times, more expensive. Can be messy and difficult to clean up. Requires precise mixing ratios for full strength. Potential for allergic reactions with skin contact. |
| Polyurethane Glue | Expands as it cures (requires moisture), strong, waterproof, fills minor gaps. | Outdoor projects, marine applications, projects where gap-filling is needed. Works well with oily or exotic woods. | Expands significantly, requiring firm clamping. Can stain skin and clothing. Requires moisture for activation. Less forgiving on squeeze-out cleanup. |
| Cyanoacrylate (CA) Glue | “Super glue.” Very fast setting, brittle, fills small gaps. | Temporary clamping, small repairs, securing small parts, turning applications (e.g., pen making in Ultimate Guide to Wood Lathe Turning). | Brittle, not for structural joints, fumes can be irritating. Poor gap-filling for larger voids. |
Consider factors like open time (how long you have to assemble and clamp), cure time, water resistance, flexibility, and gap-filling capabilities when making your selection.
Advanced Application and Clamping Strategies
Beyond choosing the correct glue, Mastering the Art of Wood Gluing hinges on the finesse of its application and the strategic deployment of clamps. Improper clamping can negate the strongest glue, while precise application ensures every fiber contributes to the bond.
Optimal Glue Application Techniques
The goal is to apply enough glue to cover both surfaces adequately, ensuring a complete bond, without excess that creates unnecessary mess or starved joints.
- Spreaders: Use a roller, brush, or dedicated glue spreader to apply an even, thin coat to one or both surfaces. For large panels, consider a notched spreader to ensure uniform coverage.
- Even Coverage: Ensure glue covers the entire joint surface. Areas missed will be weak points.
- Squeeze-Out: A slight, even squeeze-out of glue along the entire joint line indicates proper coverage and clamping pressure. Too much squeeze-out means excessive glue; too little indicates a starved joint or insufficient pressure.
- Open Time: Be mindful of the glue’s open time. This is the period after application during which you can still manipulate the joint and apply clamps effectively. Exceeding open time can lead to a weak, “dry” bond.
- Gluing Curved Pieces: For curved or contoured surfaces, flexibility in application is key. Using glues with longer open times can be advantageous. Consider applying glue to both mating surfaces to ensure even saturation. For complex curves, multiple light coats may be better than one thick one.
Mastering the Art of Clamping
Clamping is not just about holding pieces together; it’s about applying even, consistent pressure across the entire glue line until the adhesive cures.
- Even Pressure is Key: Pressure should be uniform across the entire joint. Uneven pressure can lead to gaps, weak spots, and misalignments. Use cauls (wooden strips) between clamps and the workpiece to distribute pressure evenly, especially on softer woods or delicate edges.
- Clamping for Panel Glue-Ups: For wide panels (e.g., tabletops, cabinet doors), alternate clamps above and below the panel to counteract bowing. Place clamps every 6-12 inches, applying light pressure, then gradually tightening them all. Cauls are especially important here to prevent denting.
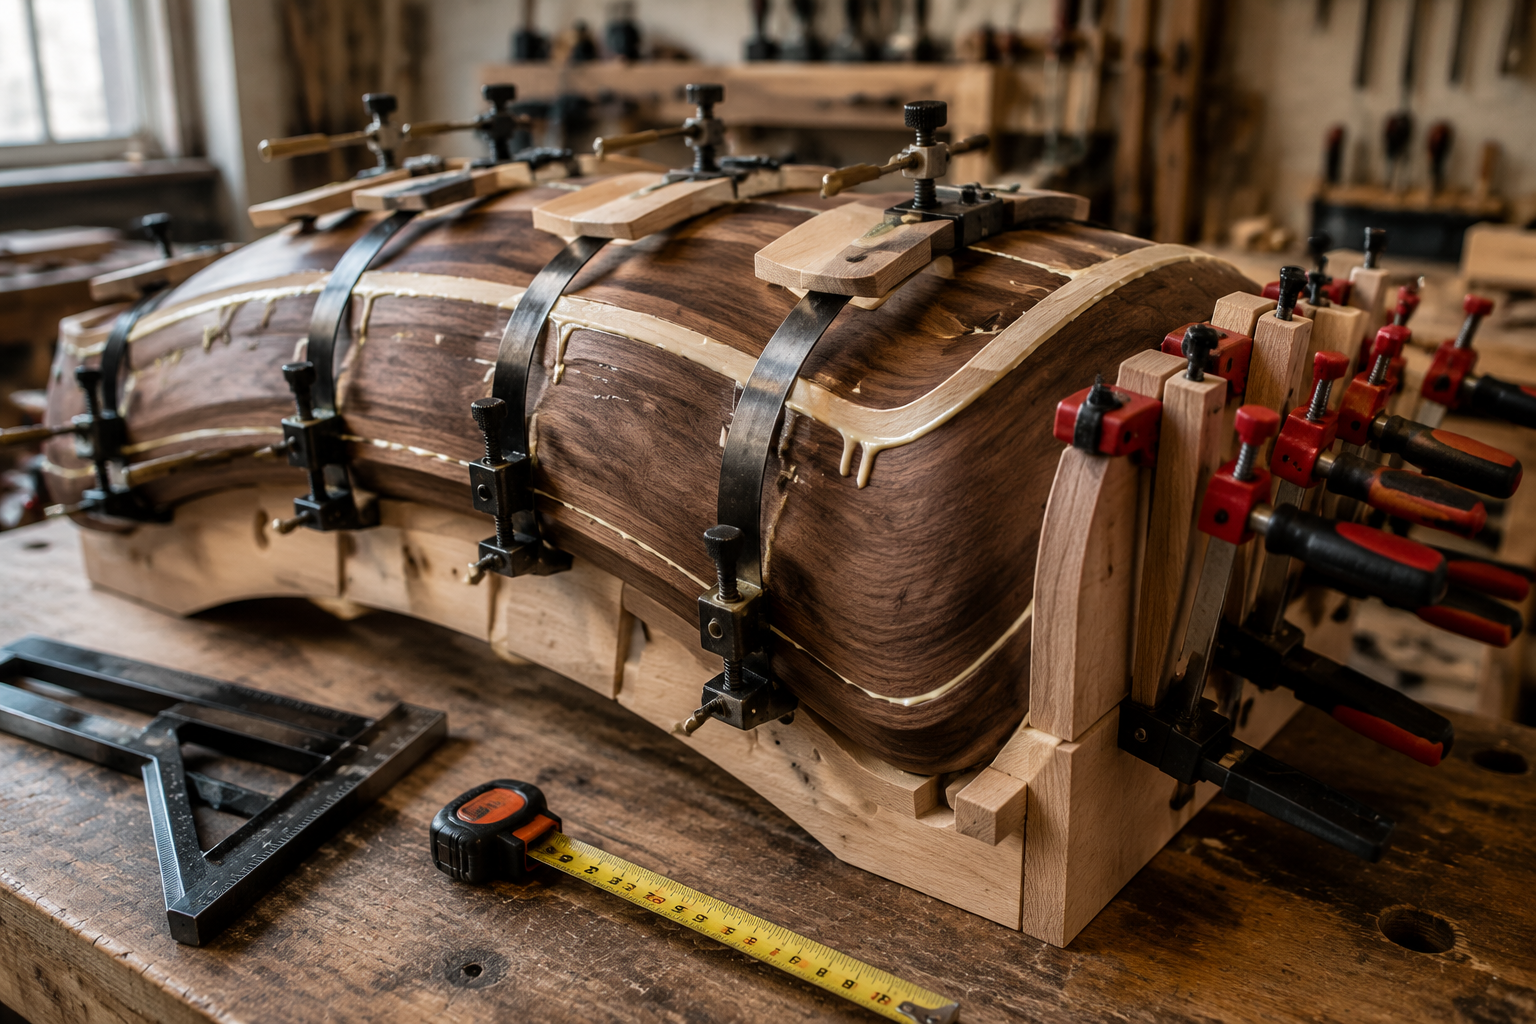
- Clamping Complex Angles and Shapes:
- Band Clamps: Excellent for irregular shapes, frames, or assemblies with multiple angles, like a hexagonal box or a wooden birdhouse. They provide encircling pressure.
- Toggle Clamps: Useful for jigs and fixtures, offering quick setup and release with consistent pressure.
- Vacuum Press: For veneering or laminating curved forms, a vacuum press provides incredible, even pressure over large or complex surfaces without traditional clamps.
- Custom Jigs: Sometimes, standard clamps aren’t enough. Designing custom clamping jigs for specific, complex assemblies—like curved chair backs or segmented bowls—can ensure perfect alignment and pressure. For more on jigs, see our Beginner’s Guide to Essential Woodworking Jigs.
- Drying Time and Clamp Removal: Always consult the glue manufacturer’s recommendations for clamp time and full cure time. Removing clamps too early can weaken the bond or cause parts to shift. Full cure can take 24-72 hours, even if clamps can be removed after a few hours.
%20image%20showcasing%20advanced%20clamping%20techniques%20on%20a%20complex%20curved%20wood%20assembly.%20Multiple%20specialized%20clamps%20(band%20clamps%2C%20cauls%2C%20veneer%20presses)%20are%20strategically%20positioned%20to%20apply%20even%20pressure%20across%20a%20contoured%20surface%2C%20ensuring%20a%20seamless%2C%20strong%20joint.%20A%20visible%20squeeze-out%20of%20glue%20is%20present%2C%20indicating%20proper%20application.%20The%20scene%20includes%20a%20measuring%20tape%20and%20square%20to%20emphasize%20precision%2C%20with%20a%20soft%2C%20diffused%20light%20source%20highlighting%20the%20curves%20and%20clamping%20mechanisms.)
Joint Reinforcement: Beyond Basic Glue-Ups
While glue alone provides immense strength, certain joints or high-stress applications benefit from additional mechanical reinforcement.
- Biscuits, Dowels, and Dominos: These small wooden fasteners primarily aid in alignment during glue-up but also add shear strength. They are particularly useful for panel glue-ups, carcass construction, and attaching shelves. Doweling jigs can significantly improve accuracy.
- Splines and Keys: Inlaid into grooves or dados, splines and keys are excellent for reinforcing mitered corners or edge joints, significantly increasing long-grain gluing surface area and preventing separation.
- Tenons and Mortises: A fundamental joinery method, the mortise and tenon joint offers substantial glue surface area and mechanical interlocking, forming incredibly strong and durable connections, often seen in Mastering Dovetail Drawers for Cabinets.
Troubleshooting and Achieving Seamless Assemblies
Even with careful planning, issues can arise. Knowing how to identify and rectify common gluing mistakes is vital for Mastering the Art of Wood Gluing: Advanced Techniques for Stronger Joints and Seamless Assemblies. Moreover, achieving truly seamless assemblies involves post-gluing techniques that hide the glue line entirely.
Common Gluing Mistakes and How to Avoid Them
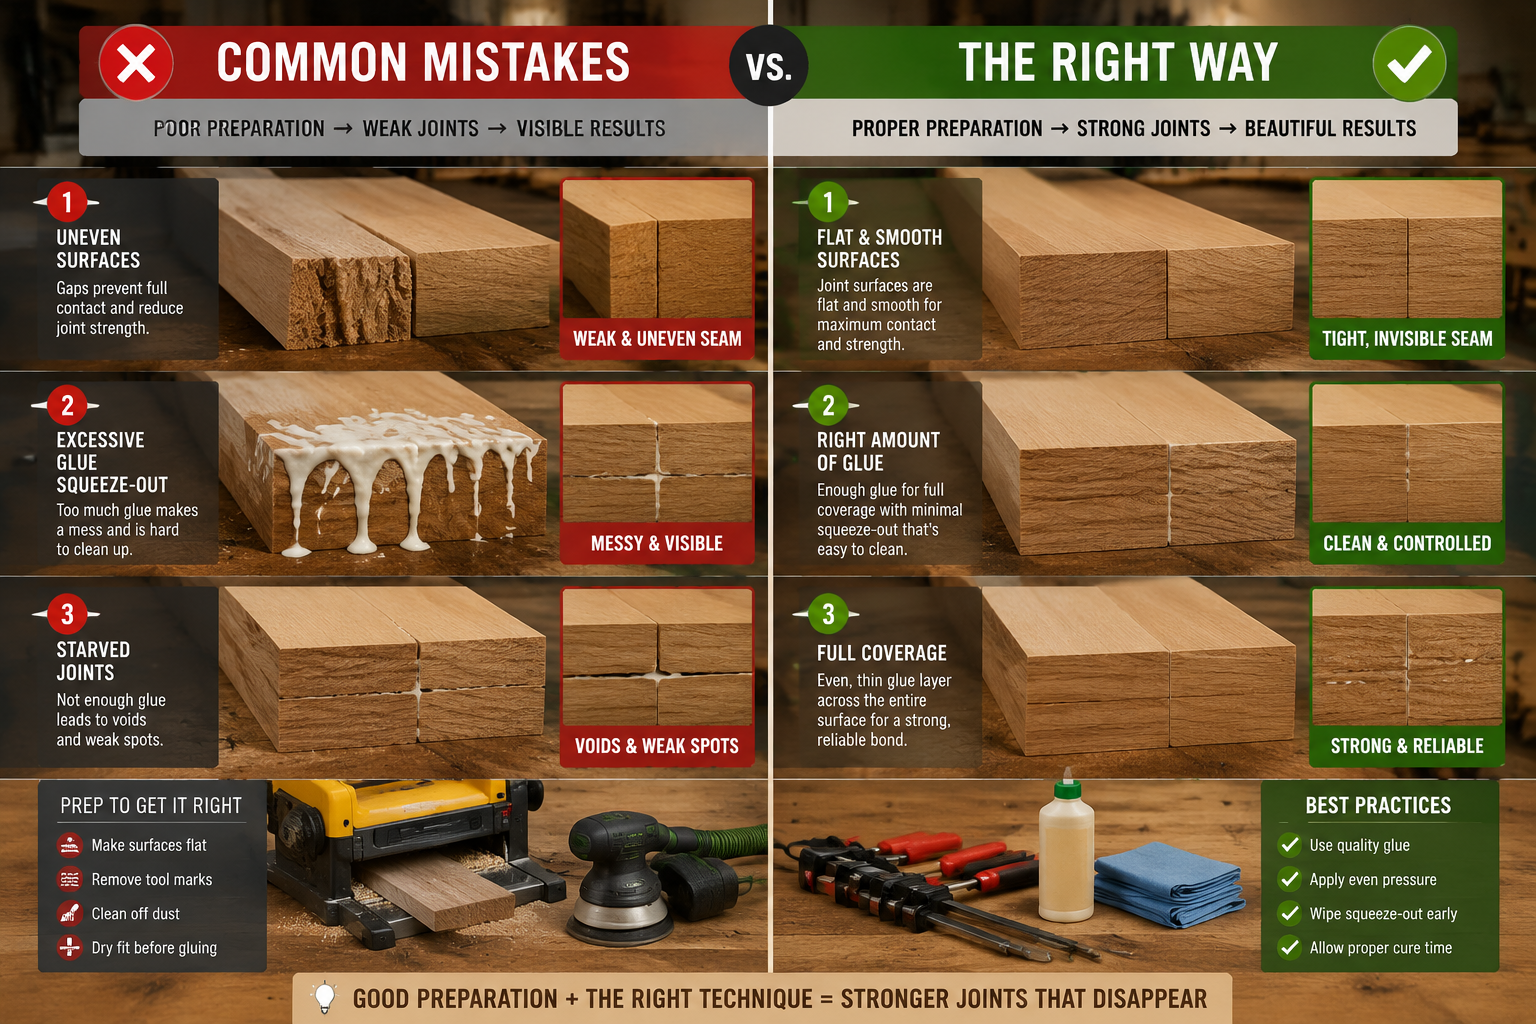
- Starved Joints: This occurs when too little glue is applied or too much clamping pressure squeezes out most of the adhesive. The result is insufficient glue to create a strong bond, leading to a weak, brittle joint.
- Solution: Apply a generous but not excessive amount of glue. For porous woods or end grain, a thin “sizing coat” allowed to soak in slightly, followed by a second application, can help. Use moderate clamping pressure—just enough to achieve consistent squeeze-out.
- Creep: Some glues, particularly standard PVA (Titebond I), can slowly deform or “creep” under constant stress over time, especially in furniture that bears weight. This can lead to visible joint lines or structural sagging.
- Solution: For high-stress applications, use glues with high creep resistance, such as Titebond II or III, epoxy, or polyurethane. Mechanical fasteners or reinforcing joinery can also help.
- Poor Alignment: Parts shifting during clamping or misalignment before clamping can result in an ugly, functionally compromised joint.
- Solution: Use cauls, clamping jigs, or reference blocks to maintain alignment. Dry clamp your assembly first to practice and identify potential issues. For long panels, use opposing clamps to keep boards flush.
- Premature Clamp Removal: Taking clamps off before the glue has adequately set can lead to joint failure.
- Solution: Always adhere to the manufacturer’s recommended clamp time. When in doubt, leave clamps on longer, especially in cooler, humid conditions.
- Inadequate Surface Preparation: As discussed earlier, dust, dirt, or uneven surfaces directly compromise bond strength.
- Solution: Meticulously prepare all mating surfaces: ensure flatness, squareness, and cleanliness.
%20image%20illustrating%20common%20wood%20gluing%20mistakes%20and%20their%20solutions.%20One%20side%20of%20the%20image%20shows%20examples%20of%20poor%20preparation%20(uneven%20surfaces%2C%20excessive%20glue%20squeeze-out%2C%20starved%20joints)%20with%20corresponding%20weak%20or%20visible%20seams.%20The%20other%20side%20demonstrates%20the%20correct%20approach%3A%20perfectly%20prepared%20surfaces%2C%20appropriate%20glue%20application%2C%20and%20minimal%2C%20controlled%20squeeze-out%20resulting%20in%20an%20almost%20invisible%2C%20strong%20joint.%20Tools%20for%20surface%20preparation%20(planer%2C%20sander)%20are%20subtly%20in%20the%20background%2C%20with%20clear%2C%20instructive%20visual%20cues.)
Achieving Seamless Glue Lines
The hallmark of truly advanced woodworking is a glue joint that is virtually invisible, blending perfectly with the surrounding wood.

- Controlled Squeeze-Out: As mentioned, a small, even bead of squeeze-out indicates a good bond.
- Immediate vs. Dried Glue Removal:
- Immediate: For water-based glues (PVA), some woodworkers prefer to wipe away wet squeeze-out with a damp cloth. However, this can push glue into the grain, causing “ghost lines” that prevent stain absorption later.
- Dried: Many professionals advocate letting PVA glue dry to a rubbery state (15-30 minutes, depending on humidity). At this point, it can be easily scraped off with a chisel, cabinet scraper, or even a credit card. This method minimizes glue being forced into the grain. For epoxy, clean up immediately with denatured alcohol.
- Scraping and Sanding: Once the glue is fully cured and squeeze-out removed, plane or scrape the surface flush. Then, sand systematically through grits to achieve a smooth, uniform surface. The goal is to remove any trace of the glue line and prepare the entire surface for finishing.
- Feathering and Blending: When joining different species of wood or performing complex repairs (such as those on live edge slabs), careful selection of glue color (e.g., matching a glue that dries clear or tan) and precise feathering of the joint can help it disappear. Using veneer tape during glue-ups for veneers also helps ensure a tight, seamless bond.
- Temperature and Humidity Control: Wood moves with changes in moisture content. Gluing in a stable environment (e.g., 60-75°F and 30-50% relative humidity) helps prevent future stresses on the glue line. If possible, acclimate your wood to the workshop environment before gluing.
Specialized Techniques for Unique Applications
Mastering the Art of Wood Gluing also involves knowing when to deviate from the norm for specialized outcomes.
- Cauls for Pressure Distribution: For wide boards or intricate shapes, cauls prevent dents and ensure even pressure. They can be straight, curved, or angled to match the workpiece.
- Hot Hide Glue for Reversibility: When working on heirloom pieces or projects where future disassembly might be necessary, hot hide glue is unparalleled. Its reversibility with heat and moisture is a distinct advantage.
- Marine Epoxy for Extreme Durability: For projects exposed to harsh elements, marine-grade epoxy offers unmatched strength and waterproof properties. This is critical for applications like building Adirondack Chairs or other outdoor furniture.
- Using Gaffer’s Tape or Painter’s Tape: For small assemblies or thin stock where traditional clamps are awkward, strong tapes can provide sufficient pressure and alignment, especially when gluing veneers or thin strips.
- Gluing Joints with Inlays: When incorporating inlays or contrasting wood elements, careful glue application and minimal squeeze-out are critical to prevent staining the lighter wood. Using a clear-drying glue is often preferred.
%20image%20showing%20a%20woodworker%20applying%20specialized%20wood%20glue%20to%20a%20complex%20curved%20piece%2C%20possibly%20a%20chair%20arm%20or%20a%20segmented%20bowl.%20The%20image%20should%20highlight%20the%20precision%20of%20the%20application%2C%20perhaps%20with%20a%20fine-tipped%20applicator%20for%20intricate%20areas.%20Various%20clamps%20are%20waiting%20in%20the%20background%2C%20ready%20for%20the%20glue-up.%20The%20focus%20is%20on%20the%20technique%20of%20applying%20glue%20to%20non-flat%20surfaces%2C%20demonstrating%20a%20seamless%20approach%2C%20with%20warm%20workshop%20lighting.)
Conclusion
Mastering the Art of Wood Gluing: Advanced Techniques for Stronger Joints and Seamless Assemblies is a journey that transforms a basic functional requirement into an integral part of high-quality woodworking. In 2026, as woodworking continues to evolve, the demand for precision and durability remains paramount. By meticulously preparing your joint surfaces, selecting the most appropriate adhesive, and employing sophisticated clamping strategies, you elevate your projects from good to exceptional.
Remember that practice and patience are key. Each glue-up offers an opportunity to refine your technique and expand your understanding of how wood and adhesives interact. Troubleshooting common issues, from starved joints to creep, will hone your diagnostic skills, while the pursuit of invisible glue lines will push the boundaries of your craftsmanship. Embrace these advanced techniques, and your woodworking projects will not only boast incredible structural integrity but also exhibit a level of finish that speaks volumes about your dedication to the craft.
Actionable Next Steps:
- Review your current glue inventory: Ensure you have a variety of glues (PVA, epoxy, polyurethane, hide glue) suitable for different applications.
- Invest in diverse clamping tools: Explore specialized clamps like band clamps, spring clamps, and sufficient bar or pipe clamps for larger assemblies.
- Practice dry clamping: Before every significant glue-up, conduct a dry run to identify potential alignment issues and refine your clamping strategy.
- Experiment with cauls: Start incorporating cauls into your clamping setups to ensure even pressure distribution and protect your workpieces.
- Observe glue squeeze-out: Pay close attention to the amount and consistency of squeeze-out to gauge proper glue application and clamping pressure.
References:
- Flexner, B. (2013). Understanding Wood Finishing: How to Select and Apply the Right Finish. Fox Chapel Publishing.
- Koehler, A., & Englerth, G. H. (1949). Properties of Wood. McGraw-Hill.
- Schwartz, D. (2010). The New Traditional Woodworker: From ‘Log to Leg’ with Only Five Hand Tools. Stobart Davies.
- Tolpin, J. (2009). The New Woodworker’s Handbook. Popular Woodworking Books.
