


The average small workshop owner loses countless hours annually simply searching for misplaced tools, navigating cluttered pathways, or repeating inefficient movements. This hidden productivity drain, often ignored in favor of acquiring new equipment, can significantly impact project completion times and even lead to unnecessary fatigue or injury. In 2026, the key to unlocking true potential in your compact workspace lies not in expansion, but in strategic design. This article focuses on Optimizing Your Small Workshop Layout: Ergonomics, Workflow, and Space-Saving Solutions for Maximum Efficiency, transforming even the most modest area into a highly functional and enjoyable environment.
Key Takeaways
- Prioritize a Zoned Layout: Divide your workshop into distinct areas for specific tasks (e.g., cutting, assembly, finishing) to streamline workflow and reduce unnecessary movement.
- Embrace Ergonomics: Adjust workbench heights, seating, and tool placement to suit your body, preventing strain and enhancing comfort and productivity during long working sessions.
- Maximize Vertical Space: Utilize walls, ceilings, and clever shelving to store tools and materials, freeing up valuable floor space.
- Implement Mobile Solutions: Use casters on benches, tool carts, and equipment to allow for flexible rearrangement and easy cleaning in dynamic small spaces.
- Declutter Relentlessly: Regularly assess and remove unused items to maintain organization and improve efficiency.
The Foundation: Zoned Layout and Workflow Streamlining for Optimizing Your Small Workshop Layout: Ergonomics, Workflow, and Space-Saving Solutions for Maximum Efficiency
An effective small workshop begins with a well-thought-out layout. Rather than randomly placing tools and equipment, consider dividing your space into functional zones. This approach inherently improves workflow, reduces wasted motion, and enhances safety. Think about the natural progression of your projects, from raw material to finished product, and design your zones to support this sequence.

The primary zones typically include:
- Material Storage Zone: This is where lumber, sheet goods, and other raw materials are kept. It should be easily accessible but out of the main work path. Vertical storage racks for lumber and flat storage for sheet goods are ideal here. Consider building modular wood storage systems for small workshops to make the most of this area.
- Preparation/Cutting Zone: This area houses your saw station (table saw, miter saw, band saw) and often includes a workbench for initial measuring and marking. Dust collection is paramount here.
- Machining/Shaping Zone: Tools like routers, jointers, planers, and drill presses belong here. Grouping similar machinery can simplify dust collection and power access.
- Assembly Zone: A clear, uncluttered workbench is essential for assembly. This space should be large enough to hold your project and provide easy access to clamps, fasteners, and hand tools. For ideas on constructing an ideal workspace, see our guide on building a compact and ergonomic workbench for small workshops.
- Finishing Zone: If space permits, a dedicated area for sanding, staining, and painting is beneficial. This keeps dust and fumes away from your main woodworking area. Good ventilation is critical here.
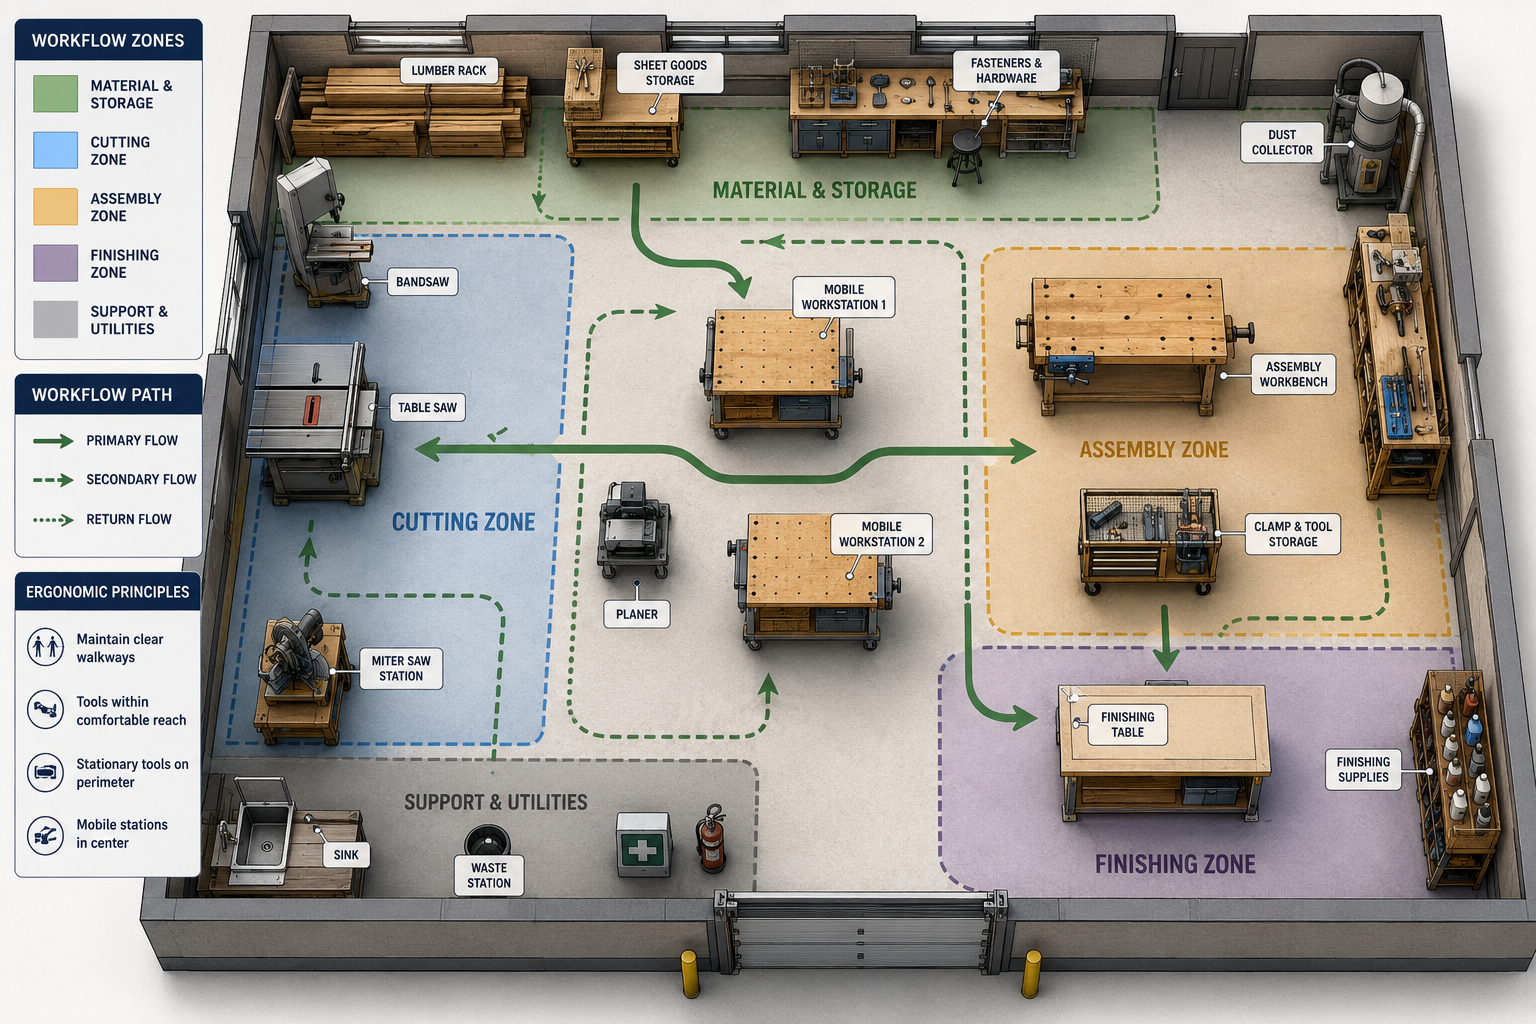
When planning your zones, consider the following:
- Logical Flow: Materials should move smoothly from storage to cutting, then to machining, assembly, and finally finishing, with minimal backtracking.
- Tool Proximity: Keep frequently used hand tools and accessories close to the specific machines or workbenches where they are needed. For example, router bits should be near the router table, and chisels near the hand tool workbench.
- Clear Pathways: Ensure there are unobstructed paths between zones and around major equipment. This is vital for safety, especially when moving large materials.
- Power and Dust Collection: Plan your layout to minimize extension cord use and maximize the efficiency of your dust collection system. Consider centralizing high-dust-producing machines.
By systematically mapping out these zones, you can visualize and refine your workflow before making any physical changes. This structured approach is fundamental to Optimizing Your Small Workshop Layout: Ergonomics, Workflow, and Space-Saving Solutions for Maximum Efficiency.
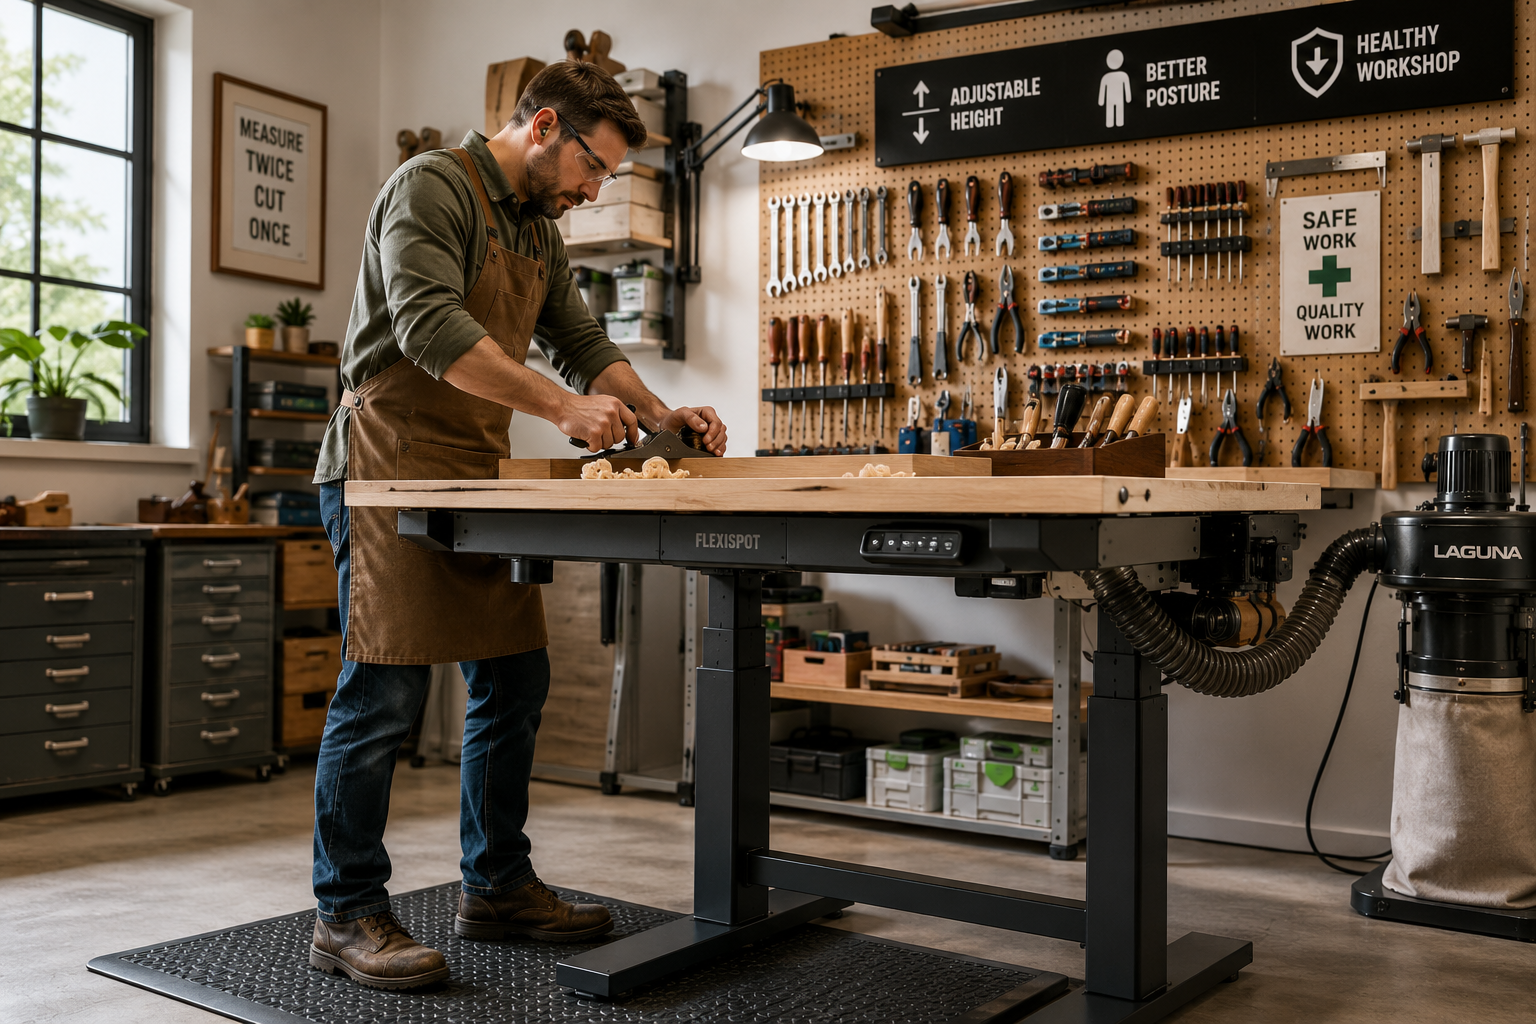
Embracing Ergonomics: Comfort and Safety for Enhanced Productivity
Ergonomics in the workshop is about designing the workspace to fit the user, rather than forcing the user to adapt to the workspace. This not only enhances comfort and reduces fatigue but also significantly lowers the risk of injuries, making you more productive and happier in the long run. Even in a small workshop, ergonomic principles can be applied effectively.
Key ergonomic considerations include:
- Workbench Height: Your primary workbench should be at a height that allows you to work comfortably without stooping or reaching excessively. For most tasks, a height where your palms rest flat on the benchtop when your arms are at your sides is ideal. Consider adjustable height workbenches or using anti-fatigue mats if you stand for long periods.
- Tool Placement: Store frequently used tools within easy reach. This minimizes bending, twisting, and repetitive motions. Tools used less often can be stored further away. Magnetic tool holders, pegboards, and drawer organizers can help keep tools accessible and visible.
- Seating: If you perform tasks while seated, ensure your stool or chair provides good back support and is adjustable. A good chair can significantly impact comfort during detailed work or assembly. Learn more about creating ergonomic workshop furniture.
- Lighting: Adequate, even lighting is crucial. Avoid shadows and glare. Overhead ambient lighting combined with task lighting (e.g., adjustable lamps at your workbench) creates an optimal environment. Natural light is always a bonus.
- Clearance Around Machines: Ensure ample space around each machine for safe operation. This includes room to feed material, adjust settings, and exit quickly if needed. Do not underestimate the importance of clear space, even if it means sacrificing some storage.
- Dust and Fume Control: Implementing effective dust collection and ventilation systems is a critical ergonomic consideration. Breathing in sawdust or chemical fumes can have serious long-term health consequences.
- Weight Management: Use carts, dollies, or hoists when moving heavy lumber or projects. Avoid lifting with your back; always lift with your legs.
By consciously integrating these ergonomic principles, you transform your workshop into a healthier, safer, and more efficient place to create. This is a core component of Optimizing Your Small Workshop Layout: Ergonomics, Workflow, and Space-Saving Solutions for Maximum Efficiency.
Space-Saving Solutions: Maximizing Every Inch in Your Small Workshop
A small workshop demands creative solutions to maximize usable space. The goal is to make every square inch work harder, whether through vertical storage, mobile units, or multi-functional furniture.
Here are some effective strategies:
- Vertical Storage is Your Best Friend:
- Pegboards and Slatwalls: These are classic solutions for organizing hand tools, clamps, and small accessories on walls, keeping them visible and accessible.
- Wall-Mounted Cabinets and Shelves: Utilize the space above your workbench or along unused walls for storing supplies, hardware, and less frequently used tools.
- Overhead Storage: Install sturdy ceiling racks for storing long lumber, sheet goods, or seasonal items. Ensure these are securely mounted and do not obstruct lighting or access.
- Mobile Workstations and Equipment:
- Casters on Everything: Put heavy machines (table saw, planer, jointer) and workbenches on locking casters. This allows you to reconfigure your shop for specific tasks, move equipment for cleaning, or clear floor space when not in use. This concept is central to smart workshop storage solutions.
- Folding Workbenches: If floor space is extremely limited, a workbench that folds up against the wall can free up significant room.
- Rolling Tool Carts: These provide mobile storage for specific tasks, keeping related tools together and allowing you to bring them directly to your project.
- Multi-Functional Furniture:
- Outfeed Table/Assembly Table: Design your table saw outfeed table to double as an assembly bench or even a large general-purpose workbench.
- Integrated Storage: Build storage directly into your workbenches. Drawers, shelves, and cabinets underneath can house tools and materials, as explored in articles like DIY Smart Workshop Storage Solutions.
- Flip-Top Carts: A cart with a rotating top can house two different machines (e.g., a planer and a miter saw), allowing you to switch between them quickly while saving floor space.
- Smart Storage Solutions:
- French Cleat System: This versatile wall-mounted system allows you to hang custom tool holders, cabinets, and shelves that can be easily rearranged.
- Drawer Dividers and Organizers: Keep small items like screws, sandpaper, and router bits neatly organized within drawers.
- Magnetic Strips: Ideal for small metal tools like chisels, screwdrivers, and measuring tapes, keeping them visible and accessible.
- Custom Jigs and Fixtures Storage: Create dedicated, compact storage for your jigs and fixtures, perhaps on a wall or in a dedicated cabinet.
By thoughtfully implementing a combination of these space-saving techniques, you can transform a cramped area into a highly efficient and productive small workshop. The ongoing process of Optimizing Your Small Workshop Layout: Ergonomics, Workflow, and Space-Saving Solutions for Maximum Efficiency is a continuous journey of refinement and ingenuity.
Maintaining and Evolving Your Optimized Workshop
Optimizing your workshop is not a one-time event but an ongoing process. As your projects evolve, your tool collection grows, and your skills improve, your workshop layout may need adjustments. Regularly review your setup and identify areas for improvement.
- Regular Decluttering: Perform periodic purges of unused materials, broken tools, and accumulated junk. A clean shop is an efficient shop.
- Evaluate Workflow: After completing a few projects, consciously reflect on your movements. Were there any bottlenecks? Did you frequently walk long distances for a tool? These observations can inform future layout tweaks.
- Adaptability: Embrace modularity and flexibility. If your storage solutions can be easily reconfigured, it will be simpler to adapt your space as your needs change.
- Safety Checks: Regularly inspect your electrical cords, dust collection hoses, and machine guarding. A well-organized shop is inherently safer, but vigilance is always necessary.
- Dust Management: Maintain your dust collection system, empty dust bags or bins, and keep filters clean. This improves air quality and equipment longevity.
A small workshop, thoughtfully optimized, can be just as productive, if not more so, than a large, cluttered space. The focus on ergonomics, streamlined workflow, and clever space-saving solutions ensures that your energy is spent on creating, not on searching or struggling.
Conclusion
Optimizing Your Small Workshop Layout: Ergonomics, Workflow, and Space-Saving Solutions for Maximum Efficiency is a continuous and rewarding endeavor. By systematically zoning your workspace, prioritizing ergonomic design, and implementing intelligent space-saving strategies, you can transform even the most compact area into a highly efficient, safe, and enjoyable environment. In 2026, a well-organized small workshop empowers you to maximize your productivity, enhance your comfort, and elevate the quality of your craft. Start by analyzing your current space, making small, impactful changes, and consistently refining your layout to match your evolving needs. Your future self, free from wasted time and unnecessary strain, will thank you.
References

- Krumholz, S. (2014). The compact woodworking shop: storage solutions, workbenches, & finishing stations for the small shop. Fox Chapel Publishing.
- Nagyszalanczy, S. (2018). Woodworking aids & devices: Jigs, fixtures, and other accessories for the workshop. Taunton Press.
- Petersen, L. (2004). Working small: The workshop design book for the small-scale woodworker. Sterling Publishing Company.
SEO Meta Title: Small Workshop Layout: Maximize Efficiency, Ergonomics & Space SEO Meta Description: Optimize your small workshop layout in 2026 with expert tips on ergonomics, workflow, and space-saving solutions for maximum efficiency and productivity.
