


Woodworking, at its heart, relies on precision and effortlessness. Yet, countless hours are wasted, and projects are marred by inefficient, rough cuts and splintered wood—all because of dull tools. Learn the fundamental techniques for sharpening essential woodworking hand tools like chisels, plane irons, and handsaws, ensuring safer operation, cleaner cuts, and extending the life of your valuable tools. This comprehensive guide, “The Beginner’s Guide to Sharpening Woodworking Tools: Chisels, Planes, and Saws for Optimal Performance,” provides the essential knowledge to transform your woodworking experience in 2026.
Key Takeaways

- Sharp tools are paramount for safety, cleaner cuts, and reduced effort in woodworking.
- Chisel and plane iron sharpening involves achieving a consistent primary bevel and a micro-bevel, typically using sharpening stones or abrasive paper.
- Handsaw sharpening requires specialized files and a saw set to correctly shape and angle each tooth.
- Regular maintenance and proper storage are crucial for preserving the sharp edges of your tools.
- Mastering sharpening is a foundational skill that significantly improves the quality and enjoyment of your woodworking projects.
Understanding the Importance of Sharpness for Chisels and Planes
A sharp woodworking tool isn’t just a luxury; it’s a fundamental requirement for both safety and quality. When a chisel or plane iron is dull, it forces the woodworker to exert excessive force. This increases the risk of the tool slipping, potentially causing injury. Furthermore, a dull edge tears wood fibers, leading to rough, unsightly cuts, tear-out, and inaccurate joinery. Conversely, a razor-sharp edge slices cleanly through wood, leaving a smooth, polished surface that requires minimal sanding and creates stronger, more precise joints. For a deeper dive into tool maintenance, consider reading about Restoring Vintage Woodworking Hand Tools: A Guide to Rust Removal.
The concept of a sharp edge is straightforward: it’s about refining the tool’s cutting edge to a microscopic point that can sever wood fibers rather than crush or tear them. This process primarily involves abrasive materials that remove minute amounts of metal from the tool, creating a precise, acute angle.
Essential Sharpening Equipment for Chisels and Plane Irons
Before you begin, gather the necessary tools. The right equipment makes the process much more manageable and effective.
- Sharpening Stones (Waterstones or Oilstones): These are the core of most sharpening systems. They come in various grits, from coarse (e.g., 200-400 grit) for repairing damaged edges, to medium (1000-2000 grit) for initial sharpening, and fine (4000-8000+ grit) for honing a mirror-like finish. Waterstones generally cut faster and require water for lubrication, while oilstones use oil.
- Honing Guide: A honing guide is invaluable for beginners, as it helps maintain a consistent angle throughout the sharpening process. This consistency is critical for creating a truly sharp edge.
- Flattening Stone (for waterstones): Waterstones wear down with use, developing hollows. A flattening stone (or a diamond flattening plate) is used to periodically restore the stone’s flat surface, ensuring even contact with the tool.
- Leather Strop and Honing Compound: After sharpening on fine stones, a leather strop with honing compound (often chromium oxide) polishes the edge, removes any remaining burr, and delivers a truly razor-sharp finish.
- Marker Pen: A simple permanent marker helps visualize the bevel. Color the bevel, and as you sharpen, you’ll see where the stone is making contact.
- Safety Gloves and Eye Protection: Always prioritize safety. Metal particles and abrasive dust can be harmful.
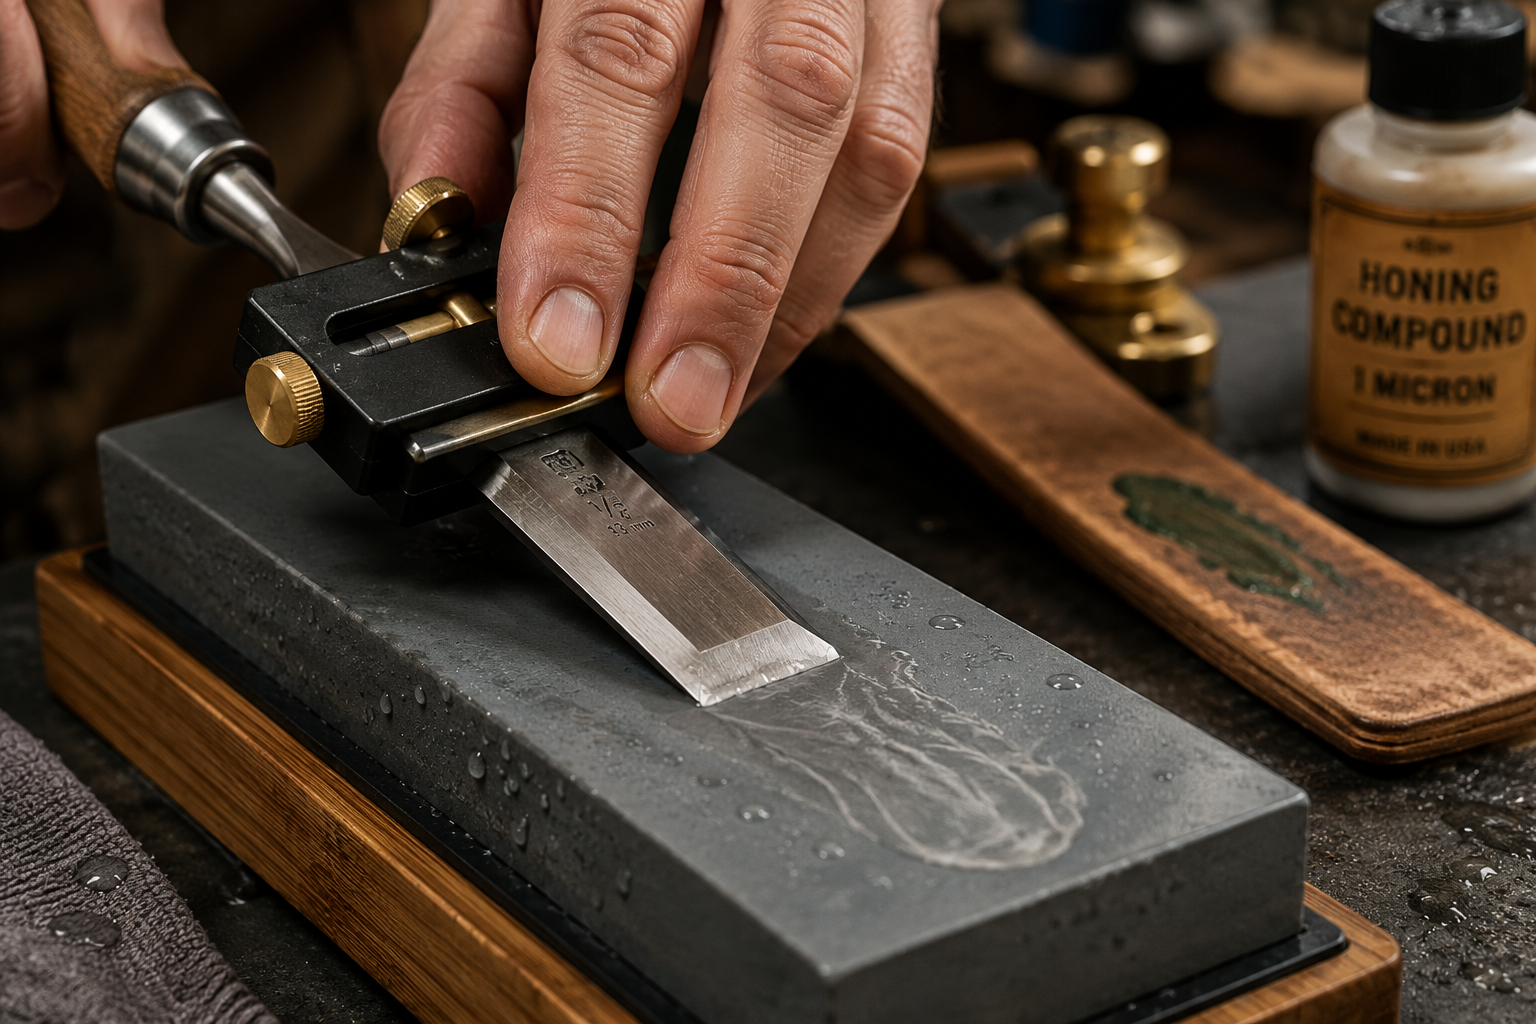
Step-by-Step Sharpening Process for Chisels and Plane Irons
Achieving a sharp edge is a systematic process. Follow these steps for optimal results:
Preparation:
- Soak waterstones in water until they stop bubbling (if using waterstones).
- Set up your sharpening station on a stable surface.
- Clean your chisel or plane iron, removing any debris.
Establishing the Primary Bevel (Coarse/Medium Grit):
- Attach your chisel or plane iron to the honing guide, setting it to the desired angle. Common angles range from 25 to 30 degrees for chisels and planes. For chisels, 25 degrees is a good starting point, sometimes followed by a micro-bevel.
- Using your marker, color the bevel. This allows you to monitor contact with the stone.
- Place the tool and honing guide on your coarse or medium grit stone. Apply light, even pressure. Push the tool forward along the stone, then pull it back. Ensure the entire bevel makes contact with the stone.
- Continue until the marker is completely removed from the bevel, and you feel a “burr” forming on the back side of the blade. This burr is a tiny wire edge of metal that curls over, indicating you’ve sharpened the entire bevel.
- Flatten your waterstone periodically to maintain its effectiveness.
Refining the Edge (Fine Grit):
- Move to your fine grit stone. Without changing the angle on your honing guide, repeat the push-pull motion.
- Focus on removing the burr and further refining the cutting edge. Work until you feel a smaller, more refined burr. This stage is crucial for creating the keenest edge.
Creating a Micro-Bevel (Optional but Recommended):
- A micro-bevel is a slightly steeper, secondary bevel added to the very tip of the primary bevel. It provides a stronger, longer-lasting edge and is easier to maintain.
- Slightly increase the angle on your honing guide by 1-2 degrees (e.g., from 25 to 27 degrees).
- Using your fine grit stone, make only a few light passes. You’ll see a tiny, bright line appear at the very edge of the bevel. This is your micro-bevel.
Removing the Burr and Stropping:
- After the final sharpening stone, you’ll still have a microscopic burr. To remove it, lay the back of the blade (the flat, non-beveled side) flat on your finest stone. Make 1-2 very light passes. This will snap off the burr.
- For the ultimate edge, move to a leather strop loaded with honing compound.
- Lay the bevel flat on the strop and pull the tool back, never push (to avoid digging the edge into the leather). Repeat for 10-20 strokes.
- Flip the tool over and lay the back flat on the strop, pulling back for 10-20 strokes.
- Repeat this process, alternating sides, until the edge feels incredibly smooth and sharp.
A properly sharpened chisel or plane iron should be able to shave hair off your arm or slice easily through a piece of paper held vertically. This level of sharpness is what enables the smooth, precise cuts that define quality woodworking. For those interested in improving accuracy, exploring Essential Hand Tools for Every Woodworker: A Comprehensive Guide to Selection, Sharpening, and Maintenance would be beneficial.
Mastering the Sharpening of Handsaws for Optimal Performance
Sharpening handsaws is a more specialized skill than sharpening chisels or plane irons, primarily due to the unique geometry of saw teeth. Each tooth acts as a tiny chisel, designed to cut effectively while clearing sawdust. A dull handsaw binds in the cut, requires excessive force, and leaves a ragged kerf. This section of “The Beginner’s Guide to Sharpening Woodworking Tools: Chisels, Planes, and Saws for Optimal Performance” will guide you through the process.
Types of Handsaws and Their Sharpening Needs
Different saws have different tooth configurations and therefore require distinct sharpening approaches:
- Rip Saws: Designed for cutting along the grain. Their teeth are shaped like chisels, with a flat top and a bevel on the leading edge, to sever wood fibers. They are typically sharpened straight across the tooth.
- Crosscut Saws: Designed for cutting across the grain. Their teeth are shaped like knives, with alternating bevels that score the wood fibers on either side of the kerf before the waste is removed. They are sharpened with a file angled to match the bevel.
- Japanese Saws: Often have impulse-hardened teeth, which are extremely hard and cannot be sharpened with traditional files. These saws are typically replaced when dull. This guide focuses on western-style, sharpenable saws.
Essential Equipment for Saw Sharpening
- Saw Vise: A specialized vise designed to hold the saw blade securely and vertically, allowing access to the teeth. This is indispensable.
- Saw Files: Triangular files (also called ‘taper files’ or ‘saw files’) are specific to saw sharpening. They come in various sizes, matched to the points per inch (PPI) of your saw. A larger PPI (finer teeth) requires a smaller file.
- Saw Set: This tool bends each tooth slightly outwards, alternating left and right. This “set” creates a kerf wider than the blade thickness, preventing the saw from binding in the wood.
- Magnifying Glass or Loupe: Useful for inspecting the teeth and ensuring consistent sharpening.
- Marker Pen: To mark teeth as you sharpen, ensuring you don’t miss any or sharpen the same one twice.
Step-by-Step Saw Sharpening Process
Saw sharpening is meticulous but rewarding.
Jointing (Optional but Recommended for Severely Dull Saws):
- This step levels all the tooth tops. Clamp the saw in its vise.
- Lay a flat file (like a mill bastard file) on top of the teeth, parallel to the blade.
- Make light, even passes across the entire length of the teeth until small, shiny flats appear on the very tips of all the teeth. This ensures every tooth is the same height.
Setting the Teeth:
- Using your saw set, bend alternate teeth slightly to one side, then flip the saw and bend the remaining teeth to the other side.
- The amount of set depends on the wood type and saw; generally, a slight bend is sufficient. Too much set wastes wood and makes for a rougher cut.
Filing the Teeth (Rip Saws):
- Clamp the saw in the saw vise.
- Identify the “gullet” (the valley between two teeth).
- For rip saws, hold the triangular file horizontally, straight across the blade, and file into the gullet.
- File every other gullet (e.g., all gullets where the tooth points right). Make an even number of strokes (e.g., 3-5) with firm, consistent pressure.
- Move to the next gullet, continuing down the length of the blade.
- Once you’ve done all alternate gullets, flip the saw in the vise and file the remaining gullets from the other side. The goal is to remove the jointed flats and create sharp, chisel-like points.
Filing the Teeth (Crosscut Saws):
- This is more complex due to the alternating bevels. Clamp the saw in the vise.
- Identify the first tooth that is set towards you. Place your file in the gullet to its left.
- Angle the file to match the existing bevels of the teeth (usually around 60 degrees from the blade’s edge).
- Hold the file with an upward tilt (usually 10-15 degrees) from the horizontal.
- File into the gullet, sharpening the leading edge of the tooth set towards you and the trailing edge of the adjacent tooth.
- File every other gullet, or all teeth with the same angle. Apply consistent strokes (e.g., 3-5).
- After completing one side, flip the saw and repeat the process, matching the opposite bevels and angles.
- Ensure all jointed flats are removed and sharp points are created.
Deburring and Final Touches:
- After filing, lightly run a fine abrasive stone or a piece of sandpaper over the sides of the teeth to remove any burrs created by filing.
- Test the saw by making a cut. It should track straight, cut cleanly, and require significantly less effort.
Sharpening saws requires patience and practice. It’s a skill that pays dividends, transforming a struggling, frustrating tool into a highly efficient one. For general woodworking projects, having sharp tools, including saws, is crucial, as highlighted in guides like Beginner’s Guide to Building a Simple Wooden Bookshelf: Tools.
Maintaining Optimal Performance: Storage and Regular Care in 2026
Sharpening is not a one-time event; it’s an ongoing commitment to tool care. To ensure your chisels, planes, and saws retain their optimal performance long after sharpening, consistent maintenance and proper storage are essential. This final section of “The Beginner’s Guide to Sharpening Woodworking Tools: Chisels, Planes, and Saws for Optimal Performance” details best practices for ongoing care.
Protecting Your Edges
The most common cause of dulling, outside of actual use, is improper storage. A freshly honed edge is incredibly delicate and can be damaged by contact with other tools, hard surfaces, or even simply being tossed into a drawer.
- Edge Guards: For chisels and plane irons, use purpose-made edge guards or make your own from leather or PVC tubing. These protect the bevel from accidental bumps and scrapes.
- Tool Rolls or Cases: Store chisels and other delicate tools in individual slots within a tool roll or a dedicated case. This prevents them from knocking against each other.
- Saw Sheaths: Handsaws should always be stored with a sheath covering their teeth. This protects both the teeth and your hands.
- Separate Storage: Designate specific, separate storage locations for sharp tools. Avoid piling them together in a toolbox. Consider building modular wood storage systems for small workshops to keep your tools organized and protected.
Preventing Rust and Corrosion
Woodworking environments often involve humidity, which can lead to rust—a major enemy of keen edges.
- Clean After Use: Always wipe down tools after use to remove wood dust, sap, and moisture. Sap, in particular, can be corrosive.
- Light Oil Coating: Apply a very thin coat of rust-preventative oil (like camellia oil or mineral oil) to the metal parts of your tools, especially the cutting edges, before storage. A few drops on a rag are usually sufficient.
- Desiccants: In very humid climates, consider placing desiccant packets (like silica gel) in your tool chests or storage areas to absorb moisture.
- Avoid Extreme Temperature Changes: Rapid changes in temperature can cause condensation, leading to rust. Store tools in a stable environment.
Regular Inspection and Minor Touch-Ups
Don’t wait until your tools are severely dull to resharpen them. Regular, minor touch-ups are far easier and quicker than a full resharpening session.

- Visual Inspection: Before each use, quickly inspect the edge. Look for any nicks, dull spots, or a rounded appearance.
- Light Stropping: For chisels and plane irons, a quick session on a leather strop after a few hours of use can often restore the edge to working sharpness without needing to go back to the stones.
- Micro-Bevel Maintenance: If you use a micro-bevel, you can often refresh the edge simply by reapplying the micro-bevel on a fine stone or strop, which is much faster than resharpening the entire primary bevel.
- Saw Tooth Check: For saws, occasionally run your finger lightly over the teeth (carefully!) to feel for inconsistent set or burrs. Listen to how the saw cuts; increased effort or binding are signs it needs attention.
By incorporating these practices into your woodworking routine, you’ll find that your tools consistently perform at their best, leading to greater enjoyment, superior results, and longer tool life. Remember, a sharp tool is a joy to use, making every project smoother and more satisfying.
Conclusion
Mastering the art of sharpening your woodworking tools—chisels, plane irons, and saws—is arguably one of the most impactful skills a woodworker can acquire. It’s not just about maintaining equipment; it’s about transforming your entire crafting experience. In 2026, as woodworking continues to evolve, the fundamental principles of a sharp edge remain timeless, offering precision, safety, and efficiency that no dull tool can provide.
This guide has laid out the foundational steps for achieving razor-sharp edges on your essential hand tools. From understanding the geometry of a chisel’s bevel to the intricate dance of filing saw teeth, each technique contributes to the optimal performance of your tools. Remember that practice is key; your first attempts may not yield perfect results, but with persistence, the muscle memory and keen eye required for effective sharpening will develop.
Embrace sharpening not as a chore, but as an integral part of the woodworking process. By consistently maintaining your tools through proper sharpening, diligent cleaning, and mindful storage, you ensure that every cut is a testament to craftsmanship. Take the actionable step today to invest in quality sharpening equipment and dedicate time to honing your skills. Your woodworking projects, and your hands, will thank you.
SEO Meta Title: Sharpen Woodworking Tools: Chisels, Planes, Saws Guide SEO Meta Description: Learn to sharpen woodworking chisels, planes, and saws for optimal performance in 2026. This beginner’s guide covers essential techniques.
woodworking tools, sharpening guide, chisels, plane irons, handsaws, tool maintenance, sharpening stones, honing guide, saw set, woodcraft
