

The difference between a passable woodworking project and one distinguished by flawless edges and robust joinery often hinges on a single, unassuming tool accessory: the router bit. Many woodworkers, even experienced ones, tend to accumulate a collection of bits without fully understanding the specific strengths and optimal applications of each, leading to inefficient work, subpar results, and premature bit wear. This article serves as The Essential Guide to Router Bits: Types, Uses, and Maintenance for Flawless Edges and Joinery, designed to empower you with the knowledge to select, utilize, and care for these crucial components, transforming your projects in 2026 and beyond.
Key Takeaways

- Router bits are specialized cutting tools designed to shape edges, cut grooves, and form joints in wood.
- Understanding the specific types of bits (e.g., straight, round-over, dovetail) is crucial for selecting the right tool for each task.
- Proper speed, feed rate, and safety practices are essential for achieving clean cuts and preventing accidents.
- Regular cleaning, sharpening, and correct storage significantly extend the lifespan and performance of router bits.
- Investing in quality bits and maintaining them properly leads to superior project outcomes and long-term cost savings.
Understanding Router Bit Anatomy and Essential Terminology
Before diving into specific types, it’s helpful to understand the basic components of a router bit and the terminology used to describe them. A typical router bit consists of a shank, which is the part that fits into the router’s collet; a body, which holds the cutting edges; and the cutting edges themselves, often made from carbide. Some bits also feature a bearing, which guides the bit along an edge or template, preventing the cutting edge from contacting the guide surface.
Bits are typically categorized by their shank diameter (1/4-inch or 1/2-inch, with 1/2-inch shanks generally preferred for heavier cuts due to reduced vibration and increased stability), material (high-speed steel, carbide-tipped, or solid carbide), and specific profile.
The Essential Guide to Router Bits: Types and Their Uses
The sheer variety of router bits can be daunting, but each type serves a distinct purpose. Knowing which bit to use for a particular application is key to achieving professional results.
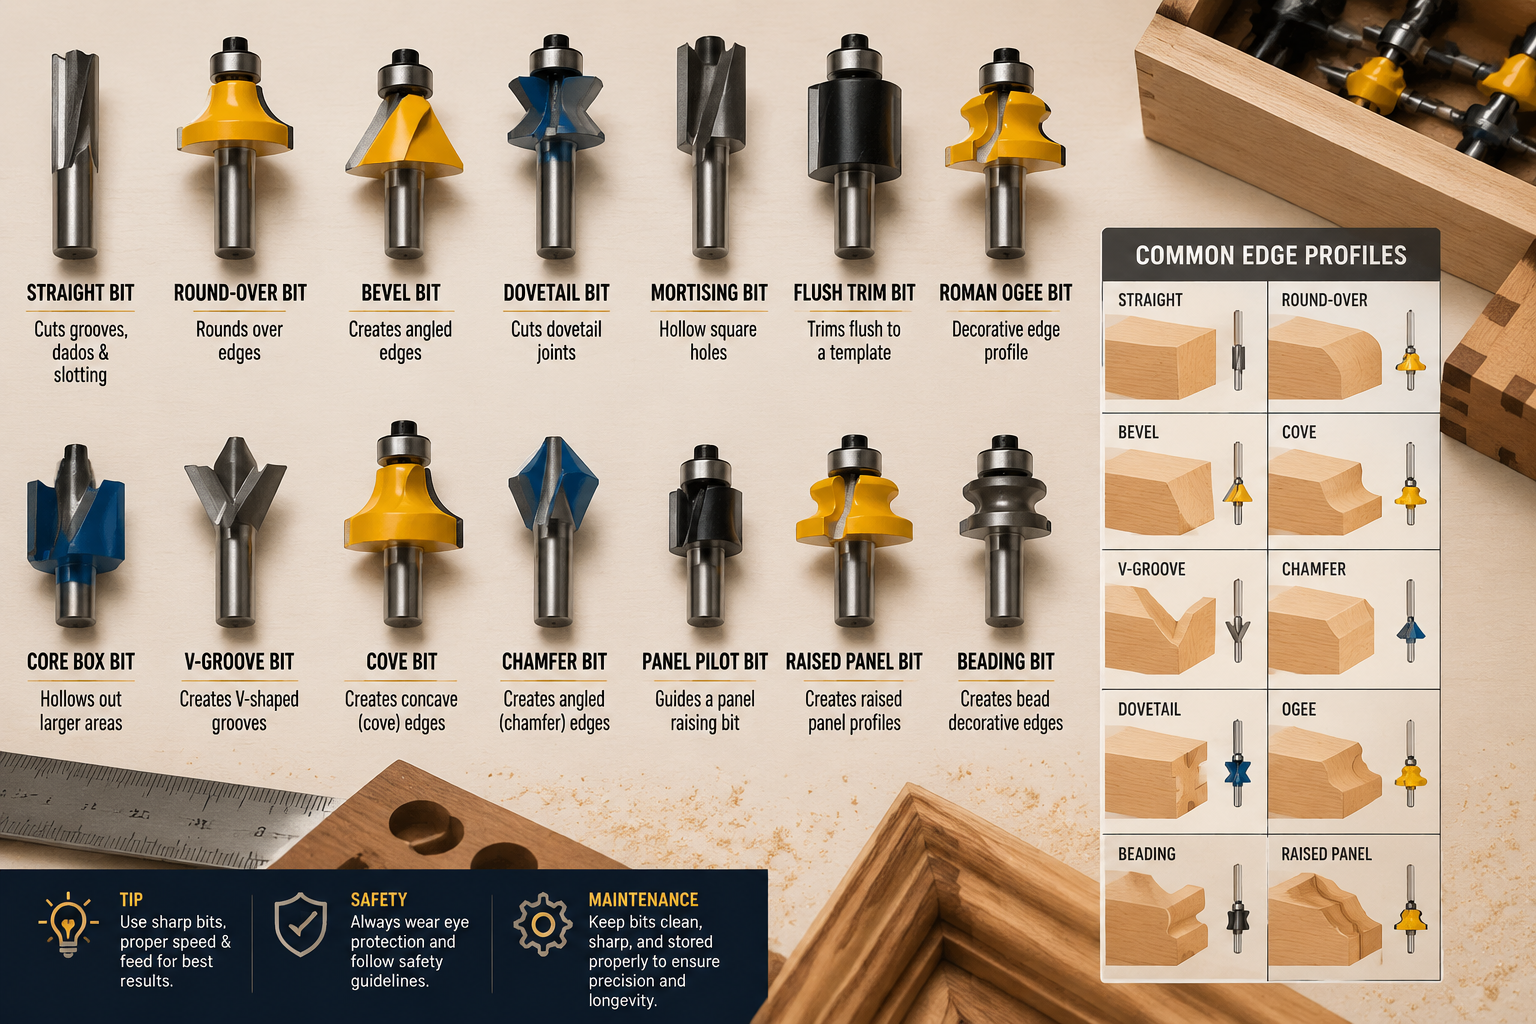
Edge-Forming Bits
These bits are primarily used for decorative edges and softening sharp corners.
- Round-Over Bit: Creates a smooth, rounded edge. Available in various radii (e.g., 1/8-inch, 1/4-inch, 1/2-inch). Essential for furniture, tabletops, and children’s items.
- Chamfer Bit: Produces a 45-degree angled edge, adding a clean, crisp detail. Ideal for creating a consistent bevel on cabinet doors or frames.
- Cove Bit: Creates a concave, curved profile. Often used in combination with round-over bits to create intricate profiles or for decorative molding.
- Ogee Bit: Features an S-shaped curve, offering a more elaborate decorative edge. There are several ogee variations, including Roman ogee and classic ogee, for elegant woodworking.
- Beading Bit: Similar to a round-over but with a small step or fillet at the bottom, creating a distinct bead profile.
- Edge-Forming Bit with Bearing: Many of these bits incorporate a bearing to guide the cut along the edge of the workpiece, ensuring a consistent profile.
Straight and Grooving Bits
These are fundamental bits for general cutting, grooving, and dado work.
- Straight Bit: The most basic router bit, used for cutting straight grooves (dados, rabbets), mortises, and recesses. Available in various diameters and cutting lengths. Essential for joinery like dados in shelving units or rabbets for back panels.
- Spiral Bit (Up-cut, Down-cut, Compression): These bits feature a helix design, similar to a drill bit, for efficient chip evacuation.
- Up-cut: Pulls chips upwards, ideal for through-cuts where chip clearance is critical, but can cause tear-out on the top surface.
- Down-cut: Pushes chips downwards, excellent for clean top edges, but can lead to chip packing in blind dados.
- Compression: Combines both up-cut and down-cut flutes, producing clean edges on both the top and bottom surfaces, especially useful for sheet goods like plywood and melamine.
- Dado Bit: While “dado bit” is often used interchangeably with “straight bit,” dedicated dado sets or larger straight bits are designed for wider, flat-bottomed grooves.
- Rabbeting Bit: Features a bearing that rides along the edge of the workpiece, cutting a stepped recess (rabbet) along the edge. Critical for creating cabinet door overlays or frame joinery.
Joinery Bits
These bits are specifically designed to create strong, interlocking joints. For more on advanced joinery techniques, explore resources like “Beyond the Basic Box: Advanced Joinery for Unique Wooden Gift Boxes” at woodcraftwiz.com/beyond-the-basic-box-advanced-joinery-for-unique-wooden-gift-boxes-and-keepsakes/.
- Dovetail Bit: Cuts the distinct angled pins and tails for dovetail joints, renowned for their strength and aesthetic appeal. Requires a router jig for accuracy.
- Mortising Bit: Specifically designed for cutting deep, clean mortises. Often has a longer, narrower cutting edge than a standard straight bit.
- Tongue and Groove Bit Set: A matched pair of bits used to create interlocking tongue and groove joints, common in flooring, paneling, and tabletops.
- Finger Joint Bit: Creates interlocking “fingers” for strong, self-aligning joints, often used in drawer construction.
- Lock Miter Bit: A highly specialized bit that cuts both halves of a 45-degree miter joint, resulting in an incredibly strong, self-aligning corner that locks together.
- Stile and Rail Bit Set: Used for constructing frame and panel doors, these sets create the cope and stick profiles for the horizontal (rails) and vertical (stiles) pieces.
Trimming and Specialty Bits
- Flush Trim Bit: Features a bearing at the top or bottom that rides along a template or existing edge, allowing the router to precisely trim a workpiece flush to that guide. Indispensable for laminate trimming or duplicating shapes.
- Pattern Bit: Similar to a flush trim bit, but the bearing is on the opposite end of the cutting flutes. Used with templates, often for routing inside or outside curves.
- Veining Bit: A V-shaped bit that creates decorative grooves or small V-carvings.
- Core Box Bit: Creates a rounded groove or flute. Useful for decorative fluting, finger pulls, or sign making.
- Keyhole Bit: Designed to cut a T-shaped slot, allowing a workpiece to be hung on a screw head.
- Bowl & Tray Bit: Creates rounded recesses, ideal for making wooden trays, small bowls, or carving out areas.
Best Practices for Flawless Edges and Joinery with Router Bits
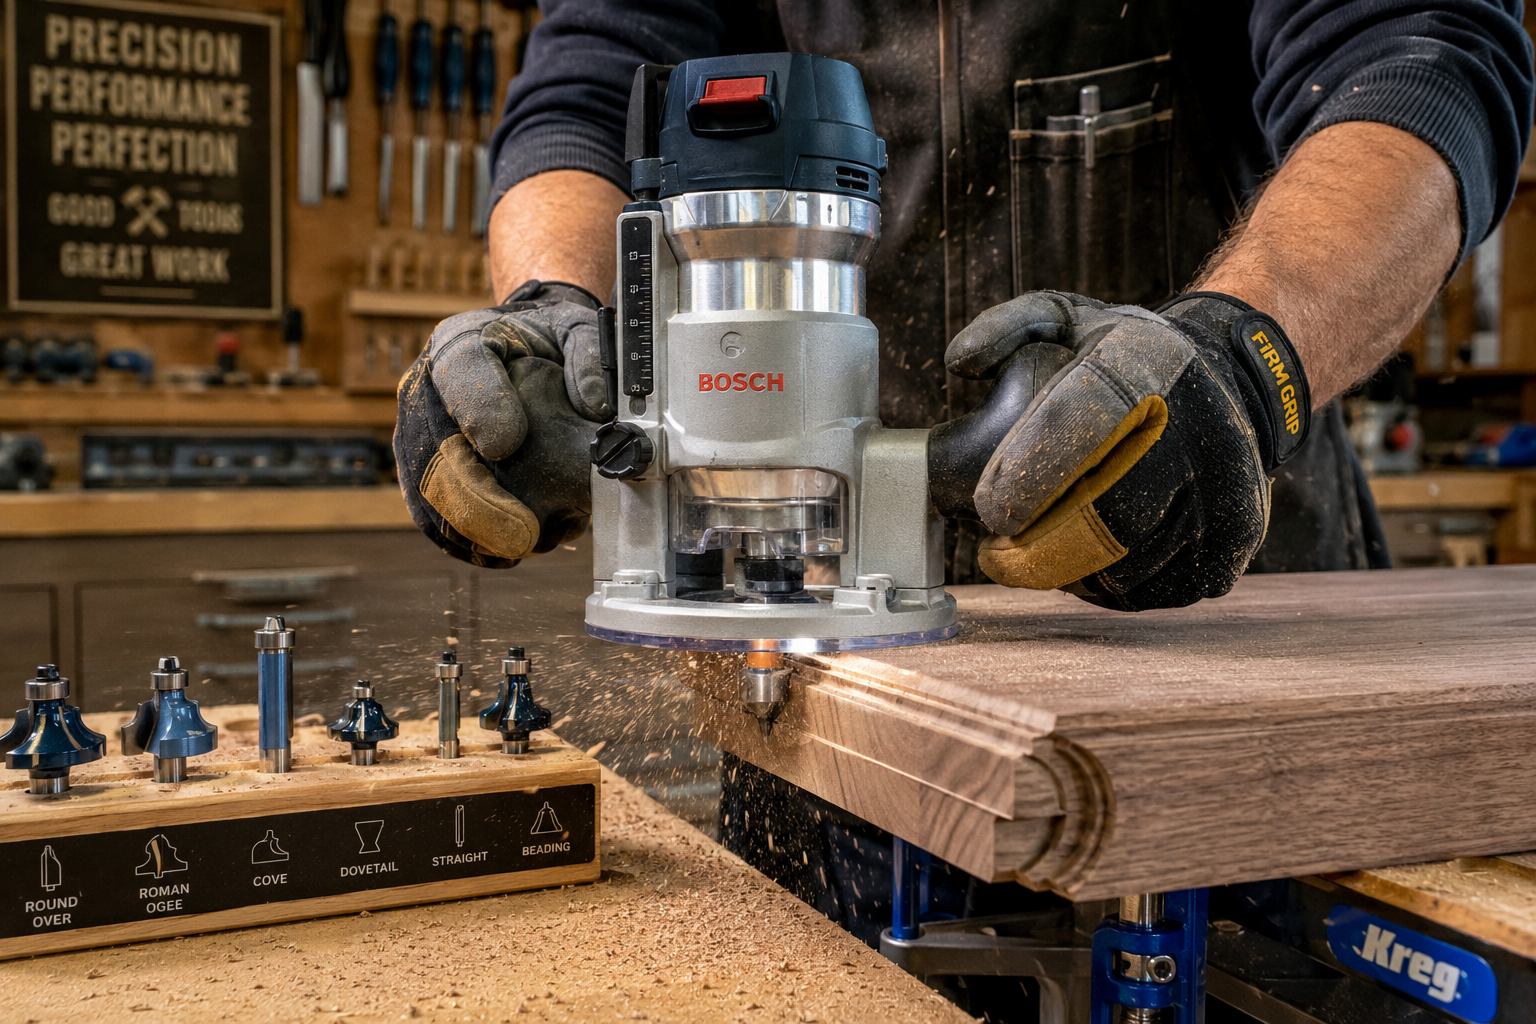
Achieving perfect results with router bits involves more than just selecting the right type. Technique, setup, and safety are paramount.
Router Speed and Feed Rate
- Speed (RPM): Refers to how fast the bit spins. Smaller diameter bits require higher RPMs, while larger bits need lower RPMs to prevent burning and excessive wear. Always consult your router’s manual and the bit manufacturer’s recommendations. Too high an RPM can burn the wood; too low can cause tear-out.
- Feed Rate: How fast you move the router through the wood. A consistent, moderate feed rate is crucial.
- Too fast: Leads to tear-out, rough cuts, and strain on the router and bit.
- Too slow: Can cause burning (especially with dull bits), friction, and heat buildup, dulling the bit faster.
- Listen to your router; it should maintain a consistent sound without bogging down.
Router Bit Setup and Safety
- Collet Insertion: Always insert the router bit shank at least three-quarters of the way into the collet, but avoid bottoming it out. This provides maximum grip and reduces vibration.
- Clamping: Secure your workpiece firmly to prevent movement during routing. This is critical for safety and cut quality.
- Direction of Cut: For handheld routing, typically move the router against the direction of the bit’s rotation (climb cutting should only be done with extreme caution and experience, or avoided). When using a router table, the workpiece is fed from right to left (into the cutter).
- Passes: For deep cuts, make multiple shallow passes rather than one deep cut. This reduces strain on the bit and router, prevents burning, and yields a cleaner cut.
- Safety Gear: Always wear eye protection and hearing protection. Consider a dust mask, especially when routing dusty materials. For insights on building a functional workspace, refer to “Building a Compact and Ergonomic Workbench for Small Workshops” at woodcraftwiz.com/building-a-compact-and-ergonomic-workbench-for-small-workshops-maximizing-space-and-efficiency/.
Router Bit Selection Tips
- Material: Carbide-tipped bits are generally superior to high-speed steel (HSS) for woodworking, especially for hardwoods and abrasive materials, offering longer edge retention. Solid carbide bits are even more durable but also more expensive.
- Quality: Invest in high-quality bits from reputable manufacturers. Cheap bits dull quickly, produce inferior cuts, and can be dangerous.
- Bearings: Check that bearings spin freely and are clean. A seized bearing can ruin your workpiece.
- Project Specifics: Match the bit to the specific task. Don’t try to force a decorative bit to do a straight cut, or vice versa.
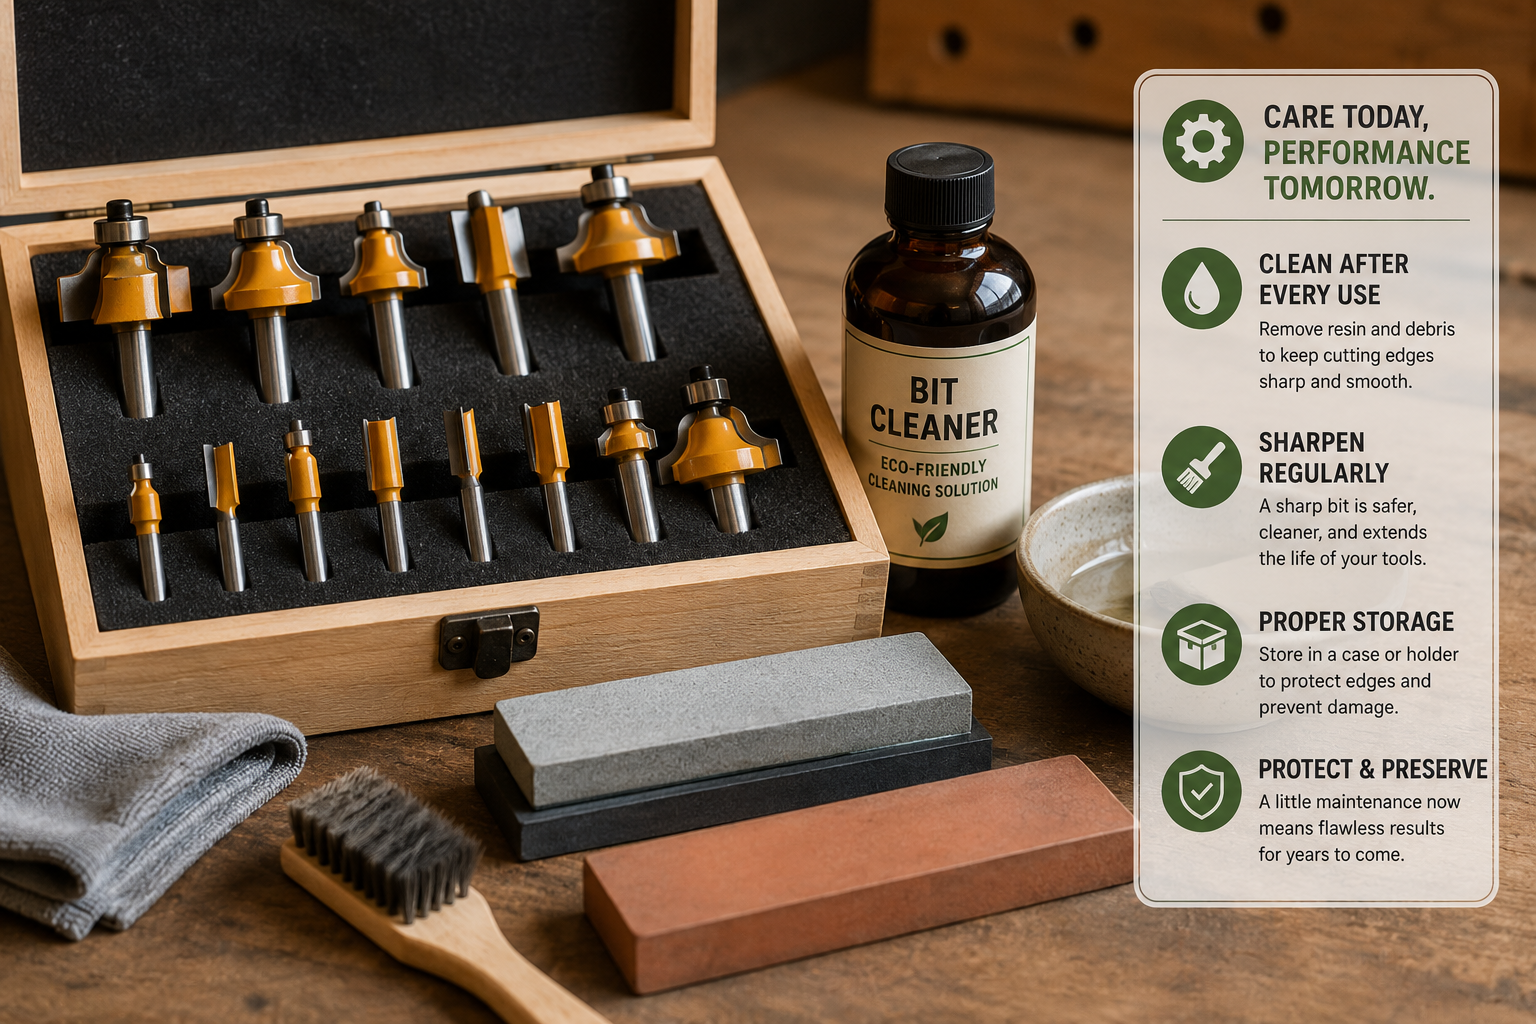
Router Bit Maintenance for Flawless Edges and Joinery
Proper maintenance is not just about extending the life of your router bits; it’s about consistently achieving flawless results and ensuring safety. A dull or dirty bit will burn wood, cause tear-out, and put excessive strain on your router.
Cleaning Router Bits
Resin and pitch buildup are the primary culprits for premature dulling and poor performance.
- After Every Use: Make it a habit to clean your bits after each significant use.
- Cleaning Solutions: Use specialized router bit cleaner, oven cleaner (carefully, as it’s caustic), or even simple mineral spirits.
- Procedure:
- Submerge the cutting portion of the bit (avoid soaking the bearing if possible) in the cleaning solution for 5-10 minutes.
- Use a brass brush (never steel, as it can damage carbide) to gently scrub away resin and pitch buildup.
- Wipe clean with a cloth.
- Apply a light coat of dry lubricant (like PTFE spray) or a rust inhibitor to prevent corrosion.
Sharpening Router Bits
While many carbide-tipped bits are difficult for the average woodworker to sharpen precisely, it is possible for some types, especially straight bits, using specialized diamond hones. For most decorative or complex profile bits, professional sharpening is recommended, or simply replacing the bit once it shows signs of dullness. Signs of a dull bit include:
- Excessive burning of the wood, even with correct speed and feed rate.
- Increased tear-out.
- More effort required to push the router.
- A dull, rough finish rather than a smooth cut.
For those interested in maintaining various tools, our guide on “Restoring Vintage Woodworking Hand Tools: A Guide to Rust Removal,” at woodcraftwiz.com/restoring-vintage-woodworking-hand-tools-a-guide-to-rust-removal-sharpening-and-handle-repair-for-enhanced-performance/ provides valuable tips applicable to some aspects of tool care.
Storage
Proper storage protects bits from damage, rust, and keeps them organized.
- Individual Slots: Store bits in individual slots in a dedicated router bit case. This prevents the cutting edges from clashing against each other, which can dull or chip them.
- Original Packaging: Many bits come in plastic cases that serve well for long-term storage.
- Moisture Control: Store bits in a dry environment to prevent rust.
- Organization: Label your bits clearly for easy identification and access.
By diligently following these maintenance practices, you ensure that your router bits remain sharp, clean, and ready to produce the flawless edges and robust joinery your woodworking projects deserve.

Conclusion
Mastering the use of router bits is a significant step towards elevating your woodworking craftsmanship. By understanding the diverse types available, their specific applications for everything from decorative edges to complex joinery, and implementing rigorous maintenance routines, you unlock the full potential of your router. In 2026, as woodworking continues to embrace precision and quality, the knowledge gleaned from The Essential Guide to Router Bits: Types, Uses, and Maintenance for Flawless Edges and Joinery will be an invaluable asset in your workshop. Always prioritize safety, invest in quality tools, and commit to consistent maintenance to ensure your router bits deliver perfect results project after project.
router bits, woodworking, router bit types, edge forming bits, joinery bits, router bit maintenance, flawless edges, wood joinery, woodworking tools, router safety
