

Building Adirondack Chairs: Ergonomic Outdoor Seating with Weather-Resistant Finishes
The Adirondack chair, a timeless symbol of relaxation and outdoor comfort, has graced porches, patios, and lakeside docks for over a century. Its distinctive wide armrests, low-slung seat, and high slatted back offer an invitation to unwind. In 2026, the demand for durable, comfortable, and aesthetically pleasing outdoor furniture remains strong, making Building Adirondack Chairs: Ergonomic Outdoor Seating with Weather-Resistant Finishes a highly rewarding woodworking project. This guide provides a comprehensive, step-by-step approach, focusing on ergonomic design, material selection, and finishing techniques suited for modern outdoor living trends, including adaptations for beginners and stackable designs.
Key Takeaways
- Ergonomic Design is Crucial: Understand the angles and curves that define the Adirondack chair’s comfort, ensuring proper support and relaxation.
- Material Matters for Durability: Select affordable hardwoods like cedar, redwood, or treated pine for their natural resistance to rot and insects.
- Precision in Cutting and Joinery: Master pattern cutting, especially for curved components, to achieve sturdy and aesthetically pleasing joints. Power tools can significantly simplify this process.
- Weather-Resistant Finishes are Essential: Apply appropriate UV-protectant polishes, marine varnishes, or outdoor paints to safeguard your chairs against the elements.
- Stackability for Modern Living: Incorporate design elements that allow for easy storage, a key consideration for smaller outdoor spaces in 2026.
Designing and Cutting Your Ergonomic Adirondack Chair for 2026
The secret to a truly comfortable Adirondack chair lies in its carefully calculated angles and curves. Unlike conventional seating, the Adirondack chair features a reclined back, a sloping seat, and wide armrests, all contributing to its signature lounge experience. When embarking on Building Adirondack Chairs: Ergonomic Outdoor Seating with Weather-Resistant Finishes, design and precise cutting are paramount.

Understanding Ergonomics and Traditional Design
The original Adirondack chair, designed by Thomas Lee in 1903, was built with 11 pieces of wood cut from a single hemlock plank. Modern designs retain the essence of its comfort but often incorporate refinements for better support and durability. Key ergonomic considerations include:
- Seat Angle: A slight downward slope from front to back, typically 5-10 degrees, helps cradle the sitter and encourages a relaxed posture.
- Backrest Angle: A significant recline, often between 25-35 degrees, is crucial for lounging. The slatted design provides breathability.
- Armrest Height and Width: Wide, flat armrests are a hallmark, offering a convenient surface for drinks or books. Their height should allow for comfortable resting of the forearms.
For those interested in exploring various woodworking techniques, understanding how to incorporate wood species selection for visible joinery can elevate the aesthetic of your Adirondack chair.
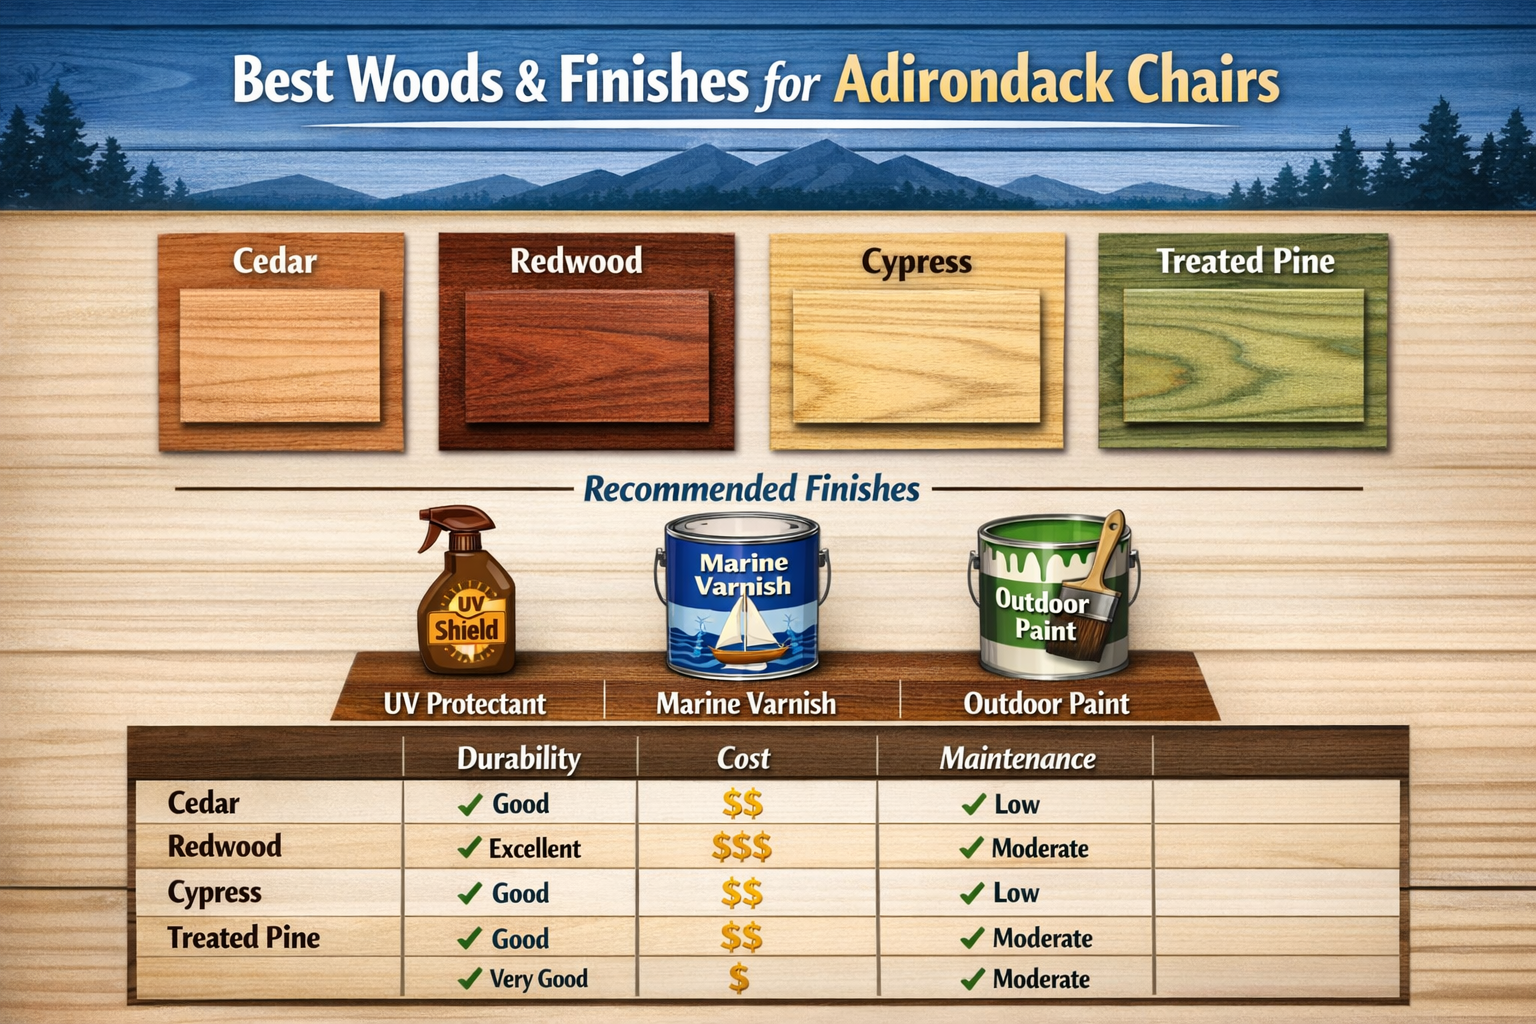
Selecting Affordable Hardwoods and Gathering Materials
Choosing the right wood is critical for an outdoor piece. You need materials that can withstand moisture, UV radiation, and temperature fluctuations. While exotic hardwoods offer supreme durability, more affordable options provide excellent performance for Building Adirondack Chairs: Ergonomic Outdoor Seating with Weather-Resistant Finishes:
| Wood Species | Pros | Cons | Cost (Relative) |
|---|---|---|---|
| Cedar | Lightweight, naturally insect/rot resistant, pleasant aroma. | Softer, can dent easily, needs good finish. | Medium |
| Redwood | Excellent rot/insect resistance, beautiful grain, stable. | More expensive than cedar, sourcing can be limited. | High |
| Cypress | Good rot/insect resistance, stable, often locally available. | Can be rough, may require more sanding. | Medium |
| Treated Pine | Very affordable, highly rot-resistant (due to chemicals). | Less aesthetically pleasing, can warp if not sealed well, heavier. | Low |
- Fasteners: Stainless steel screws or bolts are highly recommended to prevent rust and unsightly staining on your wood.
- Adhesive: Use exterior-grade, waterproof wood glue for strong, durable joints.
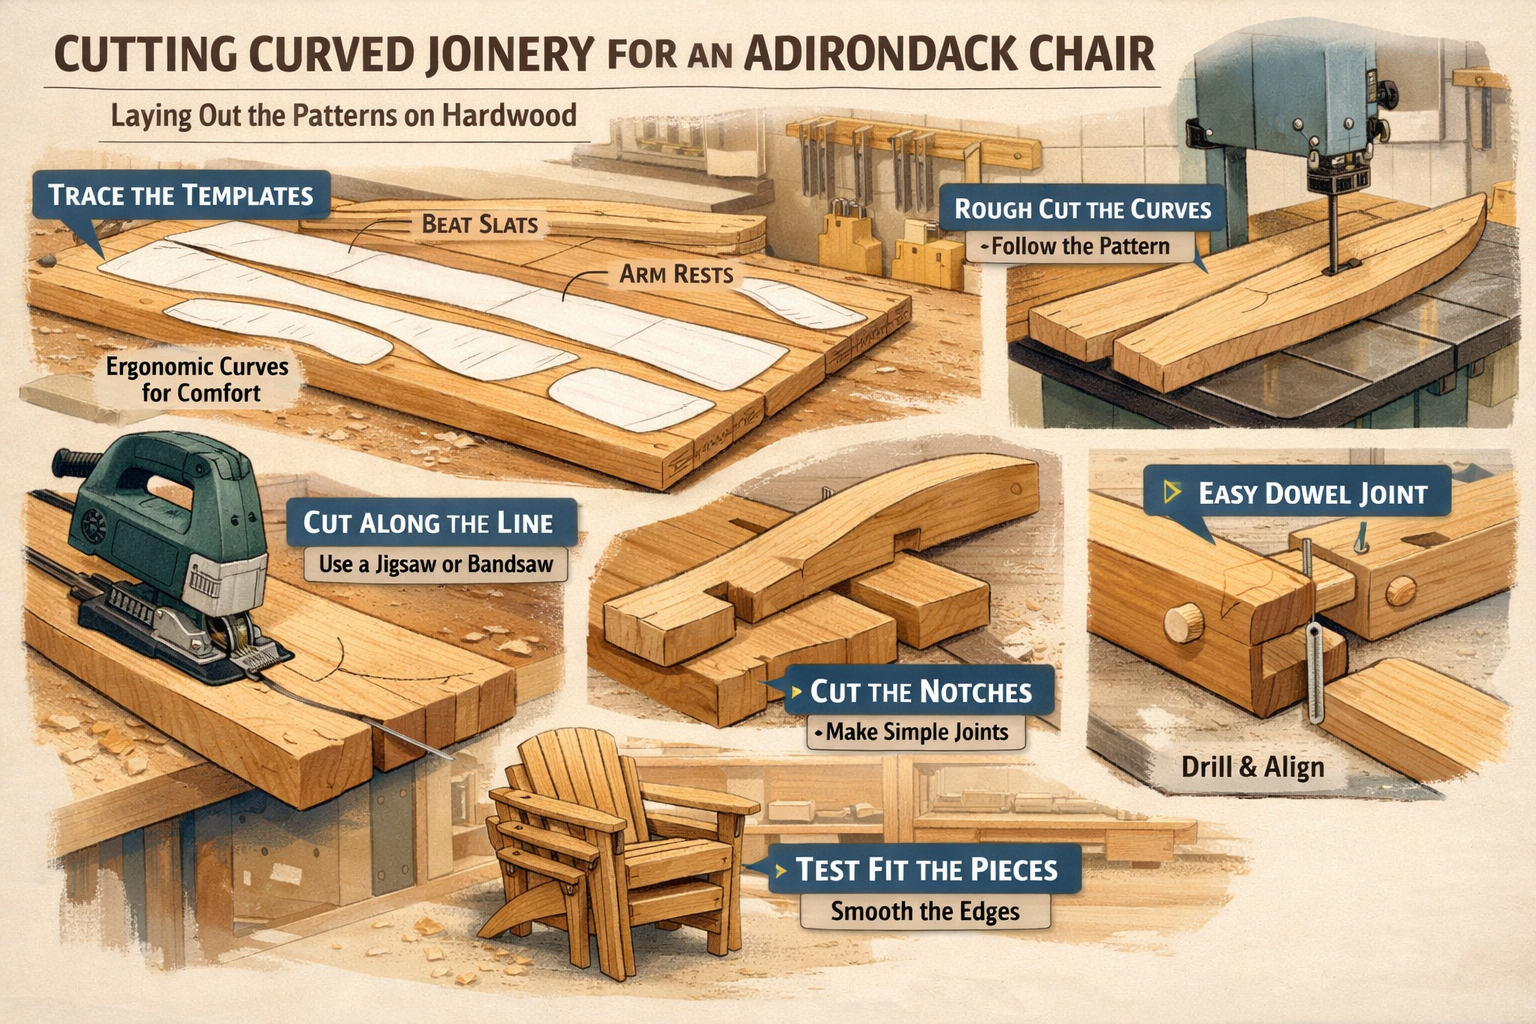
Pattern Cutting and Curved Joinery Techniques
The distinctive curves of an Adirondack chair, particularly for the back legs and seat slats, require accurate pattern cutting.
- Obtain Plans: Numerous free and paid plans are available online. Look for plans that include full-size templates or detailed measurements for each component.
- Transferring Patterns:
- Templates: Print out full-size templates and adhere them to thin plywood or MDF to create reusable cutting guides.
- Gridding: For larger pieces or if printing full-size isn’t feasible, use a grid method to transfer the design onto your chosen wood.
- Cutting Curved Pieces:
- Jigsaw: An excellent tool for beginners, offering good control for intricate curves.
- Bandsaw: Provides smoother cuts and is faster for multiple curved pieces. For guidance on different tools, consider exploring Power Tool Mastery for Building Console Tables: Modern Entry.
- Router with a Template Bit: For repeatable, identical curved parts, a router with a flush trim bit run along a template ensures precision.
“Precision in cutting curved joinery not only enhances the chair’s aesthetics but is fundamental to its structural integrity and ergonomic comfort.”
Beginner Adaptations and Power Tool Shortcuts
For those new to woodworking, Building Adirondack Chairs: Ergonomic Outdoor Seating with Weather-Resistant Finishes can seem daunting, but many shortcuts simplify the process:
- Simplified Joinery: Instead of complex mortise and tenon joints, opt for sturdy butt joints reinforced with screws and exterior wood glue. Pocket hole joinery is another strong, relatively easy option.
- Pre-cut Kits: Several manufacturers offer pre-cut Adirondack chair kits, providing all the pieces ready for assembly. This is an excellent way to learn the construction process without the cutting challenge.
- Utilize a Miter Saw: While curves are key, many straight cuts are involved. A miter saw will make quick, accurate crosscuts.
- Sanders are Your Friend: Orbital sanders will be invaluable for smoothing all surfaces and edges, preparing the wood for finishing.
Assembly and Structuring Your Stackable Outdoor Seating
Once all your components are meticulously cut, the next phase in Building Adirondack Chairs: Ergonomic Outdoor Seating with Weather-Resistant Finishes is assembly. This stage requires careful attention to detail, ensuring all joints are strong, square (where applicable), and aligned for optimal comfort and durability. Modern outdoor living trends often favor space-saving solutions, making stackability a desirable feature.
Step-by-Step Assembly Process
A systematic approach to assembly ensures a sturdy and long-lasting chair.
- Prepare Components: Sand all individual pieces thoroughly before assembly. Start with a coarser grit (e.g., 80-100) to remove saw marks and imperfections, then progress to finer grits (e.g., 150-220) for a smooth finish. Pay special attention to edges and curves.
- Assemble Leg Frames: Typically, an Adirondack chair has two side frames. Attach the front and back legs to the side rails/stretchers using waterproof glue and stainless steel screws. Ensure these frames are square and stable.
- Attach Seat Slats: Begin by attaching the front seat support rail to the side leg frames. Then, progressively attach the individual seat slats, maintaining consistent spacing as per your plans. The seat slats often fan out or curve for ergonomic comfort.
- Install Backrest Slats: Secure the bottom backrest support to the side frames. Then, attach the backrest slats, fanning them out evenly. Ensure the top of each slat is flush with the backrest’s top rail.
- Attach Armrests: Position and secure the armrest supports to the front and back legs. Then, attach the wide armrest planks firmly to these supports. These should be level and robust.
- Final Checks: Before the glue dries completely, check all angles and ensure the chair sits level on a flat surface. Make any necessary adjustments.
Incorporating Stackability for Space-Saving
Designing for stackability, while not traditional for all Adirondack chairs, is a practical adaptation for 2026 outdoor living. This feature is particularly beneficial for those with limited storage space or who need to clear patios quickly.
- Minimalist Design: Choose plans that have fewer protruding elements. Simpler, cleaner lines lend themselves better to stacking.
- Consistent Dimensions: Ensure the width and height of the chairs are consistent across a set. This allows them to nest neatly.
- Angled Legs: Slightly inward-tapering legs can help chairs nest inside one another without snagging.
- Reinforced Joints: Since stacked chairs bear the weight of others, ensure all joints are exceptionally strong. Consider through-mortise and tenon joints or robust bolted connections for critical stress points.
Ensuring Strong and Durable Joints
The longevity of your Adirondack chair depends heavily on the strength of its joints.
- Waterproof Wood Glue: Always use an exterior-grade, waterproof wood glue. Apply a thin, even coat to both mating surfaces before clamping.
- Stainless Steel Fasteners: Use stainless steel screws or bolts to prevent rust, which can stain the wood and weaken over time. Pre-drill pilot holes to prevent splitting.
- Clamping: Use clamps liberally to hold pieces together firmly while the glue dries. This ensures maximum surface contact and joint strength.
- Reinforcement: For high-stress areas, consider adding corner blocks or metal L-brackets (also stainless steel) for extra support.
- Proper Fastener Length: Ensure screws penetrate sufficiently into the mating piece without going all the way through.
For those interested in mastering more advanced joinery, exploring resources like Mastering Modern Hand-Cut Joinery: Adapting Classics for Live Edge and Modular Furniture can provide valuable insights.
Applying Weather-Resistant Finishes and UV Protection
The final, and arguably most critical, step in Building Adirondack Chairs: Ergonomic Outdoor Seating with Weather-Resistant Finishes is applying a protective coating. An appropriate finish not only enhances the chair’s natural beauty but also shields it from the harsh realities of outdoor exposure – sun, rain, humidity, and temperature swings. A well-chosen finish can dramatically extend the lifespan of your handmade furniture.
Understanding Outdoor Exposure and Wood Degradation
Wood left unfinished outdoors is highly susceptible to degradation:
- UV Radiation (Sunlight): Breaks down lignin in the wood, leading to graying, checking, and surface erosion. This is why UV-protectant polishes are so vital.
- Moisture (Rain, Humidity): Causes wood to swell and shrink, leading to cracks, warping, and delamination of layers. It also creates an environment for mold, mildew, and rot.
- Temperature Fluctuations: Exacerbate swelling and shrinking cycles, stressing wood fibers and finishes.
- Insects and Fungi: Untreated wood, especially softer species, is vulnerable to pests and rot-causing organisms.
Types of Weather-Resistant Finishes for Adirondack Chairs
The choice of finish depends on the desired aesthetic, level of protection, and maintenance commitment.

- Penetrating Oil Finishes (e.g., Teak Oil, Linseed Oil Blend):
- Pros: Penetrate deep into the wood fibers, offering a natural look and feel. Easy to reapply and maintain. Provide good moisture resistance.
- Cons: Offer less UV protection than film-forming finishes. Require more frequent reapplication (annually or bi-annually).
- Application Tip: For a comprehensive guide on Can You Stain Over Linseed Oil?, refer to our detailed article.
- Marine Varnishes:
- Pros: Highly durable, film-forming finishes designed for extreme outdoor conditions (boat decks). Excellent UV protection and water resistance. Create a hard, glossy, or satin surface.
- Cons: Can be challenging to apply without drips or bubbles. May crack or peel over time if not maintained. Require thorough surface preparation for reapplication.
- Outdoor Paints:
- Pros: Offer the highest level of UV protection and complete concealment of wood grain. Available in a vast array of colors to match any aesthetic.
- Cons: Obscure the natural beauty of the wood. Can chip, peel, or fade over time, requiring sanding and repainting.
- Polyurethanes (Exterior Grade):
- Pros: Good balance of durability, water resistance, and UV protection. Available in various sheens. Easier to apply than marine varnishes.
- Cons: Can form a plastic-like film that may yellow over time, especially less UV-stable interior versions. Ensure you use an exterior-grade product.
- Application Tip: For insights into different application methods, read about Polycrylic Spray vs. Brush: Choosing the Best Application Method.
Application Techniques for UV-Protectant Polishes
Regardless of the finish chosen, proper application is key to its performance and longevity.
- Surface Preparation:
- Sanding: Ensure all surfaces are sanded smooth to at least 220-grit. This allows the finish to penetrate or adhere properly.
- Cleaning: Remove all dust and debris with a tack cloth or compressed air. Clean any sap or grease with mineral spirits and allow to dry completely.
- Applying the Finish:
- Follow Manufacturer’s Instructions: Always adhere strictly to the product’s guidelines for application, drying times, and recoating.
- Thin Coats: Apply multiple thin coats rather than one thick coat. This promotes better adhesion, reduces drips, and allows for even drying.
- Brush, Roller, or Spray:
- Brushing: Best for intricate areas and achieving fine control. Use a high-quality natural bristle brush for oil-based finishes and a synthetic brush for water-based ones.
- Rolling: Faster for large, flat surfaces. Use a foam roller for smooth results.
- Spraying: Provides the smoothest, most even finish but requires specialized equipment and proper ventilation. This is particularly useful for achieving a flawless application on curved surfaces.
- Sanding Between Coats: Lightly sand (e.g., 320-400 grit) between coats of film-forming finishes (varnish, polyurethane, paint) to improve adhesion of subsequent layers. Clean thoroughly before recoating.
- Curing: Allow the finish to fully cure (which can take several days to weeks, depending on the product and humidity) before placing the chairs outdoors or subjecting them to heavy use.
By meticulously following these steps for Building Adirondack Chairs: Ergonomic Outdoor Seating with Weather-Resistant Finishes, you will create not just a chair, but a durable, comfortable piece of outdoor furniture ready to enhance your outdoor living space for years to come.
Conclusion
Building Adirondack Chairs: Ergonomic Outdoor Seating with Weather-Resistant Finishes is a deeply satisfying project that yields a functional, beautiful, and enduring piece of furniture for your outdoor spaces. From carefully selecting affordable hardwoods and mastering curved joinery to applying robust, UV-protectant finishes, each step contributes to a chair that offers both exceptional comfort and resistance to the elements. The emphasis on ergonomic design ensures a relaxing experience, while integrating stackability makes these chairs ideal for the practicalities of modern outdoor living in 2026.
By leveraging power tool shortcuts, even beginners can achieve professional results, transforming raw lumber into a timeless symbol of outdoor leisure. The pride of crafting a chair that withstands the test of time and weather, all while providing unparalleled comfort, is truly invaluable.
Actionable Next Steps:
- Select Your Plan and Wood: Choose an Adirondack chair plan that suits your skill level and desired features (e.g., stackability). Source your preferred affordable hardwood (cedar, redwood, treated pine) and gather all necessary fasteners and adhesives.
- Practice Cutting Curves: If new to curved cuts, practice on scrap pieces using a jigsaw or bandsaw to gain confidence before cutting your final components.
- Assemble with Precision: Take your time during assembly, ensuring all joints are tight, square, and reinforced with waterproof glue and stainless steel fasteners. Clamp thoroughly.
- Finish Smart: Invest in a high-quality exterior-grade finish (oil, marine varnish, outdoor paint, or exterior polyurethane) and apply it meticulously, following manufacturer instructions. Proper surface preparation and multiple thin coats are key.
- Enjoy and Maintain: Place your new Adirondack chairs in your favorite outdoor spot and enjoy the fruits of your labor. Establish a simple maintenance routine, such as annual cleaning and finish touch-ups, to ensure their longevity.
