


Embarking on the journey of wood lathe turning can transform a simple block of wood into a functional masterpiece or a stunning piece of art. This Ultimate Guide to Wood Lathe Turning: Pens, Bowls, and Advanced 2026 Curve Designs for Beginners is crafted to introduce you to the exciting world of woodturning, covering everything from fundamental safety to creating beautiful, sellable items and exploring contemporary design trends. If you’ve ever dreamt of crafting elegant pens, robust bowls, or intricate, flowing forms, 2026 is the perfect year to start shaping wood on the lathe.
Woodturning offers a unique blend of creativity, precision, and the satisfying tactile experience of working with natural materials. This guide will walk you through the essential steps, tools, and techniques, ensuring you build a solid foundation while also inspiring you to explore the more advanced and aesthetically pleasing organic curve designs trending in 2026. Get ready to master lathe basics and intermediate techniques, understand how to create profitable small items, and tie into the beauty of organic curve trends, all while prioritizing safety and recommending the best finishes.

Key Takeaways
- Prioritize Safety First: Always wear appropriate personal protective equipment (PPE) like safety glasses, face shields, and hearing protection before starting any lathe operation.
- Master Basic Techniques: Begin with fundamental cuts for spindle turning (like pens) and faceplate turning (like bowls) to build confidence and skill.
- Invest in Quality Tools: A good starter set of turning tools and a reliable lathe are crucial for a positive learning experience and consistent results.
- Explore Profitable Projects: Pens and small bowls are excellent starter projects that not only teach essential skills but can also be profitably sold.
- Embrace 2026 Design Trends: Experiment with organic curves and modern forms to create unique, contemporary pieces that stand out.
Getting Started: Essential Equipment and Safety for Wood Lathe Turning
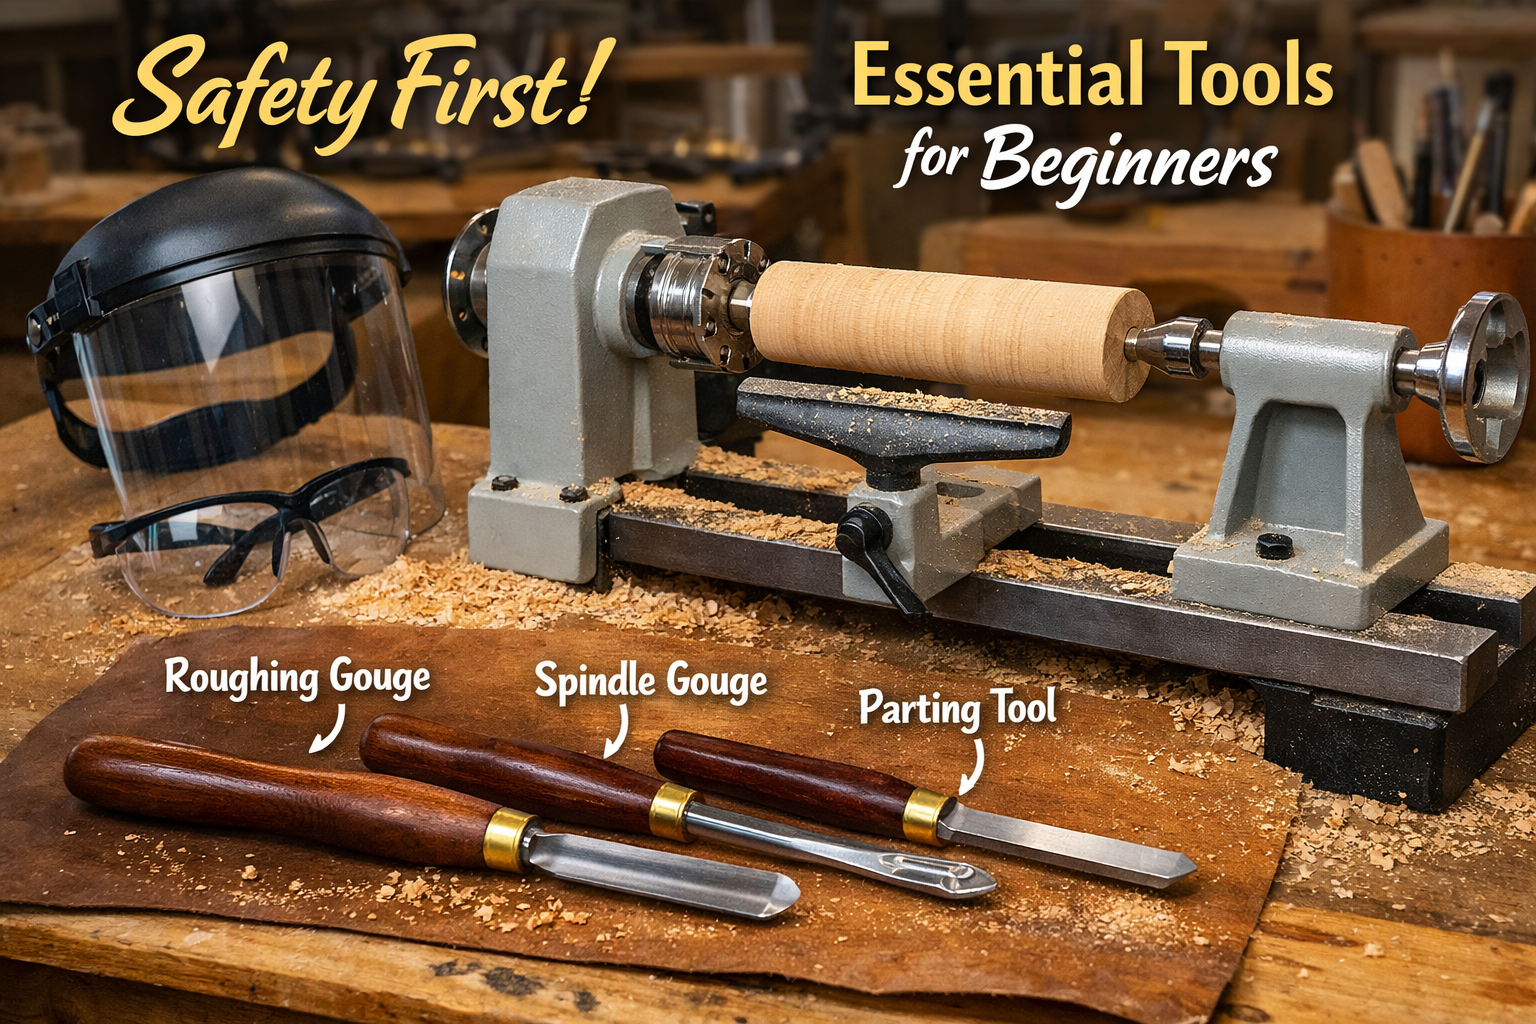
Before you even touch a piece of wood, understanding your equipment and, more importantly, establishing rigorous safety protocols are paramount. Woodturning involves rapidly spinning wood, which can be dangerous if proper precautions are not taken. This section of the Ultimate Guide to Wood Lathe Turning: Pens, Bowls, and Advanced 2026 Curve Designs for Beginners lays out the foundational knowledge you need.
Choosing Your First Wood Lathe
For beginners, a midi or mini lathe is an excellent choice. These are typically more affordable, take up less space, and are perfectly capable of turning smaller projects like pens, bottle stoppers, and small bowls.
- Benchtop vs. Floor Standing: Benchtop models are common for beginners due to their size and cost. Floor-standing lathes offer more power and capacity but require a dedicated space.
- Variable Speed: Look for a lathe with variable speed control. This allows you to adjust the RPM (revolutions per minute) based on the wood size, type, and the turning stage, which is crucial for safety and achieving smooth cuts.
- Swing and Distance Between Centers:
- Swing: The maximum diameter of wood the lathe can spin (e.g., 10-12 inches is good for beginners).
- Distance Between Centers: The maximum length of wood the lathe can hold (e.g., 16-20 inches is suitable for most beginner projects).
Essential Woodturning Tools
A good set of starter tools is invaluable. Here are the core tools you’ll need:
| Tool | Primary Use | Notes |
|---|---|---|
| Roughing Gouge | Quickly removes material, shaping square stock into round. | Used for spindle turning. |
| Spindle Gouge | Creates coves, beads, and fine details on spindle work. | Versatile for pens and other detailed pieces. |
| Bowl Gouge | Used for hollowing out bowls and creating curves. | Essential for faceplate turning. |
| Parting Tool | Cuts off finished pieces, creates tenons or grooves. | Can be thin for fine cuts or wider for robust separation. |
| Skew Chisel | Produces incredibly smooth cuts and intricate details. | Can be challenging for beginners but yields superior results with practice. |
| Scrapers | Smooths surfaces, but can leave a torn grain if not sharp. | Good for refining shapes and correcting imperfections. |
Remember, sharp tools are safe and effective tools. Invest in a good sharpening system, such as a grinder with appropriate jigs. For more on maintaining your tools, consider exploring resources on precision woodworking tools.
Safety First: Non-Negotiable Precautions
Safety is not just a recommendation; it’s a requirement in woodturning.
- Eye Protection: Always wear safety glasses and a full face shield. Flying wood chips and potential tool catches can cause serious injury.
- Hearing Protection: Lathes can be noisy. Earmuffs or earplugs are recommended.
- Dust Collection: Wood dust can be a respiratory hazard. Use a dust mask and/or a dust collection system.
- No Loose Clothing or Jewelry: Loose items can get caught in the spinning lathe. Tie back long hair.
- Secure Workpiece: Always ensure your wood blank is securely mounted to the lathe.
- Proper Tool Rest Position: Keep the tool rest as close as possible to the workpiece without touching, and position it slightly below the center line.
- Start Slow: Always start the lathe at the lowest speed and gradually increase as needed.
“Safety is not an accessory; it’s the foundation of every successful turning project. Never compromise.”
Mastering the Basics: Turning Pens and Bowls
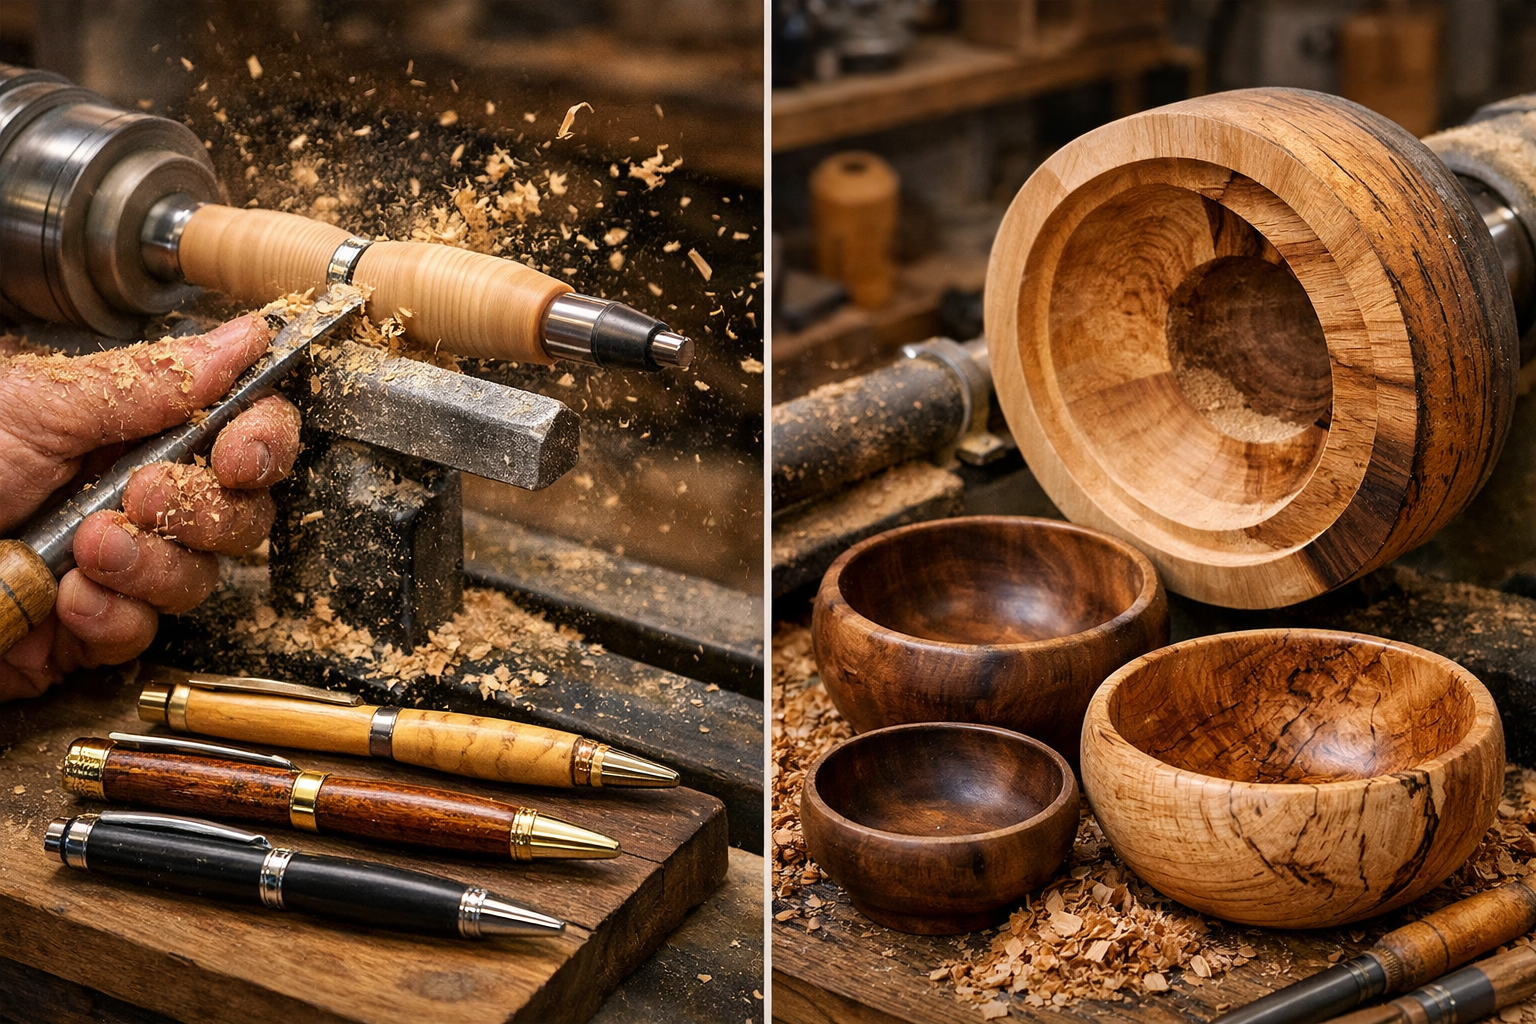
With your equipment ready and safety protocols in place, it’s time to delve into the core techniques of wood lathe turning. This section of our Ultimate Guide to Wood Lathe Turning: Pens, Bowls, and Advanced 2026 Curve Designs for Beginners focuses on two popular and rewarding projects for beginners: pens and bowls. These projects will help you develop essential skills and build confidence.
Turning a Wooden Pen (Spindle Turning)
Pens are fantastic starter projects. They are small, require minimal wood, and allow you to practice spindle turning techniques – shaping wood mounted between the headstock and tailstock centers.
Preparation:
- Select Wood: Choose a suitable wood blank (e.g., acrylic, stabilized wood, or a dense hardwood like maple or oak).
- Drill Blanks: Drill a hole lengthwise through the center of the blank to fit your pen tube.
- Glue Tubes: Rough up the pen tubes and the inside of the drilled blanks, then glue the pen tubes into the blanks using CA glue or epoxy.
- Square Ends: Use a barrel trimmer or disc sander to square the ends of the blanks to the pen tubes.
Mounting:
- Insert the pen bushings and blanks onto a pen mandrel.
- Mount the mandrel securely between the headstock and tailstock of your lathe.
Shaping:
- Start the lathe at a low to medium speed.
- Use a roughing gouge to turn the square blanks round.
- Switch to a spindle gouge to shape the pen barrel. Experiment with different profiles – straight, tapered, or curved.
- Continuously check the diameter against your pen components (clips, nibs) to ensure a snug fit.
Sanding and Finishing:
- Once shaped, sand the pen through progressively finer grits (e.g., 150, 220, 320, 400, 600, 800, 1000, 12000).
- Apply your chosen finish. Popular options include CA glue finish for a durable, high-gloss look, or natural oil finishes. For more on various wood finishing techniques, consider learning about unique wood finishing techniques or specific wood finishes like Danish oil vs. boiled linseed oil.
Assembly:
- Press the pen components (nib, clip, cap, refill) onto the finished barrels using a pen press.
Turning a Wooden Bowl (Faceplate Turning)
Turning a bowl introduces you to faceplate turning, where the wood blank is mounted directly to the headstock, allowing you to work on the face and rim. This is a fundamental skill for larger decorative items.
Preparation:
- Select Wood: Hardwoods like cherry, walnut, or maple are excellent for bowls.
- Round Blank (Optional but Recommended): Cut your blank into a rough circle using a band saw to reduce vibration and make initial rounding easier.
- Mounting: Secure the blank to a faceplate using screws, ensuring they are shorter than the blank’s thickness. Alternatively, create a tenon or mortise to mount the blank in a scroll chuck.
Shaping the Outside (Roughing):
- Mount the faceplate and blank onto the lathe.
- Start at a very slow speed, especially if the blank is unbalanced.
- Use a bowl gouge to true up the outside of the blank, creating a smooth, round exterior.
- Shape the desired external profile of the bowl.
- Create a mortise or tenon on the bottom of the bowl for re-chucking later.
Hollowing the Inside:
- Once the outside is shaped and sanded (if doing a one-chuck bowl), reverse the bowl in the chuck (if using a tenon/mortise).
- Begin hollowing out the interior using the bowl gouge, working from the rim towards the center.
- Maintain an even wall thickness as you hollow. This takes practice!
- Periodically check the wall thickness with calipers.
Sanding and Finishing:
- Sand the bowl interior and exterior through progressively finer grits.
- Apply a food-safe finish if the bowl is intended for food use. For inspiration, check out our Ultimate Guide to Wooden Cutting Boards: End-Grain Patterns which discusses food-safe finishes.
- Consider specific finishes for different wood types, like mahogany wood finishing techniques or oak wood finishing techniques.
Parting Off (If applicable):
- Carefully part off the bowl from the waste wood using a parting tool, or clean up the tenon/mortise from the bottom if it was part of the original mounting.
Advanced 2026 Curve Designs and Profitable Projects
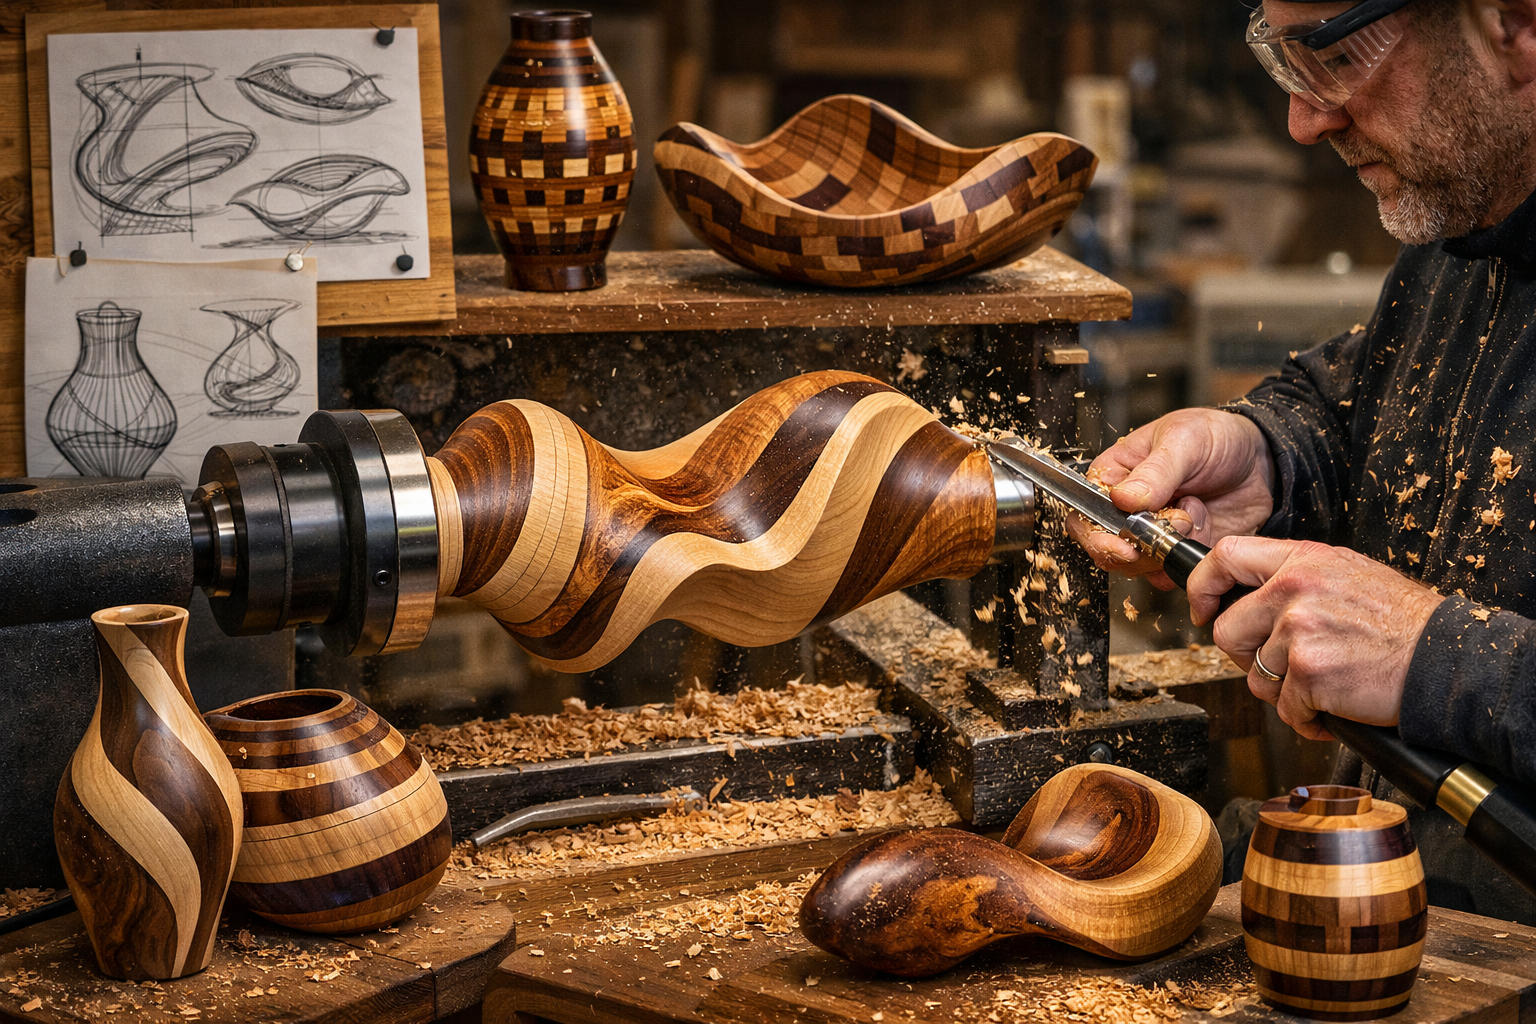
Once you’ve mastered the fundamentals of turning pens and bowls, it’s time to explore more advanced techniques and embrace the trending aesthetic of organic curve designs in 2026. This section of our Ultimate Guide to Wood Lathe Turning: Pens, Bowls, and Advanced 2026 Curve Designs for Beginners focuses on expanding your skills and making your creations unique and market-ready.
Exploring Advanced Curve Designs for 2026
The year 2026 sees a continued appreciation for organic, flowing lines and natural forms in woodworking. Moving beyond perfectly symmetrical circles and straight lines, modern woodturners are creating pieces that evoke natural elements, subtle asymmetry, and dynamic curves.
- Asymmetrical Bowls: Experiment with bowls that aren’t perfectly circular or have intentionally uneven rims. This can create a more artistic, sculptural feel.
- Flowing Spindle Work: Instead of strict beads and coves, aim for smooth, continuous curves that transition seamlessly from one element to another in spindle-turned items like candle holders or table legs. You might find inspiration in green woodworking techniques for their approach to natural forms.
- Thin-Walled Vessels: Pushing the boundaries of thinness in bowls and hollow forms creates delicate, almost translucent pieces that highlight the wood’s grain and the turner’s skill.
- Segmented Turning: This advanced technique involves gluing many small pieces of wood together to form a blank, which is then turned on the lathe. This allows for intricate patterns and custom color combinations, adding depth to curves.
- Natural Edge Turning: Leaving the live edge of the tree on a bowl creates a dramatic, organic rim that contrasts beautifully with the smooth, turned interior. This is a popular technique for showcasing unique wood. Learn more about working with live edge wood slabs for stunning results.
Profitable Small Projects for the Beginner Turner
Beyond pens and bowls, many small woodturned items can be highly profitable, especially if you focus on unique designs and quality finishes. These also make great gifts!
- Bottle Stoppers: Similar to pens, these are quick to make and can be highly decorative.
- Keychains: Small, personalized turned pieces can be very popular.
- Shaving Brushes/Handles: Craft exquisite handles for shaving brushes.
- Small Vases/Containers: Turn decorative miniature vases or boxes (for which you might also need to master woodworking box lid techniques).
- Yarn Bowls: Bowls with a spiral cut on the side to hold yarn are always in demand among knitters.
- Ring Holders: Small, elegant turned pedestals for rings.
- Desk Organizers: Multi-purpose turned pieces to hold pens, clips, or small items.
- Decorative Spheres/Ornaments: Simple but elegant, these allow you to practice perfect spherical forms.
To maximize profitability, consider using interesting wood species, incorporating different finishing techniques, or even repurposing scrap wood projects to create unique pieces. Quality finishing, such as proper sanding and the application of a durable sealant, will elevate your work significantly. For example, understanding how to remove spray adhesive from wood can be useful if you’re working with composite blanks or making repairs.
Finishing for Success
The finish you apply can make or break a turned piece.

- Oil Finishes: Penetrate the wood, enhancing natural grain and providing a soft, natural feel. Examples include Danish oil, tung oil, or linseed oil.
- Film Finishes: Create a protective layer on the surface. Polyurethane, lacquer, and CA glue are common choices, offering varying levels of durability and shine. For bowls used with food, always choose a food-safe option.
- Buffing and Polishing: After your finish cures, buffing with specialty compounds can achieve an incredibly high sheen.
By focusing on these advanced techniques and popular, profitable projects, you can quickly move beyond the basics and start creating truly exceptional pieces that reflect the cutting-edge design trends of 2026.
Conclusion
The world of wood lathe turning is incredibly rewarding, offering a tangible connection to craftsmanship and the satisfaction of creating beautiful objects from raw wood. This Ultimate Guide to Wood Lathe Turning: Pens, Bowls, and Advanced 2026 Curve Designs for Beginners has equipped you with the foundational knowledge, essential safety practices, and beginner-friendly project guidance needed to start your turning journey in 2026.
From the fundamental principles of setting up your lathe and selecting your first tools to mastering the art of turning elegant pens and sturdy bowls, you now have a roadmap. More excitingly, you’ve been introduced to the captivating realm of advanced 2026 curve designs – a chance to push creative boundaries and imbue your pieces with the organic, flowing aesthetics that are currently trending. Remember, every master turner started as a beginner. Practice consistently, prioritize safety, and don’t be afraid to experiment with different woods and forms. The journey of woodturning is one of continuous learning and immense satisfaction.
Actionable Next Steps:
- Acquire Your Gear: Start with a good quality midi lathe and a basic set of turning tools. Don’t forget your PPE!
- Watch and Learn: Supplement this guide with video tutorials from experienced turners. Seeing techniques in action is incredibly helpful.
- Practice Pens: Make several pens to truly understand tool control, shaping, and finishing.
- Move to Bowls: Challenge yourself with your first bowl, focusing on even wall thickness and smooth curves.
- Experiment: Once comfortable, begin exploring those 2026 organic curve designs and other profitable small projects. Join local turning clubs or online communities for inspiration and support.
Happy turning in 2026!
