


The year 2026 ushers in a distinctive design trend: the marriage of sleek, linear gas fireplaces with the organic warmth and undeniable character of oversized rough-hewn timber mantels. This captivating combination creates a focal point that is both modern and timeless, grounding contemporary aesthetics with rustic authenticity. The appeal lies in the contrast – the clean lines and controlled flames of a gas fireplace set against a massive, textured beam that tells a story of its origins. This guide provides a comprehensive look into Oversized Rough-Hewn Timber Mantels for 2026 Gas Fireplaces: Sourcing, Shaping, and Installation Guide, detailing every step from finding the perfect log to securely mounting it above your hearth.
The demand for these substantial, character-rich mantels reflects a growing desire for natural materials and bespoke craftsmanship in home design. Using power tools for precise rough-hewing allows for controlled artistry, while hidden joinery ensures a secure and aesthetically clean installation.

Key Takeaways
- Sourcing is Key: Prioritize reclaimed or responsibly harvested timber for unique character and sustainability.
- Safety First: Always observe strict safety protocols when working with heavy timbers and power tools.
- Precision Rough-Hewing: Master power tool techniques to achieve authentic, controlled rough-hewn textures.
- Structural Integrity: Ensure your wall can support the mantel’s significant weight, planning for robust hidden mounting systems.
- Aesthetic Balance: Choose a timber that complements the sleekness of a 2026 gas fireplace, creating harmonious contrast.
Sourcing the Perfect Timber: Character and Sustainability for 2026 Mantels
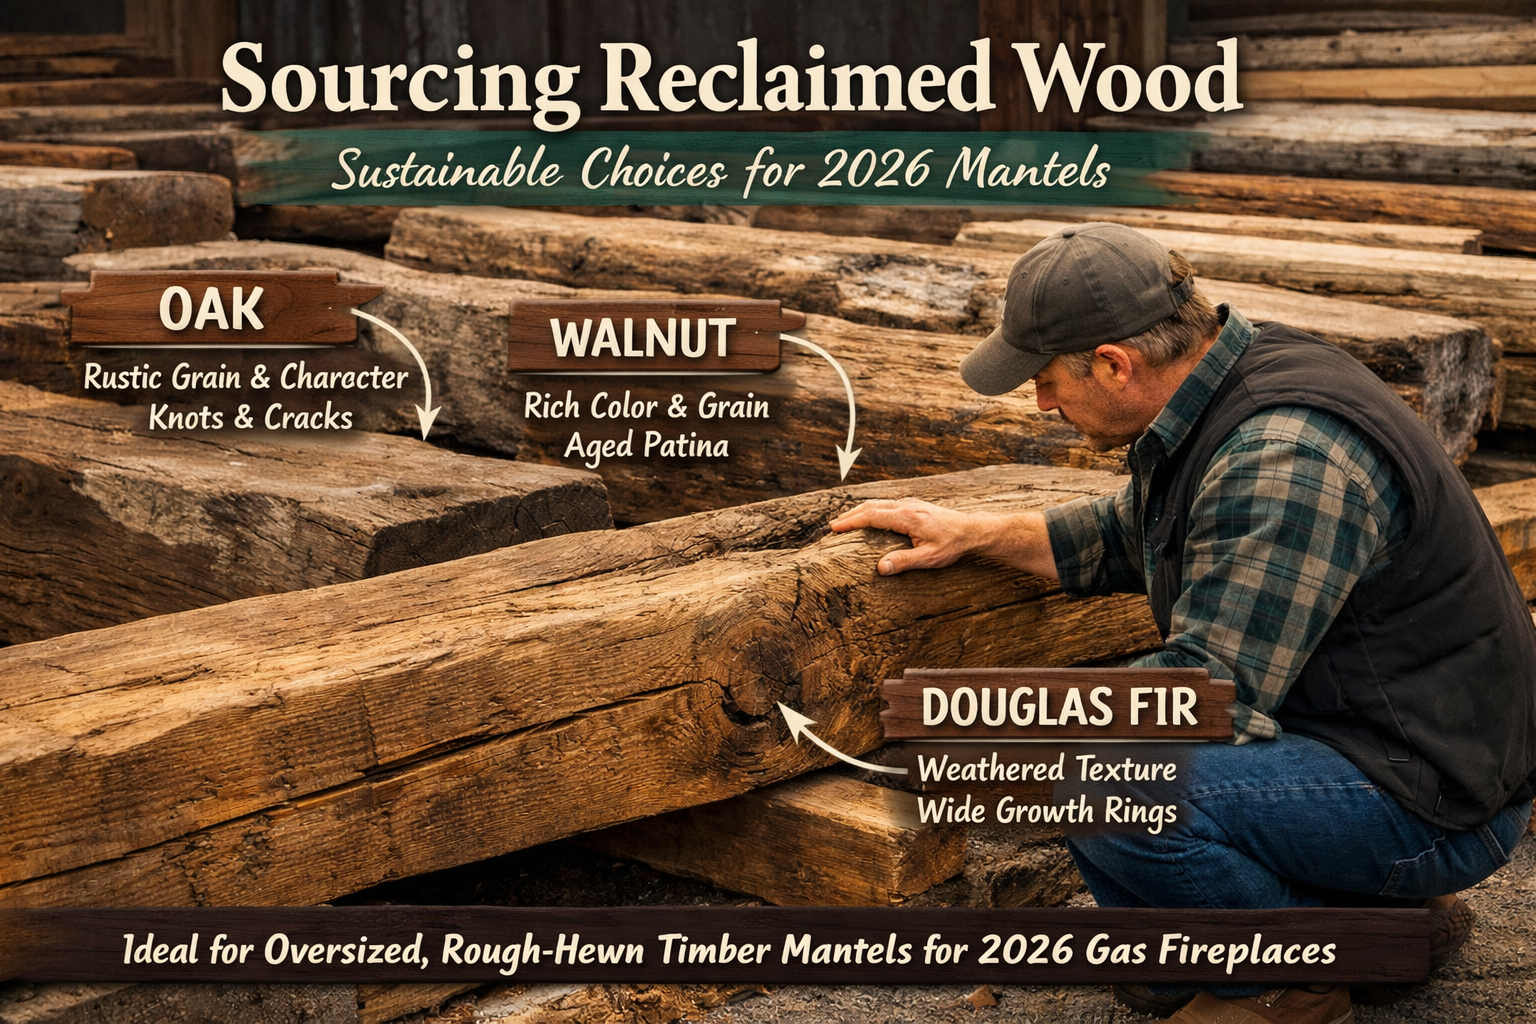
The foundation of any stunning rough-hewn mantel is the timber itself. For Oversized Rough-Hewn Timber Mantels for 2026 Gas Fireplaces: Sourcing, Shaping, and Installation Guide, the choice of wood is paramount, influencing both the mantel’s aesthetic and its structural integrity. Reclaimed wood is often the preferred choice due to its inherent character, historical provenance, and environmental benefits. It carries a story, marked by decades or even centuries of exposure to the elements, resulting in unique grain patterns, checks, knots, and variations in color that cannot be replicated with new lumber.
Where to Find Quality Reclaimed Timber
Sourcing reclaimed timber requires a discerning eye and a bit of detective work. Here are the primary avenues:
- Specialized Reclaimed Wood Suppliers: These businesses salvage wood from old barns, factories, and other deconstructed structures. They often have an extensive inventory, with timbers already cleaned, metal-detected, and sometimes even kiln-dried. They can also offer expert advice on wood species and suitability.
- Local Sawmills: Smaller, independent sawmills may have access to locally salvaged logs or storm-damaged trees that offer unique character. They can often mill a custom size for your project.
- Architectural Salvage Yards: Similar to reclaimed wood suppliers, but may have a wider range of salvaged building materials.
- Online Marketplaces/Forums: Websites and local listings can sometimes connect you with individuals selling timbers from their own property or demolition projects. Exercise caution and thoroughly inspect any timber before purchase.
Choosing the Right Wood Species
Different wood species offer distinct aesthetics and working properties:
| Wood Species | Characteristics | Ideal For |
|---|---|---|
| Oak (Red/White) | Dense, strong, prominent open grain, good for rough-hewing. | Traditional, rustic, or industrial styles. |
| Douglas Fir | Lighter in color, straight grain, strong but lighter weight. | Modern farmhouse, lighter rustic aesthetics. |
| Walnut | Dark, rich color, fine grain, highly prized, can be expensive. | Luxury, contemporary rustic designs where deep tones are desired. |
| Cypress | Naturally water-resistant, often has unique “pecky” character. | Distinctive, weathered look, highly durable. |
| Cherry | Reddish-brown, beautiful aging process, smoother grain. | Refined rustic, offering warmth without extreme ruggedness. |
Table 1: Common Timber Species for Rough-Hewn Mantels
When selecting your timber, look for pieces that are relatively straight and free from severe twisting, bowing, or excessive checking that could compromise structural integrity. Remember, natural imperfections are part of the charm of a rough-hewn mantel, but extreme defects can cause issues. For insights on working with reclaimed materials, refer to our guide on Building Reclaimed Wood Mantels: Sourcing, Restoration, and Installation Techniques.
Shaping Your Oversized Rough-Hewn Mantel: Techniques and Tools
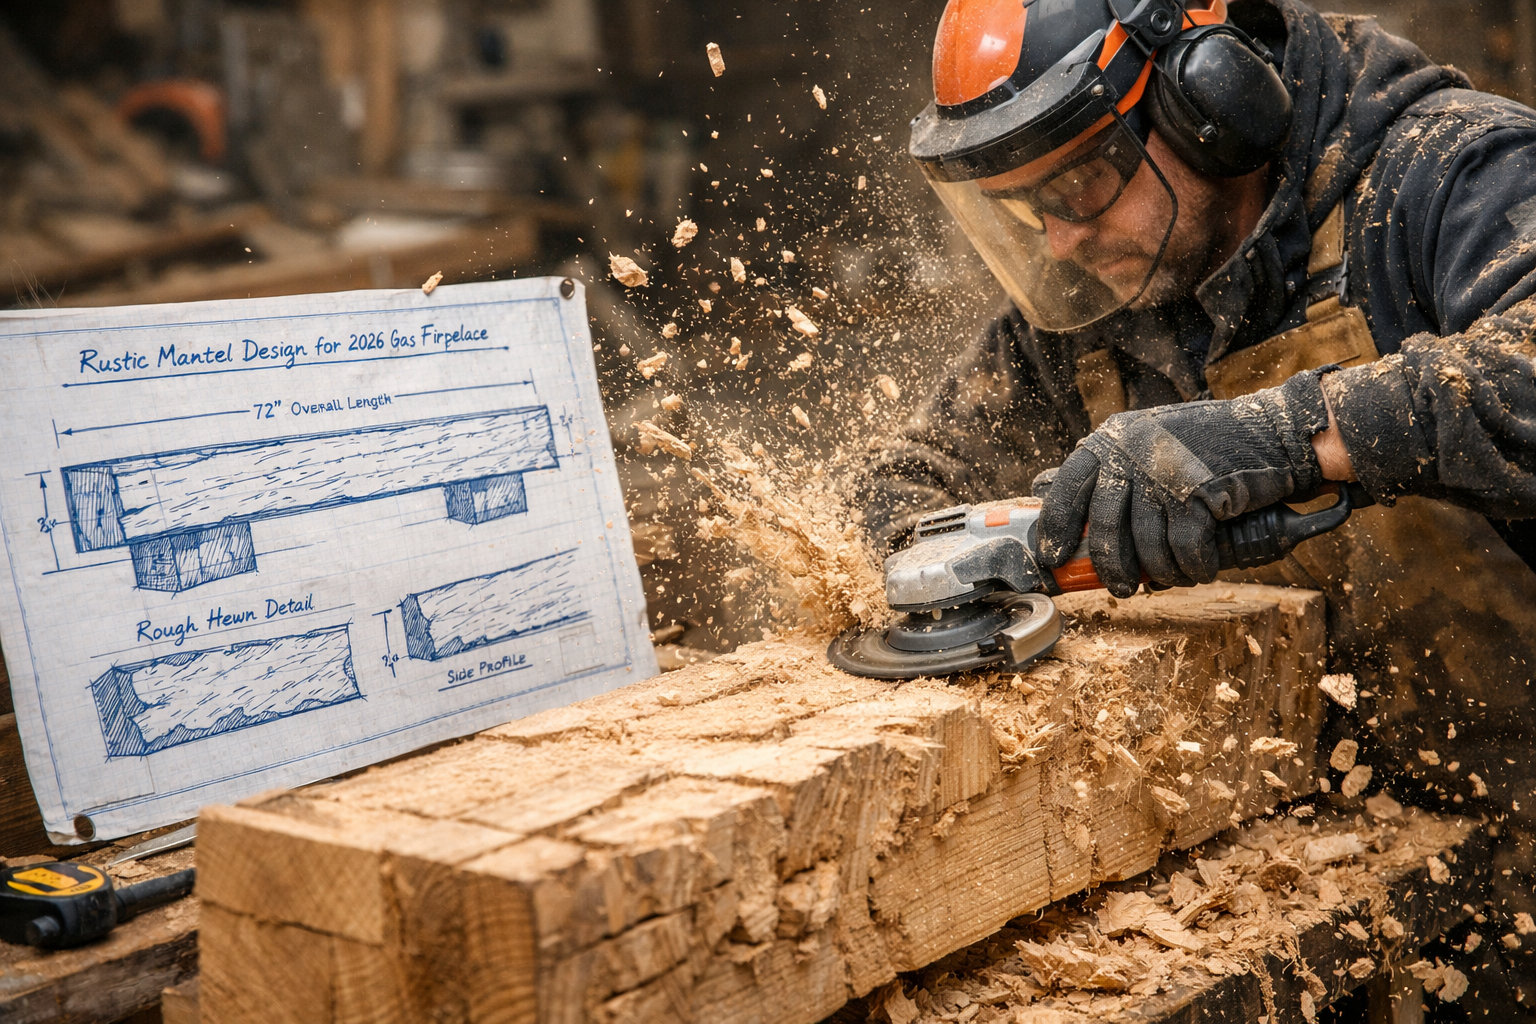
Once you’ve sourced your perfect timber, the next step is shaping it into an oversized rough-hewn mantel. This process involves a blend of artistic vision and skilled power tool operation, aiming to create a rustic, hand-hewn appearance while maintaining precise dimensions for installation above a 2026 gas fireplace.
Essential Tools for Rough-Hewing
Achieving an authentic rough-hewn look efficiently requires specific tools:
- Chainsaw: For initial shaping, squaring off ends, and creating deep texture cuts. A smaller, well-balanced chainsaw is often more manageable for detailed work.
- Angle Grinder with Carving Discs: Excellent for refining textures, creating chamfers, and sculpting contours. Various discs are available for different levels of aggression and finish.
- Drawknife/Spokeshave: Traditional hand tools that allow for more controlled peeling and shaping of the wood surface, providing an authentic, hand-crafted feel.
- Chisels and Mallets: For detail work, cleaning up corners, and adding specific marks.
- Power Planer (Optional): While counter-intuitive for “rough-hewn,” a power planer can be used sparingly to flatten the top surface for objects or to create a perfectly flat back for wall mounting, before adding rough texture back in.
- Sander (Optional): A coarse-grit sander might be used very lightly to knock off splinters or sharp edges after rough-hewing, without removing the textured appearance.
The Art of Rough-Hewing
The goal is not to create random damage, but controlled texture that mimics traditional axe-hewn timbers.
- Safety First! ⚠️ Always wear appropriate personal protective equipment (PPE): safety glasses, hearing protection, gloves, and sturdy footwear. Understand your tools and their kickback risks.
- Initial Shaping: Begin by cutting your timber to the desired length using a chainsaw or large circular saw. If the timber is uneven, use a chainsaw to roughly square the profile.
- Creating the Hewn Texture:
- Chainsaw Method: Use the tip of the chainsaw bar to make shallow, overlapping cuts along the face of the timber, mimicking axe marks. Vary the angle and depth slightly for natural variation.
- Angle Grinder Method: Attach a coarse carving disc. Work in sweeping motions, removing material to create facets and texture. Experiment with different angles and pressures.
- Drawknife/Chisel Method: For more control and a truly hand-hewn look, use a drawknife to peel away layers of wood, revealing the underlying grain. Chisels can add deeper, more defined marks.
- Edge Treatment: Decide if you want sharp, rough edges or slightly eased, chamfered edges. A chainsaw or angle grinder can create a rustic chamfer.
- Finishing the Surface: Once the rough texture is achieved, lightly sand any truly sharp splinters or edges with a coarse grit (e.g., 60-80 grit) to make the mantel safe to touch without removing the character.
Remember that the aesthetic of rough-hewn timber varies greatly. Some prefer very deep, pronounced marks, while others opt for a more subtle, textured finish. Practice on scrap pieces to find your preferred style. For more information on wood finishing techniques that can enhance the mantel’s character, explore our article on wood finishing techniques.
Installing Your Oversized Rough-Hewn Timber Mantel for 2026 Gas Fireplaces

Installing an oversized rough-hewn timber mantel, especially above a 2026 gas fireplace, demands meticulous planning and execution. Given the substantial weight of these timbers, a secure, hidden mounting system is crucial for both safety and aesthetics. Building codes often have specific requirements for combustible materials around fireplaces, which must be strictly adhered to for gas fireplaces.
Code Compliance and Clearances
Before installation, verify local building codes regarding mantel clearances from the fireplace opening. Gas fireplaces, while generally cooler than wood-burning ones, still generate heat that can affect combustible materials.
- Combustible Clearances: Typically, mantels must be a certain distance above and away from the top and sides of the firebox opening. These measurements vary by jurisdiction and fireplace model. Always consult your gas fireplace’s manufacturer specifications and local building codes.
- Heat Shielding (If Necessary): If your desired mantel placement violates clearance requirements, a non-combustible heat shield may be necessary.
Selecting a Robust Mounting System
Given the weight of oversized timber mantels, common shelf brackets are often insufficient. Hidden mounting systems offer both strength and a clean, floating aesthetic.
Floating Mantel Brackets (Heavy Duty): These are typically made of thick steel rods or plates that are securely anchored into the wall studs. The mantel beam is then drilled to slide over these rods.
- Rod Style: Multiple long, thick steel rods (e.g., 1/2″ to 1″ diameter) are drilled into the wall studs, protruding horizontally. Corresponding holes are drilled precisely into the back of the mantel.
- Plate Style: A flat steel plate is mounted to the wall studs, with smaller rods or a continuous lip extending horizontally. The mantel is then routed or drilled to accept this plate.
- Considerations: Ensure the brackets are rated for the weight of your specific mantel. Proper stud finding and robust fasteners (lag screws, structural screws) are non-negotiable.
Ledger Board with Hidden Fasteners: For extremely heavy mantels, a strong ledger board (e.g., a 2×4 or 2×6) can be securely bolted to the wall studs. The mantel then rests on this ledger, with additional hidden fasteners (e.g., long structural screws driven from the top of the mantel into the ledger and studs, or angle brackets underneath) providing extra security. This method is less “floating” but can be extremely strong.
Installation Steps for a Floating Mantel
Assume a heavy-duty floating rod system for this example:

- Locate Wall Studs: Use a reliable stud finder to locate and mark the center of at least three to four adjacent wall studs where the mantel will be mounted. Use a level to ensure your marks are perfectly horizontal.
- Mark Bracket Positions: Transfer the stud center markings to your desired mantel height. Use the bracket’s dimensions to mark pilot hole locations precisely.
- Drill Pilot Holes: Drill pilot holes through the drywall and into the center of the wall studs, ensuring they are perfectly level and perpendicular to the wall.
- Install Mounting Rods/Plates: Securely fasten the heavy-duty mounting rods or plates to the wall studs using appropriate lag screws or structural screws. Overtighten at your peril, but ensure they are extremely tight.
- Prepare the Mantel:
- Measure and Mark: Carefully measure the distance between the installed mounting rods. Transfer these measurements precisely to the back of your timber mantel, ensuring the holes will align perfectly. Mark the desired depth for the rods.
- Drill Mantel Holes: Using a drill press (if available for accuracy) or a powerful hand drill with an auger bit, drill holes into the back of the mantel corresponding to the mounting rods. These holes must be slightly larger than the rods for easier sliding and perfectly straight and level. The depth should allow the mantel to sit flush against the wall.
- Test Fit: Carefully slide the mantel onto the mounting rods. It should fit snugly but not require excessive force. Adjust holes if necessary.
- Final Installation: Apply a strong construction adhesive (e.g., liquid nails or epoxy) into the drilled holes in the mantel and onto the back surface of the mantel where it meets the wall. This will help secure it further and prevent any movement or squeaking.
- Slide and Secure: Carefully slide the mantel onto the rods, pushing it firmly against the wall. Use a level one last time to ensure it is perfectly straight. Allow the adhesive to cure fully before placing any weight on the mantel.
For complex installations or when in doubt, consider consulting a professional carpenter or structural engineer. For other large-scale woodworking projects that require secure joinery, consider guides such as DIY Box Beams and Exposed Ceiling Timbers: Transform Your Ho.
Finishing Your Mantel
Once installed, the final step is to apply a suitable finish to your oversized rough-hewn timber mantel.
- Cleaning: Remove any dust or debris.
- Stain (Optional): If desired, apply a wood stain to enhance the color or bring out the grain. Test on a scrap piece first.
- Protective Finish: Apply a durable finish to protect the wood and make it easy to clean.
- Polyurethane (Oil-based or Water-based): Provides excellent protection and durability. Consider a satin or matte finish to retain the rustic look.
- Rubio Monocoat/Hardwax Oil: A natural-looking finish that protects and enhances the wood’s texture without forming a thick film. It’s durable and easy to repair.
- Wax: Offers a soft, natural sheen but less protection than poly or oil finishes.
Always follow the manufacturer’s instructions for drying times and application techniques. For details on various finishing options, including maple wood finishing techniques or dark wood finishing techniques, check out our other resources.
Conclusion
The integration of oversized rough-hewn timber mantels with sleek 2026 gas fireplaces is more than just a passing trend; it’s a testament to the enduring appeal of natural materials and expert craftsmanship in modern homes. By carefully sourcing character-rich timber, mastering precise rough-hewing techniques with power tools, and executing a secure, hidden installation, you can create a stunning and safe focal point that elevates your living space. This guide provides the blueprint for achieving that balance, combining rugged beauty with contemporary elegance.
Embrace the warmth, texture, and story that a thoughtfully crafted timber mantel brings to your home. With diligent planning and execution, your oversized rough-hewn mantel will not only be a functional component of your fireplace but a conversation piece and a work of art for years to come.
