

For serious woodworkers, the handheld router is an indispensable tool, but its true potential for precision and safety is unlocked when mounted into a router table. Demystifying the router table involves understanding its components, how to set it up for various operations, and essential safety practices to achieve precise edge profiles, dados, and joinery with ease. This comprehensive guide, “Choosing and Using Router Tables: Maximizing Precision and Safety for Edge Profiling and Joinery,” will navigate you through everything you need to know to transform your woodworking projects in 2026.
Key Takeaways

- Router tables are essential for precision: They convert handheld routers into stationary machines, allowing for controlled, accurate cuts.
- Safety is paramount: Always use push blocks, featherboards, and proper dust collection to prevent accidents.
- Key components matter: A flat table, robust fence, and reliable router lift are crucial for optimal performance.
- Versatility for joinery: Router tables excel at creating various joints, from dados and rabbets to tongue-and-groove, significantly enhancing project quality.
- Maintenance extends lifespan: Regular cleaning and inspection ensure your router table remains accurate and safe for years.
The Foundation: Choosing the Right Router Table for Your Workshop in 2026
Selecting the appropriate router table is the first critical step in maximizing precision and safety. The market offers a wide array of options, from basic benchtop models to elaborate freestanding units, each with distinct advantages and considerations. Understanding the core components and what to look for will guide your decision.
Types of Router Tables
Benchtop Router Tables:
- Pros: Compact, portable, typically more affordable. Ideal for smaller workshops or those with limited space.
- Cons: Can be less stable, smaller work surface, may require clamping to a workbench.
- Best for: Hobbyists, occasional use, smaller projects.
Freestanding Router Tables:
- Pros: More stable, larger work surface, often include integrated storage and dust collection. Designed for dedicated router operations.
- Cons: Require more floor space, higher cost.
- Best for: Serious hobbyists, professional woodworkers, frequent use.
Router Table Inserts for Workbenches:
- Pros: Integrates seamlessly into an existing workbench, saving space. Can leverage the stability and size of your main workbench.
- Cons: Requires modifying your workbench, setup and tear-down can be more involved if not permanently installed.
- Best for: Workshops where space is at a premium and a custom solution is desired.
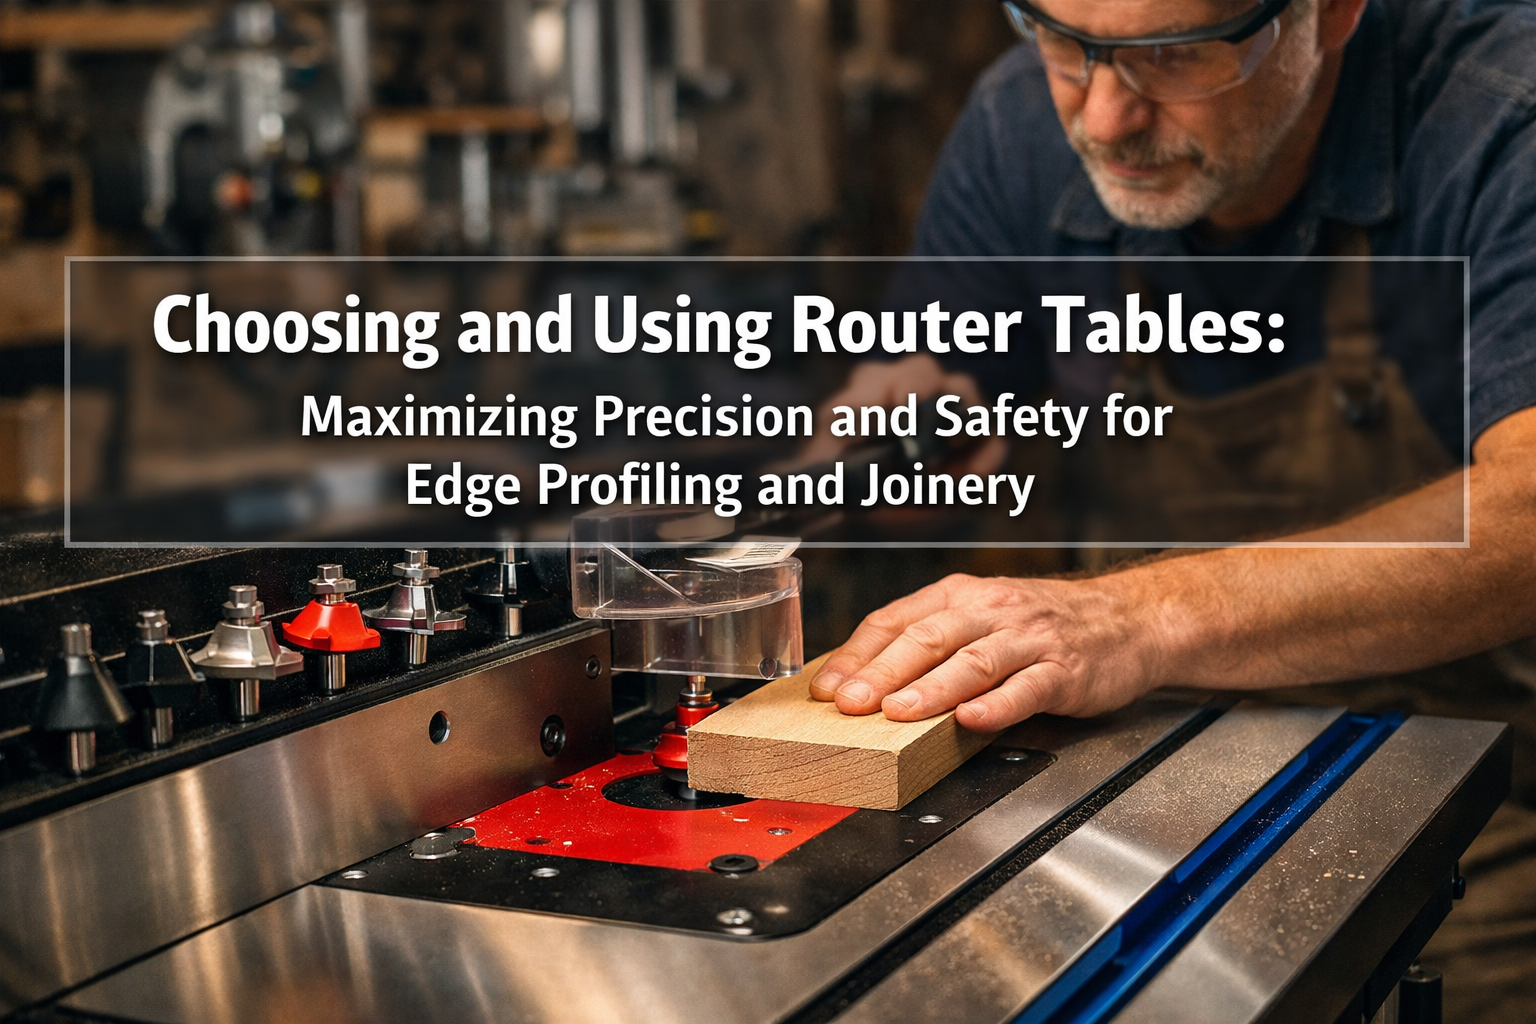
Essential Router Table Components
Regardless of the type, certain components are non-negotiable for “Choosing and Using Router Tables: Maximizing Precision and Safety for Edge Profiling and Joinery.”
- Tabletop: The surface must be flat, durable, and low-friction. Materials like phenolic resin, MDF with a laminate coating, or cast iron are common. A warped or uneven surface will compromise accuracy.
- Router Plate/Insert: This removable plate holds the router upside down. Look for plates made from robust materials (e.g., aluminum, phenolic) that are perfectly flush with the tabletop. Interchangeable insert rings are beneficial for accommodating different bit sizes and improving dust collection.
- Fence: A good fence is critical for guiding your workpiece precisely. It should be straight, rigid, easy to adjust, and ideally feature T-slots for attaching accessories like featherboards. Split fences are a premium feature, allowing you to offset one half for jointing operations.
- Router Lift (Optional but Recommended): While not strictly essential, a router lift transforms usability. It allows for easy, precise height adjustments of the router bit from above the table, eliminating the need to fumble underneath. This significantly enhances both precision and convenience.
- Dust Collection: Router tables generate a lot of chips. An effective dust collection port, usually integrated into the fence or underneath the table, is vital for a clean workspace, better visibility, and improved air quality.
{{IMG_SLOT_1}}

What to Consider When Buying
- Router Compatibility: Ensure your router model can be mounted to the table’s plate. Most major brands are compatible with common plates, but check for specific hole patterns.
- Stability: A heavy, stable base (for freestanding models) or a solid clamping mechanism (for benchtop models) reduces vibration and improves accuracy.
- Adjustability: Smooth, precise adjustments for the fence and router height are paramount.
- Budget: Router tables range from under $100 to over $1000. Balance features with your budget and anticipated usage.
- Accessories: Consider tables that offer integrated storage, casters for mobility, or easily attachable safety accessories.
Pro Tip: For those interested in advanced joinery, a sturdy router table is a significant upgrade from handheld routing. It complements techniques covered in guides like Mastering Dovetail Joinery for Drawers: Hand and Router Methods.
Mastering the Setup and Safe Operation for Precision
Once you’ve chosen your router table, the next step is to master its setup and safe operation. Precision in woodworking isn’t just about good tools; it’s about using them correctly and safely.
Setting Up Your Router Table
Mounting the Router:
- Ensure the router is securely mounted to the router plate, with the collet facing upwards.
- Align the router’s base plate with the pre-drilled holes in the router plate. If necessary, drill new holes carefully, ensuring the router is centered.
- Tighten all mounting screws firmly.
Installing the Router Bit:
- Safety First: Always unplug the router before changing bits!
- Insert the bit fully into the collet, then pull it back out about 1/8 inch. This prevents the bit shank from bottoming out, which can lead to loosening during use.
- Tighten the collet nut securely with two wrenches (one to hold the spindle, one to tighten the nut).
- Adjust the bit height using the router’s adjustment mechanism or, ideally, a router lift.
Adjusting the Fence:
- For most edge profiling, the fence should be parallel to the bit and tangent to the cutter.
- Use a straightedge to ensure the fence is perfectly straight.
- For jointing, a split fence allows you to offset the outfeed fence slightly (e.g., 1/64 inch) to remove material evenly.
Test Cuts and Micro-Adjustments:
- Always perform test cuts on scrap wood of the same species and thickness as your project material.
- Measure the results and make fine adjustments to the bit height or fence position until you achieve the desired cut. This iterative process is key to precision.
Essential Safety Practices
Safety is paramount when “Choosing and Using Router Tables: Maximizing Precision and Safety for Edge Profiling and Joinery.” Routers operate at very high RPMs, and any mishap can lead to serious injury.
- Always Wear PPE: Safety glasses (or a face shield), hearing protection, and appropriate clothing (no loose sleeves or jewelry) are non-negotiable.
- Keep Hands Clear: Never place your hands directly over the spinning bit. Use push sticks and push blocks to guide the workpiece.
- Featherboards: These indispensable accessories hold the workpiece firmly against the table and fence, preventing kickback and improving cut quality. Use one on the tabletop and one on the fence.
- Starting and Stopping: Always start the router before the workpiece touches the bit and allow it to reach full speed. Remove the workpiece from the bit before turning the router off and wait for the bit to stop spinning completely.
- Proper Feed Direction: Always feed the workpiece against the rotation of the bit (climb cutting is generally unsafe on a router table unless specifically required for a unique operation and done with extreme caution).
- Dust Collection: Connect your dust collector to the router table’s dust port. This improves visibility, reduces airborne particles, and keeps your workspace cleaner. An effective dust collection system also supports a safer shop environment.
- Bit Selection: Use sharp, high-quality bits. Dull bits cause burning, tear-out, and increase the risk of kickback.
{{IMG_SLOT_2}}

Expert Tip: Consider incorporating router table skills into projects like DIY Wooden Wall Clocks: Analog and Modern Faces with Precision Tool Guides, where consistent edge profiles are critical for a professional finish.
Advanced Techniques and Joinery Applications
Beyond simple edge profiling, the router table excels at various advanced techniques and complex joinery, making it an invaluable tool for ambitious woodworking projects in 2026.
Edge Profiling and Decorative Edges
This is the most common use for a router table. Bits like round-overs, chamfers, ogees, and cove bits can quickly transform a plain edge into a decorative feature.
- Multiple Passes: For large profiles, make several shallow passes instead of one deep pass. This reduces strain on the router, prevents burning, and results in a smoother cut.
- Grain Direction: Always pay attention to grain direction to minimize tear-out. For challenging grain, a sacrificial fence can help.
Creating Grooves, Dados, and Rabbets
Router tables are perfect for precision grooves, dados (grooves across the grain), and rabbets (grooves along the edge). These are fundamental for:
- Shelving: Creating strong, invisible joints for shelves in bookcases or cabinets.
- Drawer Construction: Forming solid joints for Mastering Dovetail Joinery for Drawers or simpler box joints.
- Back Panels: Recessing back panels into cabinets for a cleaner finish.
Steps for Dados/Rabbets:
- Install a straight bit.
- Adjust the bit height to the desired depth.
- Set the fence to determine the distance from the edge.
- Use featherboards to keep the workpiece tight against the fence and table.
- Make the cut. For wide dados, you may need to make multiple passes, shifting the fence slightly for each pass.
Tongue and Groove Joints
This classic joinery method, perfect for tabletops, floorboards, and paneling, is easily created on a router table with specialized matched bit sets.

- Setup: Use the tongue bit first on all pieces, then switch to the groove bit.
- Test Pieces: Always use scrap material to dial in the perfect fit before working on your project pieces. A snug fit is ideal, allowing for glue to penetrate effectively.
Raised Panels for Doors
With a raised panel bit, you can create elegant door panels for cabinets or furniture. These large bits require a powerful router and extremely stable setup.
- Safety: Use a large push block and multiple passes. Raised panel bits are large and can be intimidating; always proceed with caution.
- Router Speed: Often, large bits require a slower router speed. Consult your router’s manual.
Joinery Jig Work
Many specialized jigs can be used with a router table to create more complex joinery, such as:
- Coping and Railing: For cabinet doors.
- Finger Joints: For sturdy box construction.
- Mortise and Tenon: For strong frame and panel construction. While hand tool joinery for visible wood joints offers a classic touch, the router table can automate aspects of mortise and tenon creation for speed and consistency.
{{IMG_SLOT_3}}

Maintenance Tips for Longevity:
- Cleanliness: Regularly clean the tabletop, fence, and especially the router collet and bit shank to prevent buildup that can affect accuracy.
- Bit Care: Keep router bits sharp and clean. Use a bit cleaner to remove resin and pitch.
- Lubrication: Periodically lubricate adjustment mechanisms (e.g., router lift threads) according to manufacturer recommendations.
- Inspection: Routinely check all fasteners for tightness and inspect the power cord for damage.
Thought for 2026: As woodworking trends lean towards greater customization and efficient production, a well-maintained router table becomes even more vital. Whether you’re crafting a DIY Live Edge Dining Table or intricate custom furniture, the precision offered by a router table is unmatched.
Conclusion
The router table is more than just an accessory; it’s a transformative tool that elevates the precision, versatility, and safety of your woodworking shop. By thoughtfully “Choosing and Using Router Tables: Maximizing Precision and Safety for Edge Profiling and Joinery,” you unlock a new realm of possibilities for your projects. From creating flawless edge profiles to executing intricate joinery with confidence, a well-selected and properly utilized router table will become an indispensable asset. Remember to prioritize safety with every operation, consistently perform test cuts, and maintain your equipment to ensure years of accurate and enjoyable woodworking. Embrace the power of the router table and watch your craftsmanship reach new heights in 2026 and beyond.
Actionable Next Steps:
- Assess your needs: Determine if a benchtop, freestanding, or integrated router table best suits your space and project types.
- Invest in quality: Prioritize a flat tabletop, sturdy fence, and reliable router lift for long-term precision.
- Master basic setups: Practice edge profiling and simple dado cuts on scrap wood until you achieve consistent results.
- Embrace safety accessories: Always use featherboards, push blocks, and proper PPE.
- Explore advanced joinery: Once comfortable, experiment with tongue-and-groove or raised panel techniques to expand your skill set.
