


The pervasive hum of modern living, from bustling cityscapes to open-plan homes, often introduces an invisible intruder: unwanted noise. Studies indicate that excessive ambient noise can significantly impact concentration, comfort, and even well-being. Far from being a mere nuisance, sound pollution actively diminishes the quality of our living and working spaces. The solution, surprisingly, can be as beautiful as it is functional. This article delves into Crafting Acoustic Wall Art: Combining Woodworking with Sound Absorption for Home Decor – a burgeoning field where aesthetic design meets practical sound management, transforming noisy environments into tranquil havens.
Key Takeaways
- Acoustic wall art merges aesthetic woodworking with sound-absorbing materials to improve room acoustics.
- Understanding basic acoustics and material properties (NRC ratings) is crucial for effective sound dampening.
- Various woodworking techniques and designs can be employed, from slat panels to intricate diffusers.
- Selecting appropriate sound-absorbing core materials like rock wool or recycled denim is vital.
- Proper installation methods ensure both aesthetic appeal and maximum acoustic performance.
The Synergy of Woodworking and Sound Absorption in Home Decor
The concept of sound-absorbing panels is not new, often relegated to utilitarian, drab squares in recording studios or auditoriums. However, in 2026, a transformative shift is occurring within home decor: the integration of these functional elements into genuine works of art. Crafting Acoustic Wall Art: Combining Woodworking with Sound Absorption for Home Decor is about creating pieces that are not only visually stunning but also actively enhance the auditory experience of a space.

Wood, with its natural beauty and versatility, serves as an ideal medium for this craft. Its ability to be shaped, carved, and finished in countless ways allows for endless design possibilities. When combined with specialized sound-absorbing materials, wooden structures can effectively mitigate echoes, reduce reverberation, and improve speech intelligibility within a room. This is particularly beneficial in modern homes characterized by hard surfaces, high ceilings, and open layouts, which often exacerbate sound issues.
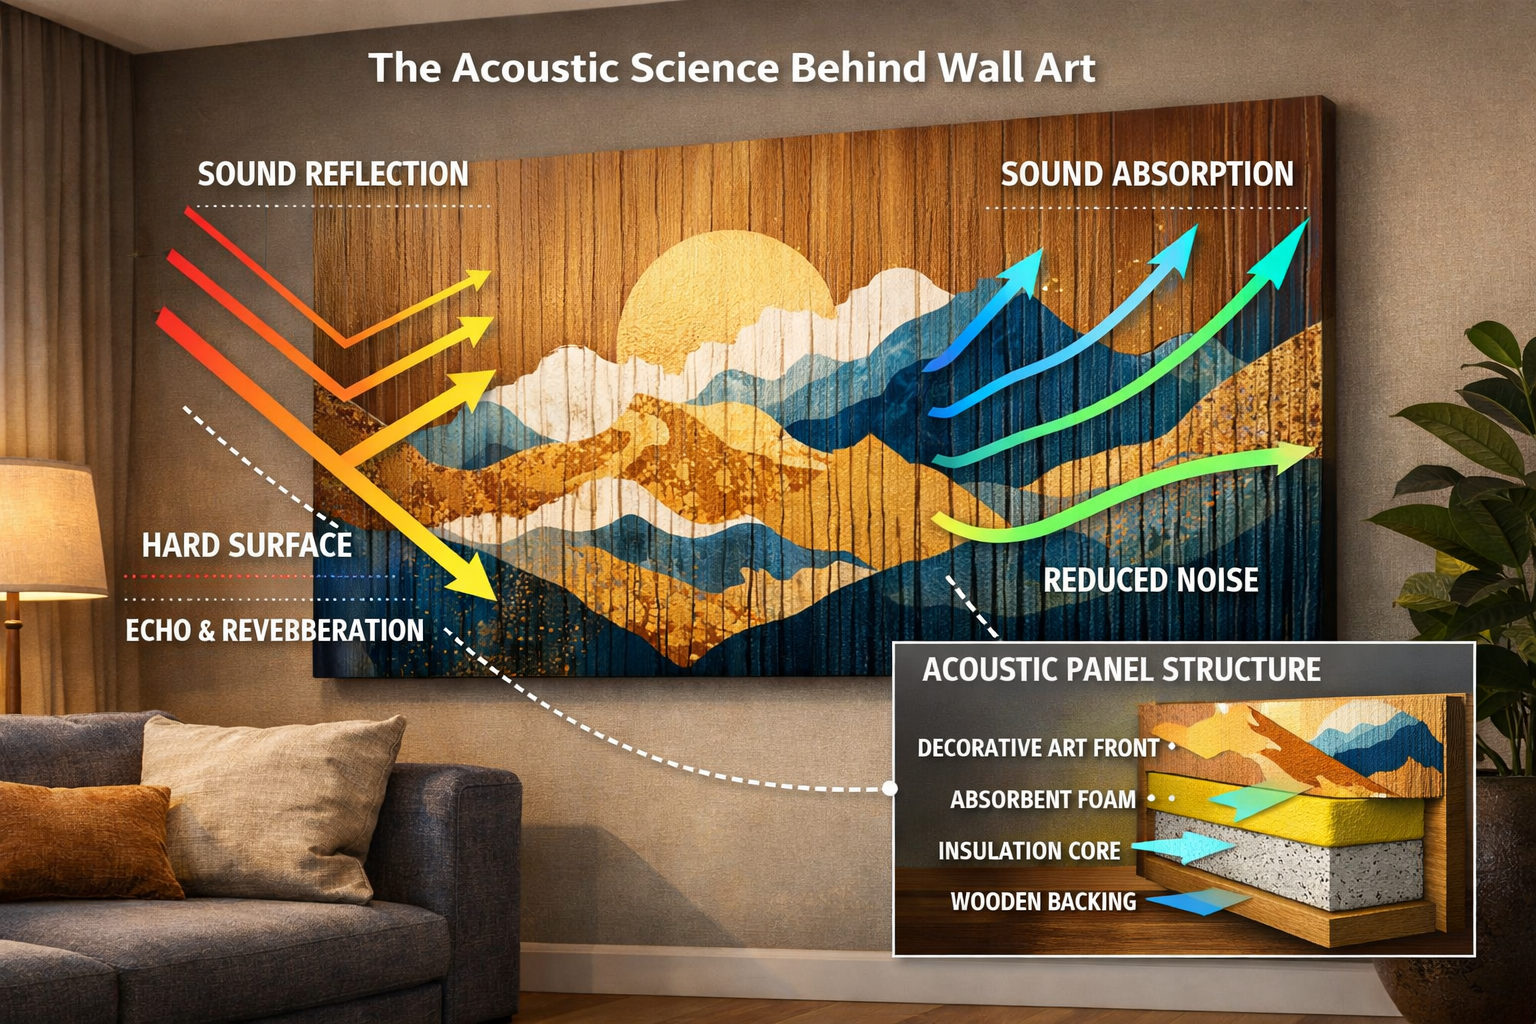
Understanding Basic Acoustics for Home Applications
Before diving into the woodworking, a foundational understanding of acoustics is essential. Sound travels as waves, and when these waves encounter a surface, they can be reflected, transmitted, or absorbed. Hard, flat surfaces like drywall, glass, and bare wood tend to reflect sound, leading to echoes and increased reverberation time. Soft, porous materials, on the other hand, absorb sound energy, converting it into heat and thus reducing reflections.
Key acoustic metrics to consider include:
- Noise Reduction Coefficient (NRC): This rating, ranging from 0.0 to 1.0, indicates how much sound a material absorbs. An NRC of 0.0 means no sound absorption, while 1.0 means total absorption. For acoustic panels, aim for core materials with high NRC values (e.g., 0.70-0.95).
- Sound Transmission Class (STC): While less critical for wall art, STC measures a material’s ability to block sound from passing through it. Acoustic wall art primarily focuses on absorbing sound within a room, not necessarily blocking it from entering or leaving.
The goal of acoustic wall art is primarily to control reverberation and echo within a specific room. This is achieved by introducing enough sound-absorbing surfaces to “tame” the room’s acoustics without making it sound unnaturally dead. Think of it as tuning your room’s sound profile.
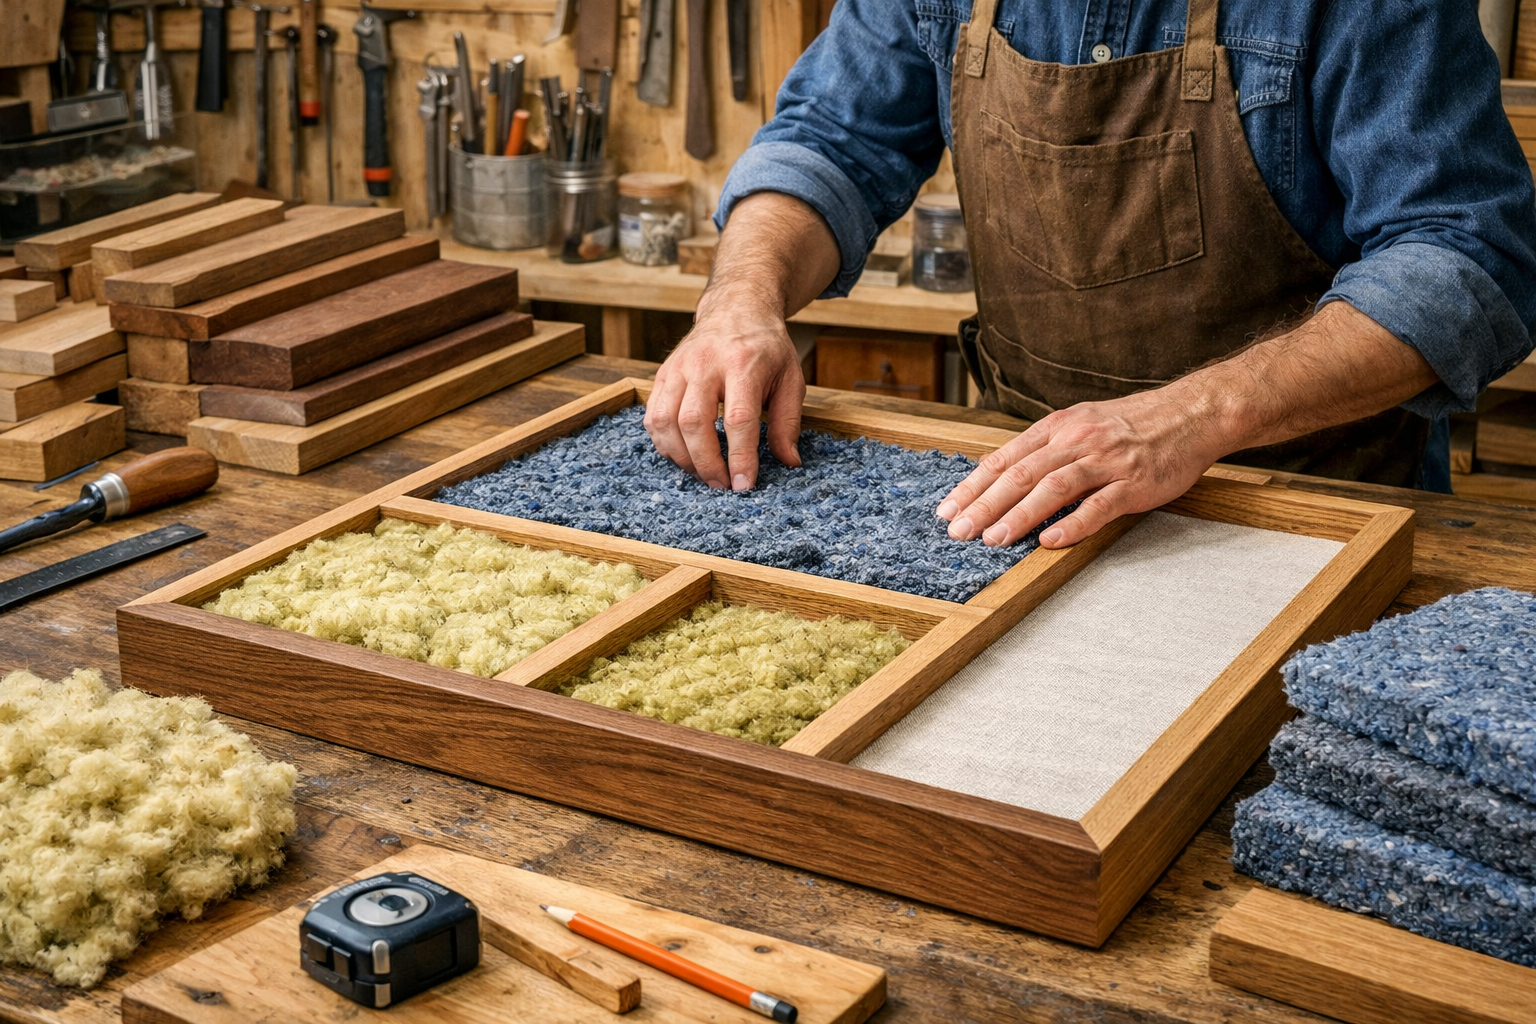
Choosing the Right Materials
The effectiveness of your acoustic wall art hinges on the judicious selection of materials.
Wood Components:
- Frame/Front: Hardwoods like oak, walnut, maple, or cherry offer durability and a beautiful aesthetic. Softwoods such as pine or cedar can also be used, especially if stained or painted. Consider reclaimed wood for a sustainable and character-rich option, as explored in our guide on Sourcing Reclaimed and Salvaged Wood.
- Backing: Thin plywood or MDF can provide a stable base, though it’s important to allow for air gaps behind the absorbing material for optimal performance.
Sound-Absorbing Core Materials:
- Mineral Wool/Rock Wool: Excellent NRC ratings, fire-resistant, and relatively affordable. Requires careful handling as fibers can be irritants.
- Recycled Denim/Cotton Batting: Eco-friendly alternative, good NRC, and safer to handle. Often slightly more expensive.
- Acoustic Foam: Lightweight and easy to cut, but often has a lower NRC than mineral wool or denim and can degrade over time. Can be used in combination with wood for specific aesthetic effects.
- Polyester Fiber: Hypoallergenic, mold-resistant, and a good balance of cost and performance.
When selecting materials, always check their NRC ratings. You’ll want a core material with an NRC of at least 0.70 for noticeable sound improvement.
Design Principles and Woodworking Techniques for Acoustic Panels
The beauty of Crafting Acoustic Wall Art: Combining Woodworking with Sound Absorption for Home Decor lies in the endless creative possibilities. The woodworking aspect allows for bespoke designs that perfectly match your interior style, far surpassing generic off-the-shelf options.
Popular Acoustic Panel Designs
Several common designs lend themselves well to incorporating sound absorption:
- Slat Panels: These feature horizontal or vertical wooden slats mounted over a fabric-wrapped acoustic core. The gaps between the slats allow sound to pass through to the absorbing material, while the wood itself can diffuse some sound and provides a striking visual element. Different wood species and finishes can dramatically alter the look.
- Perforated Panels: A solid wood panel with a pattern of drilled holes. The holes allow sound to penetrate to the absorbing layer behind. This design offers a sleek, modern look and can be customized with intricate CNC-cut patterns for unique artistic expression.
- Art-Integrated Panels: These are essentially fabric-wrapped acoustic panels where the wooden frame or decorative elements become part of the art. Think of a wooden frame surrounding a visually interesting acoustic fabric, or wooden overlays creating abstract designs on the panel surface.
- Diffuser Panels: While more complex, wooden diffusers scatter sound waves rather than absorbing them, which helps to maintain the liveliness of a room while reducing harsh echoes. They are typically made from precisely cut and arranged wooden blocks or slats of varying depths, forming a complex 3D surface. Mastering Beginner’s Guide to Essential Woodworking Joints can be highly beneficial for these intricate designs.
Woodworking Techniques and Tools
Creating these panels involves a range of woodworking skills, from basic framing to more advanced joinery and finishing.
Essential Tools:
- Table Saw: For accurately cutting wood to size, especially for slats or frame components.
- Miter Saw: For precise crosscuts and angled cuts for frames.
- Router: Useful for creating decorative edges, grooves, or dados for mounting the acoustic core. Our guide on Mastering the Router Table offers valuable insights.
- Drill Press: Crucial for creating uniform holes in perforated panels.
- Clamps: Essential for securing pieces during glue-up and assembly.
- Sanders: For achieving a smooth, professional finish.
- Staple Gun/Adhesive: For attaching fabric and acoustic material.
Construction Steps (General Overview):

- Design and Planning: Sketch your design, determine dimensions, and calculate material needs. Consider the room’s aesthetics and acoustic needs.
- Wood Cutting: Cut all wood components (frame pieces, slats, backing) to exact dimensions.
- Joinery: Assemble the wooden frame using appropriate joinery techniques. Simple butt joints with screws or pocket holes work for basic frames, while more refined joinery like mortise and tenon or half-lap joints can be used for heirloom quality pieces. Remember to consult our Ultimate Guide to Wood Glue for optimal bonding.
- Acoustic Core Integration: Cut the sound-absorbing material to fit snugly within the wooden frame or behind the slatted/perforated facade.
- Fabric Wrapping (if applicable): If using a fabric-covered core, stretch an acoustically transparent fabric (e.g., Guilford of Maine, burlap, open-weave linen) tightly over the core and secure it to the back of the frame using a staple gun.
- Assembly and Finishing: Attach the wooden facade (slats, perforated panel, or decorative elements) to the frame. Sand all wooden surfaces thoroughly, then apply your chosen finish – stain, paint, oil, or varnish – to protect the wood and enhance its beauty.
- Mounting Hardware: Install appropriate hanging hardware on the back of the panel.
Integrating Acoustic Wall Art into Your Home Decor in 2026
The final stage of Crafting Acoustic Wall Art: Combining Woodworking with Sound Absorption for Home Decor involves thoughtfully integrating your finished pieces into your living or working space. This goes beyond mere hanging; it’s about strategic placement for maximum aesthetic and acoustic impact.
Strategic Placement for Optimal Acoustics
The placement of acoustic panels is as important as their construction.
- First Reflection Points: Identify “first reflection points” – the areas on your walls where sound from your speakers (or primary sound source) first bounces before reaching your listening position. A simple mirror trick can help: sit in your primary listening position and have someone move a mirror along the side walls. Where you can see a speaker in the mirror, that’s a first reflection point. Placing panels here significantly reduces harsh reflections.
- Opposite Parallel Walls: In rooms with two large, parallel hard walls, sound can “flutter echo” between them. Placing panels on one or both of these walls can break up this phenomenon.
- Ceilings: Don’t forget the ceiling! Large, open ceilings are notorious for reflecting sound. Consider ceiling-mounted panels or smaller, suspended acoustic elements.
- Corners: Bass frequencies tend to build up in corners. While wall art primarily addresses mid and high frequencies, larger, thicker panels or dedicated bass traps can be corner-mounted for low-frequency absorption.
Aim for a balanced approach. You don’t need to cover every surface. A few strategically placed panels can make a dramatic difference.
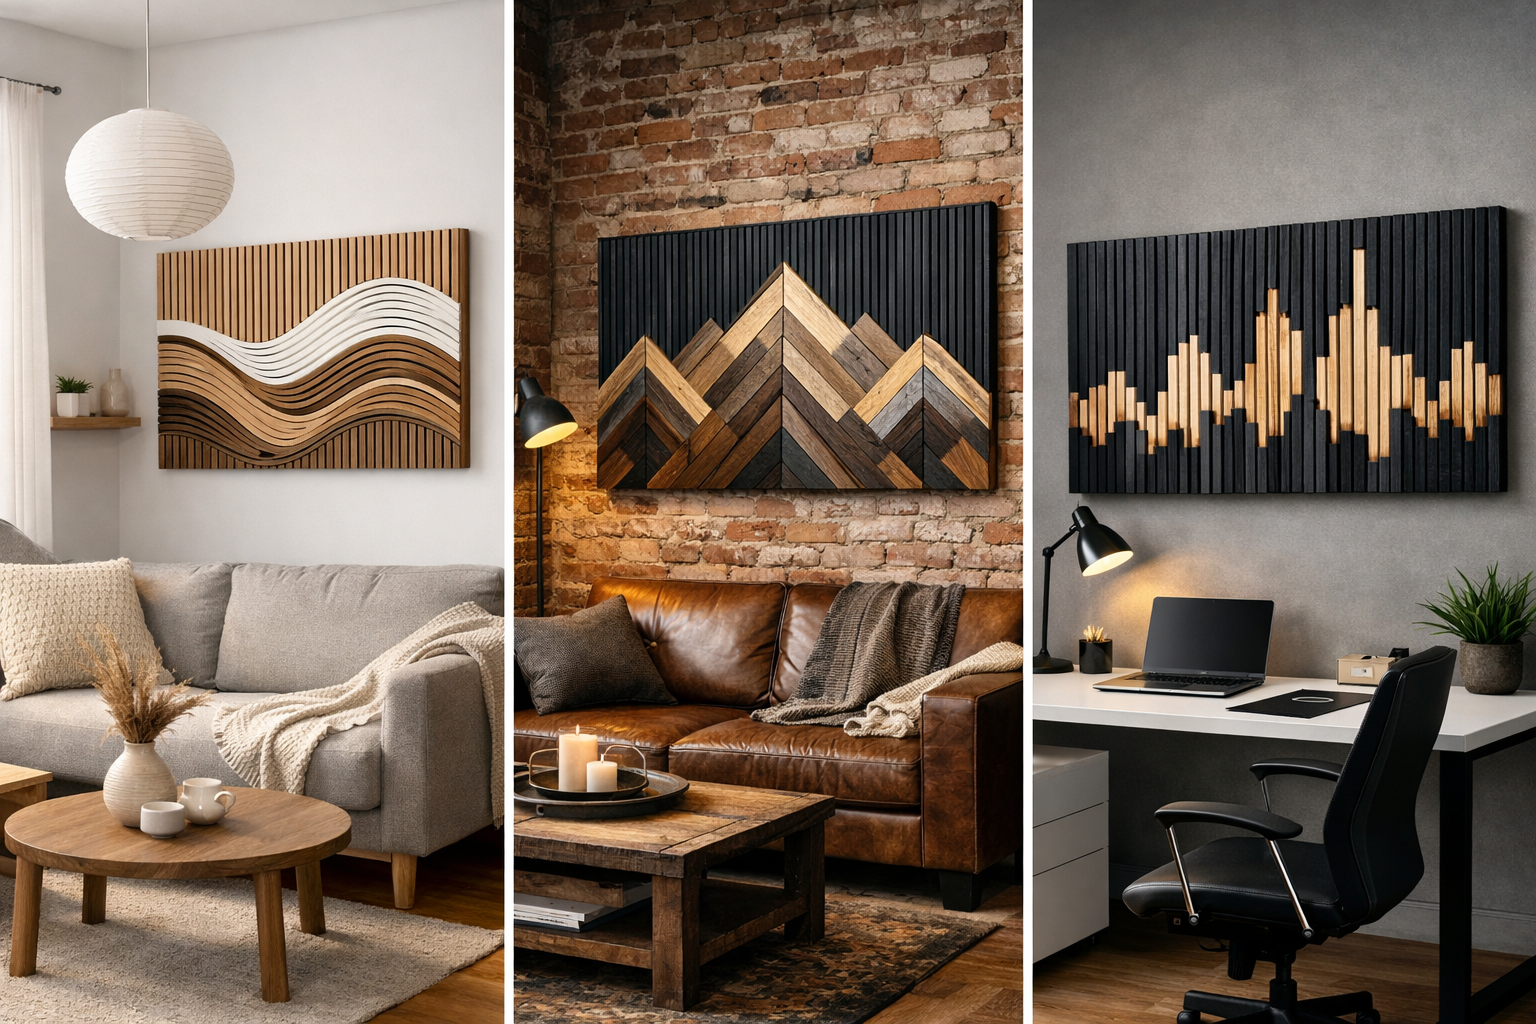
Aesthetic Integration and Styling
This is where the “art” in acoustic wall art truly shines.
- Complementary Styles: Design your wooden acoustic panels to complement your existing interior design.
- Modern/Minimalist: Clean lines, geometric patterns, light woods (maple, birch), or sleek dark stains. Perforated panels or simple slat designs work well.
- Rustic/Farmhouse: Reclaimed wood, distressed finishes, natural wood tones, and slightly coarser textures. Consider Mixed-Width Barnwood Accent Walls for inspiration in larger installations.
- Industrial: Dark metals combined with raw or stained wood, bold geometric forms.
- Bohemian: Intricate carved details, mixed wood types, or panels incorporating woven textures.
- Grouping and Arrangement: Treat acoustic panels like any other art piece. Group multiple panels to form a larger installation, arrange them in a compelling pattern (e.g., a triptych, staggered heights), or use a single, impactful piece as a focal point.
- Color and Texture: The choice of wood, stain, paint, and fabric (if used) allows for immense customization. Use colors that echo your room’s palette or create a striking contrast. The texture of the wood grain itself adds an organic element.
- Lighting: Integrate lighting with your acoustic panels. Uplighting or downlighting can highlight the texture and three-dimensionality of your woodworking, turning a functional element into a dramatic feature.
By thoughtfully blending acoustic principles with woodworking craftsmanship and design aesthetics, you can create pieces that are not just solutions to noise problems but celebrated components of your home’s decor in 2026. This approach elevates the ordinary acoustic panel to a truly functional art form.
Conclusion
The pursuit of comfortable and aesthetically pleasing living spaces is an ongoing endeavor, and in 2026, the demand for integrated solutions that address both form and function is higher than ever. Crafting Acoustic Wall Art: Combining Woodworking with Sound Absorption for Home Decor stands out as a powerful trend that marries the timeless appeal of woodworking with the essential need for improved indoor acoustics. By understanding the principles of sound absorption, carefully selecting materials, and applying thoughtful design and woodworking techniques, individuals can transform noisy environments into serene, beautiful retreats.
The journey of creating custom acoustic wall art is rewarding, offering both a tangible improvement in sound quality and a unique artistic statement. Whether you’re a seasoned woodworker looking for a new challenge or a DIY enthusiast aiming to elevate your home, this craft provides an opportunity to infuse your space with personal style and tranquility. Begin by assessing your room’s acoustic needs, exploring design inspirations, and then gathering the materials and tools for your project. The result will be a home that not only looks exceptional but also sounds profoundly better.
SEO Meta Title: Crafting Acoustic Wall Art: Woodworking & Sound Absorption SEO Meta Description: Learn to design and build beautiful wooden acoustic wall art in 2026. Combine woodworking with sound absorption for stunning home decor & improved acoustics.
