
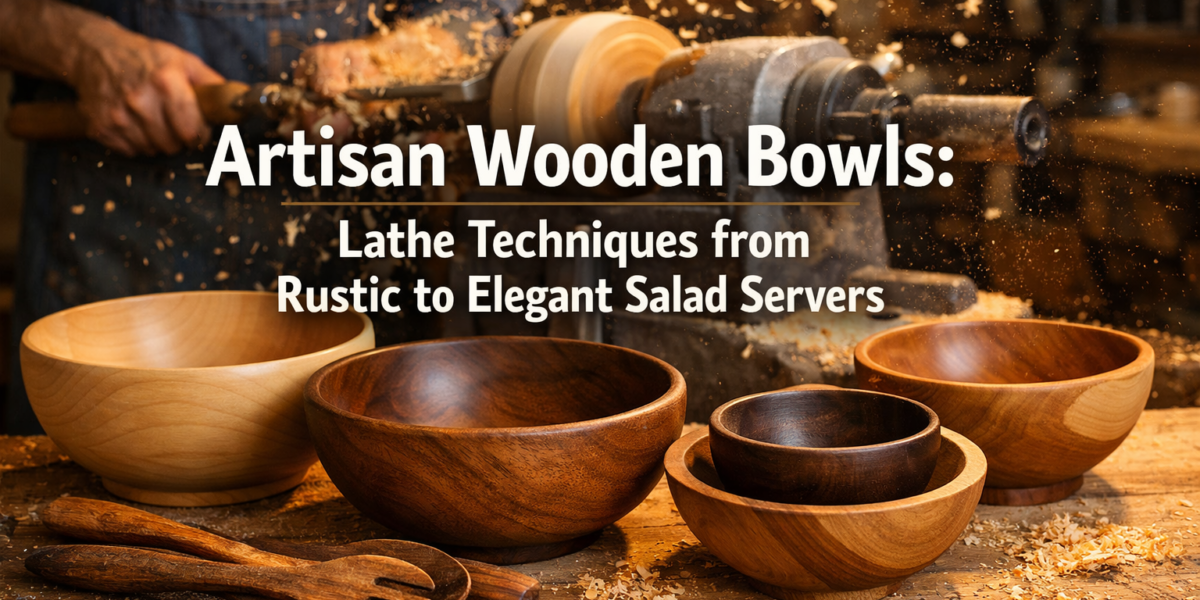

The journey from a rough log to a shimmering, functional work of art – an artisan wooden bowl or an elegant salad server – is one rooted in precision, patience, and a deep understanding of wood. It’s a craft that transcends mere woodworking, elevating raw material into pieces that tell a story, each turn of the lathe revealing hidden beauty. In 2026, the demand for unique, handcrafted items continues to grow, making “Artisan Wooden Bowls: Lathe Techniques from Rustic to Elegant Salad Servers” a particularly relevant and rewarding pursuit for woodturners of all skill levels. This article guides you through the essential steps, from selecting the perfect timber to achieving a flawless finish, ensuring your creations stand out as premium decor pieces.
Key Takeaways
- Wood Selection is Crucial: The type and condition of wood profoundly influence the final aesthetic and durability of artisan wooden bowls. Proper drying and grain orientation are key.
- Mastering the Lathe: Developing proficiency with various lathe tools, especially gouges and scrapers, is fundamental for shaping both rustic and elegant forms. Sharpening techniques are non-negotiable.
- Hollowing Techniques: Successfully hollowing deep forms without catches requires specific body mechanics, tool presentation, and often specialized hollowing systems.
- Achieving a Flawless Finish: Graduated sanding, proper pore filling, and application of food-safe finishes are critical for creating bowls that are both beautiful and durable, especially for food contact.
- Selling as Premium Decor: Understanding how to present and market your handcrafted bowls and salad servers as high-value, unique items is essential for success.
Foundations of Artisan Wooden Bowls: Wood Selection and Lathe Preparation
Crafting exquisite artisan wooden bowls, whether for a rustic centerpiece or elegant salad servers, begins long before the lathe is even switched on. The initial steps — selecting the right wood and meticulously preparing your tools — are paramount to the success and beauty of the final piece.

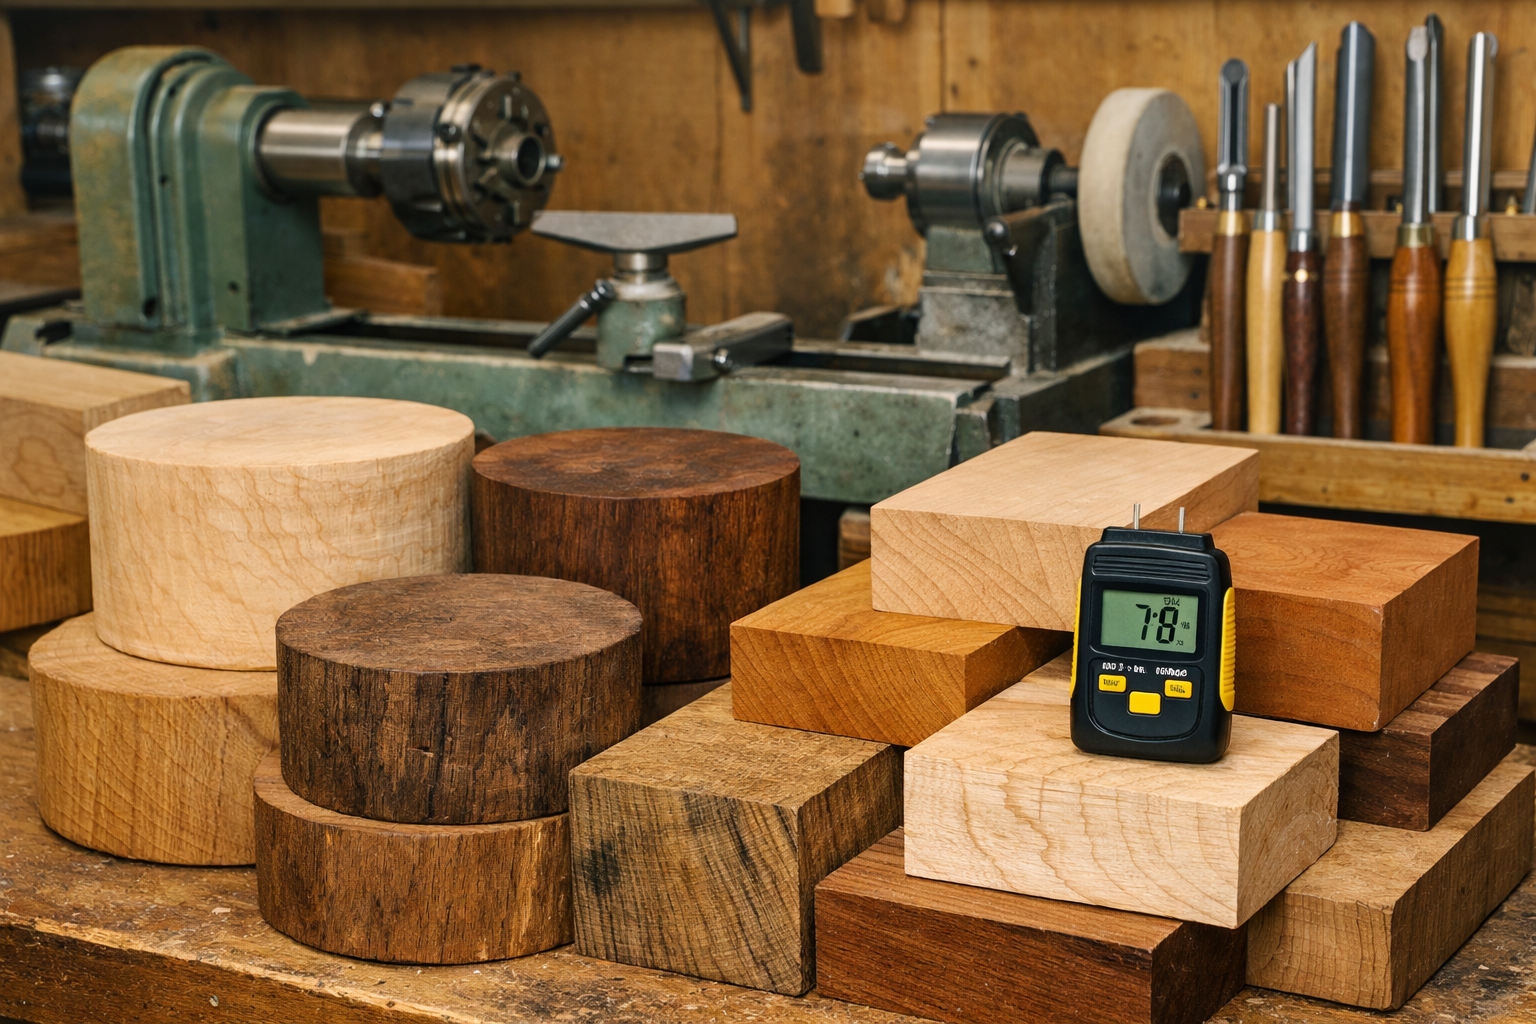
Selecting the Ideal Timber for Turning
The wood you choose dictates much about the character and workability of your bowl. Different species offer unique grain patterns, colors, and densities. For food-safe items like salad servers, non-toxic woods are essential.
Popular Wood Choices for Bowls:
- 🌳 Maple (Hard Maple, Ambrosia Maple): Known for its light color, fine grain, and excellent durability. Ambrosia maple features unique streaking from ambrosia beetle activity, adding visual interest.
- 🍒 Cherry: Develops a rich, reddish-brown patina over time, with beautiful flowing grain. It’s relatively stable and carves well.
- 🌰 Walnut (Black Walnut): Offers a deep, luxurious dark brown color with prominent, often figured, grain. It’s a classic choice for elegant pieces.
- 🍎 Applewood/Pearwood: Fruitwoods are dense and have beautiful, subtle grains, often with a pinkish hue. They are excellent for smaller, detailed pieces.
- 🪵 Oak (Red Oak, White Oak): While more porous, certain oaks can create stunning rustic bowls, especially with proper pore-filling. White oak is particularly durable and water-resistant.
- 🌿 Spalted Maple/Beech: Spalted wood features unique lines and patterns caused by fungi, creating a visually dramatic effect, perfect for decorative bowls.
Beyond species, the condition of the wood is critical. Green wood (freshly cut) is easier to turn but requires a two-stage drying process to prevent cracking and warping. Dry wood (kiln-dried or air-dried for years) can be turned directly but presents more resistance to cutting tools. Look for blanks free of major defects like large checks, knots, or insect damage, unless these features are intentionally incorporated for a rustic aesthetic. Understanding Wood Movement can provide further insights into how different woods behave.
Lathe Setup and Tool Sharpening: The Art of the Edge
A sharp tool doesn’t just cut better; it’s safer and produces a superior surface finish, reducing sanding time significantly. For crafting artisan wooden bowls, a consistently sharp edge is non-negotiable.
Essential Lathe Tools for Bowl Turning:
- Bowl Gouges: The primary workhorse for shaping the exterior and interior of bowls. Various grinds (e.g., Irish, fingernail, conventional) offer different cutting actions.
- Spindle Gouges: Useful for smaller details and coves, though less robust for heavy bowl work.
- Scrapers: Flat or round-nosed tools used for refining curves and achieving smooth surfaces, especially on the interior of bowls.
- Parting Tools: For separating the finished bowl from the waste block.
Sharpening Techniques:
- Grinders: A low-speed grinder with a CBN (cubic boron nitride) wheel or aluminum oxide wheels is essential. CBN wheels are highly recommended for their durability and consistent grit.
- Jigs: Sharpening jigs (like the Wolverine system or various homemade jigs) ensure consistent bevel angles, which are crucial for effective cutting and avoiding catches.
- Honing: While not always necessary for roughing, honing a razor-sharp edge with a strop or fine diamond stone can significantly improve the finish cut, especially for delicate elegant salad servers.
Remember, a dull tool requires more force, generates heat, and tears the wood fibers, leading to a poor finish and potential safety hazards. For those new to the craft, our Introduction to Wood Turning for Beginners offers a great starting point for mastering basic lathe operations.
Lathe Techniques: From Rough Shaping to Elegant Hollowing
Once your wood is selected and your tools are sharp, the true artistry of creating Artisan Wooden Bowls: Lathe Techniques from Rustic to Elegant Salad Servers begins. This stage involves transforming a simple block of wood into a functional and beautiful form.
Rough Shaping the Exterior and Foot
Mounting the wood blank securely on the lathe is the first critical step. This usually involves a screw chuck or faceplate for initial exterior turning.
Steps for Exterior Shaping:
- Centering and Mounting: Ensure the blank is well-centered to minimize vibration. Use a heavy-duty faceplate for larger bowls.
- Roughing: Using a robust bowl gouge, begin to remove waste wood, bringing the blank down to a cylindrical or desired profile. Take light cuts initially.
- Shaping the Exterior Curve: Gradually refine the exterior shape, working from the rim down to the foot. Aim for a pleasing curve that transitions smoothly.
- Forming the Tenon/Recess: Create a tenon (a projecting stub) or a dovetailed recess on the bottom of the bowl. This will be used to hold the bowl securely in a jaw chuck for interior turning. The precision of this tenon/recess is vital for stable future mounting.
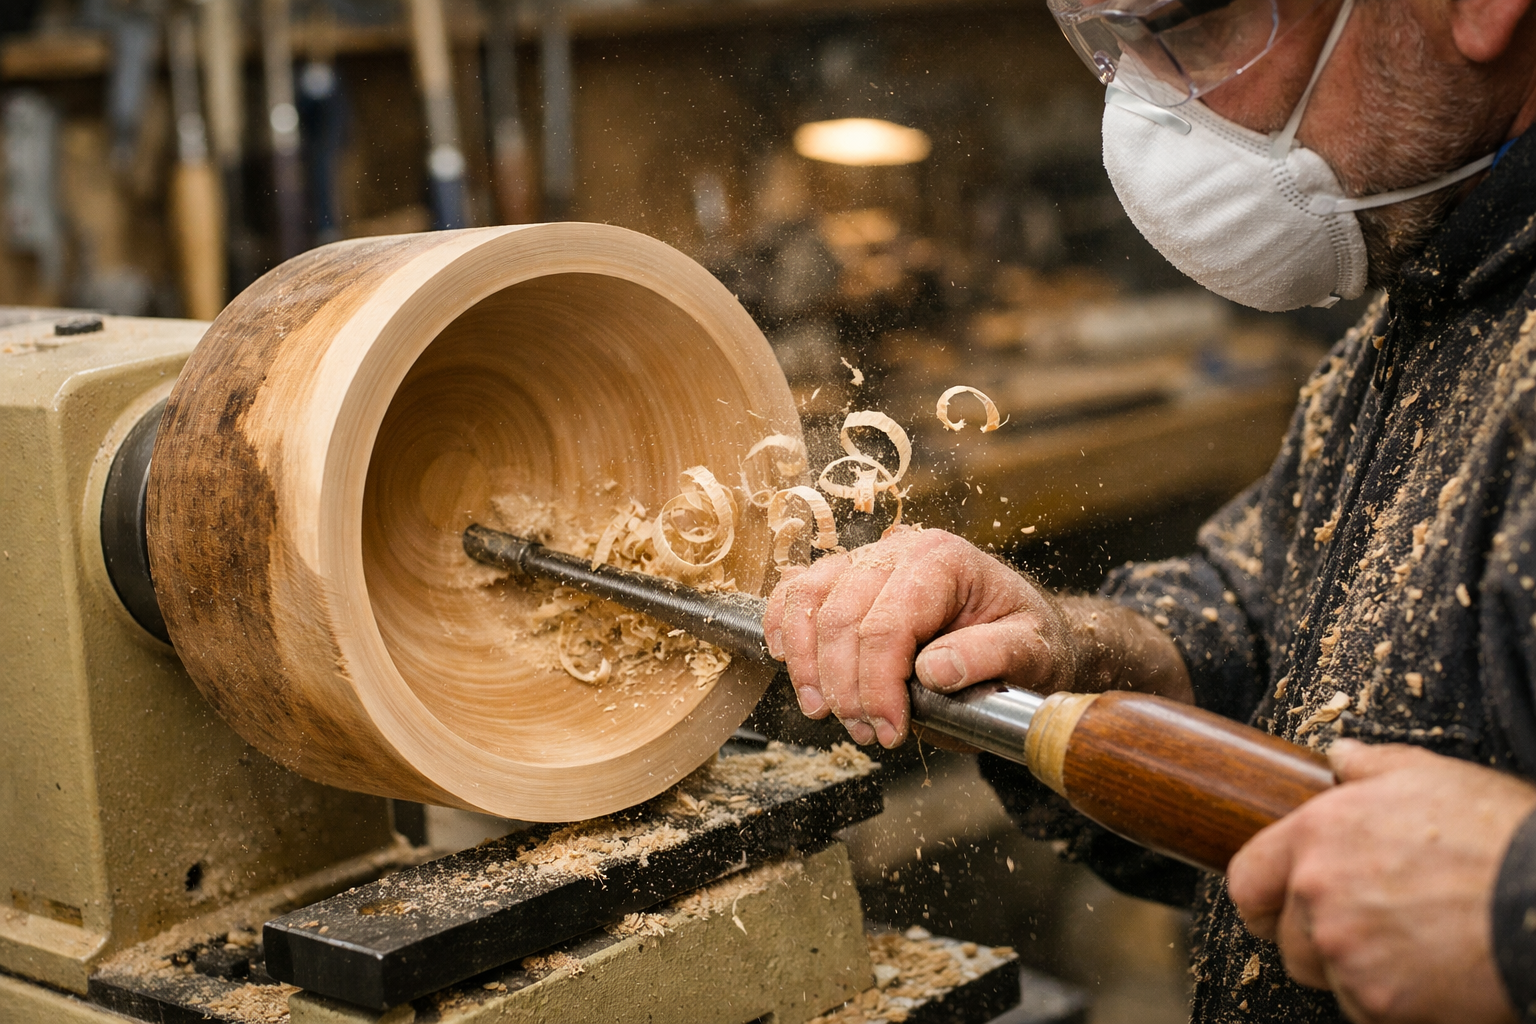
Mastering Hollowing Techniques for Artisan Bowls
Hollowing the interior of a bowl is often considered the most challenging aspect of bowl turning. It requires finesse, control, and a good understanding of tool presentation to avoid dangerous catches.
Key Considerations for Hollowing:
- Tool Presentation: The bevel of the gouge should be rubbing the wood slightly behind the cutting edge. This provides support and prevents the tool from digging in.
- Body Mechanics: Use your body weight and stance to control the tool, rather than just arm strength. Pivot your body around the lathe.
- Consistent Cuts: Take small, controlled cuts, especially as you approach the bottom and rim. Avoid taking deep, aggressive cuts that can lead to catches or tear-out.
- Clearance: Ensure adequate clearance between the tool rest and the cutting edge, adjusting as the hollowing progresses.
- Handling Catches: A “catch” is when the tool digs into the wood aggressively. Learn to react quickly by pulling the tool straight back, and re-approach with lighter pressure and correct bevel rubbing. This is where a sharp tool and consistent practice are invaluable.
- Specialized Hollowing Systems: For deep bowls or challenging woods, specialized hollowing systems (articulated arms with various cutters) can provide greater control and reduce physical strain.
When creating elegant salad servers, the hollowing process is often less about depth and more about creating a consistent, smooth curve and thickness. Thinning the walls evenly enhances the elegance and lightness of the piece. Consider exploring Green Woodworking Techniques for unique approaches to shaping.

Finishing and Presenting Your Artisan Wooden Bowls and Salad Servers
The final stages of creating Artisan Wooden Bowls: Lathe Techniques from Rustic to Elegant Salad Servers are where the true beauty of the wood is revealed. Proper sanding, finishing, and presentation elevate a turned piece from a simple wooden object to a premium decor item or cherished functional piece.
Achieving a Silky Smooth Finish: Sanding and Sealing
A smooth surface is critical for both aesthetic appeal and longevity, especially for items that will be handled frequently or used with food.
Sanding Techniques:
- Graduated Grits: Start with a relatively coarse grit (e.g., 100-120 grit) to remove tool marks. Progress through increasingly finer grits (180, 220, 320, 400, sometimes 600 or 800) until the desired smoothness is achieved.
- Off-Lathe Sanding: For the finest results, finish sanding off the lathe or use a drill with a sanding pad at very low RPMs. Always sand with the grain as much as possible, even on a lathe, to minimize visible scratches.
- Dust Removal: Between each grit, meticulously remove all sanding dust from the wood surface. Trapped dust can cause scratches with the next finer grit.
- Grain Raising: Lightly dampen the wood surface after 220 or 320 grit with water to raise the grain. Once dry, sand lightly with the previous grit to knock down the raised fibers, resulting in a smoother finish that will take finish more evenly.
Food-Safe Finishes:
For salad bowls and servers, choosing a food-safe finish is non-negotiable.
- Mineral Oil: A simple, non-toxic, and easily applied finish. It penetrates the wood and brings out the grain. Requires regular reapplication.
- Walrus Oil / Odie’s Oil / Tried & True: These are popular blends of food-safe oils and waxes that offer more durability and water resistance than plain mineral oil, while still being safe for food contact. They create a beautiful, natural luster.
- Salad Bowl Finish: Specific finishes designed for food contact, often incorporating tung oil or polymerized linseed oil for enhanced durability.
- Wax Finishes: Carnauba or beeswax blends can be buffed to a pleasing sheen and offer some protection, often applied over an oil finish.
Always allow adequate curing time for any finish before use. Our guide on Is Ebonized Wood Food Safe? offers valuable insights into food safety considerations for different wood treatments.
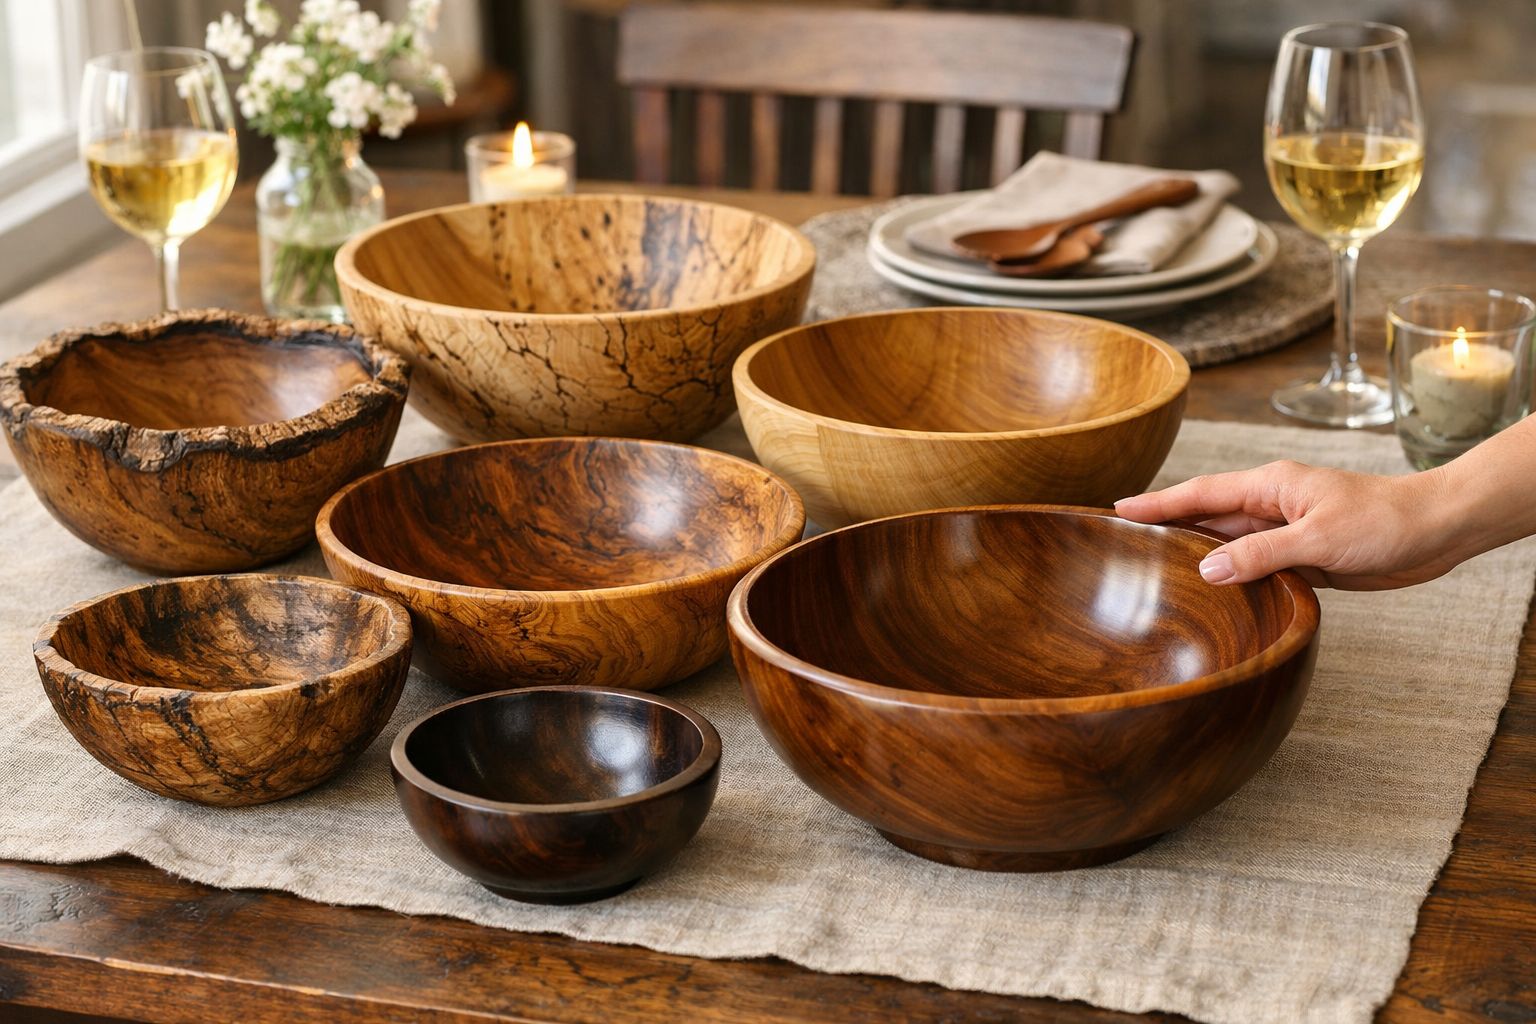
Presenting Artisan Wooden Bowls as Premium Decor Pieces
The way you present your finished artisan wooden bowls and elegant salad servers significantly impacts their perceived value and appeal as premium decor.
Tips for Presentation:
- Highlight Unique Features: Draw attention to the natural grain patterns, spalting, or live edges that make each piece unique.
- High-Quality Photography: Professional-looking photos against a clean, appealing background are crucial for online sales and portfolio building. Show the bowls in context (e.g., on a dining table with fresh salad).
- Storytelling: Share the story behind the wood – where it came from, why you chose it, and the inspiration for the design. Customers connect with narratives. Narrative Interiors Through Woodworking emphasizes the power of storytelling in handcrafted items.
- Branding: A subtle, branded stamp or signature on the bottom of the bowl adds a professional touch and certifies its handmade origin.
- Care Instructions: Provide clear care instructions (e.g., hand wash only, oil regularly) to ensure customers can maintain the beauty and longevity of their purchase.
- Pairing: Present salad bowls with matching or complementary artisan salad servers. This creates a cohesive, high-value set.
By focusing on these details, your “Artisan Wooden Bowls: Lathe Techniques from Rustic to Elegant Salad Servers” will not only be functional but will also be recognized as genuine works of art, commanding a premium in the market. Consider exploring Profitable Woodworking for Beginners for more insights into selling handcrafted items.
Conclusion
The creation of artisan wooden bowls and elegant salad servers through lathe techniques is a deeply rewarding journey that blends craftsmanship with artistic expression. From the initial selection of the perfect piece of timber, understanding its inherent qualities and challenges, to the meticulous process of shaping, hollowing, and finishing, each step contributes to the unique character of the final product. Mastering lathe techniques, from avoiding tricky catches to achieving an impeccable surface, is a continuous learning curve that yields increasingly refined and beautiful results.
In 2026, as appreciation for handcrafted quality continues to surge, your ability to transform raw wood into functional art, be it a rustic serving bowl or a sleek pair of salad servers, offers both personal satisfaction and market potential. By focusing on quality materials, precision turning, food-safe finishes, and thoughtful presentation, your creations can easily transition from a hobby to premium decor pieces or cherished gifts.
Actionable Next Steps:

- Practice Tool Sharpening: Dedicate time to mastering your sharpening system. A sharp tool is your best friend in turning.
- Experiment with Woods: Try turning different wood species to understand their unique characteristics and how they respond to the lathe.
- Refine Hollowing: If you struggle with catches, review your body mechanics and tool presentation. Consider investing in a basic hollowing system for deeper forms.
- Invest in Quality Finishes: Explore various food-safe oil and wax blends to find what works best for your projects and enhances the natural beauty of the wood.
- Develop Your Portfolio: Take high-quality photos of your best work and start building an online presence or preparing for local craft markets.
By embracing these steps, you’ll continue to grow as a woodturner, creating stunning “Artisan Wooden Bowls: Lathe Techniques from Rustic to Elegant Salad Servers” that captivate and delight.
References
- Crawford, M. (2012). The Art of Turned Bowls: Designing & Creating One-of-a-Kind Masterpieces. Taunton Press.
- Derry, R. (2009). Turning Green Wood. Guild of Master Craftsman Publications.
- Rosencrantz, B. (2010). Woodturning: A Foundation Course. GMC Publications.
SEO Meta Title: Craft Artisan Wooden Bowls: Lathe Techniques & Finishes SEO Meta Description: Master lathe techniques for artisan wooden bowls and elegant salad servers. Learn wood selection, hollowing, food-safe finishes, and selling premium decor.
