

A recent study revealed that airborne particulate matter in unventilated workshops can be up to 100 times higher than outdoor levels, posing significant long-term health risks to hobbyists and professionals alike (National Institute for Occupational Safety and Health, 2021). This stark reality underscores the critical need for effective air purification in any woodworking or DIY space. For those committed to both their craft and their well-being, embarking on a project involving DIY Smart Workshop Air Filtration: Building an Automated Air Quality Monitoring and Purification System is not just an upgrade—it’s an essential investment in a safer, healthier future. This guide explores how to integrate smart sensors and DIY filtration units to create an automated system that monitors and purifies workshop air, enhancing health and safety for woodworkers in 2026.
Key Takeaways
- Automated air filtration significantly reduces airborne dust and harmful VOCs, protecting long-term health.
- Smart sensors provide real-time air quality data, enabling a truly responsive system.
- A multi-stage filtration setup (pre-filter, MERV, HEPA, carbon) is crucial for comprehensive purification.
- DIY systems offer cost savings, customization, and integration with existing smart workshop setups.
- Implementing an automated system enhances workshop safety and overall productivity.
Understanding the Need for DIY Smart Workshop Air Filtration: Building an Automated Air Quality Monitoring and Purification System
The air in a typical workshop, especially one dedicated to woodworking, is a complex cocktail of sawdust, wood dust, volatile organic compounds (VOCs) from finishes and adhesives, and potentially even fumes from power tools. These microscopic particles, often invisible to the naked eye, can lead to immediate respiratory irritation and, more critically, contribute to serious long-term health issues such as asthma, allergies, and even certain cancers with prolonged exposure (World Health Organization, 2022). Traditional workshop air filtration often relies on manual activation or simple timers, which can be inefficient and fail to respond to dynamic changes in air quality.

This is where a DIY Smart Workshop Air Filtration: Building an Automated Air Quality Monitoring and Purification System truly shines. By integrating intelligent sensors with a custom-built filtration unit, your system can detect elevated levels of harmful particles and automatically activate, ensuring clean air precisely when it’s needed most. This proactive approach not only safeguards your health but also improves the overall working environment, reducing dust on surfaces and within machinery, ultimately prolonging equipment lifespan. Moreover, for those interested in expanding their smart workshop capabilities, such a system integrates seamlessly with other DIY Smart Workshop Upgrades: Integrating AI and IoT for Enhanced Precision and Safety.
Components of an Automated Air Quality Monitoring System
A robust monitoring system forms the brain of your automated filtration setup. Here are the core components:
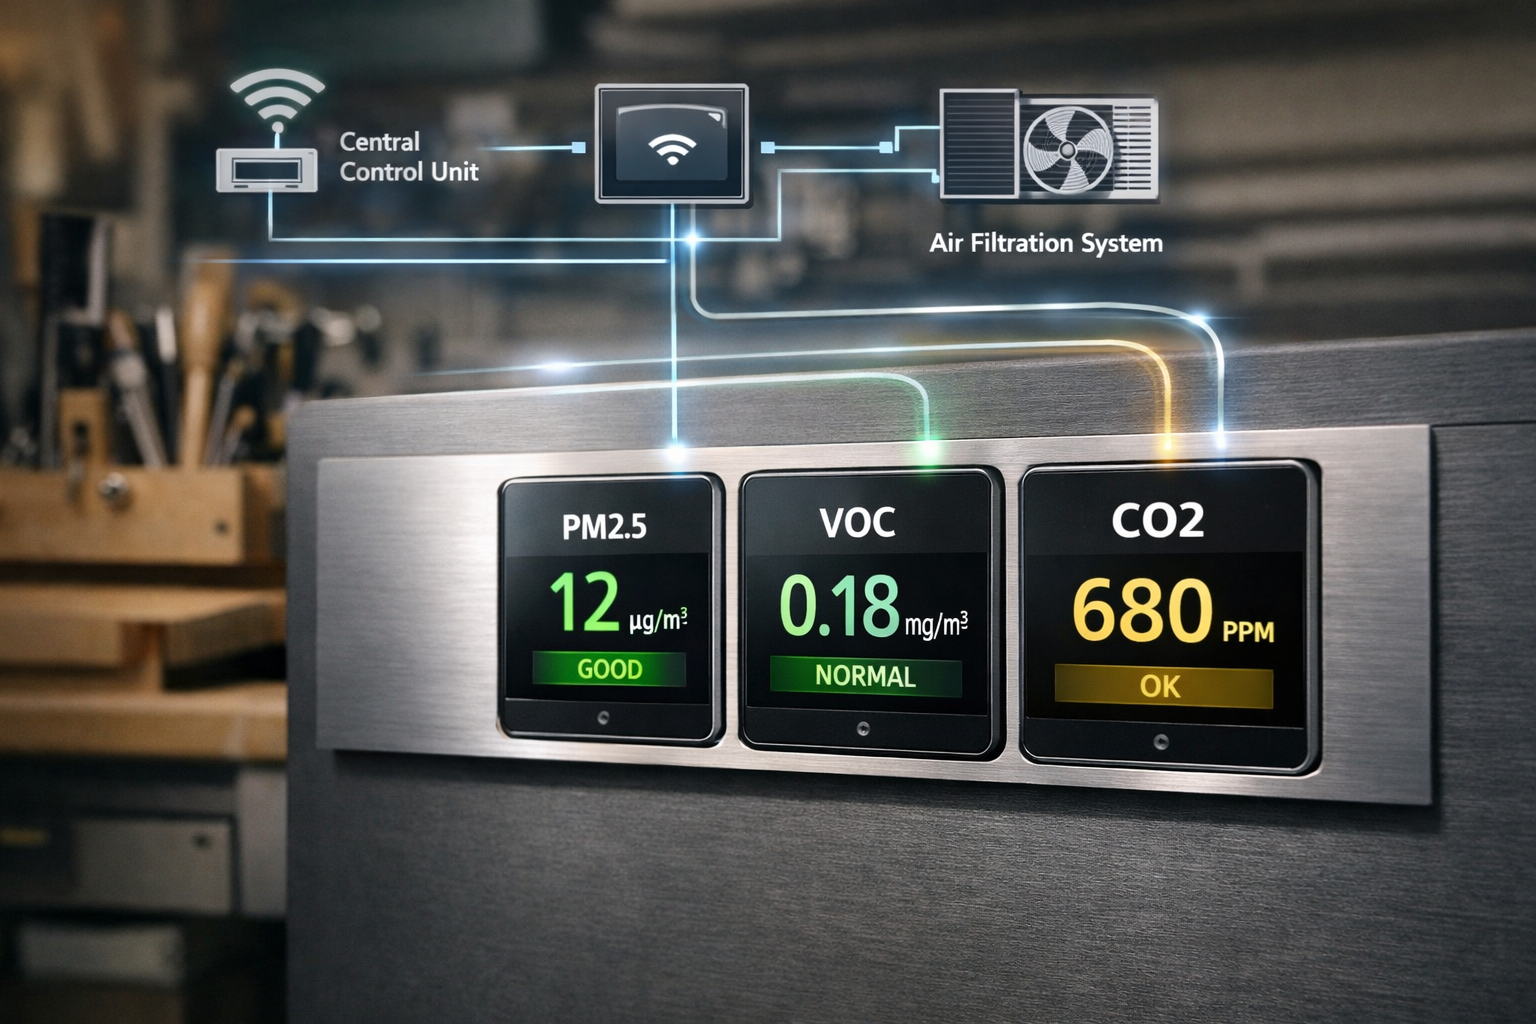
- Particulate Matter (PM) Sensors: Essential for detecting airborne dust and fine particles. Look for sensors that measure PM2.5 and PM10, as these are the most relevant for workshop environments.
- VOC Sensors: Volatile Organic Compounds are emitted from paints, stains, glues, and certain types of wood. A VOC sensor can detect these harmful gasses.
- Microcontroller (e.g., Arduino, ESP32, Raspberry Pi): This serves as the central processing unit, reading data from sensors, interpreting it, and sending commands to the filtration unit.
- Connectivity Module (Wi-Fi/Bluetooth): Allows the microcontroller to communicate with your home network, enabling data logging, remote control, and integration with other smart home platforms.
- Power Supply: A stable power source is crucial for all electronic components.
Choosing the Right Sensors
| Sensor Type | Primary Function | Common Parameters Monitored | Key Considerations |
|---|---|---|---|
| PM Sensors | Detects airborne dust, sawdust, and fine particles | PM2.5, PM10 | Accuracy, response time, lifespan |
| VOC Sensors | Detects fumes from finishes, adhesives, solvents | Total Volatile Organic Compounds | Cross-sensitivity, calibration requirements |
| CO2 Sensors | Measures carbon dioxide levels (for general air quality) | ppm (parts per million) | Less critical for dust, but good for overall ventilation |
| Temperature/Humidity | General environmental monitoring | °C/°F, % RH | Useful for understanding sensor performance and comfort |
It is recommended to place PM and VOC sensors strategically within your workshop—perhaps near your primary cutting stations, finishing areas, and general breathing zones—to get an accurate representation of the air quality during different operations.
Designing and Building Your Automated Air Purification Unit
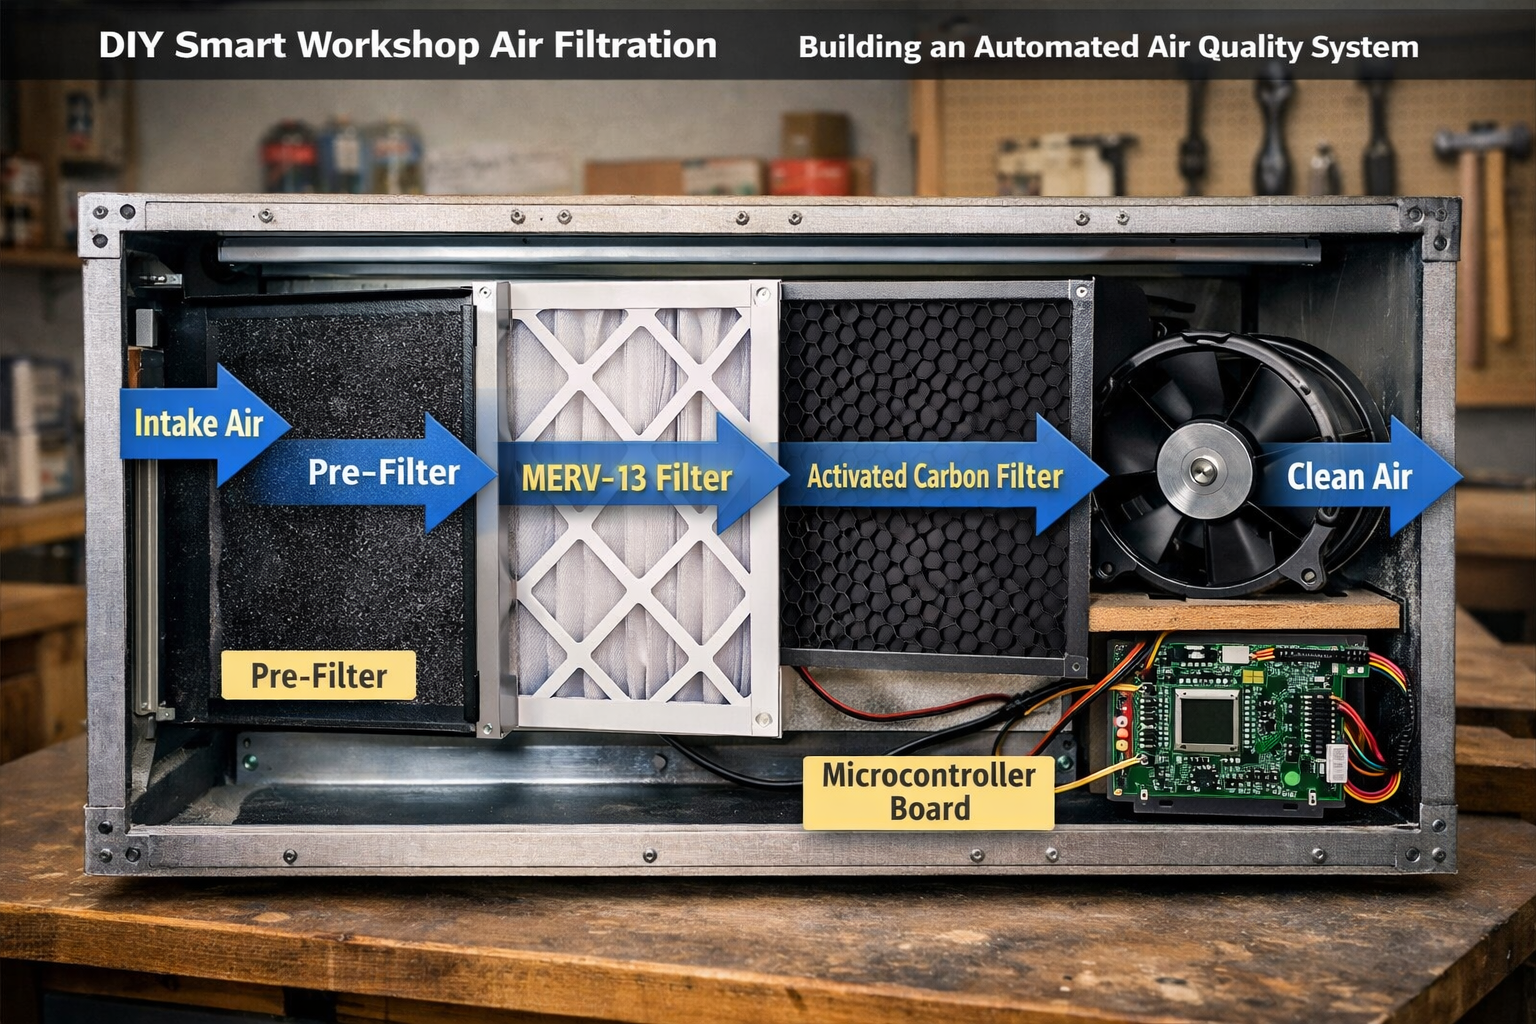
Once you have your monitoring system in place, the next step is to design and build the purification unit itself. The core principle here is multi-stage filtration to capture a wide range of airborne contaminants.
Essential Components of the Purification Unit
- Enclosure/Housing: Typically a robust wooden or plywood box designed to hold filters and a fan. Considerations include size, accessibility for filter changes, and noise dampening.
- Fan/Blower: This is the heart of the system, responsible for moving air through the filters. Look for quiet, powerful centrifugal fans or inline duct fans designed for continuous operation. The fan’s cubic feet per minute (CFM) rating should be appropriate for your workshop’s volume. A good rule of thumb is to aim for 5-6 air changes per hour for your workshop size. For example, if your workshop is 10x15x8 feet (1200 cubic feet), you’d need a fan capable of 100-120 CFM (1200 * 5 / 60 = 100).
- Pre-Filter: Captures larger particles like wood shavings and coarse dust, extending the life of subsequent filters. A simple furnace filter (MERV 8-10) works well here.
- Medium-Efficiency Filter (MERV 13-16): Traps finer dust particles, including those responsible for many respiratory issues.
- HEPA Filter (Optional but Recommended): For the highest level of purification, a true HEPA filter captures 99.97% of particles 0.3 microns or larger. This is critical for ultra-fine dust and allergens.
- Activated Carbon Filter (Optional but Recommended): Essential for removing VOCs, odors, and chemical fumes from paints, glues, and solvents.
- Relay Module: An electronic switch that allows your microcontroller to safely control the high-power fan motor.
- Ducting and Grilles: For efficient airflow, especially if the unit is ceiling-mounted or drawing air from specific areas. Consider integrating this with a building a mobile dust collection cart for a comprehensive dust management strategy.
Filtration Stages Explained
| Filter Type | Purpose | MERV Rating (Typical) | Replacement Frequency (Workshop Use) |
|---|---|---|---|
| Pre-Filter | Captures large debris, extends life of other filters | MERV 8-10 | Every 1-3 months |
| Medium-Efficiency | Traps smaller dust particles, allergens | MERV 13-16 | Every 3-6 months |
| HEPA Filter | Captures very fine particles (0.3 microns and larger) | N/A (efficiency rating) | Every 6-12 months |
| Activated Carbon | Absorbs VOCs, odors, chemical fumes | N/A (adsorption) | Every 3-6 months |
“A well-designed multi-stage filtration system isn’t just about removing dust; it’s about eliminating the invisible threats that compromise your long-term health.”
Wiring and Software for Automation
Connecting your sensors, microcontroller, and filtration unit requires careful wiring and programming.
- Sensor Integration: Connect your PM and VOC sensors to the microcontroller’s GPIO pins according to their datasheets. Libraries are typically available for popular sensors, simplifying data reading.
- Fan Control: Use a relay module to switch the fan’s power on and off. The microcontroller sends a low-voltage signal to the relay, which then safely handles the higher voltage/current for the fan.
- Programming Logic:
- Read sensor data at regular intervals (e.g., every 5-10 seconds).
- Establish thresholds for PM2.5, PM10, and VOC levels. These thresholds will depend on your specific workshop environment and sensitivity. Start with recommended indoor air quality guidelines and adjust as needed.
- If any monitored value exceeds its threshold, activate the fan.
- Implement a “run-on” timer: even after air quality improves, allow the fan to run for an additional 15-30 minutes to ensure thorough purification.
- Consider different fan speeds based on severity (e.g., low speed for slight elevation, high speed for major events).
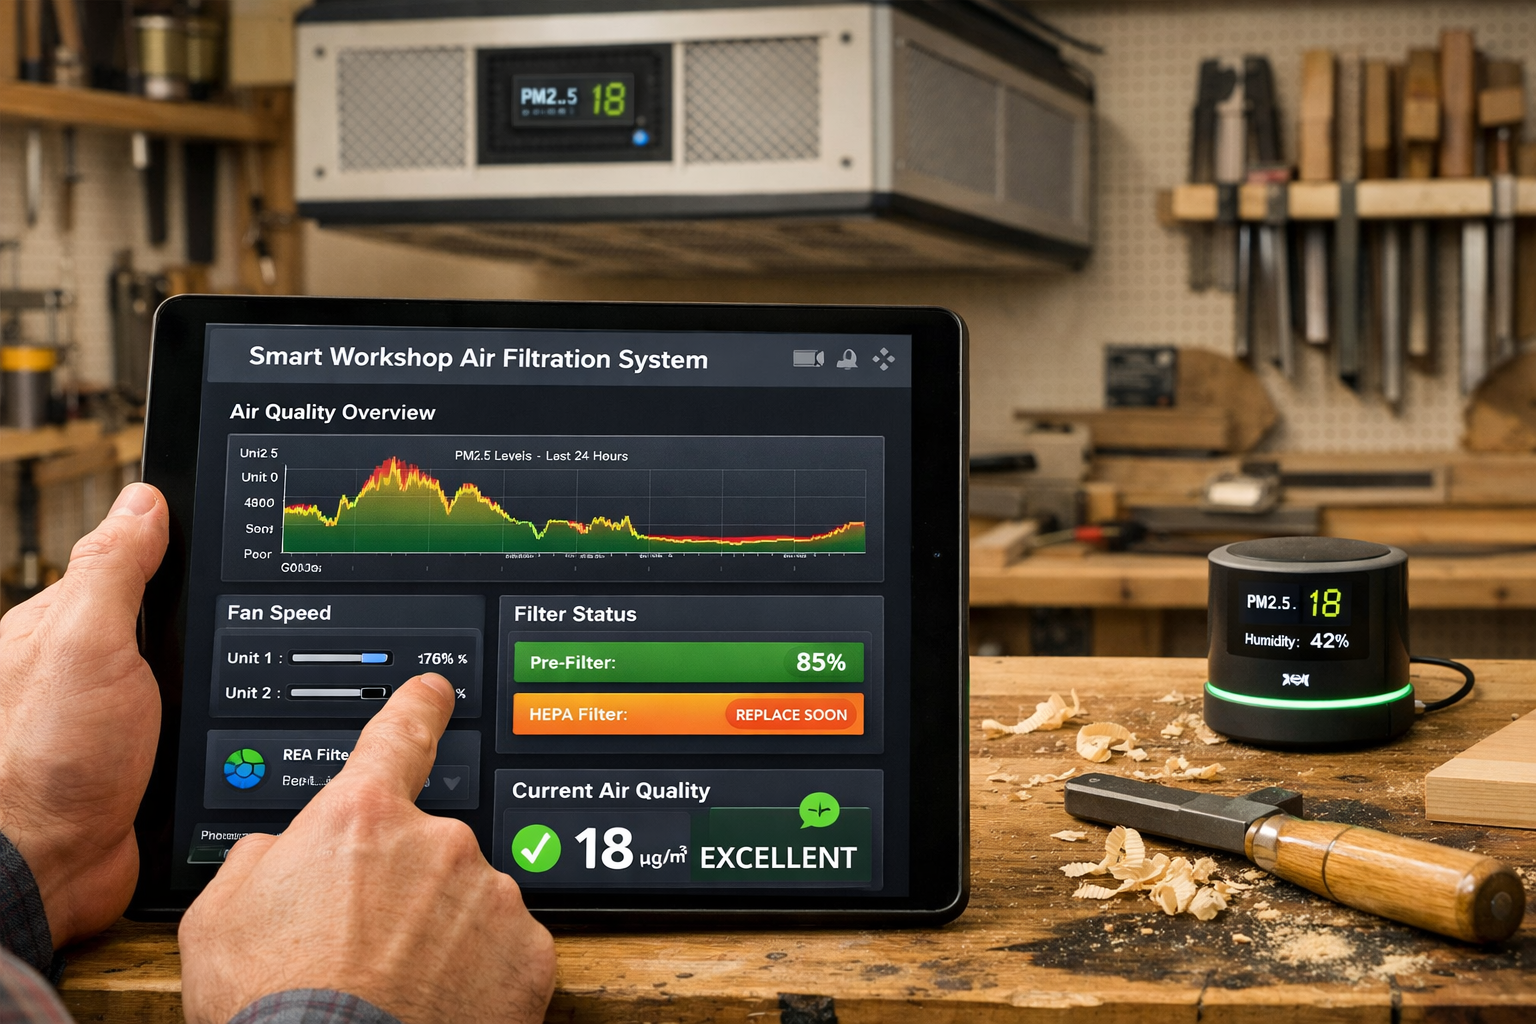
- Add an LCD display or web interface to show real-time air quality and system status.
- Integrate with smart home platforms (e.g., Home Assistant, Google Home) for remote monitoring and control.
- Notifications: Configure your system to send alerts (via email, push notification, or smart assistant) when air quality degrades significantly or when filters need changing.
For more in-depth guidance on microcontrollers and programming, explore resources on IoT development for DIY projects. Consider mounting your completed unit in a central location, perhaps near your most active work zones, or integrating it into your existing building modular wood storage systems for small workshops to save space.
Implementing and Optimizing Your Automated System
Building the system is only the first step. Effective implementation and ongoing optimization are crucial for maximizing the benefits of your DIY Smart Workshop Air Filtration: Building an Automated Air Quality Monitoring and Purification System.
Placement and Airflow Dynamics
The effectiveness of your system heavily relies on strategic placement.
- Central Location: Ideally, place the primary filtration unit in a central area of the workshop to ensure even air circulation. Ceiling-mounted units are often ideal as they don’t take up floor space and allow for better air movement.
- Targeted Extraction: For specific, high-dust-producing tools (e.g., table saw, planer, sander), consider supplemental localized extraction in conjunction with your ambient system. This could involve direct connection to the tool or a dedicated smaller filtration unit.
- Airflow Pattern: Plan your intake and exhaust points to create a beneficial airflow pattern. You want to draw dusty air towards the filter and return clean air to circulate throughout the space, avoiding short-circuiting where clean air is immediately drawn back into the intake.
Calibration and Threshold Setting
Initial calibration of your sensors is vital. Run your system through various workshop activities (e.g., sanding, cutting, applying finishes) and observe the sensor readings. This will help you:
- Establish Baseline: Understand your “clean” workshop air quality.
- Set Realistic Thresholds: Determine at what PM and VOC levels your filtration system should activate. Start with conservative settings and fine-tune them based on your comfort and the system’s performance. For example, a PM2.5 threshold of 15-25 µg/m³ might be a good starting point, significantly lower than general indoor guidelines to ensure optimal workshop air.
- Monitor Trends: Use data logging to identify peak pollution times and the system’s effectiveness in reducing them.
Maintenance and Filter Management
Even the smartest system requires regular physical maintenance.

- Filter Replacement: Adhere to recommended replacement schedules for each filter stage. Your automated system can even track filter run-time and alert you when a change is due. Neglecting filter changes will reduce efficiency and can strain your fan motor.
- Sensor Cleaning: Dust can accumulate on sensor components, leading to inaccurate readings. Periodically clean sensors according to manufacturer instructions.
- System Checks: Regularly inspect all connections, fan operation, and the integrity of the enclosure.
By continuously monitoring, adjusting, and maintaining your DIY Smart Workshop Air Filtration: Building an Automated Air Quality Monitoring and Purification System, you create a truly proactive defense against airborne hazards. This hands-on approach ensures your woodworking haven remains a safe and enjoyable space for years to come. For those working with specialized materials like sourcing reclaimed and salvaged wood, where unknown contaminants might exist, this level of detailed air quality management becomes even more crucial.
Conclusion
The pursuit of craftsmanship in a woodworking workshop should never come at the expense of health. By embracing DIY Smart Workshop Air Filtration: Building an Automated Air Quality Monitoring and Purification System, woodworkers in 2026 can create an environment that is not only productive but also exceptionally safe. This comprehensive guide has detailed the critical components, design considerations, and operational strategies for developing a personalized, automated air quality solution. From smart sensors diligently tracking airborne threats to multi-stage filtration units diligently scrubbing the air clean, every element works in concert to protect your most valuable asset: your health.
Taking control of your workshop’s air quality through a DIY automated system is a rewarding project that combines electronics, woodworking, and a commitment to well-being. It empowers you to tailor a solution that perfectly fits your space, budget, and specific needs, far surpassing the capabilities of off-the-shelf, non-automated alternatives.
Actionable Next Steps:
- Assess Your Workshop: Evaluate the size of your space and identify primary dust and fume sources.
- Source Components: Begin acquiring the necessary sensors, microcontroller, fan, and filtration media.
- Design Your Enclosure: Plan a robust and accessible housing for your filtration unit.
- Start Small with Monitoring: Begin by setting up just the air quality monitoring system to get a feel for your current workshop air.
- Build and Integrate: Construct your filtration unit and integrate it with the monitoring system for automated control.
- Calibrate and Optimize: Spend time fine-tuning your system’s thresholds and observing its performance during various tasks.
Invest in your health and enhance your craft by bringing smart, automated air filtration to your workshop today.
References
National Institute for Occupational Safety and Health. (2021). NIOSH Guide to the Selection and Use of Particulate Respirators. Centers for Disease Control and Prevention.
World Health Organization. (2022). WHO global air quality guidelines: particulate matter (PM2.5 and PM10), ozone, nitrogen dioxide, sulfur dioxide and carbon monoxide. World Health Organization.
