


A staggering 80% of DIY enthusiasts report spending more time searching for tools than actually working on projects in an unorganized workshop. This widespread inefficiency highlights a critical need for structured solutions. Transforming your workshop chaos into an organized haven is not just about tidiness; it’s about reclaiming precious time, boosting productivity, and enhancing safety. This article will delve into practical DIY Workshop Organization Hacks: Maximizing Storage and Efficiency with Custom Built-ins and Tool Carts, offering strategies to optimize every inch of your workspace.
Key Takeaways

- Custom built-ins are essential for utilizing vertical and often-overlooked spaces.
- Mobile tool carts significantly improve workflow by bringing tools directly to the work.
- Strategic planning and decluttering form the foundation of any effective organization system.
- Labeling and dedicated zones reduce search time and maintain order.
- DIY solutions offer cost-effective and highly customizable organizational benefits.
The Foundation of an Organized Workshop: Planning and Decluttering
Before a single board is cut for a new shelf or a tool cart is envisioned, the most crucial step in implementing DIY Workshop Organization Hacks: Maximizing Storage and Efficiency with Custom Built-ins and Tool Carts is thorough planning and ruthless decluttering. Imagine attempting to build a house without a blueprint; the results would be chaotic and inefficient. The same principle applies to workshop organization.
Assess Your Current Space and Inventory
Start by taking a hard look at your workshop as it exists today. What tools do you own? What materials do you frequently use? How much space do you truly have?
- Categorize Tools: Group tools by type (e.g., hand tools, power tools, measuring tools) and frequency of use. Tools used daily should be the most accessible.
- Inventory Materials: Note the types and quantities of lumber, hardware, and consumables. This helps determine appropriate storage solutions like lumber racks or parts bins.
- Identify Problem Areas: Where do tools always seem to accumulate? Which areas are consistently cluttered? These hotspots are prime candidates for custom solutions.
The Art of Decluttering: Less is More
Decluttering goes beyond simply tidying up. It’s about making conscious decisions about what truly belongs in your workshop.
- The “Four-Box Method”:
- Keep: Items you use regularly or for specific projects.
- Repair/Maintain: Tools that need fixing before they can be stored properly.
- Donate/Sell: Items you no longer need or use but are still functional.
- Discard: Broken, irreparable, or unusable items.
- One Year Rule: If you haven’t used a tool or material in a year, consider getting rid of it. Exceptions apply for specialized tools or seasonal items.
- Prioritize Safety: Discard or properly store hazardous materials and dull or damaged tools that pose a risk.
Designing for Efficiency: Zoning Your Workshop
Once decluttered, divide your workshop into logical zones. This strategy is a cornerstone of effective DIY Workshop Organization Hacks: Maximizing Storage and Efficiency with Custom Built-ins and Tool Carts.
- Work Zones:
- Main Workbench: For assembly, detailed work, and hand tool operations. Consider building a custom workbench with integrated storage.
- Machine Zone: Dedicated space for larger power tools like table saws, miter saws, and planers.
- Finishing Zone: A cleaner area, often with good ventilation, for sanding, painting, and applying finishes.
- Material Storage: Area for lumber, sheet goods, and smaller stock.
- Tool Storage Zones:
- Hand Tools: Often near the workbench for easy access.
- Power Tools: Stored near their respective work zones or on mobile carts.
- Fasteners/Hardware: Organized in drawers or bins.
Custom Built-ins: Maximizing Vertical Space and Permanent Storage
Custom built-ins are the backbone of any highly organized workshop. Unlike generic shelving, built-ins are tailored to your specific space and tool collection, ensuring every nook and cranny is utilized. This is where the “custom built-ins” aspect of DIY Workshop Organization Hacks: Maximizing Storage and Efficiency with Custom Built-ins and Tool Carts truly shines.
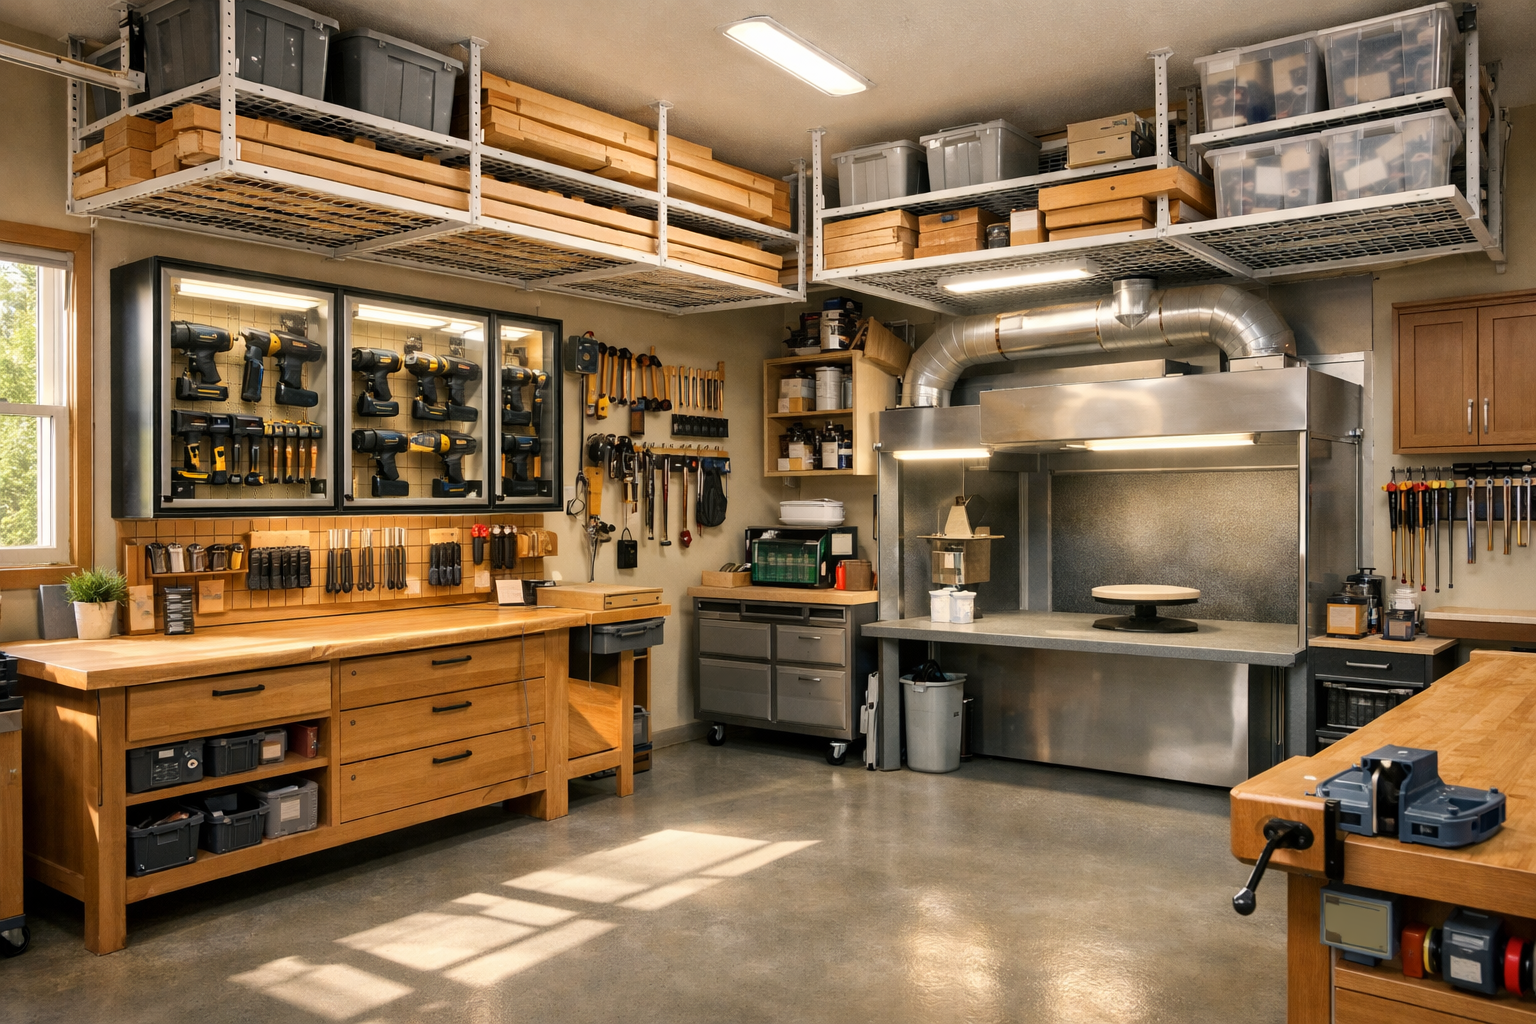
Wall-Mounted Storage Systems
Walls are often the most underutilized real estate in a workshop.
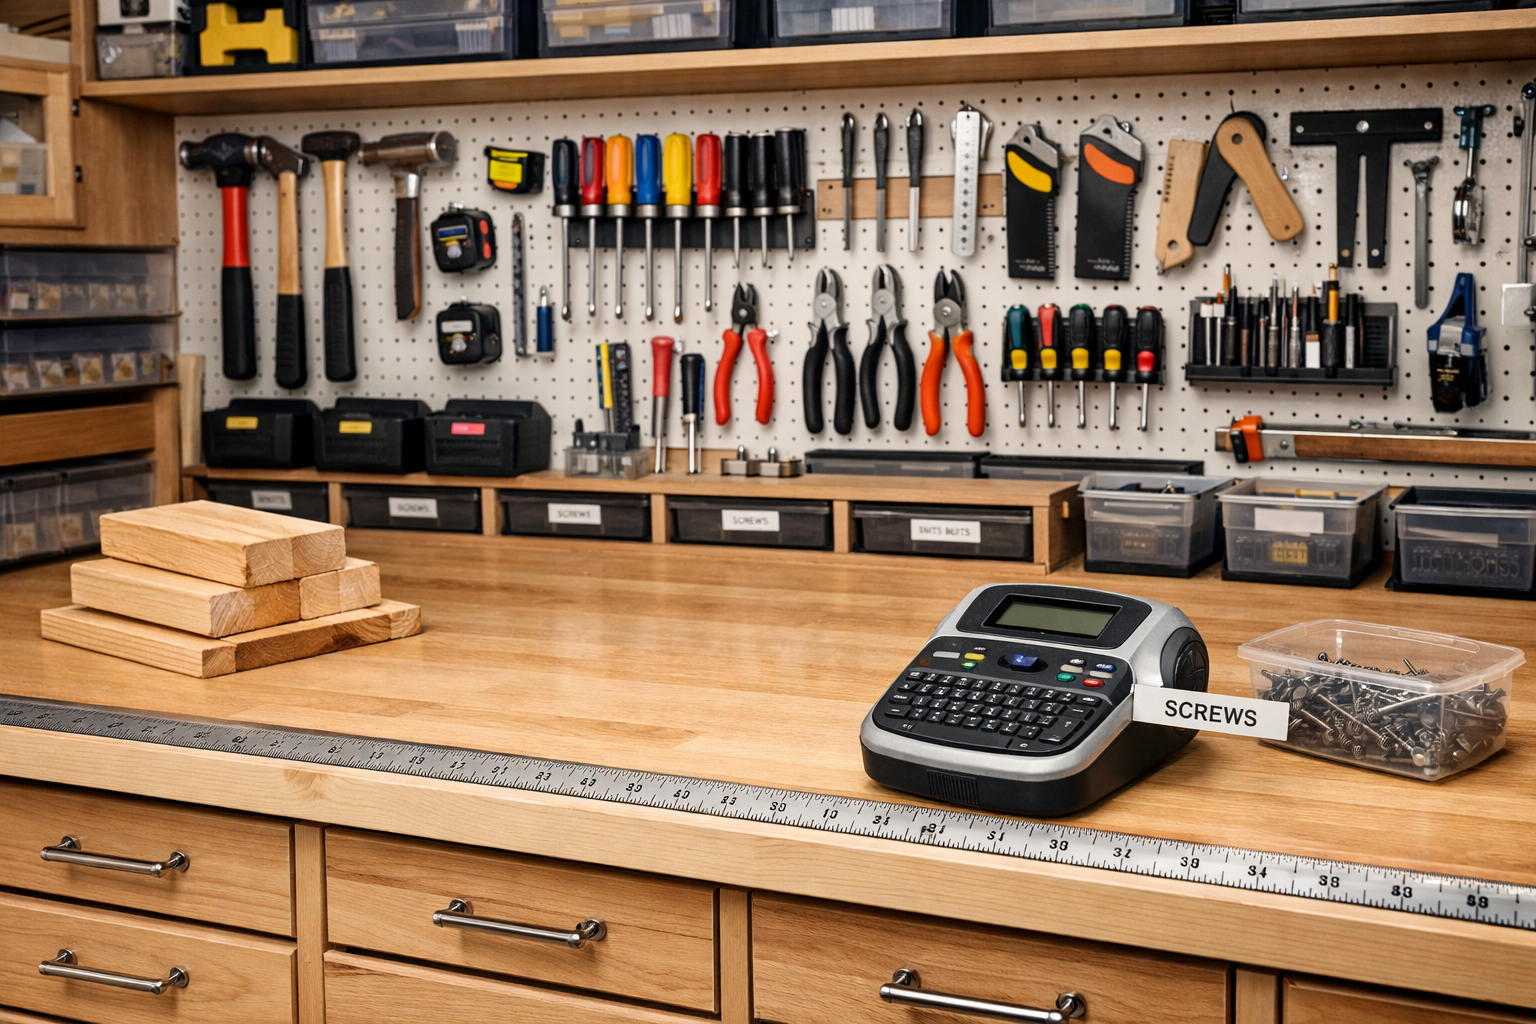
- Pegboards: A classic for a reason. Pegboards offer flexible storage for hand tools, frequently used items, and jigs. Use outlines to quickly identify missing tools.
- French Cleats: A robust and versatile system for hanging cabinets, shelves, and tool holders. Items can be easily moved or reconfigured as your needs change. This system is perfect for creating smart workshop storage solutions.
- Wall-Mounted Cabinets: Enclosed cabinets protect tools from dust and provide a clean look. Build them with adjustable shelves to accommodate varying tool sizes. Consider adding custom floating shelves for heavier items or display.
Integrated Workbench Storage
Your workbench should not just be a flat surface; it’s a prime location for integrated storage.
- Drawer Systems: Install drawers of various sizes under your workbench. Use dividers or custom inserts to keep hand tools, measuring devices, and small parts organized. Mastering dovetail drawers can elevate the functionality and aesthetics.
- Open Shelving: Below the workbench, open shelves can hold larger items like sandpaper rolls, glue, or frequently used jigs.
- Bench Dogs and Vises: Integrate bench dogs and quick-release vises for clamping flexibility without cluttering the surface.
Lumber and Material Storage
Managing raw materials is critical to keeping a workshop clear.
- Vertical Lumber Racks: Essential for storing long stock vertically along a wall, freeing up floor space. Design them to hold various lengths and thicknesses.
- Sheet Goods Storage: Store plywood and MDF vertically in a dedicated slot system to prevent warping and make selection easier.
- Scrap Wood Bins: Don’t let valuable offcuts become a tripping hazard. Create categorized bins for small, medium, and large scraps. These scraps can be turned into profitable micro-projects.
| Storage Type | Best Use Case | DIY Project Idea |
|---|---|---|
| Pegboard | Hand tools, frequently used items, jigs | Wall-mounted pegboard with custom hooks and tool outlines |
| French Cleats | Heavy tools, modular cabinets, shelves | Series of cleat strips for adaptable storage |
| Drawers | Small parts, measuring tools, specialized bits | Under-workbench drawer units with custom inserts |
| Vertical Racks | Long lumber, pipes, moldings | A-frame or wall-mounted vertical rack |
| Overhead Shelves | Seasonal items, less used tools, larger jigs | Reinforced ceiling joist shelves for sturdy storage |
Mobile Tool Carts: Enhancing Efficiency and Workflow
While built-ins provide permanent homes, mobile tool carts are dynamic solutions that bring tools and accessories directly to your work. They are a game-changer for workflow and are a central component of effective DIY Workshop Organization Hacks: Maximizing Storage and Efficiency with Custom Built-ins and Tool Carts.
Designing Specialized Tool Carts
Each major power tool can benefit from its own dedicated mobile cart.
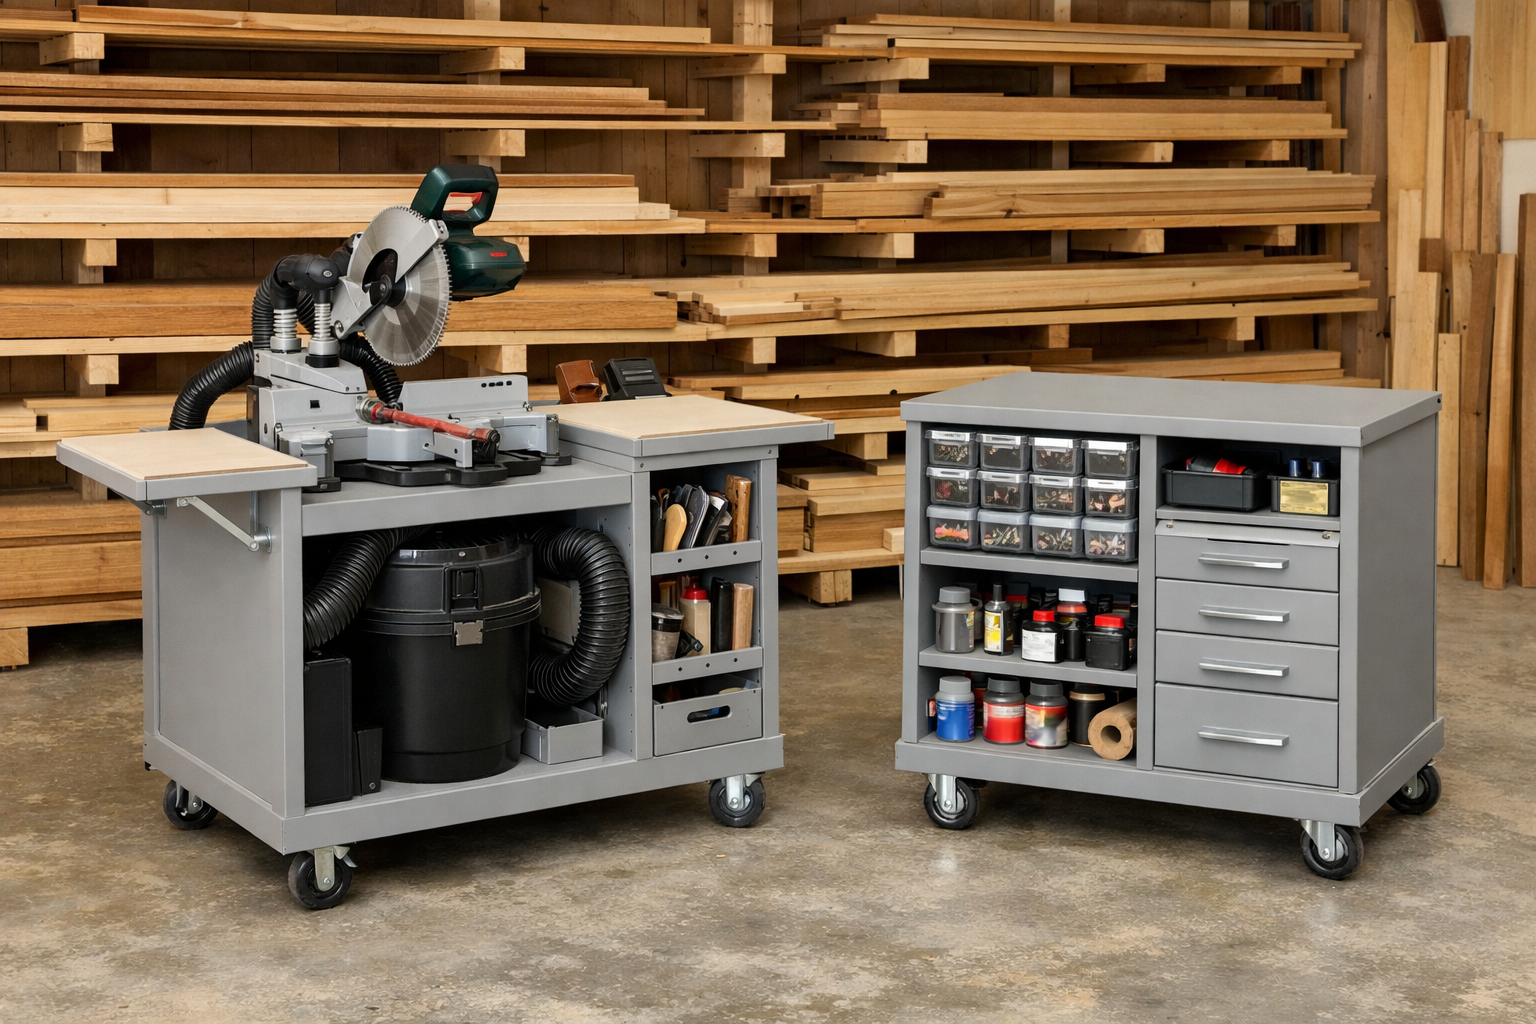
- Miter Saw Station: A cart with an integrated miter saw, extendable wings for material support, and drawers for blades, stops, and measuring tools.
- Router Table Cart: Combine a router table with storage for router bits, fences, and push blocks. Add a dust collection port.
- Assembly Cart: A simple, sturdy cart with a flat top, lower shelf, and casters, ideal for moving projects around or holding glues and clamps during assembly.
- Dust Collection Cart: A mobile cart for your shop vacuum or dust collector. This allows you to move your dust extraction system to whichever machine you are currently using, significantly improving air quality. Consider building a mobile dust collection cart for maximum flexibility.
General Purpose Mobile Storage
Beyond specialized carts, consider general mobile storage solutions.
- Multi-Drawer Carts: These are excellent for organizing hand tools, fasteners, and consumables. Use clear bins within drawers for small parts like screws, washers, and dowels.
- Open Shelf Carts: Useful for storing larger, bulkier items that need to be moved frequently, such as paint cans, buckets, or project components.
- Work Surface Carts: Some carts feature a durable top that can double as an auxiliary workbench, providing extra workspace when needed. These can be particularly helpful in smaller workshops where every surface counts.
Key Features for Effective Tool Carts
When building or selecting tool carts, keep these features in mind:
- Durable Casters: Invest in heavy-duty, locking casters. They allow easy movement and secure positioning.
- Ergonomic Height: Design carts to a comfortable working height if they will be used as auxiliary surfaces.
- Integrated Power Strips: Adding a power strip to a cart means fewer extension cords trailing across the floor, enhancing safety and convenience.
- Dust Collection Integration: For carts holding power tools, ensure there’s an easy way to connect to a dust collector or shop vac.
Implementing and Maintaining Your Organized Workshop
The best organization system is one that is consistently maintained. Implementing DIY Workshop Organization Hacks: Maximizing Storage and Efficiency with Custom Built-ins and Tool Carts is an ongoing process, not a one-time event.

The Power of Labeling and Shadow Boards
Once items have a home, make sure everyone (including future you!) knows where that home is.
- Labels: Use a label maker for shelves, drawers, and bins. Clear, concise labels prevent items from migrating back to “general clutter.”
- Shadow Boards: For pegboards or French cleat systems, draw an outline of each tool on the wall. This instantly shows where a tool belongs and if one is missing.
- Color-Coding: Assign colors to different tool categories or project types for quick visual identification.
Establishing a Routine
Regular maintenance is key to preventing a relapse into disarray.
- “Five-Minute Cleanup” Rule: At the end of each work session, dedicate five minutes to putting tools away and wiping down surfaces.
- Weekly Reset: Once a week, spend 15-30 minutes doing a deeper tidy-up, restocking consumables, and ensuring everything is in its designated spot.
- Seasonal Overhaul: A more thorough reorganization and cleaning twice a year, perhaps in spring and fall, allows you to re-evaluate your system as your projects and tool collection evolve.
Continuous Improvement and Adaptability
Your workshop organization system should evolve with your skills and projects.
- Evaluate Regularly: Are certain storage solutions working effectively? Do new tools require new solutions?
- Be Flexible: Don’t be afraid to adjust or rebuild a system if it’s not serving your needs. The beauty of DIY built-ins and carts is their adaptability.
- Learn from Others: Look at how other woodworkers and DIYers organize their spaces. There’s always a new trick to learn. For more ideas, explore other DIY smart workshop storage solutions.
By embracing these DIY Workshop Organization Hacks: Maximizing Storage and Efficiency with Custom Built-ins and Tool Carts, your workshop will transform from a source of frustration into a highly functional and enjoyable space. The investment in time and effort will pay dividends in increased productivity, reduced stress, and more successful projects in 2026 and beyond.
Conclusion
An organized workshop is not a luxury; it’s a fundamental requirement for efficient and enjoyable DIY projects. By systematically planning, decluttering, and implementing smart storage solutions like custom built-ins and mobile tool carts, you can reclaim valuable time, boost your productivity, and foster a safer working environment. The journey begins with a clear vision and unfolds through thoughtful design and consistent maintenance. Embrace these DIY Workshop Organization Hacks: Maximizing Storage and Efficiency with Custom Built-ins and Tool Carts to create a workspace that inspires creativity and streamlines your workflow. Start small, stay persistent, and watch your workshop transform into the efficient haven it was always meant to be.
Actionable Next Steps:
- Conduct a Workshop Audit: Take inventory of all your tools and materials.
- Declutter Ruthlessly: Apply the “Four-Box Method” to clear out unnecessary items.
- Map Out Zones: Sketch a layout for your workshop, identifying dedicated work and storage areas.
- Start Small: Begin with one custom built-in project, like a pegboard wall or a simple shelf unit.
- Build Your First Tool Cart: Choose a frequently used power tool and design a dedicated mobile cart for it.
- Implement Labeling: Ensure every storage solution has clear labels for easy identification.
- Establish a Cleanup Routine: Commit to a 5-minute cleanup after each session.
