


The average woodworker wastes 10-15% of their raw lumber due to inefficient cutting and planning. Imagine transforming a single thick board into multiple thinner, perfectly matched panels, not only reducing waste but also unlocking unparalleled aesthetic potential. This is the power of resawing. This comprehensive resource, “The Ultimate Guide to Resawing Lumber: Techniques, Tools, and Tips for Maximizing Yield and Creating Book-Matched Panels,” will demystify this essential woodworking skill, empowering you to create stunning projects while maximizing your material investment.
Key Takeaways
- Resawing efficiently transforms thick lumber into thinner boards, drastically increasing material yield.
- The band saw is the primary tool for resawing, requiring proper blade selection, tension, and setup for optimal results.
- Mastering resawing allows for the creation of visually striking book-matched panels, enhancing project aesthetics.
- Proper technique, including consistent feed rate and effective jigs, is crucial for safety and cut quality.
- Attention to detail in lumber selection and preparation significantly impacts the success of resawing and the final product.
Understanding Resawing: The Foundation of Maximizing Yield
Resawing is the process of cutting a thick piece of lumber lengthwise into two or more thinner boards. It’s an indispensable technique for any woodworker looking to make the most of their material, especially with expensive or rare hardwoods. Beyond simply reducing waste, resawing opens up a world of design possibilities, most notably the creation of book-matched panels.

Why Resaw? The Benefits Explored
The advantages of mastering resawing are numerous and significant:
- Maximizing Yield: One of the most compelling reasons to resaw is to get more usable material from a single board. A 8/4 (two-inch thick) board can easily yield two 4/4 (one-inch thick) boards, or even multiple thinner pieces for veneer or decorative accents. This is particularly valuable when working with highly figured or exotic lumber, effectively doubling or tripling your investment.
- Cost Savings: By purchasing thicker, often less expensive, rough lumber and resawing it yourself, you can save considerably compared to buying pre-milled thin stock.
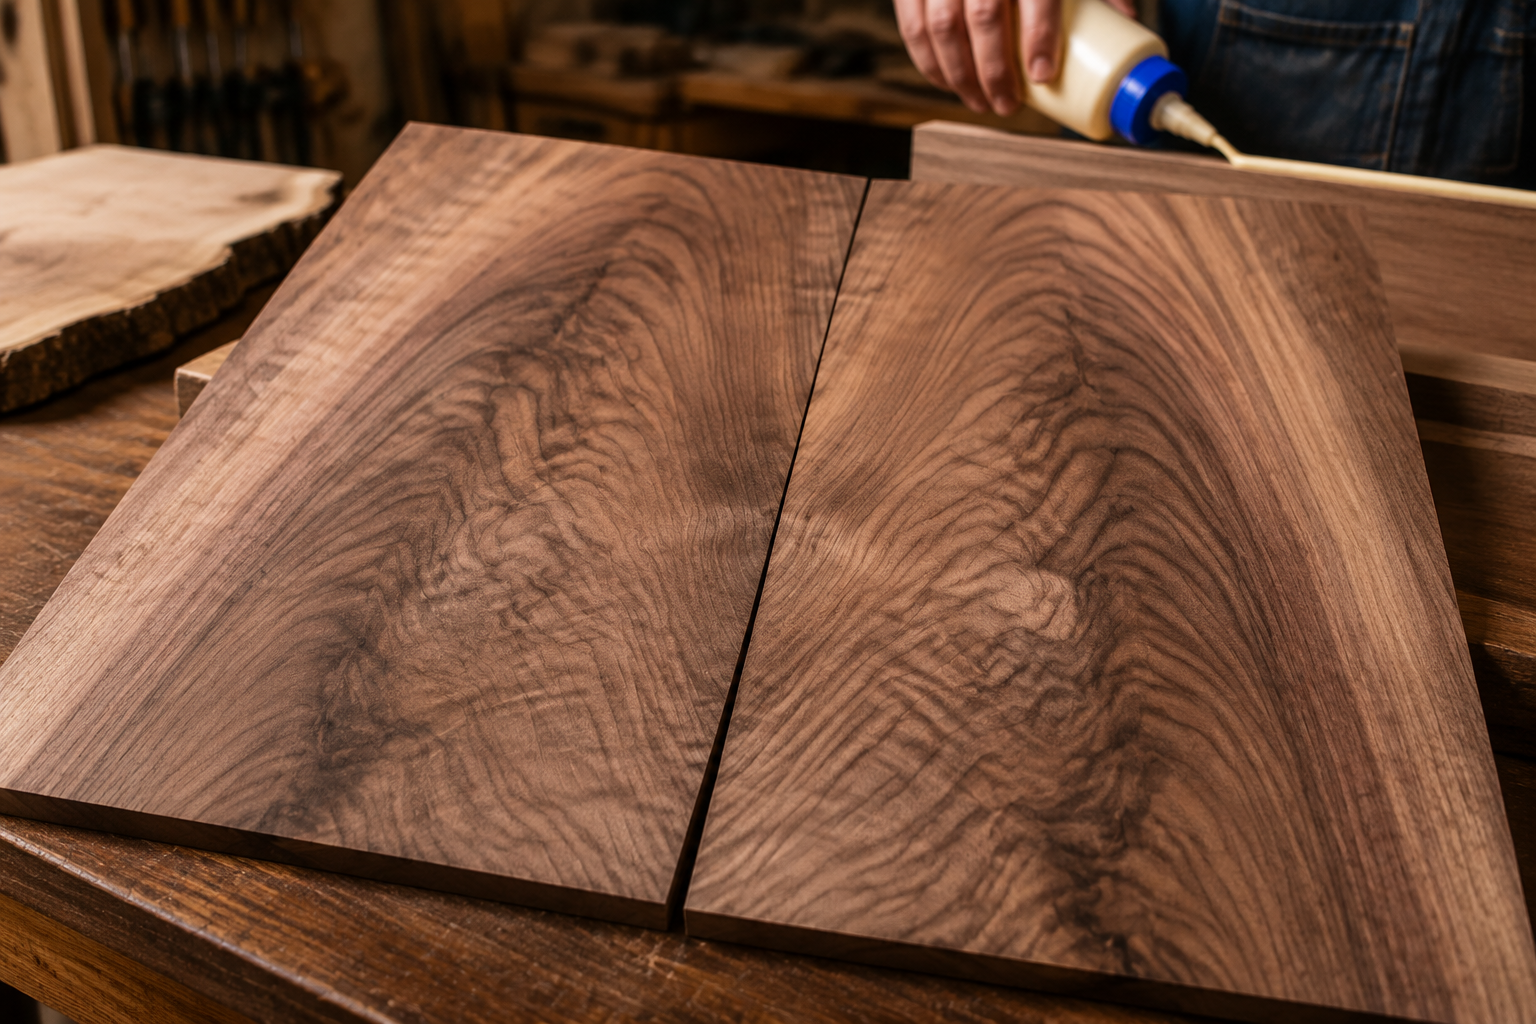
- Creating Book-Matched Panels: This is where resawing truly shines aesthetically. When a board is resawn into two thinner pieces, and these pieces are opened up like a book, their adjacent faces reveal a mirrored grain pattern. This “book match” creates a stunning, symmetrical visual effect, perfect for tabletops, cabinet doors, drawer fronts, and decorative boxes.
- Accessing Internal Grain: Sometimes, a board’s most beautiful grain or figure is hidden beneath its surface. Resawing allows you to expose these internal patterns, revealing chatoyance, curl, or burl that might otherwise go unnoticed.
- Dimensional Stability: Thinner boards generally have less internal stress than thicker ones, potentially leading to greater stability and less susceptibility to warping or cupping in the final project.
The Ultimate Guide to Resawing Lumber: Essential Tools
While a hand saw can be used for small, precise resawing tasks – particularly if you’re exploring Beginner’s Guide to Japanese Hand Saws: Precision Cuts and Essential Techniques for Fine Woodworking – the primary tool for efficient and accurate resawing is the band saw.
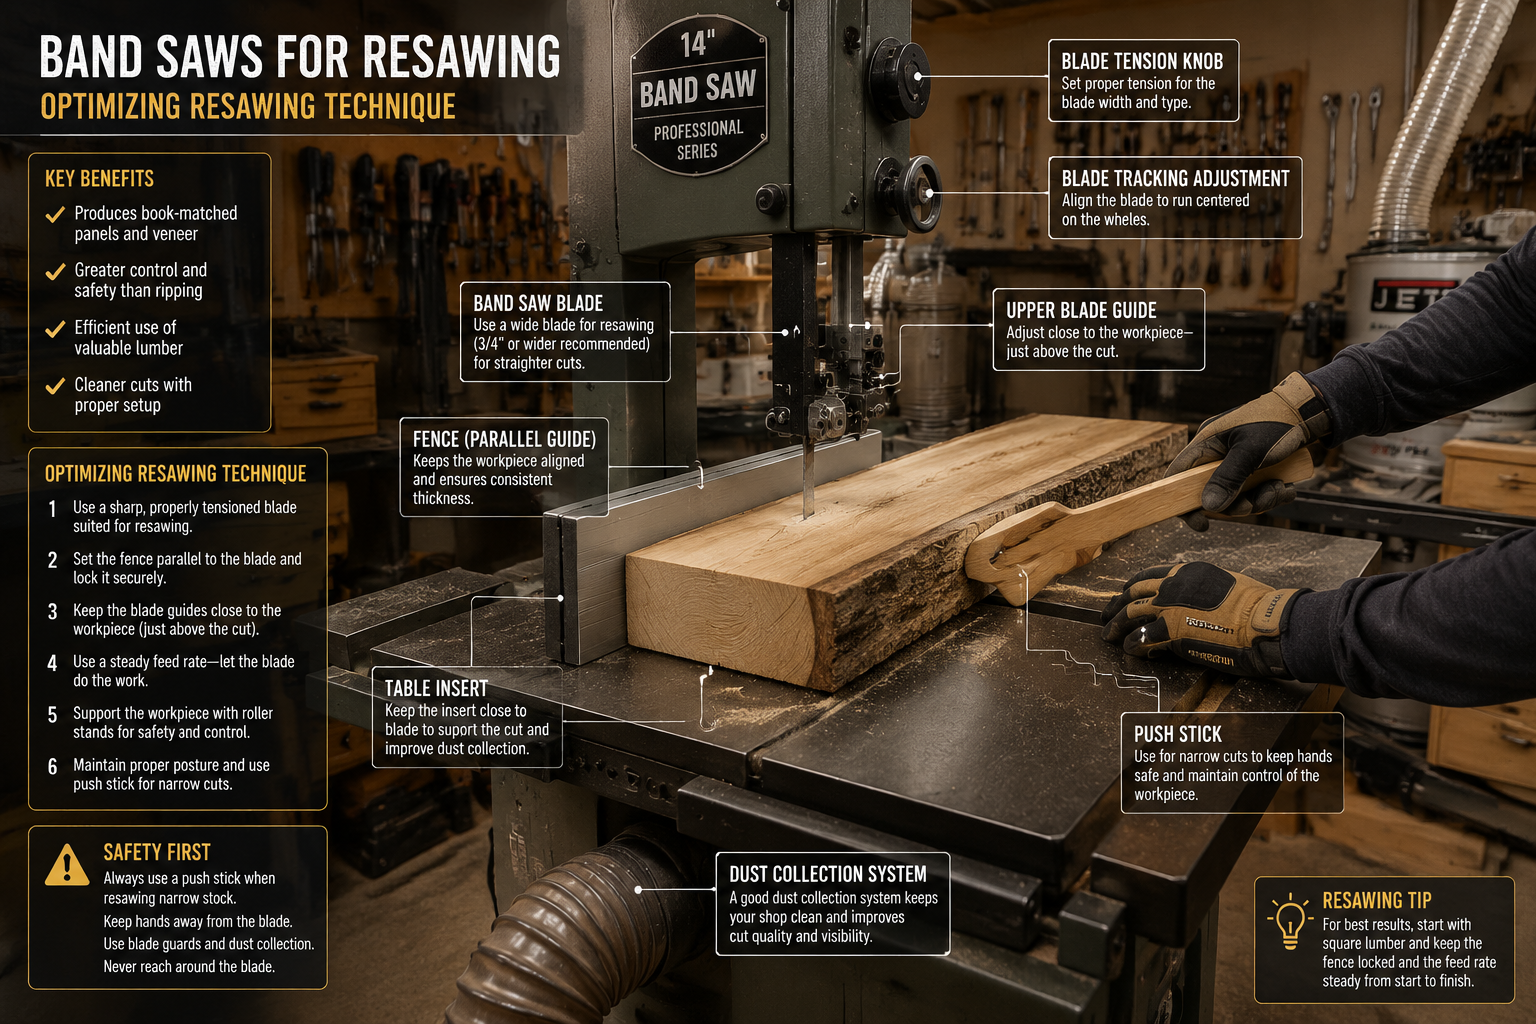
Band Saw Requirements for Resawing
Not all band saws are created equal for resawing. Here’s what to look for:
- Resaw Capacity: This refers to the maximum height of lumber that can pass between the table and the upper blade guides. A 14-inch band saw typically offers 6 inches of resaw capacity, which is sufficient for most hobbyists. Larger projects or thicker stock may necessitate a 17-inch or larger saw, offering 10-12 inches of capacity.
- Motor Horsepower: Resawing puts a significant load on the motor. A minimum of 1 HP is recommended for occasional resawing, but 1.5 HP or more is ideal for consistent, clean cuts in dense hardwoods.
- Blade Guides: High-quality blade guides (ball bearing or ceramic) are essential for supporting the blade and preventing deflection, which is critical for straight, consistent cuts. Ensure they are well-adjusted and close to the workpiece.
- Heavy-Duty Fence: A tall, rigid fence is non-negotiable for resawing. It provides stability and prevents the workpiece from twisting. Aftermarket fences are often a worthwhile upgrade.
- Table: A flat, sturdy cast iron table provides a stable base for the lumber.
For an in-depth look at band saw setup and maintenance, you might find our article on G1019 Bandsaw Overview: Performance Tips and More helpful.
Blade Selection for Resawing
Choosing the right blade is paramount. A dedicated resaw blade will make all the difference:
- Width: Wider blades (3/4″ to 1″ or even 1-1/4″ if your saw allows) are preferred. They resist deflection better, leading to straighter cuts.
- Tooth Count (TPI): A low TPI (2-4 TPI) is best. Fewer, larger teeth clear sawdust more efficiently, reducing heat buildup and ensuring a faster, cleaner cut through thick stock.
- Tooth Style: Hook teeth are aggressive and efficient for resawing.
- Material: Carbide-tipped or bi-metal blades offer superior durability and sharpness, especially in hardwoods, though carbon steel blades are a good economical option for softer woods.
Mastering Resawing Techniques for Precision and Book-Matched Panels
Achieving consistent, high-quality resawn lumber and stunning book-matched panels requires more than just the right tools; it demands precision in technique and setup.
Preparing Your Lumber for Resawing
Before approaching the band saw, proper lumber preparation is crucial:
- Flatten and Square: The face of the board that will rest on the band saw table must be perfectly flat. The edge that runs against the fence must be perfectly square to that face. Use a jointer and planer to achieve this. Imperfections here will translate directly into inconsistent thickness in your resawn boards.
- Mark Your Cut Line: Clearly mark the desired thickness on both ends and along the edge of your board. This provides a visual guide for consistent thickness.
- Choose Your Orientation: Decide which face will be against the table and which edge against the fence. This is critical for achieving a true book match. For book matching, you’ll typically resaw the board down its center, keeping the outer faces intact.
Setting Up Your Band Saw for Resawing
Accuracy in setup prevents frustration and ensures quality cuts:
- Blade Installation and Tension: Install your chosen resaw blade. Ensure it’s properly seated on the wheels and tensioned correctly according to your saw’s recommendations. Proper tension is vital to prevent blade wander and ensure straight cuts.
- Blade Tracking: Adjust blade tracking so the blade runs in the center of the tire, or slightly forward, depending on your saw model.
- Guide Adjustment: Adjust the upper and lower blade guides so they are just behind the gullets of the blade teeth and as close to the blade as possible without touching when the blade is not running. The side bearings should lightly touch the blade on both sides, providing firm support.
- Fence Setup: Position your tall resaw fence parallel to the blade. Measure from the fence to the blade’s teeth to set the desired thickness of your resawn board. Double-check this measurement at the front and back of the fence to ensure parallelism.
- Featherboards (Optional but Recommended): For extra stability, a featherboard can be clamped to the table to hold the workpiece firmly against the fence.
Feed Rate and Technique
Consistent feed rate is key to smooth, straight cuts and preventing blade burning or deflection.
- Start Slow and Steady: Begin feeding the lumber into the blade at a slow, controlled pace. The motor should maintain its RPMs without bogging down.
- Push Sticks: Always use a push stick, especially as your hands get close to the blade or when resawing shorter pieces.
- Maintain Pressure: Apply firm, consistent pressure against the fence and down onto the table.
- Listen to Your Saw: The sound of your band saw will tell you a lot. If it’s straining, slow down. If the blade is wandering, check your tension and guides.
Creating Book-Matched Panels
Once your board is resawn, the magic of book matching begins.
- The “Open Book” Effect: Take the two resawn pieces and open them up as you would a book. The grain patterns on the adjacent faces will be mirrored, creating a striking symmetrical design.
- Edge Jointing: Joint the edges of the two book-matched pieces that will be glued together. This creates a perfectly straight, flat surface for a strong glue joint.
- Gluing Up: Apply wood glue evenly to both jointed edges. Clamp the two pieces together firmly, ensuring they remain flat and aligned. For durable glue-ups, especially in furniture, refer to our The Ultimate Guide to Wood Glue: Choosing the Right Adhesive for Every Project, Joint, and Environmental Condition.
- Drying and Flattening: Allow the glue to dry completely. Once dry, you may need to lightly plane or sand the panel to achieve final flatness and thickness.
Book-matched panels are ideal for projects like DIY Live Edge Dining Table: Step-by-Step Build for 2026 Trends or high-end cabinet doors, adding a touch of elegance and craftsmanship.
Advanced Tips and Troubleshooting for Resawing Lumber
Even with the right tools and basic techniques, resawing can present challenges. Here are some advanced tips and troubleshooting strategies to refine your skills and ensure success.
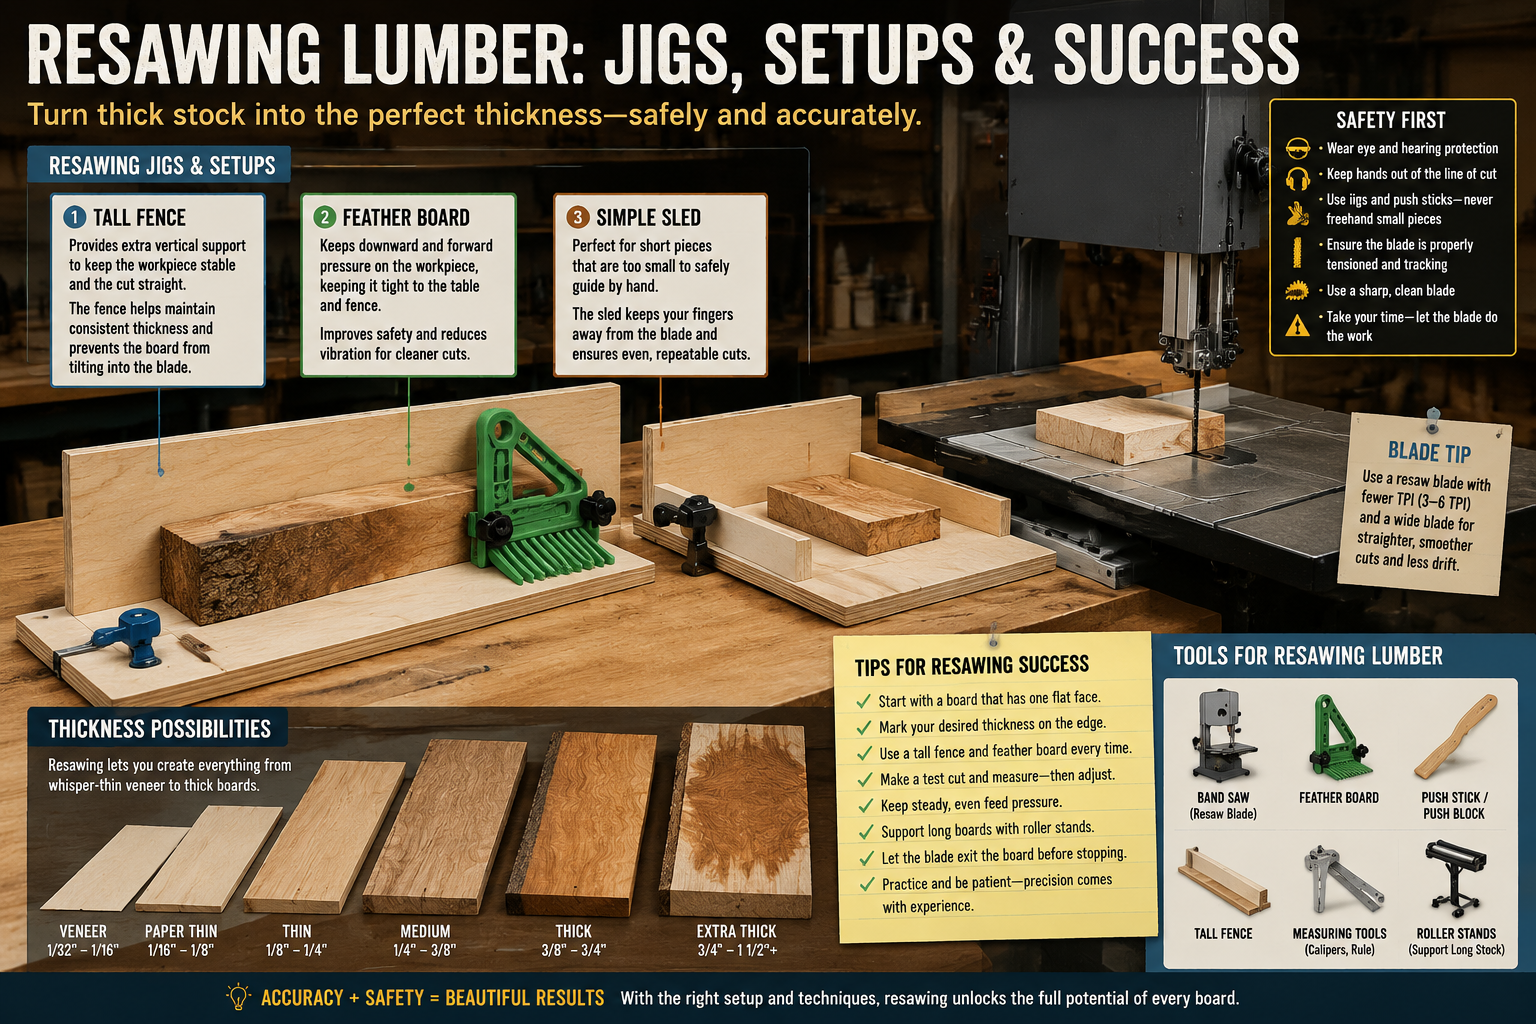
Jigs and Accessories for Enhanced Accuracy
Specialized jigs can significantly improve the safety and accuracy of your resawing operations:

- Tall Resaw Fence: While mentioned before, a robust, tall fence is worth reiterating. It prevents the board from tipping or twisting during the cut. You can often make your own out of plywood or MDF.
- Auxiliary Table: For very tall stock, an auxiliary table that attaches to your band saw table can increase support and stability.
- Resaw Sleds: For shorter pieces or when absolute parallelism is paramount, a resaw sled that rides against your fence or in your miter slot can provide exceptional control.
- Laser Guides: Some advanced band saws come with laser guides, or you can add an aftermarket one, which project a line onto your workpiece, helping you track your cut more precisely.
Troubleshooting Common Resawing Issues
| Problem | Cause | Solution |
|---|---|---|
| Blade Wander/Curved Cuts | Insufficient blade tension | Increase blade tension according to your saw’s manual. |
| Dull blade | Replace or sharpen your blade. | |
| Improper guide setup | Ensure guides are close to the blade, just behind the gullets, and supporting the blade without binding. | |
| Too fast feed rate | Slow down your feed rate. Let the blade do the work. | |
| Insufficient motor power/bogging down | Check blade sharpness and TPI. Reduce feed rate. For very dense wood, a higher HP motor or more aggressive blade might be needed. | |
| Burn Marks on Wood | Dull blade | Replace or sharpen the blade. |
| Too slow feed rate | Increase feed rate slightly, ensuring the blade is clearing dust. | |
| Blade guides too tight | Adjust guides to provide support without causing excessive friction. | |
| Inconsistent Thickness | Uneven pressure against fence/table | Maintain consistent pressure. Use featherboards and a tall, rigid fence. |
| Un-jointed or un-planed lumber | Ensure the reference face and edge are perfectly flat and square before resawing. This is a common culprit. | |
| Blade deflection | Check blade tension, width, and sharpness. A wider, properly tensioned blade is less prone to deflection. | |
| Blade Breaking | Excessive blade tension | Do not over-tension your blade. Follow manufacturer recommendations. |
| Blade guides too far apart | Guides should be as close as possible to the workpiece for support. | |
| Forcing the cut | Reduce feed rate and let the blade cut at its own pace. | |
| Old/fatigued blade | Replace old blades regularly, especially if you resaw frequently. Small cracks can indicate impending failure. |
Safety First!
Resawing involves powerful machinery and sharp blades. Always prioritize safety:
- Eye Protection: Always wear safety glasses or a face shield.
- Hearing Protection: Band saws can be noisy.
- Dust Collection: Resawing produces a lot of sawdust. A good dust collection system is essential for visibility and respiratory health.
- Proper Attire: Avoid loose clothing or jewelry that could get caught in the machinery.
- Clear Work Area: Ensure your workspace is free of clutter.
- Focus: Never operate machinery when distracted or fatigued.
By diligently following these techniques and troubleshooting common issues, you’ll soon be resawing lumber with confidence, maximizing your material, and creating breathtaking book-matched panels for all your woodworking endeavors in 2026 and beyond. This is truly the ultimate guide to resawing lumber.
Conclusion
Mastering resawing is a transformative skill for any woodworker. It moves beyond basic cutting to unlock the hidden potential within each piece of lumber, allowing you to create more with less and craft truly unique, visually captivating projects. From the satisfaction of maximizing your material yield to the artistic elegance of book-matched panels, the benefits are clear.
By understanding the proper techniques for setting up your band saw, selecting the right blade, and employing effective jigs, you can achieve precise, consistent cuts. Remember to prioritize lumber preparation, maintain a steady feed rate, and always put safety first. Don’t be discouraged by initial challenges; like any woodworking skill, practice and persistence will lead to proficiency. Start with less expensive stock to refine your technique before moving on to valuable hardwoods. Your journey to unlocking the full potential of your lumber begins now!
SEO Meta Title: Resaw Lumber: Techniques, Tools & Book-Matched Panels SEO Meta Description: Unlock the full potential of your lumber! This ultimate guide covers resawing techniques, essential tools, and tips for maximizing yield and creating stunning book-matched panels.
