


Imagine a woodworking session lasting several hours, where every cut, carve, and joint feels fluid, precise, and entirely comfortable, with no nagging aches in your wrist or fingers. For many woodworkers, this isn’t the reality; discomfort and fatigue often set in, hindering productivity and enjoyment. The culprit? Often, it’s the generic, mass-produced handles on otherwise excellent hand tools. Learning how to custom-make ergonomic wooden handles for your favorite hand tools can dramatically improve grip, reduce fatigue, and enhance precision, leading to a significantly more comfortable and productive woodworking experience. This article delves into the art and science of Crafting Ergonomic Wooden Hand Tool Handles: Upgrading Comfort and Control for Extended Woodworking Sessions.
Key Takeaways

- Ergonomic handles are crucial for reducing strain, preventing injuries, and improving control during extended woodworking sessions.
- Understanding biomechanics and individual hand anatomy is fundamental to designing truly effective custom handles.
- Selecting the right wood species and utilizing appropriate shaping techniques are vital for durability and comfort.
- The process involves careful measurement, prototyping, shaping, and finishing to achieve an optimal grip.
- Upgrading tool handles represents a significant investment in a woodworker’s long-term health and efficiency.
The Imperative of Ergonomics in Hand Tool Design
The human hand is an intricate marvel of engineering, capable of incredible dexterity and strength. However, it is also highly susceptible to strain and injury when subjected to repetitive motions or awkward grips, especially common in woodworking. Carpal tunnel syndrome, tendonitis, and general hand fatigue are unwelcome companions for many enthusiasts and professionals alike. This is precisely where Crafting Ergonomic Wooden Hand Tool Handles: Upgrading Comfort and Control for Extended Woodworking Sessions becomes not just a luxury, but a necessity.
Ergonomics, in essence, is the science of designing and arranging workspaces and tools to fit the user, rather than forcing the user to adapt to the equipment. When applied to hand tools, it means creating handles that:
- Distribute pressure evenly: Preventing hot spots that lead to blisters and discomfort.
- Promote a neutral wrist position: Reducing the strain on tendons and nerves.
- Provide a secure, non-slip grip: Enhancing control and safety.
- Match the user’s hand size and grip style: Offering a personalized fit.
The benefits extend beyond mere comfort. A well-designed ergonomic handle allows for finer control, enabling more precise cuts and carvings. This translates to higher quality work, fewer mistakes, and ultimately, a more satisfying creative process. In 2026, with increasing awareness of long-term health and wellness in all professions, the bespoke approach to tool ergonomics is gaining significant traction among dedicated woodworkers.
Understanding Hand Biomechanics for Superior Handle Design
To effectively craft an ergonomic handle, one must first grasp the basic biomechanics of the hand and wrist. When gripping a tool, the forces are transmitted through the fingers, palm, and wrist. Issues arise when:
- Excessive force is required: Leading to muscle fatigue and strain.
- The wrist is bent at an unnatural angle: Causing impingement on nerves and tendons.
- Pressure is concentrated on small areas: Resulting in localized pain or nerve compression.
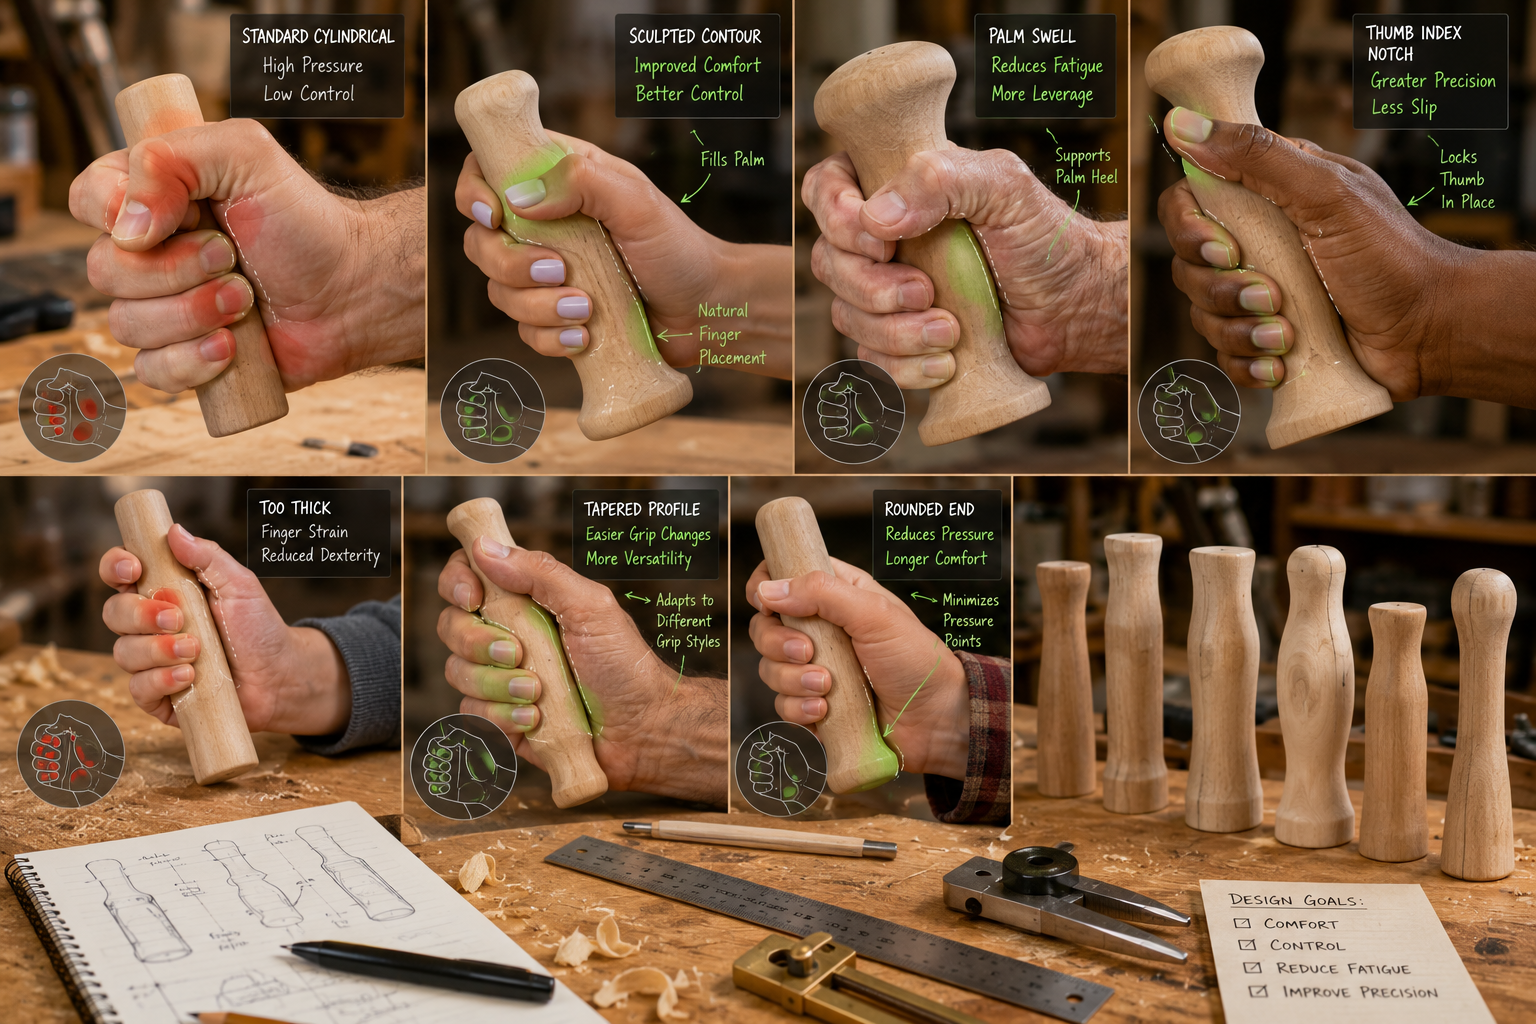
Key principles for ergonomic handle design:
- Diameter and Shape: A handle that is too thin requires excessive gripping force from the fingers. One that is too thick can make it difficult to fully wrap the fingers, leading to a less secure grip. The ideal diameter often matches the natural curve of the hand, allowing the fingers to comfortably curl around it without overlap or strain. A slightly oval or teardrop shape can often conform better to the palm than a perfectly round one.
- Length: The handle should be long enough to accommodate the entire hand, preventing fingers from slipping off the end and ensuring even weight distribution.
- Texture and Material: A smooth, yet non-slip surface is crucial. Wood is an excellent material for handles due to its natural warmth, slight give, and ability to absorb some vibration. Its porous nature can also provide a subtle grip.
- Balance: The handle’s weight and balance relative to the tool head significantly impact maneuverability and reduce fatigue. A well-balanced tool feels lighter and requires less effort to control.
By thoughtfully considering these elements, woodworkers can move beyond generic designs to create handles that are truly extensions of their own hands, leading to improved outcomes in every project. For further insights into optimizing your workspace, consider exploring our guide on Creating Ergonomic Workshop Furniture: Building Custom Workbenches, Stools, and Storage to Prevent Strain and Increase Productivity.
Materials and Techniques for Crafting Ergonomic Wooden Hand Tool Handles
The journey of Crafting Ergonomic Wooden Hand Tool Handles: Upgrading Comfort and Control for Extended Woodworking Sessions begins with material selection and progresses through precise shaping techniques. The choice of wood is paramount, influencing not only the aesthetics but also the durability, feel, and overall ergonomic performance of the handle.
Choosing the Right Wood Species
When selecting wood for tool handles, several characteristics are important:
- Hardness: Harder woods generally offer better durability and resistance to dents and dings.
- Grain Structure: A fine, interlocking grain provides strength and prevents splitting, especially around the tang or ferrule.
- Density: Denser woods often feel more substantial and contribute to tool balance.
- Comfort: Some woods feel naturally warmer or smoother to the touch.
Here’s a comparison of popular wood species for handles:
| Wood Species | Hardness (Janka) | Key Characteristics | Best Uses |
|---|---|---|---|
| Maple | 1450 lbf | Hard, dense, fine grain, takes finish well | Chisels, files, mallets |
| Cherry | 950 lbf | Moderate hardness, attractive grain, warm feel | Carving tools, knife handles |
| Walnut | 1010 lbf | Moderate hardness, dark color, good shock absorption | Saws, larger chisels, mallets |
| Ash | 1320 lbf | Strong, flexible, excellent shock resistance | Axes, hammers, heavy-duty tools |
| Hickory | 1820 lbf | Very hard, strong, tough, excellent shock absorption | Heavy-impact tools, striking tools |
(Janka Hardness values are approximate and can vary)
Consider the tool’s purpose. A carving tool might benefit from the warmth and smooth finish of cherry, while a chisel handle needs the robustness of maple or walnut.
Shaping Techniques for Optimal Ergonomics
The actual shaping of the handle is where the ergonomic principles come to life. The process typically involves a combination of stock removal and refinement.

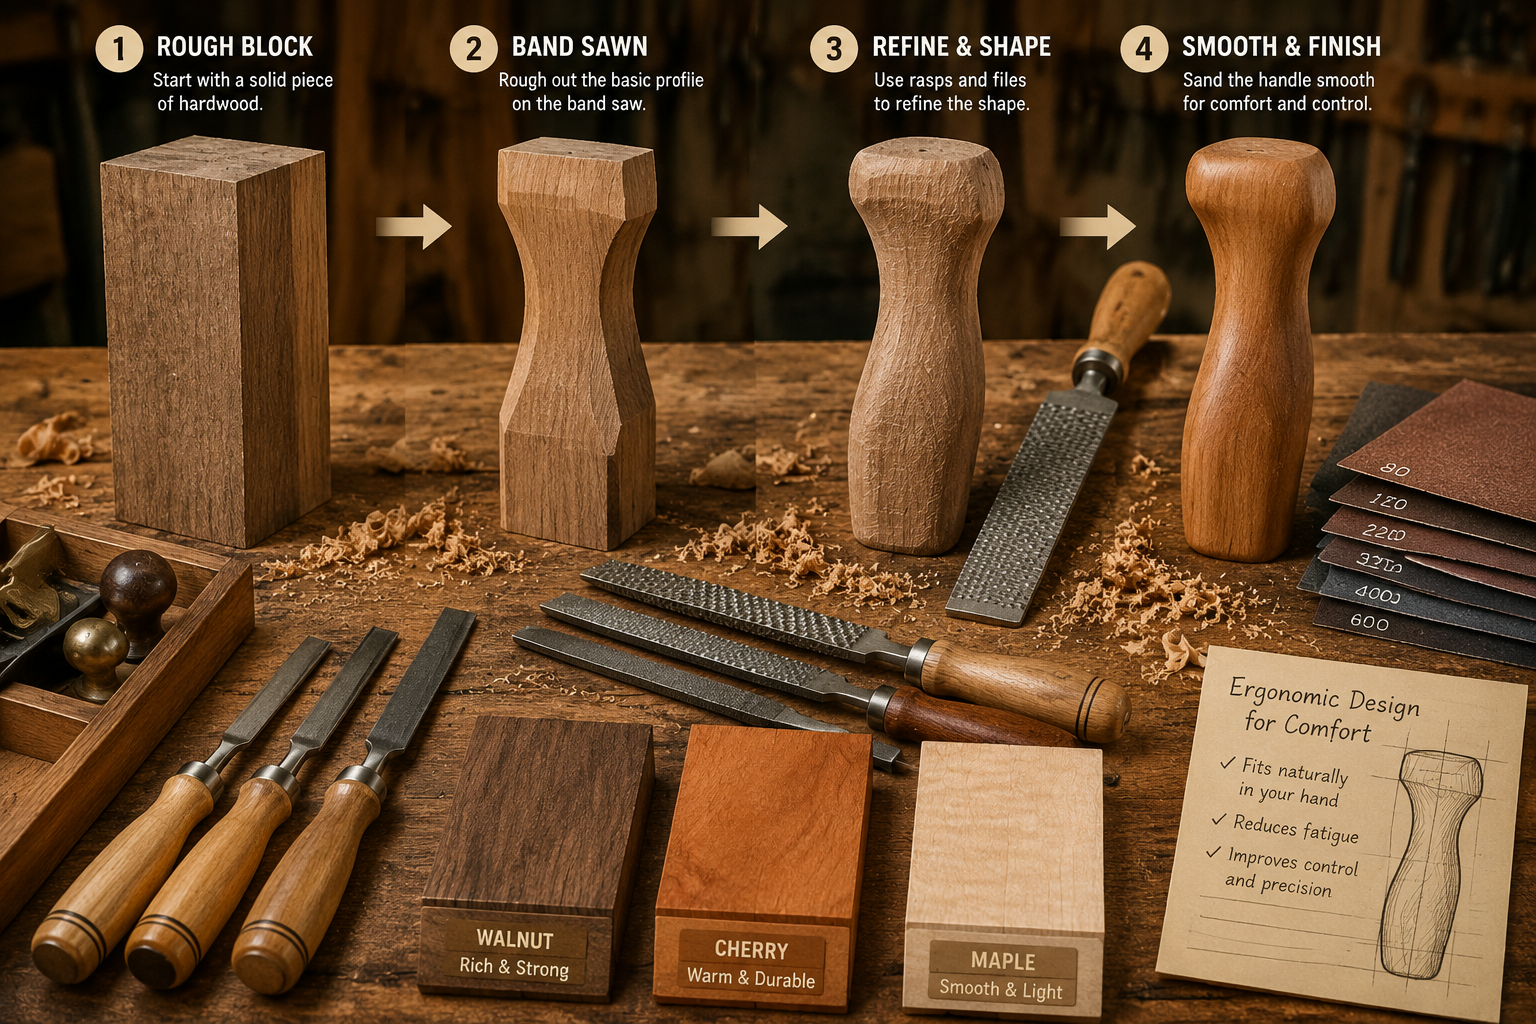
1. Roughing Out: Start by cutting the handle blank to its approximate length and general profile. This can be done using a band saw, ensuring you leave enough material for subsequent shaping. For handles with a specific tang or ferrule, ensure the mortise or bore is accurately drilled or chiseled at this stage.
2. Initial Shaping (Stock Removal): This is where the bulk of the material is removed to achieve the handle’s general form.
- Carving Tools: For intricate shapes, various wood carving tools like gouges and knives are essential.
- Rasps and Files: These are indispensable for quickly removing material and defining curves. Start with coarser rasps for aggressive removal and move to finer files for smoother transitions.
- Spokeshaves: Excellent for shaping curves and roundovers on handles, allowing for good control over the cut.
- Lathe (for round handles): If crafting perfectly round or symmetrical handles for tools like awls or small chisels, a wood lathe is ideal. For an introduction, see our guide on Introduction to Wood Turning for Beginners: Mastering Basic Lathe Operations and Simple Bowl Projects.
3. Refining and Fitting: This crucial stage involves test-fitting the handle to your hand repeatedly.
- Feel for hot spots: Grip the handle as if you were using the tool. Are there any sharp edges or uncomfortable pressure points?
- Check wrist alignment: Does the handle encourage a neutral wrist position?
- Adjust curves and contours: Use finer files, scrapers, and sandpaper (progressing through grits from 80-grit to 220-grit) to refine the shape, creating gentle swells and depressions that perfectly fit your palm and fingers. Consider subtle finger grooves if they enhance grip without restricting movement.
- Chamfering/Rounding Edges: Ensure all edges are softly rounded to prevent discomfort.
4. Surface Preparation and Finishing: Once the shape is perfected and sanded smooth (up to 320 or 400-grit), it’s time for finishing.
- Oil Finishes: Penetrating oil finishes like tung oil, linseed oil, or a Danish oil blend are excellent for tool handles. They penetrate the wood, offer good protection, enhance the natural grain, and provide a tactile, non-slippery grip that improves with age. Apply multiple thin coats, wiping off excess between coats.
- Wax Finishes: A final coat of paste wax can add an extra layer of protection and a silky smooth feel.
- Avoid Varnish/Polyurethane: While durable, these film finishes can create a slick surface that reduces grip, defeating the ergonomic purpose.
By combining the right wood with thoughtful shaping and finishing, woodworkers can create handles that not only look beautiful but also significantly enhance the comfort and utility of their favorite hand tools.
The Impact of Custom Handles: Upgrading Comfort, Control, and Precision
The investment in Crafting Ergonomic Wooden Hand Tool Handles: Upgrading Comfort and Control for Extended Woodworking Sessions yields tangible benefits that transform the woodworking experience. It’s more than just a cosmetic upgrade; it’s a fundamental improvement in the interaction between the artisan and their instruments.
Enhanced Comfort and Reduced Fatigue
The most immediate and appreciated benefit of a custom ergonomic handle is the dramatic improvement in comfort. Generic handles often force a less-than-ideal grip, leading to:
- Muscle strain: Especially in the forearm, wrist, and hand.
- Pressure point discomfort: Causing blisters or soreness.
- Nerve compression: Contributing to numbness or tingling.
A handle tailored to an individual’s hand mitigates these issues. The natural contours, appropriate diameter, and smooth transitions distribute forces evenly, allowing muscles to work more efficiently and with less stress. This means longer, more productive woodworking sessions without the usual onset of fatigue and discomfort. Imagine using your favorite chisel for an extended period, maintaining the same level of focus and comfort as when you began.
Superior Control and Precision
Beyond comfort, ergonomic handles significantly improve a woodworker’s control over their tools.
- Secure Grip: A handle that fits perfectly reduces the need to constantly adjust grip or clench the hand tightly, freeing up mental energy and allowing for more fluid movements.
- Feedback: Wood, particularly with an oil finish, offers excellent tactile feedback, allowing the user to better “feel” the cut and respond with greater sensitivity.
- Reduced Slippage: A well-designed wooden handle, often with a subtle texture or slight swells, provides a more secure grip than slick plastic or metal, especially when hands might be slightly damp or dusty. This enhanced grip directly translates to greater precision in critical operations like mastering dovetail joints with hand tools or delicate carving.

Longevity and Personal Connection
Custom wooden handles also contribute to the longevity of the tool itself. By providing a better grip, they can help prevent accidental drops or mishandling, protecting the tool’s blade or head. Furthermore, the act of crafting a custom handle fosters a deeper personal connection with the tool. It transforms a generic implement into a personalized extension of the artisan, imbued with care and craftsmanship. This enhances the overall enjoyment of woodworking, making each project feel more personal and fulfilling.

Considering the importance of tools, ensuring they are well-maintained is also crucial. For guidance on keeping your edges sharp, refer to The Ultimate Guide to Sharpening Woodworking Chisels and Planes: Achieving Razor Sharp Edges. By upgrading handles and maintaining sharp edges, woodworkers ensure their hand tools perform at their absolute best.
Conclusion
The journey of Crafting Ergonomic Wooden Hand Tool Handles: Upgrading Comfort and Control for Extended Woodworking Sessions is a highly rewarding endeavor for any serious woodworker. It moves beyond merely using tools to truly personalizing and optimizing them for individual comfort, health, and performance. By understanding the fundamentals of hand biomechanics, carefully selecting appropriate wood species, and applying meticulous shaping and finishing techniques, woodworkers can transform their hand tools into seamless extensions of their own hands.
In 2026, as woodworking continues to be celebrated for its blend of skill and artistry, the emphasis on ergonomic design will only grow. Investing time in custom handle fabrication not only mitigates the risk of long-term injuries but also unlocks new levels of precision, control, and enjoyment in every project. Take the step to upgrade your tools; your hands, your craft, and your overall woodworking experience will thank you.
Actionable Next Steps:
- Assess Your Tools: Identify the hand tools you use most frequently and where you experience the most discomfort.
- Research Wood Options: Based on the tool’s use and your aesthetic preferences, select a suitable wood species.
- Gather Materials: Acquire a block of your chosen wood, appropriate carving tools, rasps, files, and sandpaper.
- Start Small: Begin with a less critical tool or a practice blank to hone your shaping skills.
- Iterate and Refine: The key to true ergonomics is continuous test-fitting and refinement until the handle feels perfectly comfortable and secure in your hand.
