


In 2026, indoor gardening continues its rapid ascent, driven by a desire for fresh, homegrown produce and a deeper connection to nature, regardless of outdoor space limitations. While pre-built hydroponic systems are readily available, the true magic often lies in customization – specifically, marrying the precision of woodworking with the efficiency of modern hydroponics. This article delves into the comprehensive process of Building a DIY Hydroponic Herb Garden Stand: Integrating Woodworking with Indoor Gardening Systems, transforming raw timber into a functional, aesthetically pleasing, and highly efficient growing environment for your favorite herbs. By combining traditional craft with innovative technology, you can create a centerpiece that not only yields fresh basil, mint, or cilantro but also showcases your craftsmanship.
Key Takeaways
- Design for Durability: Choose water-resistant woods and apply proper sealing techniques to ensure your stand withstands the moist hydroponic environment.
- Integrated Functionality: Plan for nutrient reservoirs, plumbing, and lighting before construction to ensure seamless system integration.
- Structural Stability: Employ robust joinery and a solid frame to safely support the weight of water, plants, and equipment.
- Aesthetic Appeal: Consider wood finishes, plant spacing, and overall design to create a visually appealing piece that complements your home decor.
- Sustainable Gardening: A DIY stand allows for efficient, year-round herb cultivation, reducing reliance on store-bought produce and fostering a greener lifestyle.
Designing and Planning Your Hydroponic Herb Garden Stand
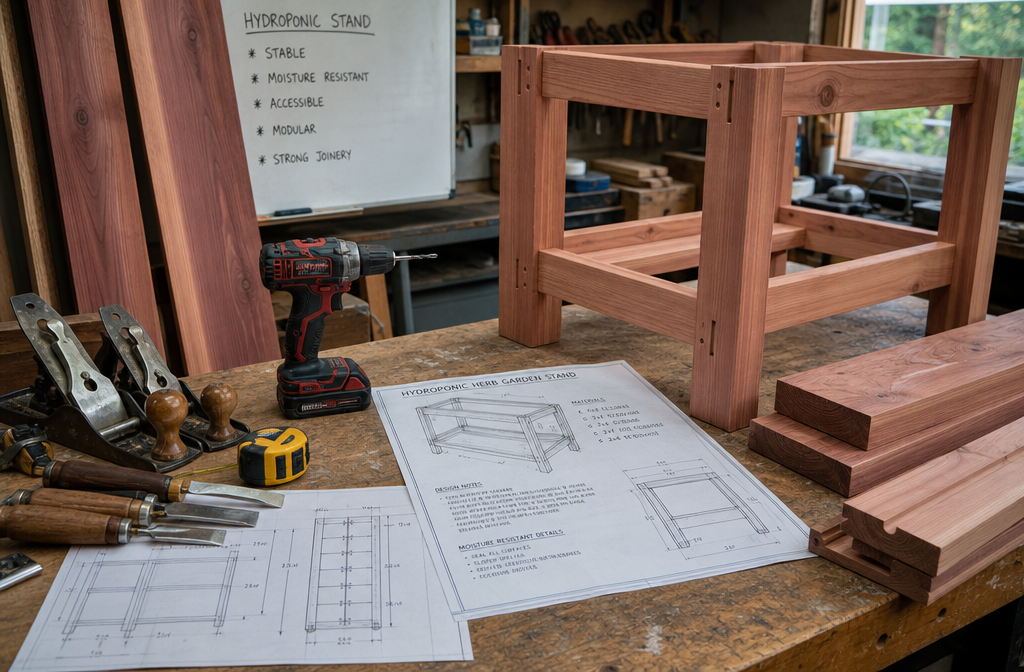
The foundation of any successful woodworking project is meticulous planning, and this holds especially true when Building a DIY Hydroponic Herb Garden Stand: Integrating Woodworking with Indoor Gardening Systems. You’re not just building a shelf; you’re creating a small, self-contained ecosystem.

Essential Design Considerations
Before cutting the first piece of wood, visualize the final product.
- Location: Where will your stand live? This dictates size, style, and whether you need features like wheels for mobility.
- Hydroponic Method: Will you use Nutrient Film Technique (NFT), Deep Water Culture (DWC), or a drip system? Each has different space and reservoir requirements.
- Number of Plants: How many herb plants do you want to grow? This determines the number of tiers and growing sites.
- Lighting: LED grow lights are crucial. Plan for mounting points, cable management, and adjustable height if desired.
- Water Management: Consider the size and placement of the nutrient reservoir, pump, and plumbing. Easy access for refilling and cleaning is paramount.
- Aesthetics: Do you want a rustic, modern, minimalist, or industrial look? The wood choice and finish will heavily influence this.
Choosing the Right Materials: Water-Resistant Woods and Components
Wood and water typically don’t mix well, so material selection is critical for longevity.
- Water-Resistant Wood:
- Cedar: Naturally resistant to rot and insects due to its oils. Aromatic and beautiful.
- Redwood: Similar to cedar in resistance, but often more expensive.
- Teak: Extremely durable and water-resistant, but very costly.
- Pressure-Treated Lumber: Designed for outdoor use, but be cautious with direct contact with edible plants due to chemicals. If used, ensure it’s properly sealed and consider lining areas that directly contact water.
- Composite Decking: While not wood, it’s a highly water-resistant alternative for shelves or base if you’re open to non-wood materials for wet zones.
- Sealing and Finishing: Even water-resistant woods benefit from sealing. Marine-grade varnishes, epoxy resins, or spar urethane provide excellent protection. For areas in direct contact with nutrient solution, a food-safe pond liner or thick plastic sheeting is recommended to create a barrier. Learn more about how to finish mahogany for outdoor use for insights into durable wood finishing.
- Hardware: Use stainless steel screws, bolts, and hinges to prevent rust in a humid environment.
- Hydroponic Components:
- Reservoir: Food-grade plastic totes are ideal.
- Pump: Submersible water pump sized for your system.
- Tubing: Food-grade PVC or silicone tubing.
- Net Pots & Growing Medium: Standard hydroponic net pots and coco coir, rockwool, or clay pebbles.
- Grow Lights: Full-spectrum LED grow lights are energy-efficient and effective.
Sketching and Prototyping
Start with detailed sketches from multiple angles, then create a cut list. For complex designs, a scale model or a 3D CAD drawing can identify potential issues before you start cutting. Consider structural integrity, especially since the stand will bear the weight of water-filled reservoirs and plants. Refer to guides like Building a Custom Wood Workbench: Design Considerations and for inspiration on sturdy frame construction.
Construction: Integrating Woodworking with Hydroponic Systems

With a solid plan in place, the construction phase brings your vision to life. This is where your woodworking skills truly shine, particularly in ensuring the stand can gracefully accommodate all hydroponic components.
Building the Structural Frame
The frame must be sturdy. Utilize strong joinery techniques appropriate for the chosen wood.
- Mortise and Tenon: Offers excellent strength and aesthetics.
- Half-Lap Joints: Relatively simple and strong for connecting members.
- Pocket Hole Joinery: Quick and effective for many applications, but ensure screws are stainless steel.
- Through-Tenons: Can add a decorative element while providing maximum strength.
Dimension your frame to comfortably hold your chosen hydroponic trays or troughs on multiple tiers. Remember to account for the depth of the nutrient reservoir at the bottom. For complex joints, tools like a router table can achieve precision cuts. Consider integrating shelves or compartments for storing nutrients, pH testing kits, and other supplies.
Incorporating Hydroponic Elements
This is the core of integrating systems.
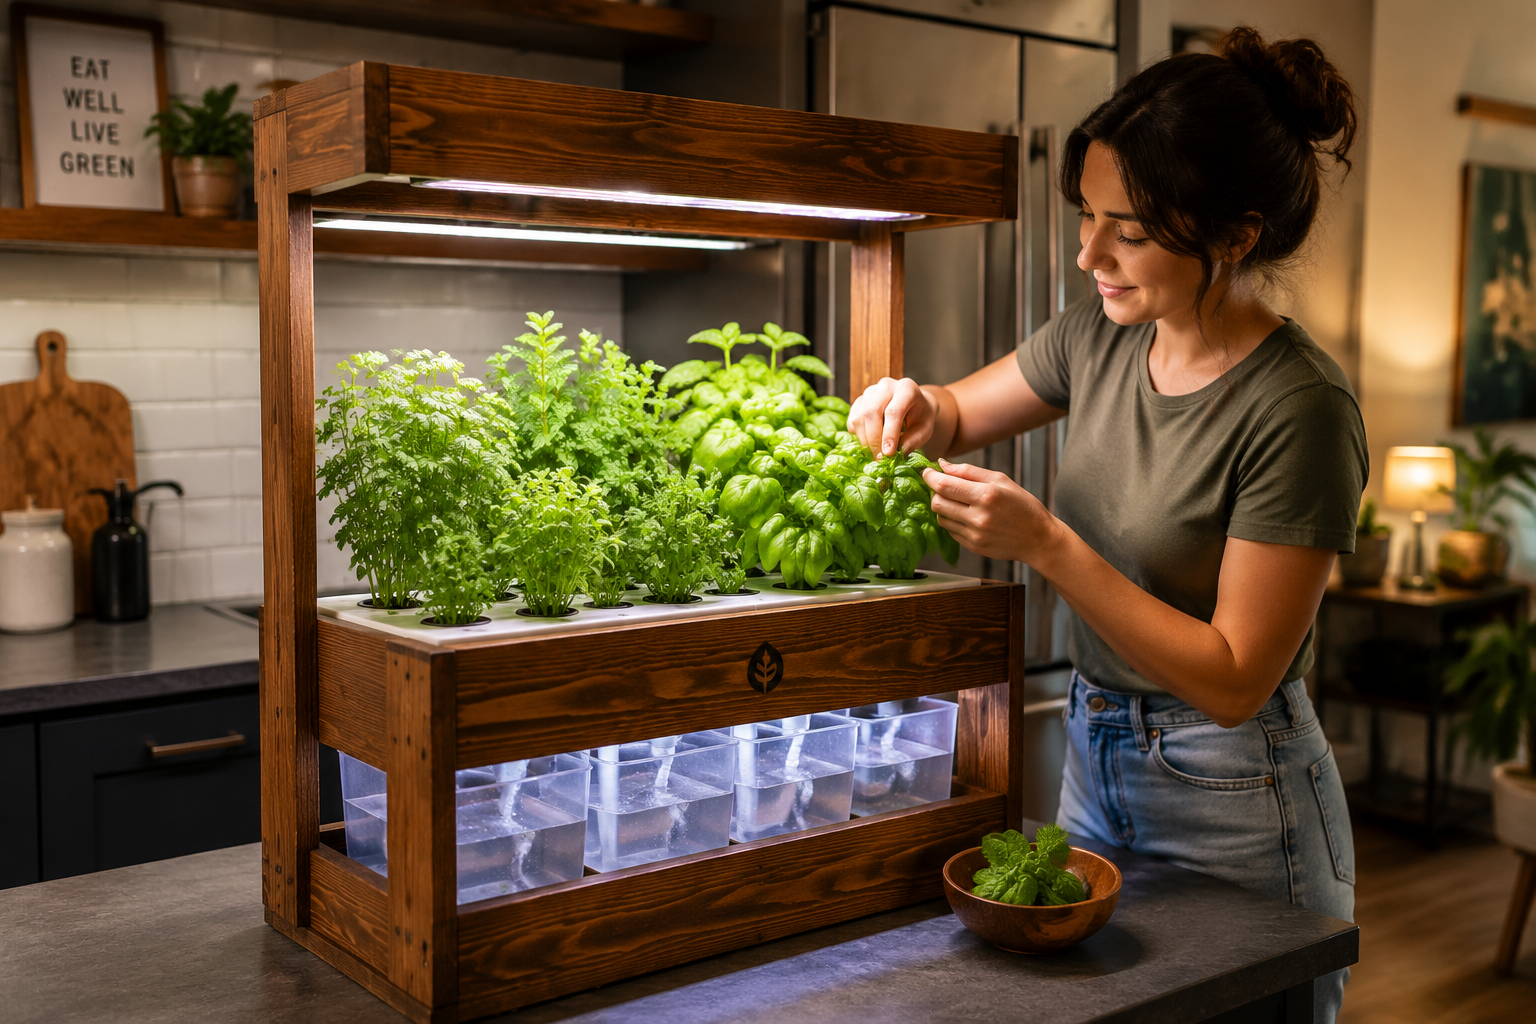
- Reservoir Placement: Design a dedicated, easily accessible compartment at the base for the nutrient reservoir. Ensure it’s large enough to minimize frequent refilling and can be removed for cleaning.
- Plumbing Pathways: Route PVC or flexible tubing through the wooden structure. Drill precise holes for water lines to run discreetly, ideally along vertical supports or under shelves, minimizing exposure and potential damage.
- Grow Light Mounts: Incorporate sturdy cross-members or dedicated mounting points for your LED grow lights directly above each growing tier. These often need to be adjustable to accommodate plant growth. Some designs use chains or cables for easy height adjustment.
- Wiring Management: Plan for power cables for the grow lights and pump. Create channels or use cable clips to keep wires tidy and safe, preventing them from dangling into water or becoming tripping hazards. A DIY Smart Home Integration with Custom Wooden Enclosures: Concealing approach could be adapted here to hide wiring.
- Waterproofing Critical Areas: Any wooden surface that will come into direct or frequent contact with water should be sealed meticulously. Use marine-grade sealants or apply a waterproof liner. For trays, consider using food-grade PVC pipe cut lengthwise to create troughs, or purchase ready-made hydroponic trays that fit your stand’s dimensions.
Finishing for Longevity and Aesthetics
- Sanding: Sand all surfaces smooth, progressively moving to finer grits. This enhances the beauty of the wood and prepares it for finishing.
- Staining (Optional): Apply a wood stain to achieve your desired color.
- Protective Finish: This is crucial. Apply multiple coats of a waterproof finish like spar urethane, marine varnish, or an epoxy sealer. Pay extra attention to end grain, which absorbs moisture more readily. Ensure the finish is fully cured before introducing water.
- Assembly: Securely fasten all components using stainless steel hardware. Check for stability and levelness.
Setting Up and Maintaining Your DIY Hydroponic Herb Garden
Once your stand is built and finished, the final step is to set up your hydroponic system and begin growing your herbs. This section outlines the practical steps and maintenance tips for a thriving indoor garden.
System Assembly and Initial Setup
- Place the Reservoir: Position your clean, food-grade reservoir in its designated space at the base of the stand.
- Install the Pump: Place the submersible pump inside the reservoir. Connect it to the main water line that will deliver nutrient solution to your plants.
- Run Plumbing: Route the tubing as planned, ensuring it reaches all growing sites. For DWC, air stones and an air pump will also be needed. For NFT or drip systems, ensure even distribution to each plant. Secure all connections to prevent leaks.
- Install Grow Lights: Mount your LED grow lights at the appropriate height above the growing tiers. Most herbs require 12-16 hours of light per day.
- Fill with Nutrient Solution: Fill the reservoir with dechlorinated water and add hydroponic nutrients according to the manufacturer’s instructions. Test the pH and adjust it to the ideal range for herbs (typically 5.5-6.5).
- Planting: Place your young herb plants, seedlings, or clones into net pots with your chosen growing medium. Carefully position them in the growing sites.
Choosing and Cultivating Herbs
Many herbs thrive in hydroponic systems:
- Basil: Fast-growing and prolific.
- Mint: Very easy to grow, but can be invasive – keep it isolated.
- Cilantro: Prefers cooler temperatures.
- Parsley: A consistent producer.
- Oregano & Thyme: Slower growing but rewarding.
- Lettuce & Arugula: While not herbs, they are excellent candidates for hydroponics and fit well on such a stand.
Ongoing Maintenance for a Thriving Garden
Consistent care is key to a productive hydroponic garden.
- Nutrient Solution Checks:
- pH: Test daily or every other day and adjust as needed. Fluctuations can harm plants.
- EC/TDS: Monitor the electrical conductivity or total dissolved solids to ensure plants are receiving adequate nutrients. Top up with fresh nutrient solution as needed.
- Reservoir Changes: Completely change the nutrient solution every 1-2 weeks to prevent nutrient imbalances and pathogen buildup. Clean the reservoir thoroughly during changes.
- Pruning and Harvesting: Regularly prune your herbs to encourage bushier growth and prevent them from bolting (going to seed). Harvest leaves as needed, typically from the top or outer edges.
- Pest and Disease Monitoring: Inspect plants daily for any signs of pests or diseases. Early detection is crucial in an indoor environment. Good airflow around the plants, possibly with a small fan, can help prevent fungal issues.
- Light Adjustment: As plants grow, adjust the height of your grow lights to maintain the optimal distance, preventing stretching or burning.
By meticulously Building a DIY Hydroponic Herb Garden Stand: Integrating Woodworking with Indoor Gardening Systems and adhering to a consistent maintenance schedule, you will enjoy a continuous supply of fresh, flavorful herbs, enhancing your culinary endeavors and bringing a vibrant green element into your home.
Conclusion
Building a DIY hydroponic herb garden stand is a rewarding project that seamlessly blends the artistry of woodworking with the innovation of indoor gardening. It’s an opportunity to create a custom, functional piece of furniture that not only enhances your living space but also provides a sustainable source of fresh herbs year-round. From selecting water-resistant woods and designing for integrated plumbing and lighting to the meticulous construction and ongoing care, each step contributes to a successful and beautiful outcome.
By taking the time to plan carefully, choose appropriate materials, and apply sound woodworking techniques, you can overcome the challenges of integrating water-based systems into a wooden structure. The result is more than just a stand; it’s a testament to your craftsmanship and a vibrant, living addition to your home. Embrace the journey of creation, and soon you’ll be harvesting fresh herbs from your very own custom-built hydroponic garden stand. For more advanced woodworking concepts that can enhance future projects, consider exploring advanced wood carving techniques for decorative furniture accents or delve into high-demand woodworking projects for 2026 for your next endeavor.

References
- Chambers, A. (2018). Hydroponics for Beginners: The Ultimate Guide to Building Your Own Hydroponic System. Independently published.
- Jones, R. (2021). The Woodworker’s Guide to Water-Resistant Projects. Woodworking Monthly.
- Resh, H. M. (2013). Hydroponic Food Production: A Definitive Guidebook for the Advanced Home Gardener and the Commercial Hydroponic Grower (7th ed.). CRC Press.
SEO Meta Title: Build a DIY Hydroponic Herb Garden Stand (2026) SEO Meta Description: Learn to build a DIY hydroponic herb garden stand in 2026. Integrate woodworking with indoor gardening for fresh herbs year-round.
