

Achieving professional-grade finishes on all your woodworking projects transforms a simple piece of wood into a masterpiece. This in-depth guide demystifies stains, oils, and lacquers, providing step-by-step instructions for application, common pitfalls, and achieving a durable, beautiful surface. Whether you’re a seasoned woodworker or just starting, mastering The Art of Wood Finishing: Step-by-Step Guide to Stains, Oils, and Lacquers for Professional Results is crucial for elevating your craft in 2026. This article will equip you with the knowledge and techniques to create stunning, long-lasting finishes that truly showcase the natural beauty of wood.
Key Takeaways
- Proper wood preparation is the most critical step for any professional finish.
- Understanding the characteristics of stains, oils, and lacquers helps choose the best product for your project.
- Applying finishes in thin, even coats and adhering to proper drying times prevents common defects.
- Sanding between coats and using appropriate application methods are vital for smooth, durable results.
- Safety precautions and proper ventilation are non-negotiable when working with wood finishes.
Preparing the Surface: The Foundation of Professional Wood Finishing
The secret to a flawless finish doesn’t begin with the brush or sprayer; it starts long before, with meticulous surface preparation. Skipping this crucial stage is the most common reason for unsatisfactory results. Just as a building needs a strong foundation, a beautiful finish demands a perfectly prepared surface.

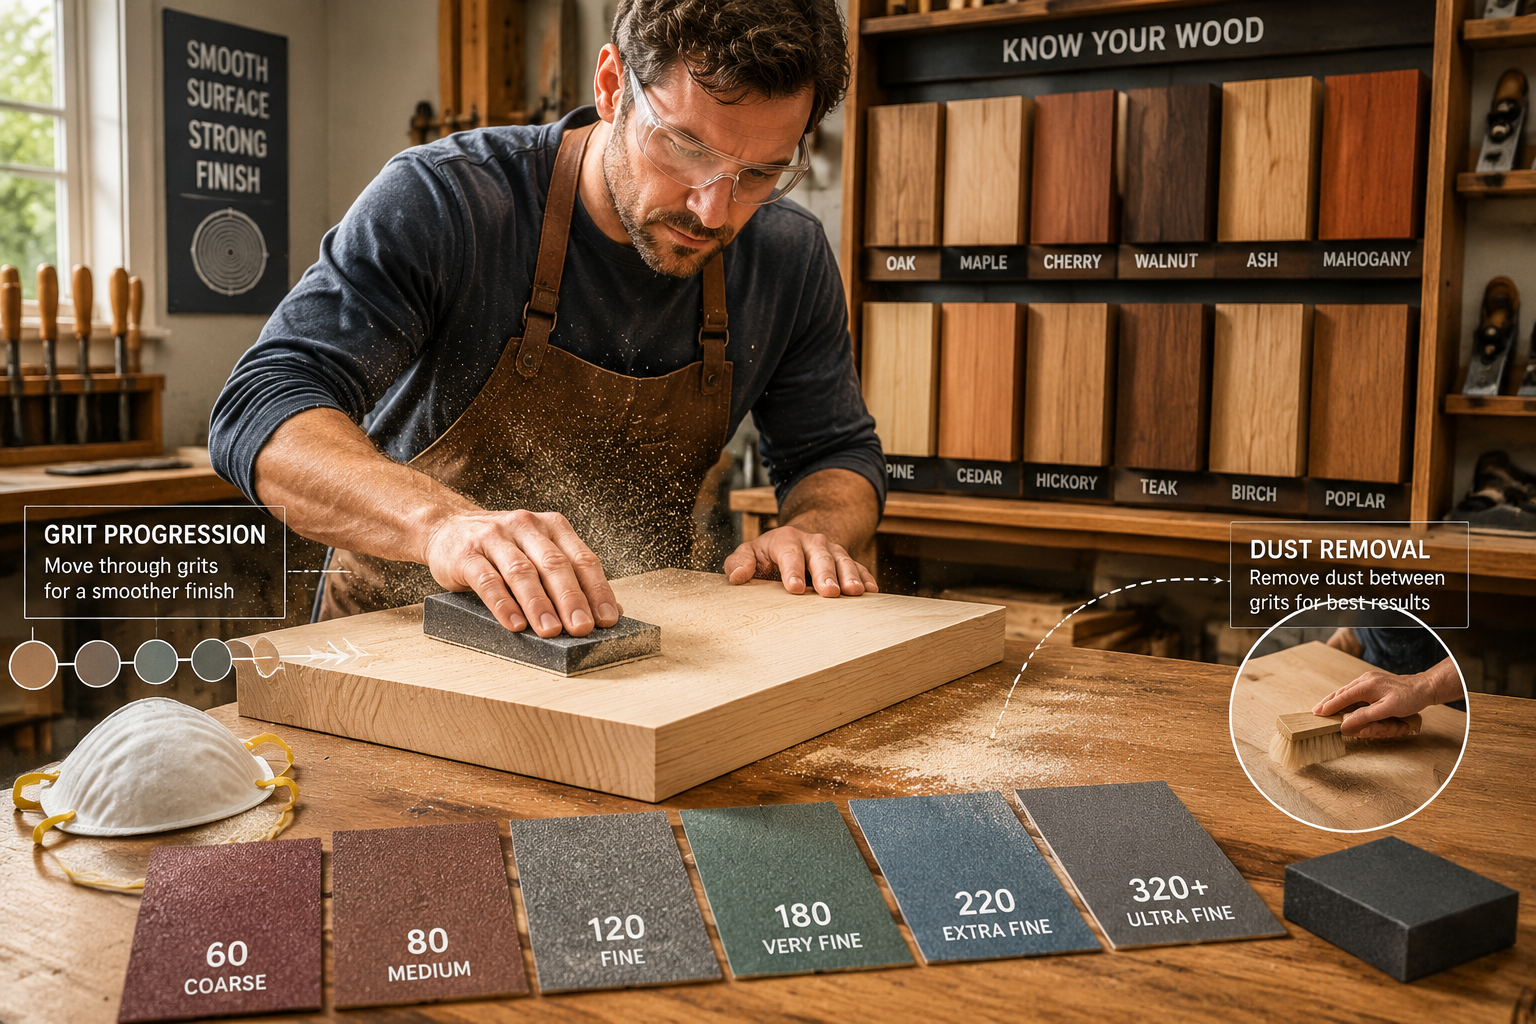
Essential Sanding Techniques and Grit Progression
Sanding is fundamental. Its purpose is to create a smooth, uniform surface that will accept the chosen finish evenly. Start with a coarse grit sandpaper and gradually work your way to finer grits. A typical progression might look like this:
- Rough Sanding (80-100 grit): Use this for initial shaping, removing mill marks, glue squeeze-out, or significant imperfections.
- Medium Sanding (120-150 grit): This removes scratches left by the coarser grit.
- Fine Sanding (180-220 grit): This prepares the surface for most stains and clear finishes. For very fine work or if you’re using a wiping oil finish, you might go up to 320 or even 400 grit.
- Pro Tip: Always sand with the grain of the wood. Sanding across the grain will leave visible scratches that become amplified once a finish is applied.
- Moisture Pop: After sanding to your final grit, wipe the wood down with a damp cloth to raise any compressed wood fibers. Let it dry completely, then lightly sand again with your final grit (e.g., 220). This “wakes up” the grain and helps prevent blotchiness, especially with softwoods or woods prone to uneven staining.
Dust Removal and Surface Cleaning
After sanding, dust is your enemy. Even the tiniest dust particle can compromise a perfect finish, leading to bumps or an uneven appearance.
- Vacuuming: Use a shop vacuum with a brush attachment to remove as much dust as possible from the workpiece and your workspace.
- Compressed Air: A gentle blast of compressed air can dislodge dust from intricate carvings or tight corners.
- Tack Cloth: A tack cloth is a resin-impregnated cloth that effectively picks up fine dust particles. Wipe gently, avoiding excessive pressure that might transfer residue.
- Denatured Alcohol or Mineral Spirits: For a final clean, wipe the wood surface with a cloth dampened with denatured alcohol or mineral spirits. This also reveals any missed glue spots or sanding imperfections that need further attention. Ensure the wood is completely dry before applying any finish.
For guidance on working with raw materials, check out our article on Live Edge Slab Selection and Milling: From Raw Wood to Finis which emphasizes the importance of initial preparation for subsequent finishing stages.
Understanding and Applying Different Finishes: Stains, Oils, and Lacquers
Each type of wood finish offers distinct characteristics, appearances, and levels of protection. Choosing the right one for your project is crucial for achieving The Art of Wood Finishing: Step-by-Step Guide to Stains, Oils, and Lacquers for Professional Results.
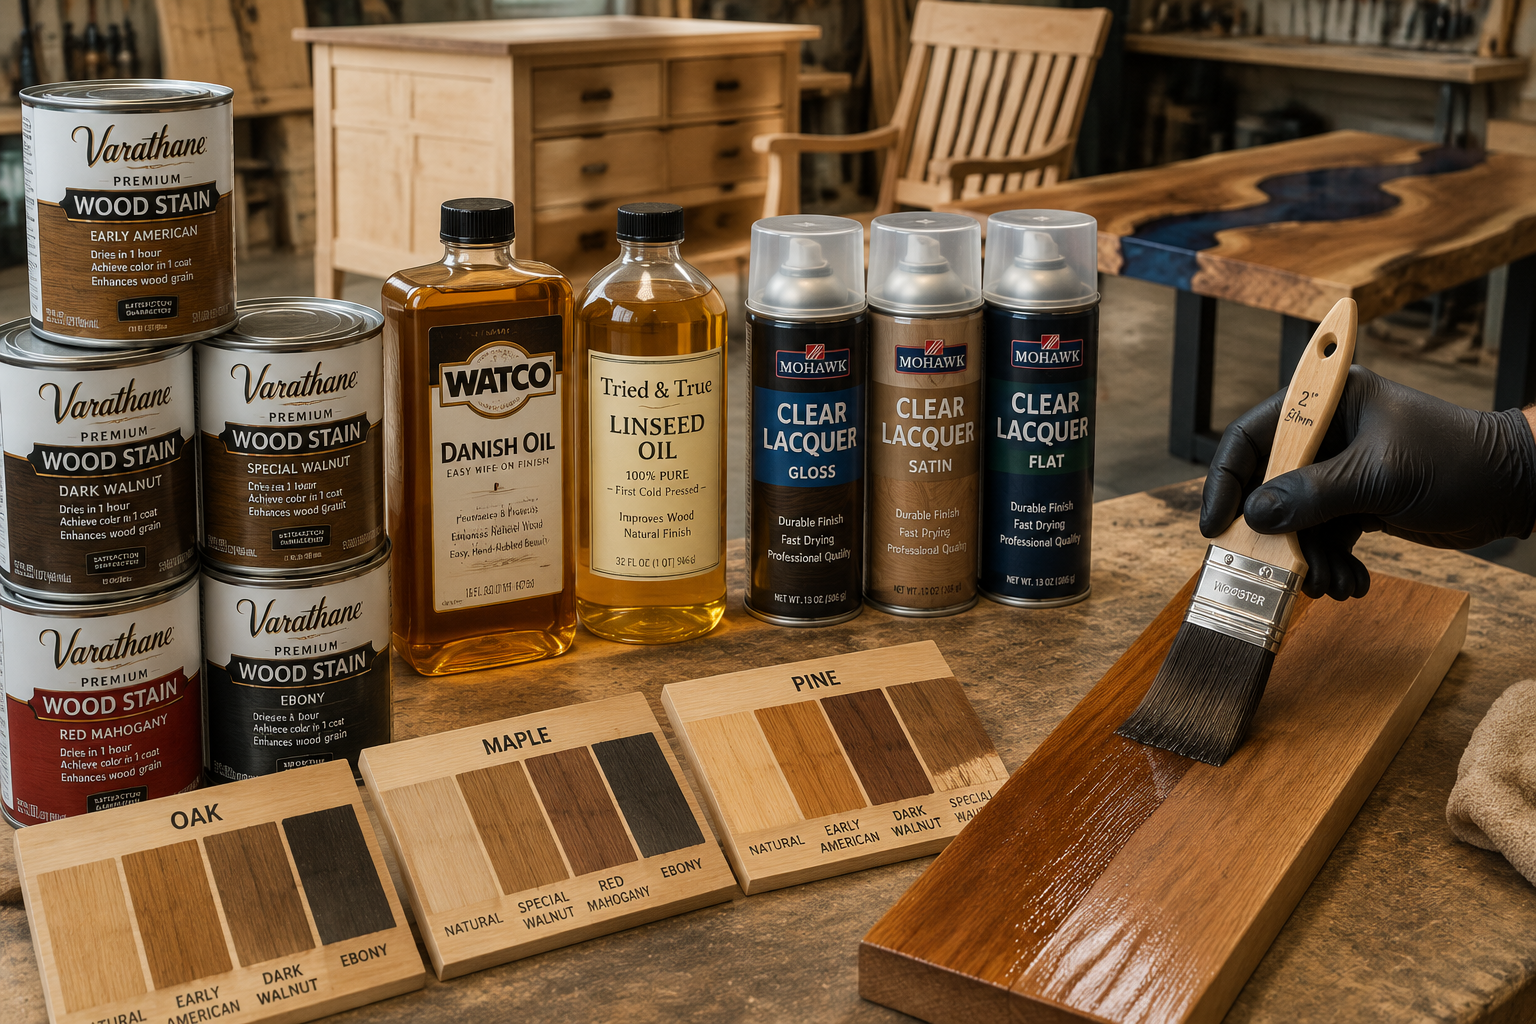
1. Wood Stains: Enhancing Color and Grain
Stains penetrate the wood fibers to add color, enhancing the natural grain patterns. They don’t provide much protection, so they are typically topped with a clear coat.
- Types of Stains:
- Oil-Based Stains: Common, easy to apply, offer longer open time, and deep penetration.
- Water-Based Stains: Faster drying, low odor, and easier cleanup. Can raise the grain, so pre-wetting the wood (as in the “moisture pop” technique) is beneficial.
- Gel Stains: Thicker consistency, less prone to blotching, good for difficult woods like pine or maple. They sit more on the surface than penetrate.
- Application Process:
- Pre-Stain Conditioner (Optional but Recommended): For blotch-prone woods (pine, maple, birch, cherry), apply a pre-stain conditioner. This helps the stain absorb more evenly. Let it dry according to the manufacturer’s instructions.
- Apply Stain: Apply an even coat of stain with a brush, rag, or foam applicator. Work in small sections, always with the grain.
- Wipe Off Excess: After allowing the stain to penetrate for the recommended time (check the can – usually 5-15 minutes), wipe off any excess with a clean, lint-free cloth. Leaving excess stain on the surface can result in a gummy, uneven, or non-drying finish.
- Drying: Allow ample drying time between coats and before applying a topcoat. This can range from a few hours to 24-48 hours, depending on the stain type and humidity.
2. Wood Oils: Natural Beauty and Easy Repair
Oils penetrate deep into the wood fibers, hardening within the wood to provide protection while highlighting its natural warmth and feel. They are less about forming a surface film and more about becoming part of the wood itself.
- Types of Oils:
- Tung Oil: A natural, slow-drying oil that offers excellent water resistance and a natural, low-sheen finish.
- Linseed Oil (Boiled Linseed Oil – BLO): Also natural, provides a warm, golden hue. BLO contains drying agents to speed up cure time. Raw linseed oil dries extremely slowly.
- Danish Oil: A blend of oil, varnish, and thinner. It offers more protection than pure oil but still penetrates well, providing a beautiful, hand-rubbed look. For a detailed comparison, see our article on Danish Oil vs. Linseed: The Ultimate Wood Finishing Guide.
- Application Process:
- Apply Generously: Apply a liberal coat of oil with a rag or brush, ensuring the entire surface is wet.
- Allow Penetration: Let the oil soak in for 15-30 minutes. You may see dull spots where the wood has absorbed more oil; reapply oil to these areas.
- Wipe Off All Excess: This is CRITICAL. Wipe off all excess oil thoroughly with a clean, lint-free cloth. Any oil left on the surface will become sticky, gummy, and difficult to remove.
- Drying and Reapplication: Allow 12-24 hours for each coat to dry. Apply multiple thin coats (3-5 or more) for better protection and depth. Lightly sand with very fine sandpaper (e.g., 400-600 grit) or fine steel wool between coats to smooth out any raised grain.
- Safety Warning: Rags soaked with oil can spontaneously combust. Always lay them flat to dry or immerse them in water before discarding.
3. Lacquers: Durable, Fast-Drying Protection
Lacquers are film-forming finishes known for their fast drying times, high durability, and ability to be easily repaired. They create a hard, clear protective layer on the surface of the wood.
- Types of Lacquers:
- Nitrocellulose Lacquer: Traditional, easily sprayed, fast-drying, and can be recoated quickly. It offers a classic look but can be susceptible to alcohol and heat.
- Pre-Catalyzed Lacquer: More durable and chemical-resistant than nitrocellulose, with a longer pot life.
- Post-Catalyzed Lacquer: The most durable type, requiring a catalyst to be mixed in just before application. Used for high-traffic surfaces.
- Application Process (Typically Sprayed):
- Thin Coats: Lacquer is best applied in multiple thin coats using a spray gun. Over-application can lead to runs, drips, and a cloudy finish. Hold the sprayer about 6-8 inches from the surface and move steadily.
- Flash Off Time: Allow each coat to “flash off” (surface dry) for 15-30 minutes before applying the next. This rapid drying allows for multiple coats in a short period.
- Sanding Between Coats: Lightly sand with 320-400 grit sandpaper or fine abrasive pads every 2-3 coats to ensure a smooth, level surface. Clean dust thoroughly.
- Final Coats: Apply 2-3 final coats without sanding between them, allowing the lacquer to melt into a uniform film.
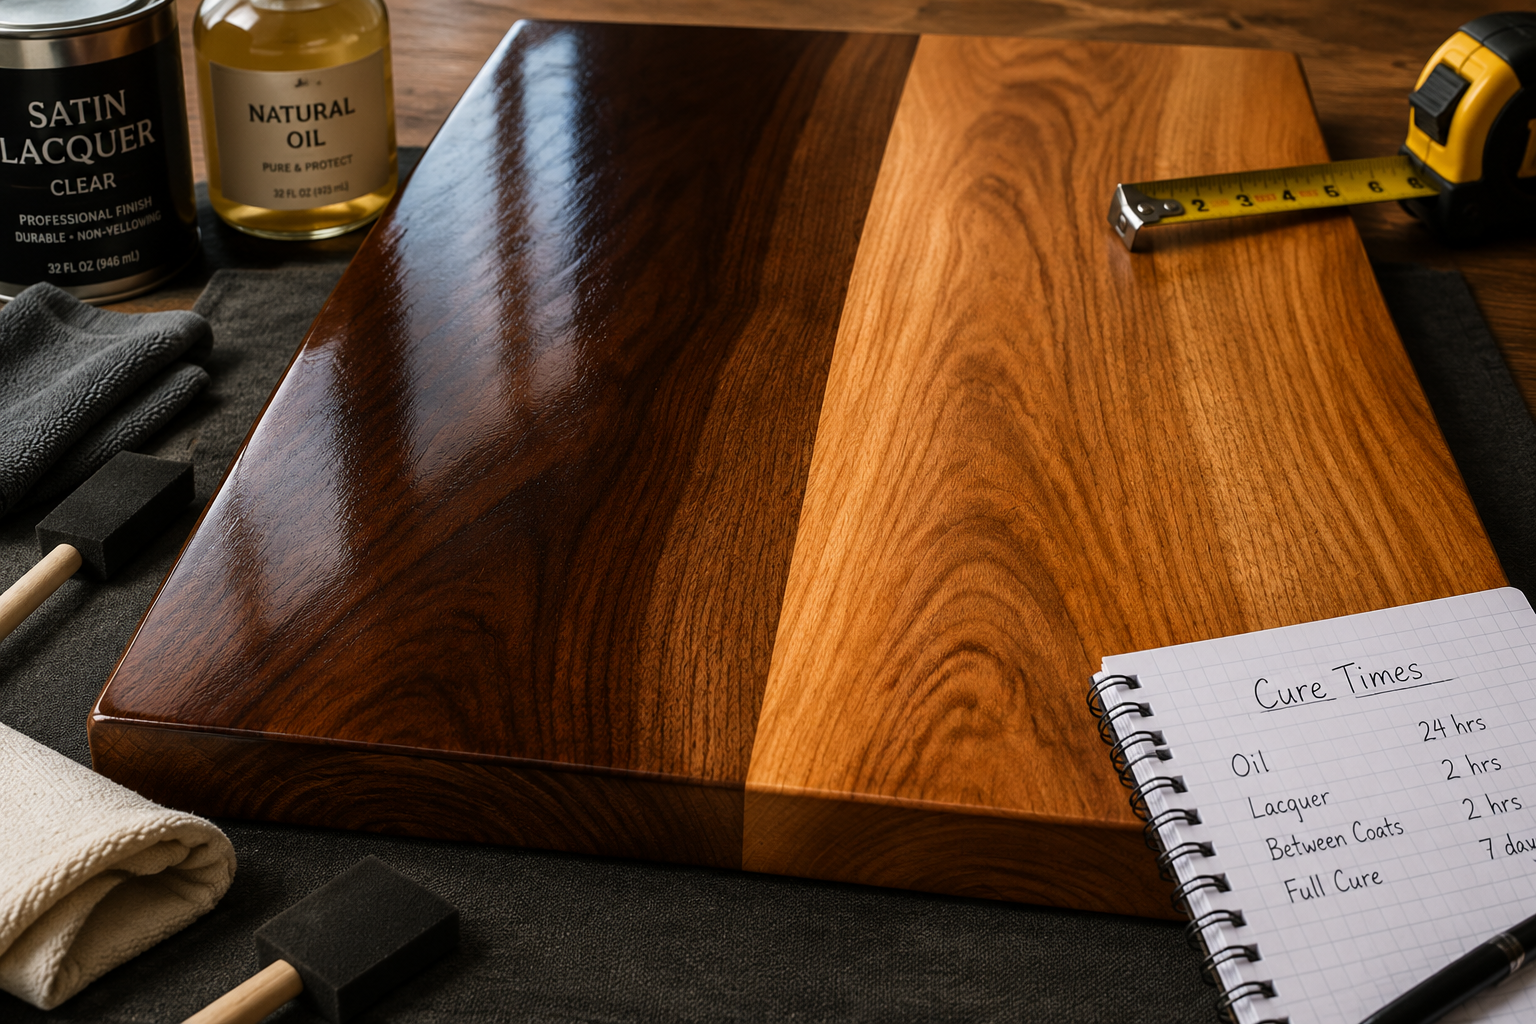
- Curing: While lacquer dries quickly to the touch, it takes several days to weeks to fully cure and achieve maximum hardness.
For durable, clear finishes that protect wood projects such as those listed in High-Demand Woodworking Projects for 2026: Coffee Tables, Wi, lacquers are an excellent choice.
Advanced Techniques and Troubleshooting for Flawless Results
Even with careful application, challenges can arise. Knowing how to prevent and fix common problems is part of mastering The Art of Wood Finishing: Step-by-Step Guide to Stains, Oils, and Lacquers for Professional Results.
Common Finishing Pitfalls and How to Avoid Them
| Problem | Cause | Prevention | Solution |
|---|---|---|---|
| Blotching | Uneven stain absorption, especially on softwoods. | Use pre-stain conditioner. Apply gel stain. | Sand back to bare wood and reapply with conditioner/gel stain. |
| Fisheyes | Surface contamination (silicone, oil, wax). | Thoroughly clean wood with mineral spirits or denatured alcohol. | Sand back and clean rigorously. Use a fisheye eliminator additive. |
| Runs/Sags | Applying too much finish, too thick a coat, or too close. | Apply thin coats. Hold sprayer at correct distance. | Sand affected area smooth and reapply thin coats. |
| Dust Nibs | Dust settling on wet finish. | Work in a clean, dust-free environment. Use a tack cloth. | Lightly sand with fine grit (400+) and recoat. |
| Orange Peel | Improper spray gun settings, insufficient thinner. | Adjust air pressure, fluid flow. Thin lacquer if needed. | Sand smooth and respray with correct settings. |
| Bubbles/Foaming | Shaking finish, over-brushing, high humidity. | Stir, don’t shake. Use foam brush. Work in ideal conditions. | Pop bubbles with a fine needle. Sand, then reapply carefully. |
| Slow Drying/Gummy | Too thick a coat, poor ventilation, low temperature, old product, or insufficient wiping of oil. | Apply thin coats. Ensure good airflow and proper temperature. Wipe oils thoroughly. | Scrape off gummy finish, clean with appropriate solvent, reapply correctly. |
Achieving Different Sheen Levels
The sheen, or gloss, of your finish significantly impacts the final look.
- Matte/Flat: No shine, very natural look. Often achieved with special flattening agents in the finish or by rubbing out gloss finishes with fine abrasives.
- Satin: A soft, low luster, often preferred for its subtle elegance and ability to hide minor imperfections. Most popular sheen.
- Semi-Gloss: A noticeable shine, reflecting some light, offering a clean, professional appearance.
- Gloss/High Gloss: A highly reflective, mirror-like surface. Achieved by applying multiple coats of clear gloss finish and often buffing or polishing the final coat.
Many finishes are available in different sheen levels directly from the manufacturer. For example, sprayable water-based polyurethane comes in various sheens and is a popular choice for a durable topcoat.
Final Polishing and Curing
Even after the final coat is applied, the finishing process isn’t truly complete until the piece has fully cured.
- Curing Time: While a finish might be dry to the touch in hours, it takes days or even weeks (depending on the product and conditions) for it to fully harden and reach its maximum durability. Avoid heavy use or placing objects on the finished surface during this time.
- Rubbing Out (Optional for High-End Finishes): For an ultra-smooth, professional-grade finish, especially with lacquers or varnishes, a technique called “rubbing out” can be employed.
- Allow the finish to fully cure.
- Use very fine abrasive pads (e.g., 1000-2000 grit) or rubbing compounds to gently level the surface and remove any minor imperfections or dust nibs.
- Progress through finer grades of rubbing compound, followed by polishing compound, to achieve the desired sheen, from satin to high gloss.
- Waxing: For added protection and a subtle luster, a final coat of paste wax can be applied and buffed to a shine, particularly over oil finishes or lower-sheen film finishes.
When working on complex projects like Ultimate Guide to Wooden Candle Holders: Stacked Designs wit, the final finish is what truly brings the piece to life.

Conclusion
Mastering The Art of Wood Finishing: Step-by-Step Guide to Stains, Oils, and Lacquers for Professional Results is a rewarding journey that elevates your woodworking projects from good to exceptional. Remember that patience, attention to detail, and a willingness to learn from experience are your greatest assets. By meticulously preparing your surfaces, understanding the nuances of different finishes, and employing careful application techniques, you can achieve durable, beautiful results that highlight the inherent elegance of wood.
For your next project in 2026, take the time to plan your finish, gather the right materials, and apply these step-by-step guidelines. The effort you put into the finish will undoubtedly reflect in the final masterpiece. Continue exploring advanced techniques and new products, and you’ll find endless possibilities in the world of wood finishing.
