

The average woodworker spends countless hours perfecting their craft, yet many overlook the incredible versatility and precision offered by the bandsaw. This powerful machine, often intimidating at first glance, is indispensable for tasks ranging from intricate curved cuts to efficient resawing of thick lumber. This article provides a comprehensive Introduction to Bandsaw Techniques: Essential Cuts and Safety for Every Woodworker, guiding you through its setup, various applications, and crucial safety measures to unlock its full potential in your workshop by 2026.
Key Takeaways
- Versatility: The bandsaw excels at curved cuts, resawing, and preparing stock for joinery, offering capabilities unmatched by other power tools.
- Blade Selection is Key: Matching the correct blade type (width, TPI) to your project and wood type is crucial for optimal performance and clean cuts.
- Precision Setup: Proper blade tension, guide alignment, and table adjustments are fundamental for accurate and safe operation.
- Safety First: Always prioritize personal protective equipment (PPE), maintain clear workspaces, and use push sticks to prevent injury.
- Practice Makes Perfect: Mastering bandsaw techniques requires practice, starting with basic cuts and gradually progressing to more complex operations.
Understanding the Bandsaw: Components and Setup
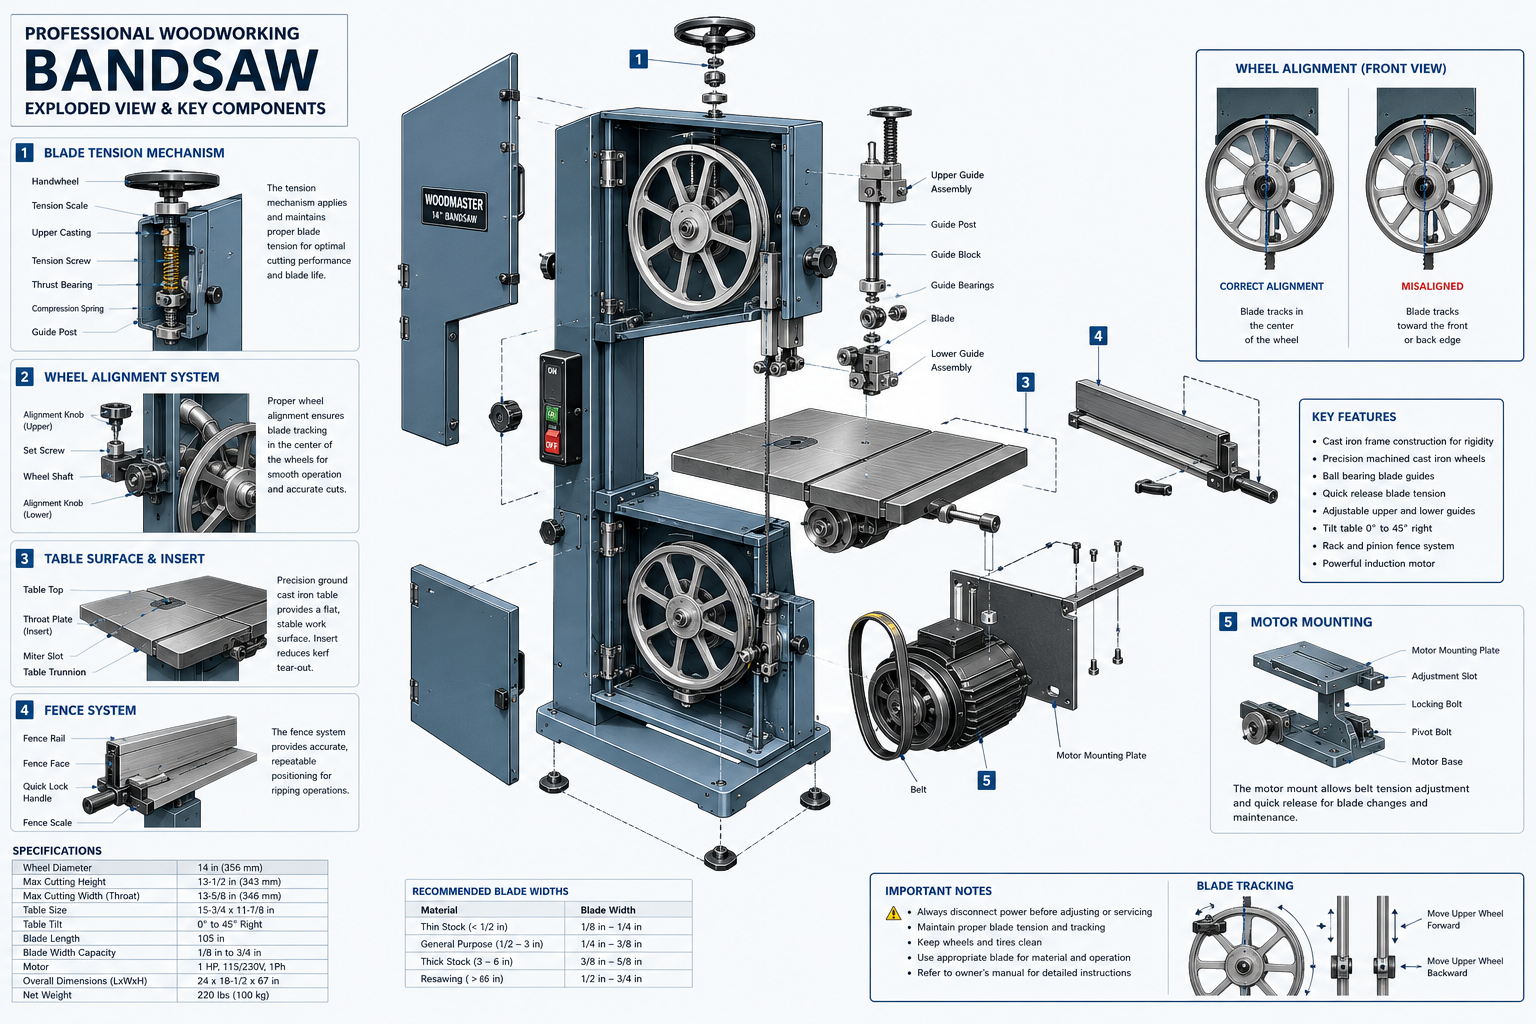
Before making your first cut, it’s vital to understand the bandsaw’s anatomy and how to set it up correctly. A bandsaw consists of a continuous loop blade running over two (or sometimes three) wheels, driven by an electric motor. Its vertical blade allows for unique cutting operations.

Essential Components
Let’s break down the key parts of a bandsaw:
- Blade: The cutting element, available in various widths, tooth per inch (TPI) counts, and materials for different applications.
- Wheels: Upper and lower wheels that guide and power the blade. The upper wheel usually has a tensioning mechanism.
- Blade Guides: Located above and below the table, these ensure the blade tracks straight and prevent twisting. They typically consist of side bearings/blocks and a thrust bearing.
- Table: The work surface, often tiltable for angled cuts.
- Fence: An adjustable guide for straight cuts, particularly useful for resawing.
- Dust Port: Connects to a dust collection system to keep the workspace clean and improve visibility.
- Motor: Powers the wheels and, consequently, the blade.
- Tensioning Mechanism: Adjusts the blade tension, crucial for straight cuts and preventing blade breakage.
Initial Setup and Adjustments
Proper setup is paramount for both safety and cutting accuracy. Here’s a general checklist:
- Blade Installation:
- Unplug the saw.
- Open the wheel covers.
- Install the blade, ensuring the teeth point downwards towards the table.
- Center the blade on the crown of the wheels.
- Close the wheel covers.
- Blade Tension:
- Adjust the tension according to the blade width – wider blades require more tension. A good rule of thumb is to tension until the blade deflects slightly (about 1/4 inch) when pushed sideways with your finger. Too loose, and the blade will wander; too tight, and it risks breaking.
- Blade Guides and Thrust Bearings:
- Adjust the side guides so they are just behind the gullets (the deepest part between teeth) and provide minimal clearance (about the thickness of a dollar bill) on each side of the blade.
- Adjust the thrust bearing (behind the blade) so it is just barely touching the blade when cutting pressure is applied, preventing the blade from flexing backward.
- Table Squareness:
- Use a reliable square to ensure the table is 90 degrees to the blade for accurate straight cuts. Adjust if necessary.
- Dust Collection:
- Connect your dust collection system to the bandsaw’s dust port. A clean workspace significantly enhances safety and visibility. For tips on setting up an efficient system, refer to “Building a DIY Smart Workshop Dust Collection System: Integrating IoT Sensors for Automated Air Quality and Tool Activation” (https://woodcraftwiz.com/building-a-diy-smart-workshop-dust-collection-system-integrating-iot-sensors-for-automated-air-quality-and-tool-activation/).

Essential Bandsaw Techniques and Cuts
The bandsaw shines where other saws struggle, particularly with non-linear cuts. Mastering these techniques will expand your woodworking capabilities significantly.
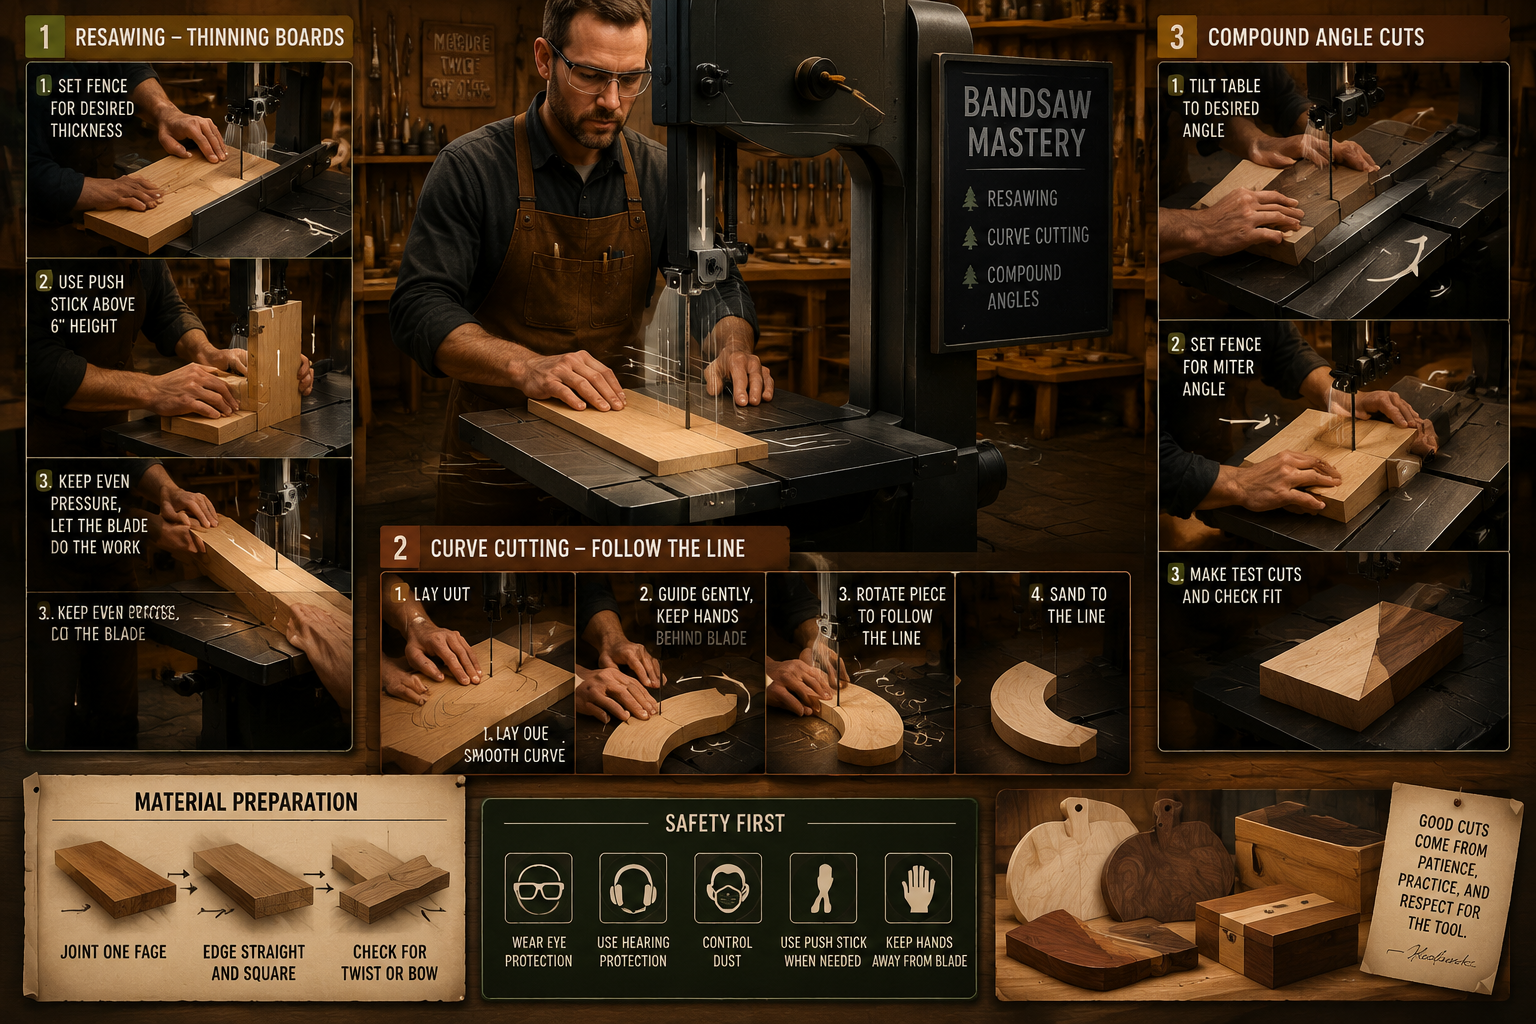
Curved Cuts
This is where the bandsaw truly excels.
- Blade Selection: Use a narrower blade for tighter curves. A 1/8″ or 1/4″ blade is ideal for intricate work, while a 1/2″ blade can handle gentle curves.
- Feed Rate: Maintain a slow, consistent feed rate. Let the blade do the work. Forcing the wood can cause the blade to wander, overheat, or even break.
- Relief Cuts: For very tight curves or internal cutouts, make several perpendicular “relief” cuts into the waste material. This allows pieces of waste to fall away, preventing the blade from binding.
- Follow the Line: Focus your eyes slightly ahead of the blade, guiding the workpiece along your marked line. Use gentle pressure and let the blade determine the pace.
Resawing
Resawing involves cutting a thick piece of lumber into thinner planks. This is incredibly useful for creating veneer, matching grain patterns, or reducing lumber thickness.
- Blade Selection: Use a wide blade (3/4″ or 1″ for most bandsaws) with a low TPI (2-4 TPI) for efficient chip removal and a straight cut. A “resaw blade” with a specific tooth geometry is ideal.
- Fence Setup: A tall, straight fence is crucial for supporting the lumber throughout the cut. Adjust the fence to the desired thickness. Some woodworkers offset the fence slightly to compensate for blade drift.
- Featherboards: Employ featherboards or a resaw guide to keep the workpiece firmly against the fence and table, ensuring a consistent thickness.
- Feed Rate: A steady, firm feed rate is necessary. Too slow, and the blade can heat up and dull; too fast, and the blade might deflect.
- Push Stick/Block: Always use a push stick or push block, especially towards the end of the cut, to keep your hands safely away from the blade.
Cutting Joinery Components
The bandsaw can efficiently rough-cut components for various joinery types, making subsequent hand or router work much faster.
- Tenons: You can quickly cut the shoulders and cheeks of tenons using the bandsaw, leaving minimal material for chiseling or router cleanup.
- Dovetails: While not for the final precision cut, the bandsaw can remove waste between dovetail pins and tails, significantly speeding up the process. For more on mastering dovetails, see “Mastering Dovetail Joinery for Drawers: Hand and Router Methods for Cabinet Builders” (https://woodcraftwiz.com/mastering-dovetail-joinery-for-drawers-hand-and-router-methods-for-cabinet-builders-2/).
- Curves for Furniture: Crafting curved furniture components, like chair backs or table aprons, is simplified with the bandsaw. Consider “Crafting your Perfect Woodworking Nightstand: A Comprehensive Guide for 2026” (https://woodcraftwiz.com/crafting-your-perfect-woodworking-nightstand-a-comprehensive-guide-for-2026/) for projects where curves might be employed.
Bandsaw Safety: Protecting Yourself and Your Work
Safety around any power tool is non-negotiable, and the bandsaw is no exception. Ignoring safety protocols can lead to serious injury.
Personal Protective Equipment (PPE)
Always wear the following when operating a bandsaw:
- Safety Glasses/Face Shield: Protect your eyes from flying sawdust and wood chips. 👓
- Hearing Protection: Bandsaws can be noisy. Earplugs or earmuffs protect your hearing. 🎧
- Dust Mask: While dust collection helps, a mask provides an extra layer of protection against fine airborne particles. 😷
- Appropriate Clothing: Avoid loose clothing, jewelry, or long hair that could get caught in the blade or machinery.
Safe Operating Practices
- Read the Manual: Familiarize yourself with your specific bandsaw’s manual before operation.
- Unplug Before Adjusting: Never make blade or guide adjustments, or clear debris, without unplugging the saw. This prevents accidental startup.
- Clear Workspace: Ensure your work area is free of clutter, allowing you to move and position the workpiece safely.
- Proper Lighting: Adequate lighting is essential for clear visibility of your cut line and the blade.
- Use Push Sticks/Blocks: Always use a push stick or push block to feed the workpiece, especially when hands get close to the blade. Never use your bare hands to push the wood past the blade.
- Maintain Blade Clearance: Keep your hands and fingers a safe distance (at least 3-4 inches) from the blade at all times.
- Control the Workpiece: Always have a firm grip on the workpiece and maintain control throughout the cut. Avoid twisting or sudden movements.
- Support Long Material: Use outfeed tables or roller stands when resawing or cutting long pieces to prevent tipping and maintain control.
- Avoid Ripping Freehand: Always use the fence when making straight rip cuts. The bandsaw is not ideal for small, freehand ripping like a table saw might be. For table saw safety, consult “Pro-Tech Table Saw: A Comprehensive Guide for Effective Usage” (https://woodcraftwiz.com/pro-tech-table-saw-a-comprehensive-guide-for-effective-usage/).
- Blade Guard Adjustment: Adjust the blade guard so it is just above the workpiece. This minimizes exposed blade and provides better protection.
- Be Patient: Never rush a cut. Take your time, maintain focus, and if you feel uncomfortable, stop the saw.
- Blade Selection: Using the correct blade for the task minimizes strain on the machine and reduces the risk of blade breakage. For instance, attempting a tight curve with a wide blade is dangerous and inefficient.
- Work with Sound Material: Avoid cutting wood with excessive knots, nails, or other foreign objects, as these can cause kickback or blade damage. When “Sourcing Reclaimed and Salvaged Wood: Quality Assessment, Restoration, and Safe Handling” (https://woodcraftwiz.com/sourcing-reclaimed-and-salvaged-wood-quality-assessment-restoration-and-safe-handling/), always inspect carefully before cutting.
By adhering to these safety guidelines, you can operate your bandsaw confidently and prevent accidents, ensuring a productive and enjoyable woodworking experience.

Conclusion
The bandsaw, with its unique cutting capabilities, is an indispensable tool for any serious woodworker. From crafting delicate curves to efficiently resawing lumber, mastering its techniques opens up a world of creative possibilities. This Introduction to Bandsaw Techniques: Essential Cuts and Safety for Every Woodworker has highlighted the critical aspects of setup, various cutting methods, and, most importantly, the foundational safety practices that must always be followed.

By diligently applying these principles in your workshop, you’ll not only enhance your skill set but also ensure a safe and productive environment for all your woodworking projects in 2026 and beyond. Take the time to understand your machine, choose the right blades, and practice patiently. Your journey to becoming a bandsaw master begins with these essential steps.
Actionable Next Steps:
- Review Your Bandsaw: Inspect your current bandsaw’s components and ensure all parts are in good working order.
- Acquire Proper Blades: Invest in a variety of blades suitable for different tasks (e.g., narrow for curves, wide for resawing).
- Practice Basic Cuts: Start with simple curved cuts on scrap wood to get a feel for the machine.
- Prioritize Safety Gear: Ensure you have and consistently use appropriate PPE (safety glasses, hearing protection, dust mask).
- Watch Demonstrations: Seek out reputable online videos or local workshops for visual demonstrations of advanced techniques.
