


The estimated value of a custom-made furniture piece can increase by 20-50% simply by incorporating decorative wood inlays, transforming ordinary objects into heirloom-quality masterpieces. This ancient art form, spanning millennia from ancient Egyptian sarcophagi to ornate Renaissance cabinetry, continues to captivate and challenge woodworkers today. Understanding the techniques for creating custom wood inlays, and how to add decorative details to furniture and boxes, offers an unparalleled opportunity to imbue projects with unique character and enduring beauty.
Inlays involve embedding a contrasting material—typically wood, but also shell, metal, or stone—into the surface of another material, creating a flush, decorative pattern. This guide delves into the essential techniques, tools, and considerations for mastering this rewarding craft in 2026.

Key Takeaways
- Wood inlay is an ancient decorative technique that significantly enhances furniture and boxes.
- Careful design, precise material selection, and accurate template creation are foundational to successful inlays.
- Routers, chisels, and specialized inlay tools are crucial for cutting recesses and fitting inlay pieces accurately.
- The process demands meticulous attention to detail, from initial cutting to final sanding and finishing.
- Mastering inlay allows for personalized, high-value creations, combining artistic vision with woodworking skill.
Designing and Planning Your Custom Wood Inlays
The journey of Creating Custom Wood Inlays: Techniques for Adding Decorative Details to Furniture and Boxes begins long before the first cut. Thoughtful design and meticulous planning are the bedrock of a successful inlay project. Without a clear vision and precise execution plan, even the most skilled hands can struggle to achieve professional results.
Conceptualizing Your Design
Begin by considering the overall aesthetic of the piece you are enhancing. Is it a modern minimalist table, a rustic chest, or a classic jewelry box? The inlay design should complement, not overwhelm, the primary object.
- Geometric Patterns: Simple lines, squares, and triangles offer a clean, contemporary look. They are often easier for beginners as they rely on straight cuts.
- Organic Shapes: Curves, leaves, flowers, and intricate scrollwork can add elegance and natural beauty. These require more advanced cutting techniques.
- Figurative Designs: Silhouettes, animals, or specific scenes can personalize a piece, telling a story or reflecting a particular theme.
Consider the scale of your design relative to the piece. A large, bold inlay might suit a dining table, while delicate, intricate patterns are perfect for small boxes or drawer fronts. Sketch out multiple ideas, experimenting with different scales and complexities.
Selecting Your Materials
The choice of inlay material dramatically impacts the visual appeal and longevity of your work. Contrast is key.
- Contrasting Wood Species: This is the most common form of inlay.
- Light Woods: Maple, holly, sycamore.
- Dark Woods: Walnut, wenge, ebony.
- Reddish Woods: Padauk, bloodwood.
- Yellowish Woods: Canarywood, yellowheart.
- Grain Patterns: Consider how the grain of the inlay material interacts with the grain of the base material. A straight-grained inlay might stand out more on a highly figured host wood.
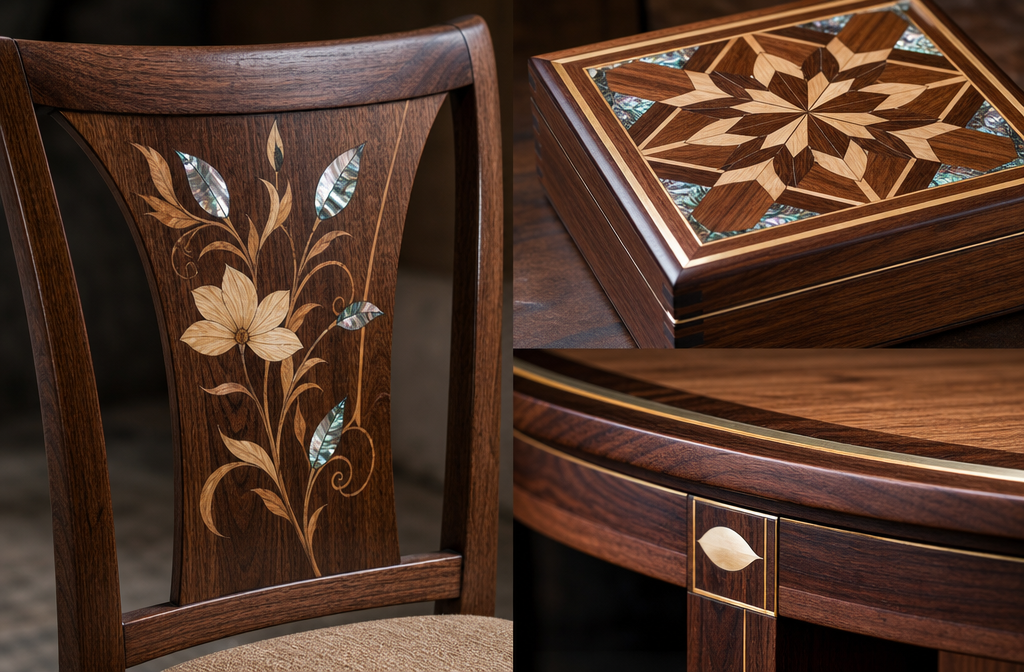
- Non-Wood Materials: Expanding beyond wood opens up a world of possibilities.
- Mother-of-Pearl/Abalone: Offers iridescent beauty, commonly seen in musical instruments and antique furniture.
- Metal: Brass, copper, or pewter strips can add a striking metallic accent.
- Bone/Ivory (ethical alternatives): Used historically for fine details, modern ethical alternatives exist.
- Stone/Minerals: Thin slices can create unique textures and colors.
When choosing materials, ensure they have similar expansion and contraction rates to prevent cracking or delamination due to humidity changes. For non-wood inlays, consider how their hardness compares to the base wood, as this affects sanding and finishing.
Creating Accurate Templates
Precision is paramount in inlay work. Any inaccuracies in your template will be magnified in the final piece.
- Digital Design: Use CAD software (e.g., Inkscape, AutoCAD, Vectric Aspire) to create your design. This allows for perfect symmetry, scaling, and easy iteration. It also facilitates laser cutting or CNC routing of templates or even the inlay pieces themselves.
- Physical Templates: For hand-cutting, transfer your design to a rigid material like MDF, plywood, or even thick plastic.
- Outer Template: This defines the perimeter of the recess you’ll cut into the base material.
- Inner Template (or Inlay Piece Template): This defines the exact shape of your inlay piece.
- Offset: When using a router with a guide bushing, remember to account for the offset between the router bit and the bushing. Your templates must be designed with this offset in mind to ensure the inlay piece fits snugly.
For complex designs, breaking the pattern into smaller, manageable template sections can improve accuracy. Always double-check your templates against your design and against each other before cutting any wood.
Essential Techniques for Creating Custom Wood Inlays: Techniques for Adding Decorative Details to Furniture and Boxes
Mastering the practical techniques for Creating Custom Wood Inlays: Techniques for Adding Decorative Details to Furniture and Boxes involves a blend of precise tool handling, patience, and attention to detail. Whether using traditional hand tools or modern power tools, each step requires careful execution.
Cutting the Recess into the Base Material
The recess, or mortise, is the negative space where your inlay will reside. Its accuracy directly dictates the fit of the inlay.
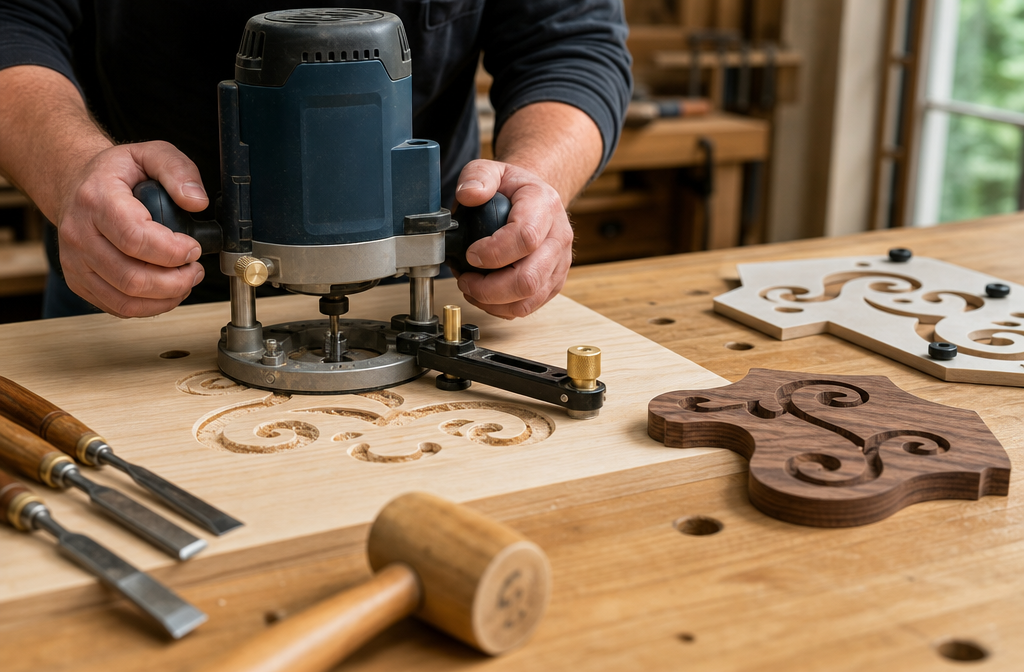
Router Techniques
Routers are excellent for achieving clean, consistent recesses, especially for larger or more geometric patterns.
- Router with Inlay Kit: Many router manufacturers offer inlay kits that include a small straight bit and a guide bushing. The key is to use two templates: one for cutting the recess (larger) and one for cutting the inlay piece (smaller), with the guide bushing automatically accounting for the offset.
- Template Routing: Securely attach your template to the base material. Use a router with a straight bit and a guide bushing. Make multiple shallow passes to avoid tear-out and prevent overloading the router, slowly deepening the cut until the desired depth is reached. The depth should match the thickness of your inlay material precisely.
- Freehand Routing (Advanced): For very simple, organic shapes or when extreme precision is not required, some experienced woodworkers can freehand route, but this is challenging and generally not recommended for beginners.
- CNC Routing: For ultimate precision and repeatability, especially for intricate or production work, a CNC router can cut both the recess and the inlay pieces flawlessly from digital designs. This method offers unparalleled accuracy and efficiency.
Hand Tool Techniques
For smaller, more intricate designs, or when a router is unsuitable, hand tools offer tactile control and a connection to traditional craftsmanship.
- Marking: Carefully transfer your design from the template onto the base wood using a sharp pencil, an awl, or a marking knife. Precision here is critical.
- Outline Cutting: Use a very sharp inlay knife or X-Acto knife to score the outline of your design, cutting deeply into the wood fibers. Make multiple passes to ensure a clean, vertical cut.
- Removing Waste:
- Chisels: With various sizes of sharp chisels, pare away the wood within the scored outline. Start by cutting across the grain to establish the boundaries, then work inward, taking shallow slices. For delicate work, pairing chisels and carving tools are invaluable.
- Router Plane: A small router plane can be used to achieve a consistent depth across the recess, particularly for larger areas.
- Undercutting: For a tighter fit, some traditionalists slightly undercut the edges of the recess. This means angling the chisel inwards so the bottom of the recess is marginally smaller than the top. When the inlay piece is pressed in, the undercut acts like a dovetail, helping to hold it securely.
Preparing and Fitting the Inlay Piece
Once the recess is cut, the inlay piece needs to be crafted to fit perfectly.
Cutting the Inlay Material
- Template and Router: If using a router inlay kit, use the corresponding smaller template (or the original design directly if CNC cutting) to cut the inlay piece from your chosen material.
- Band Saw/Scroll Saw: For organic shapes, a band saw or scroll saw is ideal. Carefully follow the marked outline, ensuring square edges. Fine blades are essential for tight curves.
- Hand Saw/Knife: For small or simple geometric shapes, a coping saw or even a sharp knife can be used.
Achieving a Perfect Fit
This is often the most challenging part of Creating Custom Wood Inlays: Techniques for Adding Decorative Details to Furniture and Boxes.

- Test Fit: Gently place the inlay piece into the recess. It should fit snugly without any gaps. Do not force it.
- Refinement:
- Sanding: If the inlay is slightly too large, carefully sand the edges of the inlay piece. Use fine-grit sandpaper wrapped around a flat block to maintain square edges.
- Scraping: For very minor adjustments, a cabinet scraper or a sharp knife can delicately shave material from the edges.
- Recess Adjustment: If the inlay is too small, or gaps exist, the recess itself might need minor adjustments. This is where the undercut technique can sometimes help compensate, or very fine slivers of wood can be glued into larger gaps.
Gluing and Clamping
The right adhesive is crucial for a strong, lasting bond.
- Wood Glue: Standard PVA wood glue is excellent for wood-to-wood inlays. Apply a thin, even coat to both the bottom of the recess and the back of the inlay piece. Avoid excessive glue, which can create a “squeeze-out” mess and hinder drying. For selecting the right glue, refer to “The Ultimate Guide to Wood Glue: Choosing the Right Adhesive for Every Project.”
- Epoxy: For non-wood inlays (shell, metal, stone) or when extra strength and gap-filling properties are needed, a two-part epoxy is often preferred. Mix thoroughly according to manufacturer instructions.
- Clamping: Apply even pressure across the inlay using clamps. Use cauls (flat blocks of wood) to distribute the pressure evenly and protect the inlay surface. Ensure the inlay remains flush with the surface during clamping. If the inlay is small, masking tape or weights might suffice.
- Drying Time: Allow ample drying time as specified by the glue manufacturer. Resist the urge to remove clamps too early.
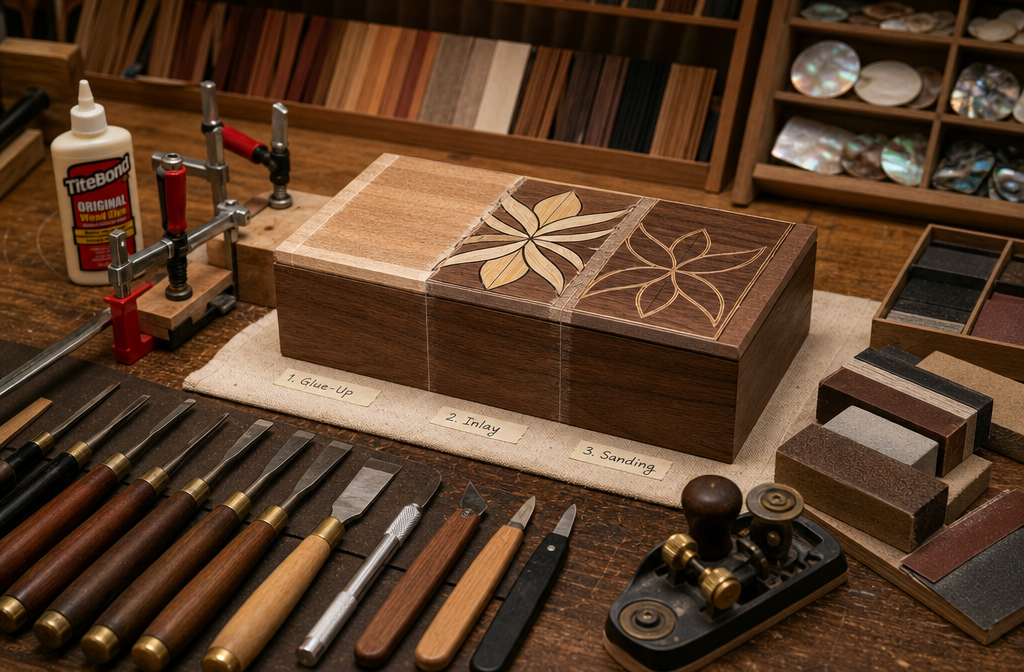
Finishing Your Custom Wood Inlays
The finishing stages are where your inlay truly comes to life, integrating seamlessly with the base material. This involves careful sanding, filling any minor imperfections, and applying a protective finish.
Sanding and Scraping
After the glue has fully cured, the inlay will likely sit slightly proud of the surface or have minor glue squeeze-out.
- Initial Leveling: Use a sharp cabinet scraper or a random orbital sander with a coarse grit (e.g., 80 or 100 grit) to carefully bring the inlay flush with the surrounding surface. Be extremely gentle, especially with softer inlay materials or delicate edges.
- Progressive Sanding: Gradually move through finer grits of sandpaper (120, 150, 180, 220, and higher) to remove scratch marks and achieve a smooth surface. Always sand with the grain of the wood.
- Dust Removal: Between grits, thoroughly clean the surface to remove sanding dust, which can create deeper scratches if carried over to the next finer grit. A tack cloth or compressed air works well.
Filling Gaps and Imperfections
Even with meticulous work, tiny gaps or imperfections can occur.
- Wood Filler: For wood inlays, use wood filler that closely matches the color of the base wood, or a neutral filler that can be stained. Alternatively, mix fine sanding dust from the base wood with wood glue or epoxy for a custom-colored filler.
- Epoxy Filler: For non-wood inlays or when maximum strength and transparency are desired, a clear epoxy can be used to fill small gaps. Tinted epoxy can also be effective.
- Application: Apply filler sparingly to the gaps, pressing it in firmly. Allow it to dry completely, then sand flush. This process might need to be repeated.
Applying a Protective Finish
The finish protects the wood and inlay, enhances their natural beauty, and unifies the appearance of the piece. The choice of finish depends on the desired look and the intended use of the furniture or box. For further insights into finishes, explore unique wood finishing techniques or rustic wood finishing techniques.
Common Finishes for Inlays
- Oil Finishes (e.g., Danish Oil, Tung Oil): These penetrate the wood, offering a natural, hand-rubbed look. They enhance the grain and colors of both the base and inlay woods. They are easy to apply and repair but offer less protection against moisture and abrasion than film finishes. For a deeper dive, compare “Danish Oil vs. Linseed: The Ultimate Wood Finishing Guide.”
- Varnish/Polyurethane: These create a durable film on the surface, offering excellent protection against wear and moisture. They can be applied by brushing, wiping, or spraying. For advice on application, consider our guide on “Aerosol Polyurethane: Benefits, Application, and Types.” You might also find our article on “Polyurethane Not Drying: Troubleshooting Steps and Prevention Techniques” helpful if you encounter issues.
- Lacquer: Provides a very smooth, hard, and clear finish that dries quickly. It is often sprayed for the best results and is commonly used on high-end furniture.
- Shellac: A traditional finish that offers a beautiful warm glow. It is alcohol-soluble and can be used as a sealer or a topcoat, but it is less durable than varnish or lacquer.
Application Tips for Inlays
- Even Application: Apply thin, even coats, allowing sufficient drying time between coats.
- Compatibility: Ensure your chosen finish is compatible with both the base wood and the inlay material. Some finishes might react differently with various materials (e.g., certain oils can darken specific woods more than others).
- Buffing: For a high-gloss finish, consider buffing the final cured coat with fine polishing compounds.
Maintaining Your Inlayed Piece
Proper care will ensure your custom wood inlay remains beautiful for years to come.
- Regular Cleaning: Dust with a soft, damp cloth. Avoid harsh chemical cleaners, which can damage the finish or the inlay material.
- Humidity Control: Wood is sensitive to humidity. Maintain a stable indoor environment to prevent excessive expansion and contraction, which can lead to cracks or lifting of the inlay.
- Repair: Minor scratches or dings in the finish can often be spot-repaired. More significant damage to the inlay itself might require professional restoration.
Conclusion
Creating custom wood inlays, and adding decorative details to furniture and boxes, is a deeply rewarding woodworking endeavor that elevates any project from functional to exquisite. From the initial spark of design inspiration and careful material selection to the precise cutting of recesses and the meticulous fitting of contrasting elements, each step demands patience and skill. By embracing both traditional hand tools and modern power equipment like routers, woodworkers can achieve stunning, intricate patterns that speak to a rich history of craftsmanship.
The techniques covered—design conceptualization, accurate templating, precise cutting with routers or chisels, careful fitting, robust gluing, and meticulous finishing—form a comprehensive pathway to mastering this art. Remember that practice is paramount; start with simpler designs and gradually work towards more complex patterns. The beauty of a well-executed inlay is a testament to the artisan’s dedication and keen eye, transforming a piece of wood into a lasting work of art.
Actionable Next Steps:
- Start Small: Begin with a simple geometric inlay on a small project, such as a custom wooden key holder or a jewelry box, to practice the core techniques without overwhelming yourself.
- Invest in Quality Tools: Sharp chisels, a good router with an inlay kit, and accurate measuring tools are indispensable.
- Experiment with Materials: Explore different wood species and even non-wood materials to understand their properties and visual impact.
- Practice Templating: Spend time creating precise templates, as this is foundational to accurate inlay work.
- Study Masterpieces: Examine examples of historical and contemporary inlays to draw inspiration and learn about different styles and complexities.
By following these guidelines and committing to practice, you will not only add decorative details to furniture and boxes but also imbue your work with a level of artistry that sets it apart.
