
The ambition to craft a functional, beautiful dining table often begins with a fundamental question: “How big should it be, and how will I put it together?” For new woodworkers, the journey from raw lumber to a centerpiece of family gatherings can seem daunting without a clear understanding of practical dimensions and reliable joinery. This “Beginner Woodworker’s Guide to Dining Room Tables: Standard Sizes, Clearance Rules, and First-Build Joinery” demystifies these initial hurdles, providing a concrete roadmap for your first significant furniture project in 2026.
Key Takeaways
- Dining Table Sizing: Standard dining tables range from 48-72 inches for rectangular tables (seating 4-8) and 36-60 inches for round or square tables (seating 2-6), depending on guest capacity.
- Room Clearance: Crucial for functionality, aim for a minimum of 36 inches of clearance between the table edge and walls or other furniture to allow for comfortable seating and movement.
- Accessible Joinery: Butt joints reinforced with screws or dowels, half-lap joints, and simple mortise and tenon joints are excellent choices for a beginner’s dining table, offering strength without excessive complexity.
- Wood Movement: Account for wood movement by using appropriate joinery and fasteners that allow wood to expand and contract, preventing cracks and warping.
- First Project Focus: Prioritize stable design, accurate cuts, and strong, straightforward joinery for your initial dining table build to ensure success and build confidence.
Understanding Standard Dining Table Sizes and Clearance Rules
The first step in building a dining table is understanding how it will fit into its intended space and accommodate guests comfortably. This involves knowing standard table dimensions and critical clearance rules.
Standard Dining Table Dimensions
Dining tables come in various shapes, each with its own typical sizing guidelines. Your choice will largely depend on your room’s shape and the number of people you wish to seat.
Rectangular Tables
Rectangular tables are the most common and versatile.
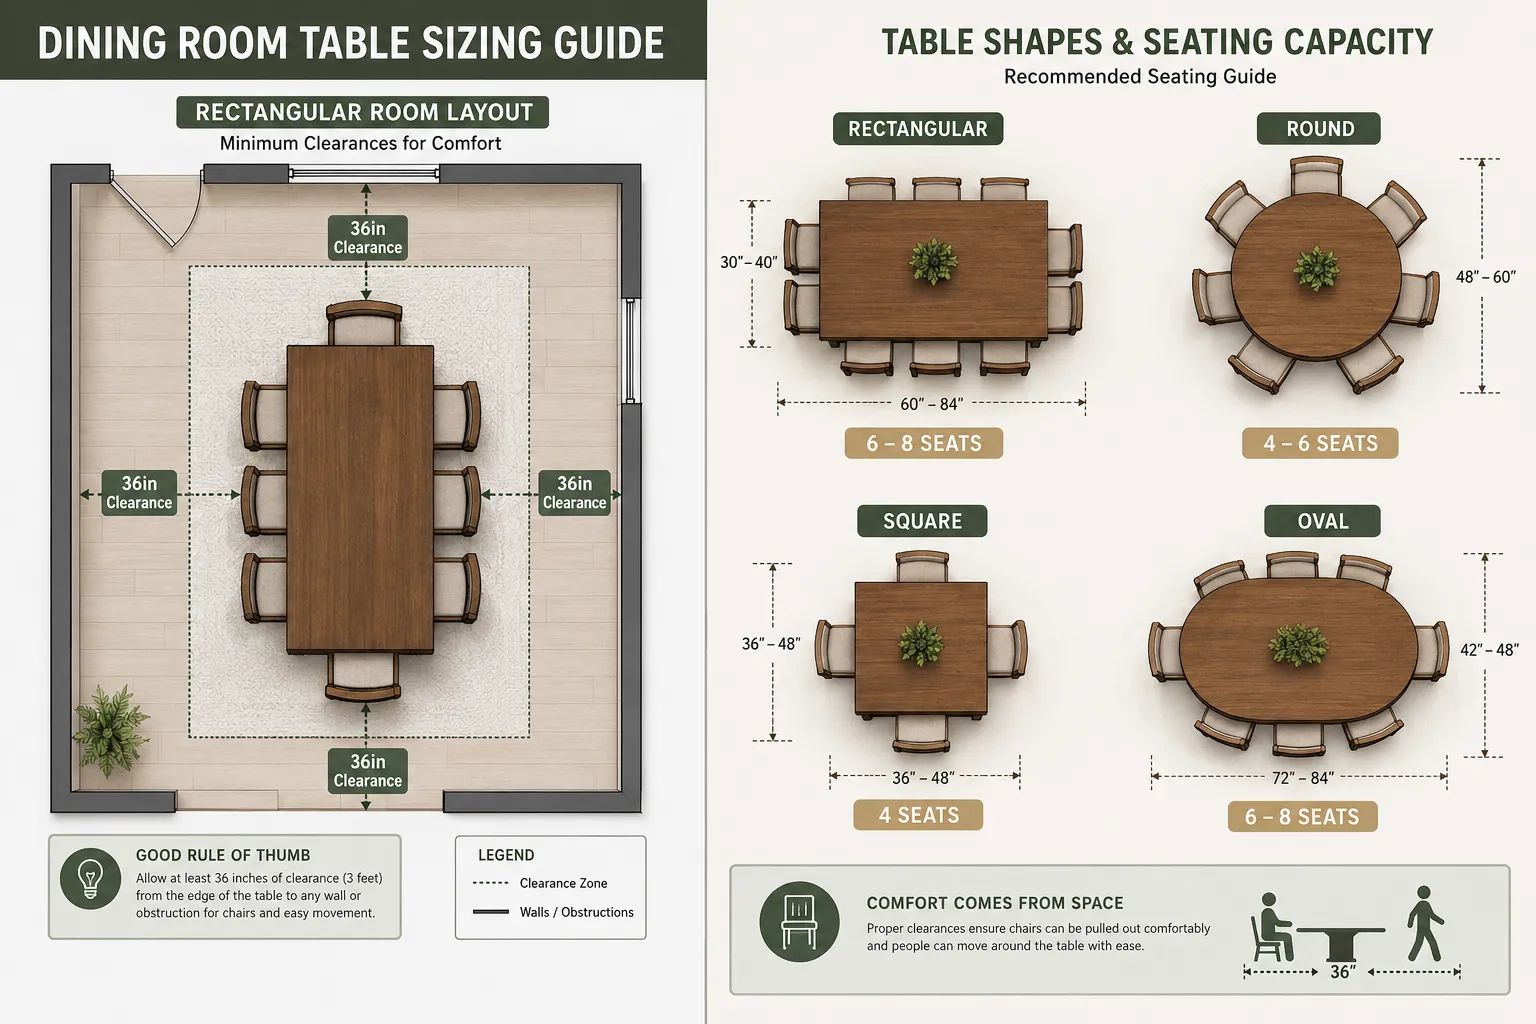
- Small (4-6 people): 48-60 inches long, 30-36 inches wide.
- Medium (6-8 people): 60-72 inches long, 36-40 inches wide.
- Large (8-10+ people): 72-96+ inches long, 40-44 inches wide.
Round Tables
Round tables are excellent for smaller spaces and promote conversation, as everyone is equidistant.
- Small (2-4 people): 36-44 inches in diameter.
- Medium (4-6 people): 44-54 inches in diameter.
- Large (6-8 people): 54-72 inches in diameter.
For tables with integrated leaves or extensions, consider how these additions will affect both the seating capacity and room clearance. Our guide on building a compact round dining table with integrated leaf for small kitchens offers further insights into adaptable designs.
Square Tables
Square tables work well in square rooms or for seating a smaller, equal number of people on each side.
- Small (2-4 people): 36-48 inches square.
- Medium (4-6 people): 48-60 inches square.
Essential Room Clearance Rules for Dining Tables
Once you’ve considered the table size, you must account for the space around it. Neglecting clearance can make a dining room feel cramped and uncomfortable.
Key Clearance Measurements:
- Minimum Walkway Clearance (from table edge to wall/furniture): Aim for at least 36 inches (approximately 91 cm). This allows people to push chairs out and walk behind seated diners comfortably. For high-traffic areas or frequent entertaining, 42-48 inches (107-122 cm) is ideal.
- Chair Push-Out Space: Each chair typically needs about 20-24 inches (51-61 cm) to pull out from the table comfortably.
- Tabletop Height: Standard dining table height is 29-30 inches (74-76 cm). Ensure your chairs have a seat height that allows for comfortable legroom (typically 10-12 inches less than the tabletop height).
“Overlooking clearance can turn a well-built table into an unusable centerpiece. Measure twice, build once, and always factor in room to move.”
When planning, sketch your dining room on graph paper, including existing furniture, and then draw in potential table sizes. This visual aid is invaluable for confirming your chosen dimensions for your “Beginner Woodworker’s Guide to Dining Room Tables: Standard Sizes, Clearance Rules, and First-Build Joinery” project.
First-Build Joinery Techniques for Dining Room Tables
For a beginner woodworker, selecting the right joinery is crucial. You want joints that are strong, reliable, and achievable with basic tools. While advanced techniques exist, focusing on foundational joints will lead to a successful first dining table. Understanding beginner’s guide to hand tool joinery: mastering mortise and tenon can be a valuable resource here.
Strong and Simple Joints for Table Construction
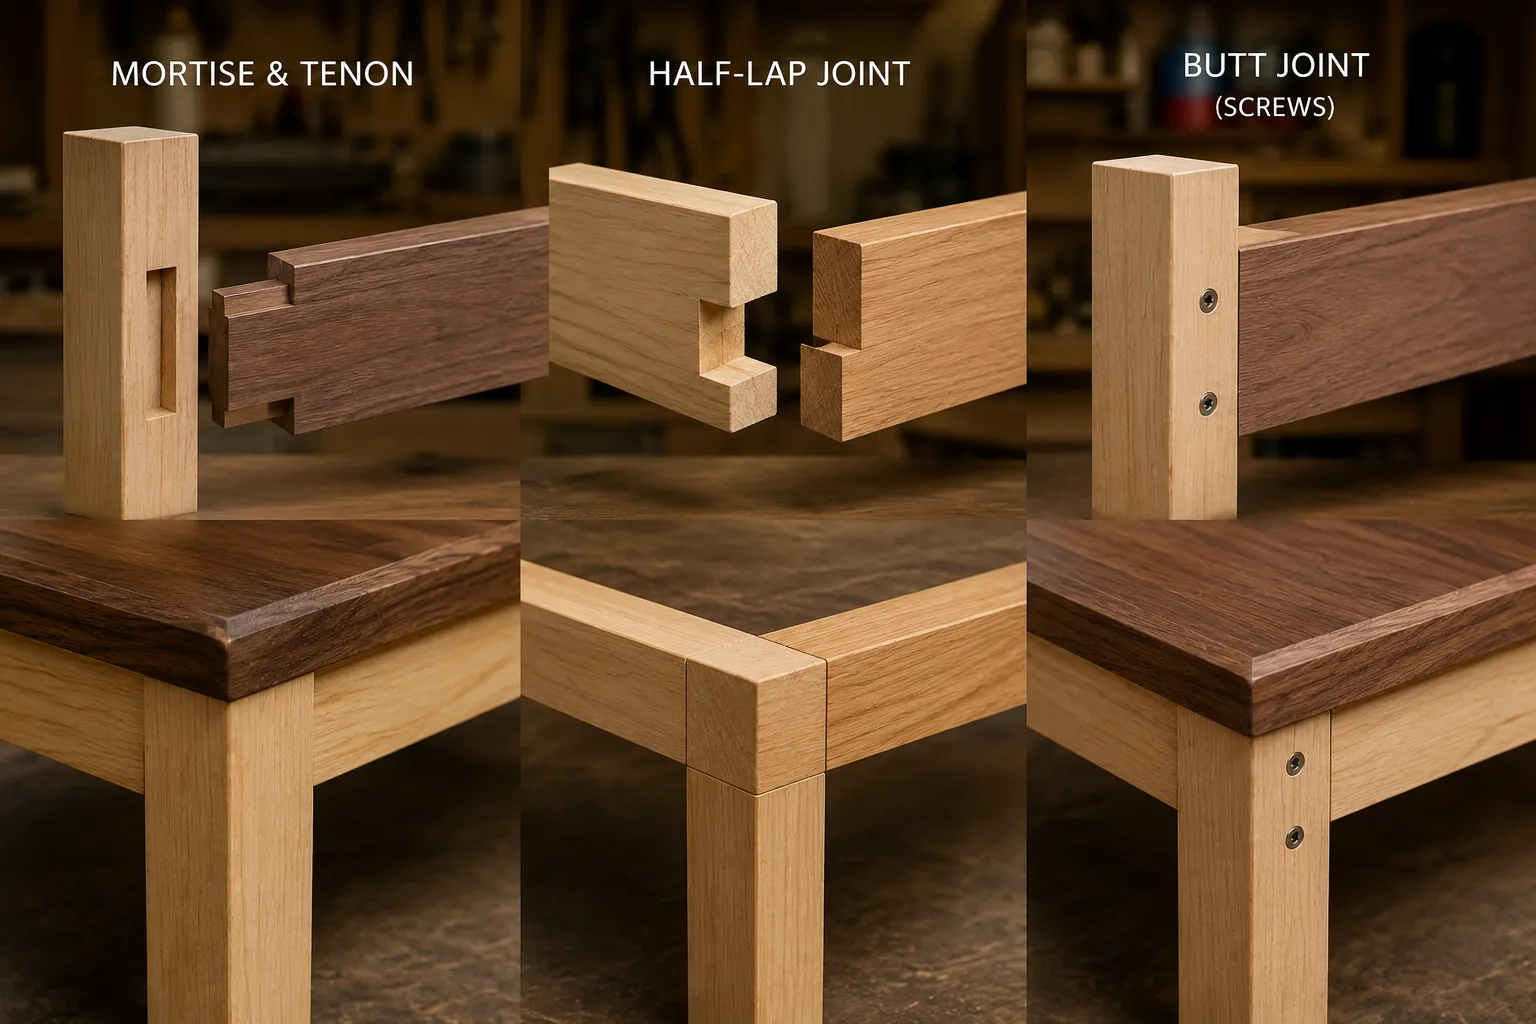
1. Butt Joints with Reinforcement
A butt joint, where two pieces of wood are joined end-to-end or edge-to-edge, is the simplest. For a dining table, it requires reinforcement to be strong enough.
- Screws: Countersink pilot holes and use appropriate wood screws to pull the joint tight. This is a very common method for attaching aprons to legs, especially when paired with glue.
- Dowels: Drill corresponding holes in both pieces, apply glue, and insert dowels. This adds significant strength and alignment. A dowel jig can make this process more accurate.
- Pocket Holes: Using a pocket hole jig allows you to create angled pilot holes for screws, pulling the joint together very tightly and hiding the fasteners on one side. This is a popular technique for attaching tabletops to aprons, allowing for wood movement.
2. Half-Lap Joints
A half-lap joint involves removing half the thickness from the end of two pieces of wood so they overlap and form a flush joint. This is excellent for connecting stretchers or aprons to legs, providing a larger gluing surface and mechanical strength.
- How to Cut: Use a table saw with a dado blade, a router, or even a hand saw and chisel. Accuracy is key for a tight fit.
- Advantages: Strong, relatively easy to cut with practice, and provides good alignment.
3. Mortise and Tenon Joints
Often considered the hallmark of fine furniture, the mortise and tenon joint consists of a “tenon” (a projecting piece) on one board that fits snugly into a “mortise” (a hole or slot) in another. This joint offers exceptional strength and rigidity, making it ideal for connecting legs to aprons or stretchers.
- For Beginners: While it sounds intimidating, a simple through-mortise and tenon (where the tenon passes entirely through the mortise) can be cut with a drill press, chisel, and careful marking.
- Blind Mortise and Tenon: The mortise does not go all the way through, hiding the joint. This requires more precision but offers a cleaner look.
- Tools: Chisels, a drill press, or a router with a mortising jig are common tools. Our guide on the essential guide to router bits can help you select the right bits.
Addressing Wood Movement in Dining Table Construction
A critical aspect of furniture building, especially for dining tables, is understanding understanding wood movement: how to design furniture that lasts a lifetime. Wood naturally expands and contracts across its grain due to changes in humidity. If a tabletop is rigidly attached to a frame, this movement can lead to warping, cracking, or splitting.
Techniques to Accommodate Wood Movement:
- Z-Clips or Tabletop Fasteners: These metal clips fit into a kerf (saw cut) on the inside of the apron and screw into the underside of the tabletop, allowing the top to expand and contract while staying securely attached.
- Elongated Screw Holes: For attaching a top directly with screws, drill oversized holes in the aprons where the screw passes through, allowing the screw to shift slightly as the tabletop moves.
- Breadboard Ends: A more advanced technique where a cross-grain piece is joined to the ends of the tabletop, often with a large mortise and tenon, to help keep the top flat while allowing for movement. For a first table, focusing on Z-clips or elongated holes is sufficient.
By incorporating these foundational joinery techniques and understanding wood movement, your first dining table project will be both achievable and robust, a testament to your growing woodworking skills.
Planning Your First Dining Table Project in 2026: A Step-by-Step Approach
Embarking on a dining table build as a beginner requires careful planning. This section outlines a practical approach, combining the knowledge of sizes, clearance, and joinery into an actionable plan for your “Beginner Woodworker’s Guide to Dining Room Tables: Standard Sizes, Clearance Rules, and First-Build Joinery” project.
1. Design and Sketch
- Determine Shape and Size: Based on your dining room dimensions and desired seating capacity, choose a table shape (rectangular, round, square) and approximate dimensions. Revisit the standard sizes and clearance rules.
- Conceptualize Style: Think about the aesthetics, simple and clean lines, a farmhouse look, or something more modern. For a first project, simplicity is your friend.
- Rough Sketch: Draw your table with basic dimensions. Include the tabletop, legs, and aprons/stretchers. This helps visualize the proportions and identify potential issues.
2. Material Selection
- Wood Species: For your first table, consider readily available and workable woods. Pine and Poplar are affordable and easy to work with, though softer. Hardwoods like Oak, Maple, or Cherry offer greater durability and beauty but are more challenging for beginners and cost more. Our guide on building a robust outdoor dining table: wood selection offers insights into wood properties.
- Lumber Dimensions: Plan for appropriate thicknesses for the tabletop (often 3/4″ to 1.5″), legs (typically 2.5″x2.5″ to 4″x4″), and aprons (e.g., 1″x3″ or 1″x4″).
3. Joinery Selection and Tooling
- Choose Your Joints: Based on the simplicity and strength, select the joinery for each connection (e.g., mortise and tenon for legs to aprons, pocket holes for tabletop attachment).
- Identify Necessary Tools: List the tools you’ll need for your chosen joinery. For a beginner, this might include a circular saw or table saw for cuts, a drill/driver, chisels, a hand plane, clamps, and measuring tools. For table saw choices, see choosing a table saw with built-in stand. Don’t forget the ultimate guide to measuring and marking tools for precision.
4. Cut List and Detailed Drawings
- Create a Cut List: This is a detailed list of every piece of wood you need, including its exact dimensions (length, width, thickness). This helps minimize waste and ensures you have all parts before assembly.
- Detailed Drawings: For critical joints or complex assemblies, draw them out in detail, showing exact measurements and how the pieces fit together. This is crucial for accurate execution.
5. Assembly and Finishing
- Dry Fit: Before applying glue, always dry-fit all your joints and assemblies. This allows you to check for accuracy, make adjustments, and ensure everything aligns.
- Gluing and Clamping: Apply glue evenly and clamp firmly. Ensure your surfaces are flush and square before the glue sets.
- Sanding: Start with a coarser grit sandpaper (e.g., 80 or 100 grit) and progressively move to finer grits (e.g., 150, 220) for a smooth finish.
- Finishing: Choose a finish appropriate for a dining table, something durable and food-safe like polyurethane, varnish, or an oil-wax blend. Apply according to manufacturer instructions. For outdoor tables, advanced wood finishing for outdoor furniture offers specific guidance.

By methodically following these steps, focusing on accuracy, and selecting achievable joinery, your first dining table project in 2026 will be a rewarding experience, culminating in a beautiful and functional piece of furniture you can be proud of.
Conclusion
Building your first dining room table is a significant milestone for any beginner woodworker. By carefully considering standard sizes, adhering to essential clearance rules, and embracing reliable, beginner-friendly joinery techniques, you lay a solid foundation for success. This guide, “Beginner Woodworker’s Guide to Dining Room Tables: Standard Sizes, Clearance Rules, and First-Build Joinery,” has aimed to simplify these critical planning stages, transforming what might seem like a complex endeavor into a manageable series of steps.
Remember, patience and precision are your greatest assets. Don’t rush cuts, always dry-fit your components, and choose joinery that matches your current skill level. The satisfaction of gathering around a table you crafted with your own hands is immense. Take these insights, apply them to your design, and embark on your woodworking journey with confidence. Your functional and beautiful dining table awaits.