
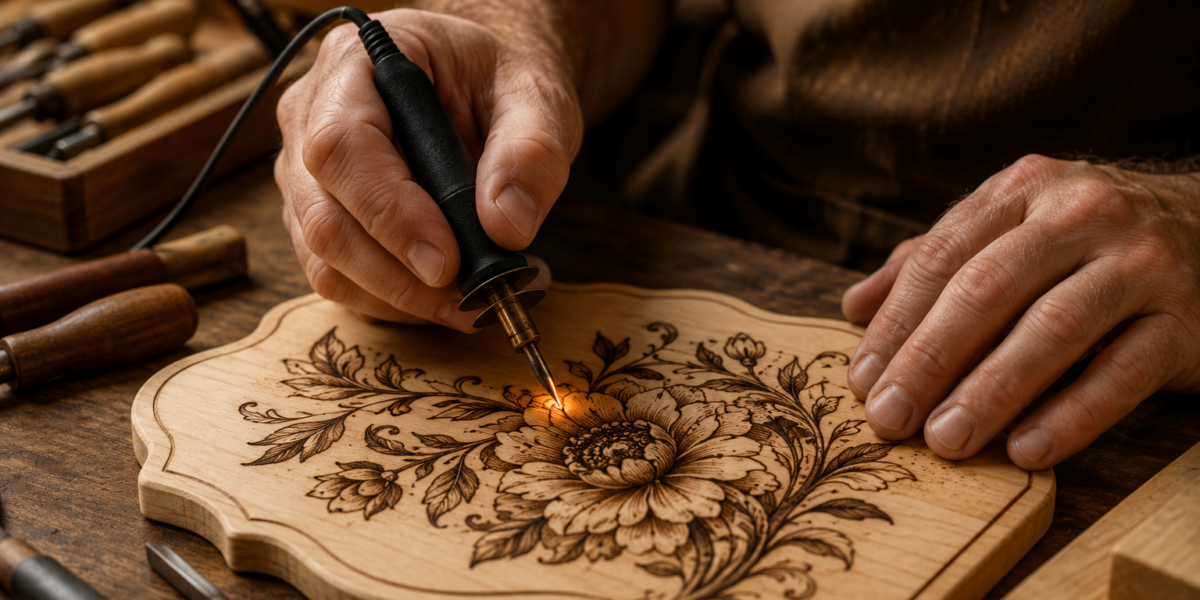

The delicate dance between a heated metal tip and a raw wooden surface transforms simple planks into personalized masterpieces. Pyrography, often called wood burning, is an ancient art form gaining significant traction in 2026 for its accessibility and rewarding results. For those venturing into this captivating craft, understanding the foundational principles is paramount to creating beautiful, lasting designs. This comprehensive guide, focusing on The Art of Pyrography on Wood: Beginner’s Guide to Wood Burning Designs, will illuminate the path from novice to confident wood burner.
Key Takeaways
- Pyrography is a versatile art form suitable for beginners, requiring minimal initial investment.
- Safety precautions, including proper ventilation and personal protective equipment, are crucial.
- Choosing the right wood and understanding grain patterns significantly impacts design quality.
- Mastering basic techniques like lines, shading, and texturing forms the foundation for complex designs.
- Practice, patience, and creative design transfer methods are key to developing pyrography skills.
Getting Started with The Art of Pyrography on Wood: Essential Tools and Safety
Embarking on any new craft requires understanding its core components, and pyrography is no exception. Before the creative sparks fly, it’s essential to gather the right tools and prioritize safety. This section will walk you through the necessary equipment and critical safety measures for successful wood burning.

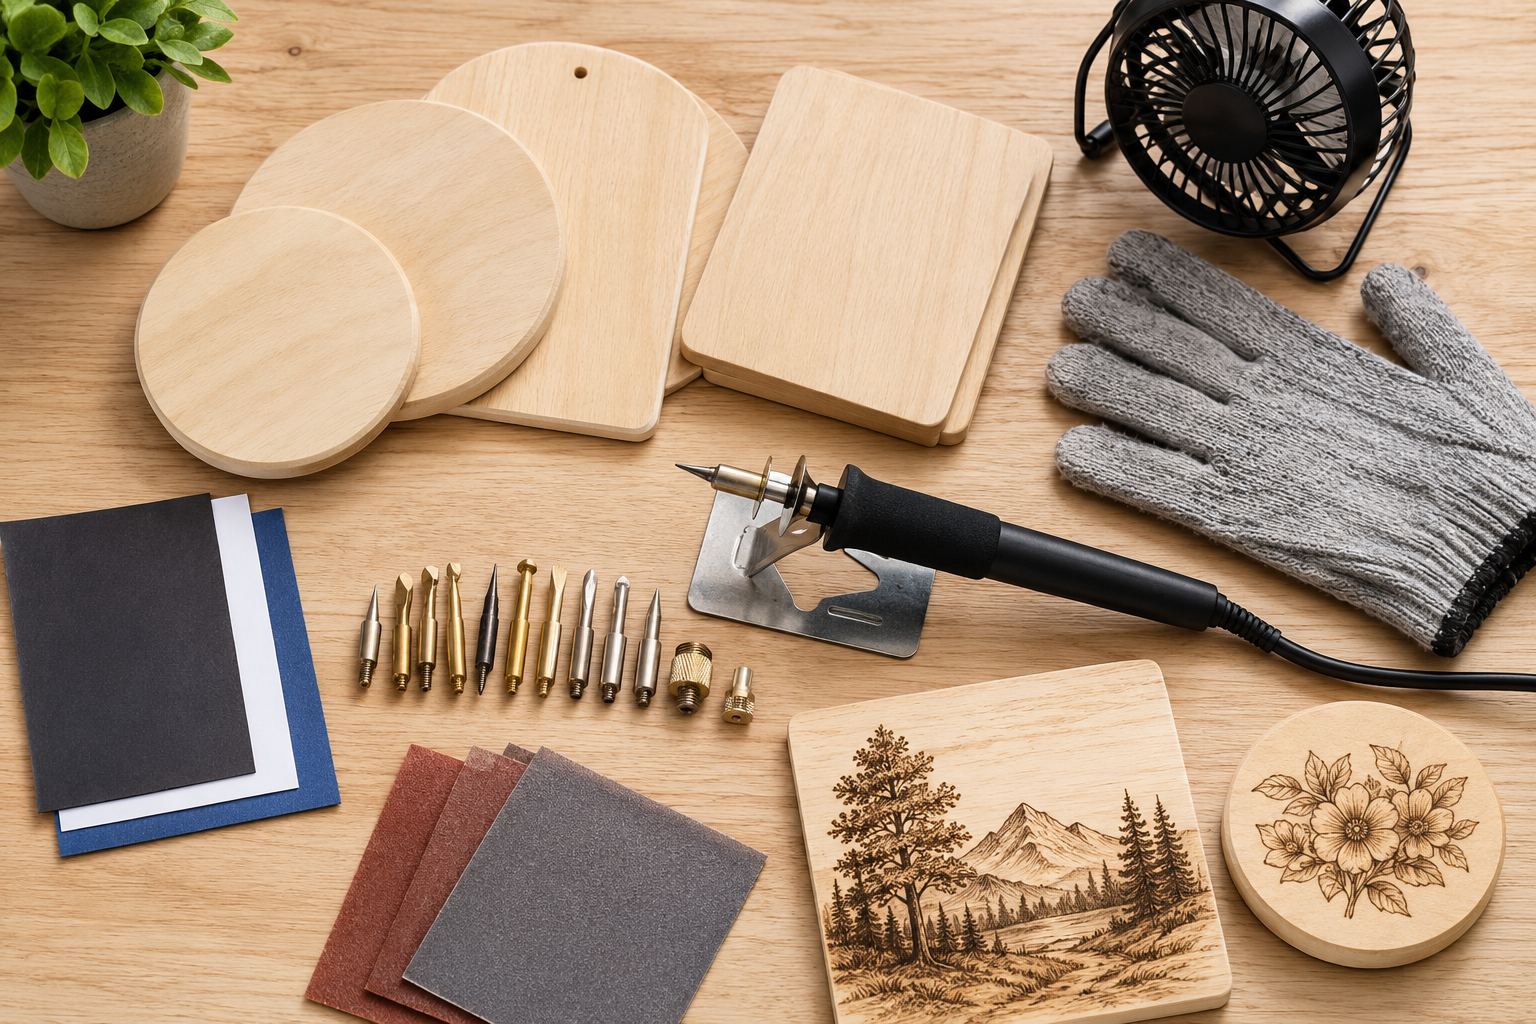
Understanding Your Pyrography Tools
The heart of wood burning lies in the pyrography pen. These tools typically come in two main types:
- Craft-style (Solid-Point) Burners: These are often entry-level tools, resembling soldering irons. They have a fixed temperature or limited heat settings and usually come with a few screw-in tips. They are excellent for beginners due to their simplicity and lower cost.
- Professional (Wire-Nib) Burners: These offer precise temperature control and interchangeable wire nibs that heat up rapidly. They are preferred by experienced artists for their versatility, speed, and ability to achieve finer details and smoother shading. While a larger investment, they provide greater creative freedom.
Essential Accessories:
- Pyrography Pen: Your primary tool.
- Assorted Nibs/Tips: Different shapes (universal, shading, writing, fine point) allow for varied line weights, textures, and shading techniques.
- Wood Blanks: Softwoods like basswood, poplar, and birch are ideal for beginners due to their fine, light grain.
- Sandpaper: Fine-grit sandpaper (180-220 grit) for preparing the wood surface.
- Pencil: For transferring designs.
- Eraser: To remove pencil marks.
- Carbon Paper or Graphite Paper: For easily transferring intricate designs.
- Heat-Resistant Surface: A ceramic tile or specialized mat to rest your hot pen.
- Pliers: To safely change hot nibs (for wire-nib burners).
- Leather or Heat-Resistant Gloves: To protect your hands, especially when holding smaller pieces.
Choosing the Right Wood for Wood Burning Designs
The type of wood you select significantly influences the outcome of your pyrography.
| Wood Type | Characteristics | Beginner Suitability |
|---|---|---|
| Basswood | Light color, fine grain, soft, uniform texture | Excellent (Recommended) |
| Poplar | Light to greenish-brown, even texture, moderately soft | Good |
| Birch | Pale, fine, tight grain, moderately hard | Good |
| Maple | Light, very fine grain, hard, dense | Intermediate |
| Pine | Light, pronounced grain, knots, resinous | Challenging (Resin can ooze) |
| Oak | Pronounced open grain, hard, often dark | Advanced |
For beginners, basswood is highly recommended. Its light color provides excellent contrast, and its fine, uniform grain allows the burning tool to glide smoothly, making it easier to control your lines and shading. Always ensure the wood is unfinished and free of oils or waxes, as these can produce toxic fumes when burned.
Prioritizing Safety in Pyrography
Wood burning involves heat and smoke, so safety is paramount.
- Ventilation is Key: Always work in a well-ventilated area. The smoke produced contains carbon monoxide and other irritants. Consider using a small fan to direct smoke away from your face or, ideally, work near an open window or with an exhaust fan.
- Personal Protective Equipment (PPE):
- Gloves: Heat-resistant gloves protect your hands from accidental burns and allow you to comfortably hold smaller pieces of wood.
- Face Mask: An N95 respirator can filter out fine particulate matter from the smoke.
- Safety Glasses: Protect your eyes from embers or accidental splashes.
- Heat Management:
- Always place your hot pyrography pen on a heat-resistant stand or surface when not in use.
- Allow the pen to cool completely before storing it or changing tips (unless using pliers designed for hot tips).
- Never leave a hot pen unattended.
- Workspace: Keep your workspace clean and free of flammable materials. Have a fire extinguisher or a bucket of water nearby for emergencies.
- Power Cord: Ensure the cord is not frayed and is kept away from the hot tip.
Adhering to these safety guidelines will allow you to enjoy The Art of Pyrography on Wood: Beginner’s Guide to Wood Burning Designs without unnecessary risks.
Mastering Basic Wood Burning Designs and Techniques
Once your tools are ready and safety measures are in place, it’s time to delve into the fundamental techniques that form the bedrock of pyrography. Practice is crucial here; think of these as your building blocks for more complex wood burning designs.
Preparing Your Wood Surface
A smooth, clean surface is critical for good results.
- Sanding: Lightly sand your wood blank with 180-220 grit sandpaper. This removes minor imperfections and opens the wood grain slightly, allowing for more consistent burning. Wipe off all dust with a clean, dry cloth afterward.
- Cleaning: Ensure the surface is free of any oils or debris.
- Transferring Your Design:
- Freehand: For experienced artists, drawing directly onto the wood with a pencil is an option.
- Pencil Transfer: Sketch your design on paper, then heavily shade the back of the paper with a pencil. Place the shaded side down on the wood and trace your design, transferring the graphite.
- Carbon/Graphite Paper: This is the easiest method for beginners. Place the carbon paper face down on your wood, then your design on top of the carbon paper. Trace your design with a pencil, and it will transfer cleanly to the wood. Avoid pressing too hard to prevent deep indentations.
“Patience is not simply the ability to wait – it’s how we behave while we’re waiting. In pyrography, patience transforms simple lines into profound stories.”
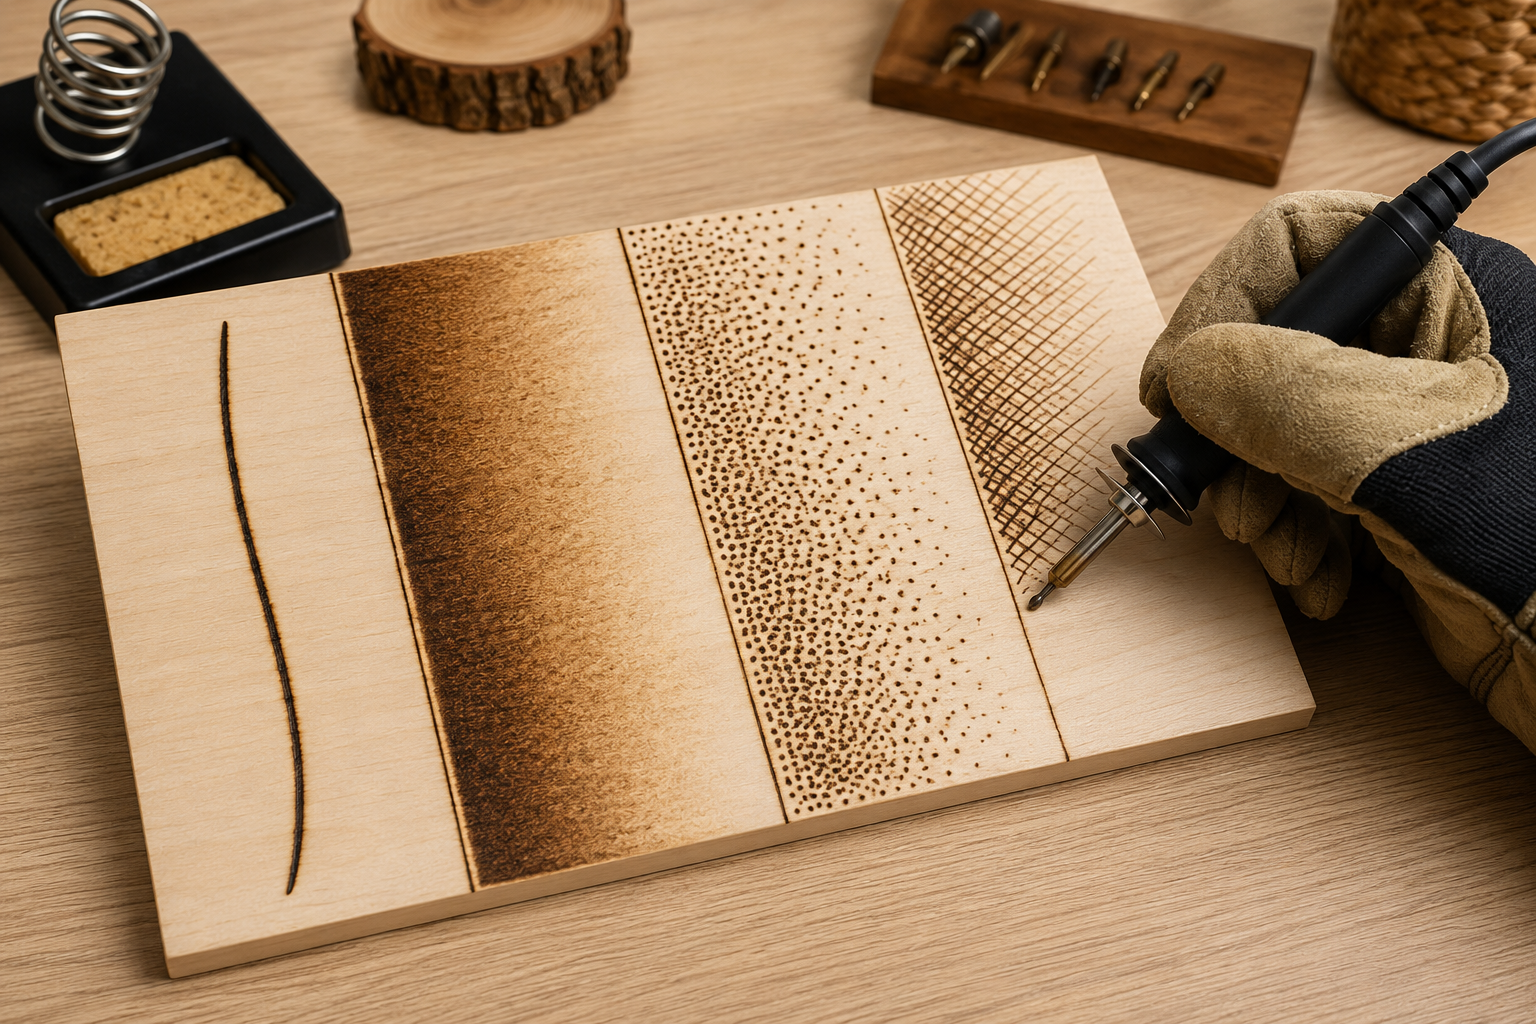
Fundamental Wood Burning Techniques
Each stroke and movement with your pyrography pen contributes to the final design. Understanding how different tips and pressures affect the burn is essential.
- Lines and Outlines:
- Tip: Use a universal writing tip or a fine point.
- Technique: Hold the pen like a pencil. Apply consistent, light pressure and move at a steady, slow pace. Speed affects darkness – slower movement results in a darker line.
- Practice: Draw straight lines, curved lines, circles, and geometric shapes to get a feel for control.
- Shading: This technique adds depth and dimension.
- Tip: Use a shading tip or a spoon-shaped tip.
- Technique: Vary pressure and speed. Lighter pressure and faster movement create lighter tones. Heavier pressure and slower movement create darker tones. You can also vary the heat setting if your burner allows it.
- Practice: Create gradient boxes, transitioning from light to dark. Work in small, overlapping strokes, similar to pencil shading.
- Texturing: Textures add visual interest and realism.
- Stippling: Using a fine point tip, tap the wood repeatedly to create a pattern of dots. Vary dot density for different effects.
- Cross-hatching: Create intersecting lines. This is excellent for creating rough textures or dense shading.
- Feathering: Use a fine tip to make short, light strokes that resemble feathers or fur.
- Dabbing/Pressing: Using a flat shading tip, gently press down to create areas of uniform darkness or irregular shapes.
Controlling Heat and Pressure
These two factors are paramount to achieving desired results in The Art of Pyrography on Wood: Beginner’s Guide to Wood Burning Designs.
- Heat: Higher temperatures burn faster and darker. Lower temperatures give you more control and create lighter marks. Always test your pen on a scrap piece of wood before working on your main project.
- Pressure: Consistent, light pressure is usually best for outlines. Increased pressure will create darker, wider lines but can also damage the wood or the tip if excessive. Learn to let the heat do most of the work.
For those interested in expanding their woodworking skills, learning about Mastering the Band Saw: Essential Techniques for Resawing, Curve Cutting and Joinery Preparation can complement pyrography, allowing you to create custom wood blanks for your designs.
Advancing Your Pyrography Designs and Projects in 2026
Once you’ve mastered the basic techniques, you’re ready to explore more intricate wood burning designs and apply them to various projects. Pyrography integrates beautifully with many woodworking endeavors, offering a unique avenue for personalization and artistic expression.
Incorporating Complex Designs
Moving beyond simple shapes requires thoughtful design and careful execution.

- Layering: Build up your design in layers, starting with lighter outlines and then adding darker details, shading, and textures. This approach allows for corrections and greater depth.
- Negative Space: Consider the unburned areas as part of your design. Sometimes, leaving certain areas untouched can create striking contrasts and focal points.
- Combining Techniques: Blend stippling with shading, or cross-hatching with solid lines, to create rich, varied textures.
- Inspiration: Look to nature, mandalas, Celtic knots, calligraphy, or geometric patterns for inspiration. Tracing books or online resources can provide excellent starting points for intricate designs.
Finishing Your Pyrography Projects
Proper finishing protects your work and enhances its appearance.
- Cleaning: After burning, use a soft eraser or a very fine-grit sanding sponge (lightly!) to remove any remaining pencil marks or smudges.
- Sealing: Applying a finish protects the wood and the burned design from moisture, dirt, and UV damage.
- Spray Sealers: Clear acrylic spray sealers are easy to apply and provide a protective layer without altering the burned details.
- Oil Finishes: Tung oil or linseed oil can deepen the contrast of the burn and bring out the natural beauty of the wood, but they can also slightly darken the overall piece. Apply thin coats and wipe off excess.
- Wax Finishes: Beeswax or furniture wax offers a natural, soft sheen and some protection.
- Varnish/Polyurethane: These offer durable protection but can sometimes create a thicker, glossier layer that might obscure fine details.
Always choose a finish appropriate for the project’s intended use. For instance, a food-safe finish is essential for items like cutting boards. For more ideas on profitable woodworking projects, consider exploring Profitable Beginner Woodworking: Picture Frames, Cutting Boa where pyrography can add significant value.
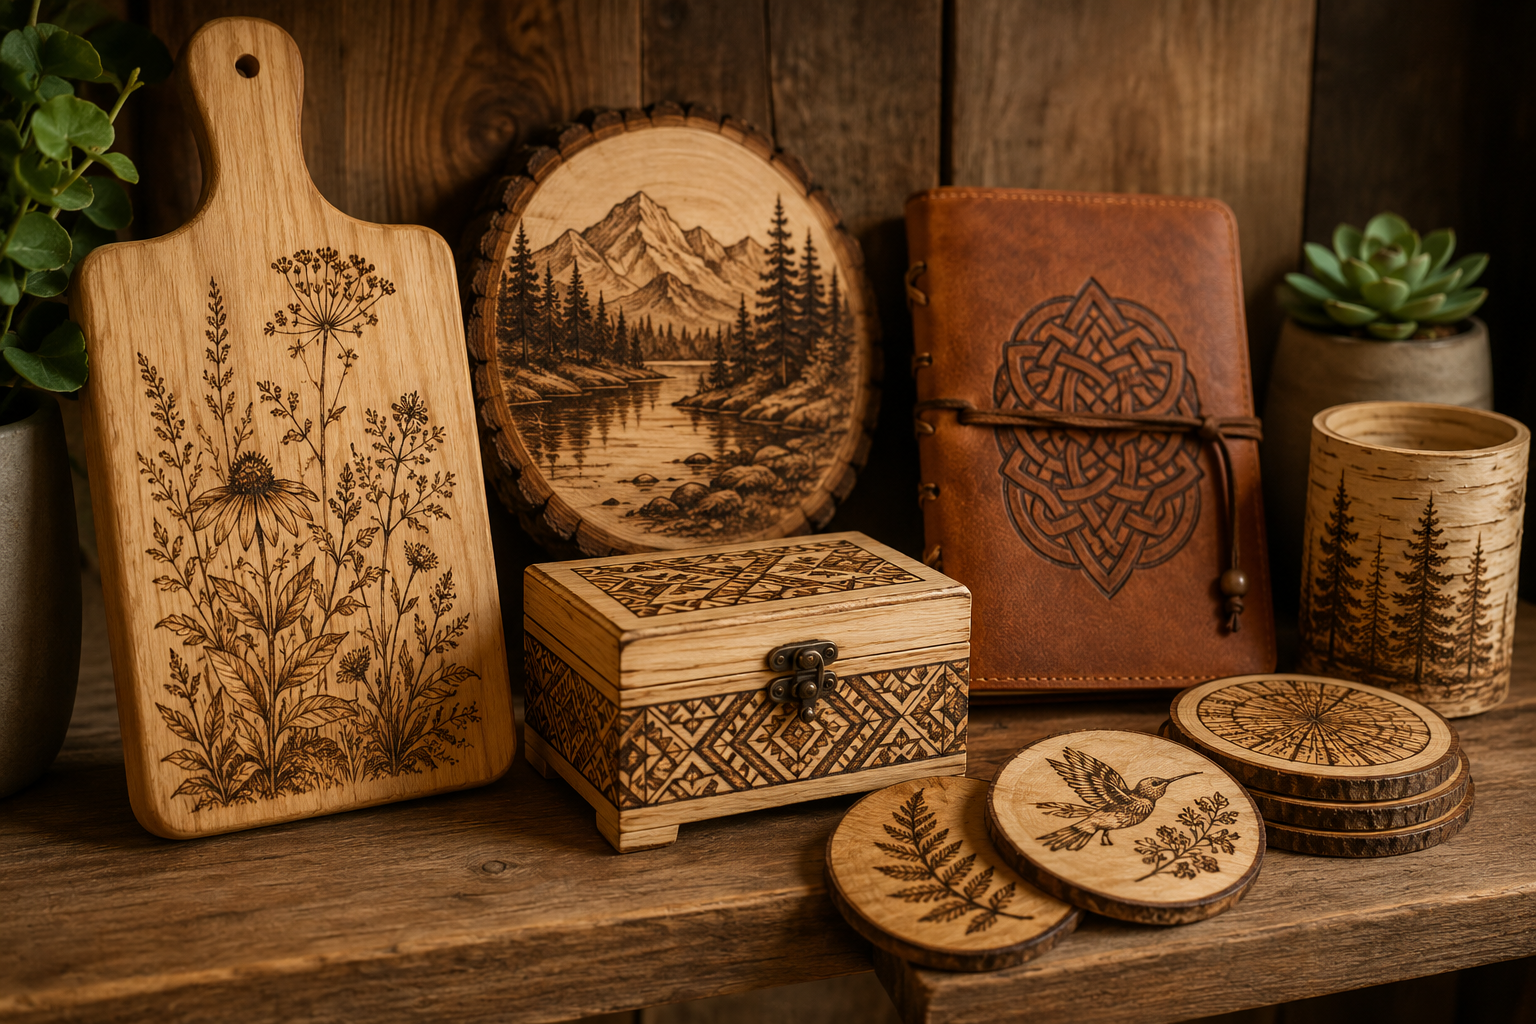
Creative Applications for Pyrography
The versatility of pyrography means it can be applied to a wide array of woodworking projects, enhancing their aesthetic appeal and perceived value.
- Personalized Gifts: Customizing items like wooden spoons, cutting boards, picture frames, or jewelry boxes with names, dates, or special messages.
- Home Decor: Creating wall art, decorative plaques, coasters, or embellishing wooden furniture pieces. See how pyrography can personalize items like Engraved Wooden Coasters with Custom Designs: Laser and Hand for inspiration.
- Wearable Art: Designing on wooden pendants or brooches.
- Functional Items: Adding unique touches to wooden bowls (ensure food-safe sealants), trays, or even parts of a Custom Wood Workbench: Design Considerations and.
- Mixed Media: Combining pyrography with wood carving, painting, or staining for truly unique pieces.
In 2026, handcrafted items hold immense appeal. Pyrography offers a unique way to distinguish your work, whether you’re creating for personal enjoyment or for sale. The beauty of The Art of Pyrography on Wood: Beginner’s Guide to Wood Burning Designs lies in its ability to transform ordinary wood into extraordinary art, making it a fulfilling craft for any enthusiast. You might also find inspiration in Handcrafted Wooden Wall Clocks: Designs That Blend Narrative and consider adding pyrography details to create truly bespoke timepieces.
Conclusion
The Art of Pyrography on Wood: Beginner’s Guide to Wood Burning Designs opens up a world of creative possibilities. From the initial thrill of selecting your first wood burning tool to the satisfaction of seeing your intricate designs emerge from the wood, this craft offers a rewarding journey. By understanding the essential tools, adhering to crucial safety protocols, and diligently practicing fundamental techniques, anyone can transform simple wood into personalized works of art. The journey into wood burning is one of patience, precision, and immense artistic gratification.
Actionable Next Steps:
- Invest in a Starter Kit: Purchase a basic pyrography pen, a few basswood blanks, and carbon paper to begin your journey.
- Set Up a Safe Workspace: Ensure good ventilation, gather your PPE, and establish a heat-resistant surface.
- Practice Basic Strokes: Dedicate time to practicing lines, curves, and simple shading on scrap wood to build muscle memory and control.
- Experiment with Designs: Start with simple outlines, then gradually incorporate more complex patterns and textures. Don’t be afraid to make mistakes; they are part of the learning process.
- Explore Finishing Options: Learn about different wood sealers and finishes to protect and enhance your completed projects.
Embrace the learning curve, enjoy the process, and let your creativity burn bright on every piece of wood you touch.
SEO Meta Title: Master Pyrography: Beginner’s Guide to Wood Burning Designs SEO Meta Description: Learn the art of pyrography on wood in 2026 with our beginner’s guide. Discover essential tools, safety tips, techniques, and wood burning designs.
