
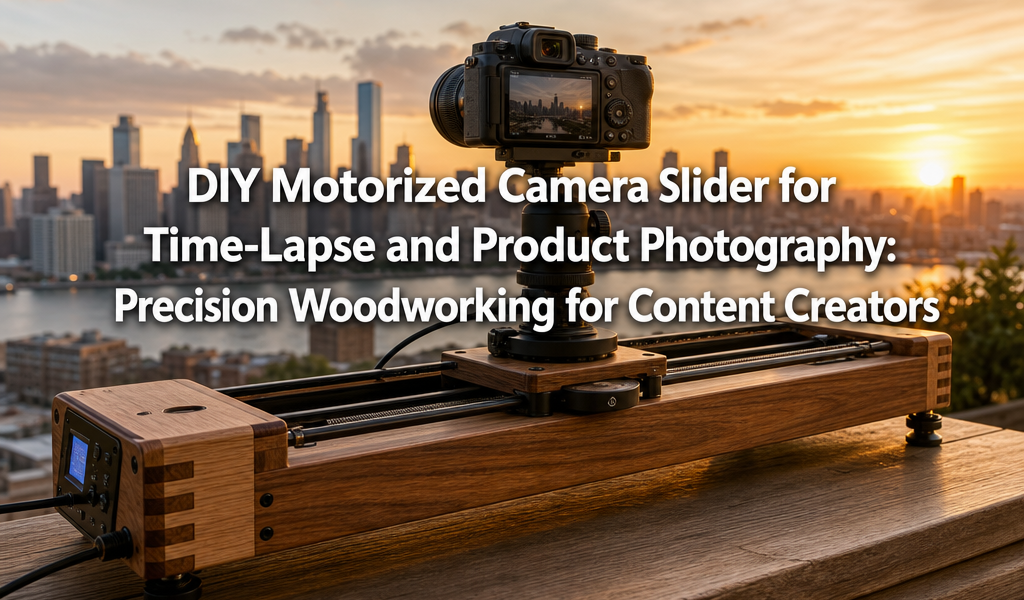

Creating dynamic, cinematic camera movements often requires expensive, specialized equipment. However, content creators, especially those passionate about woodworking, can construct a highly precise and affordable DIY Motorized Camera Slider for Time-Lapse and Product Photography: Precision Woodworking for Content Creators. This article delves into the fusion of traditional craftsmanship with modern technology, demonstrating how a handcrafted wooden slider can elevate your visual storytelling, whether you’re capturing the subtle shifts of a time-lapse or the intricate details of a product.
Key Takeaways
- A DIY wooden camera slider offers a cost-effective alternative to commercial units, providing customizability and a rewarding build experience.
- Precision woodworking techniques are essential for smooth, consistent camera movements, directly impacting the quality of your time-lapses and product shots.
- Integrating basic electronics, such as a stepper motor and microcontroller, transforms a static slider into a dynamic, programmable motion control system.
- Selecting the right wood and ensuring accurate joinery are critical for the slider’s stability and performance.
- This project enhances content creation capabilities, allowing for professional-grade visual effects to showcase woodworking projects and more.
The Synergy of Woodworking and Motion Control: Building Your DIY Motorized Camera Slider for Time-Lapse and Product Photography
The core appeal of a motorized camera slider lies in its ability to introduce smooth, controlled motion to static shots, adding a professional dimension to videos, time-lapses, and product showcases. For woodworkers, this project presents a unique opportunity to apply their skills in a new domain, blending the tactile satisfaction of working with wood with the precision of modern electronics. Imagine capturing the slow, graceful bloom of a flower or the intricate grain of a newly finished piece of furniture with a perfectly smooth camera glide—all achieved with a device you built yourself. This DIY Motorized Camera Slider for Time-Lapse and Product Photography: Precision Woodworking for Content Creators project is not just about saving money; it’s about crafting a tool tailored to your creative vision.


The foundation of any good slider is its mechanical stability and smooth operation. Wood, with its inherent strength-to-weight ratio and ease of machining, makes an excellent material choice. Hardwoods like maple, oak, or even a dense plywood can provide the rigidity needed to prevent flex, ensuring that your camera moves along a perfectly straight path. The selection of materials is paramount; a slight warp or unevenness in the wood can translate into noticeable jitters in your final footage. For inspiration on material choices and quality assessment, consider exploring resources on sustainable wood sourcing or even sourcing reclaimed and salvaged wood for a unique aesthetic.
Essential Components for a Precision Wooden Slider
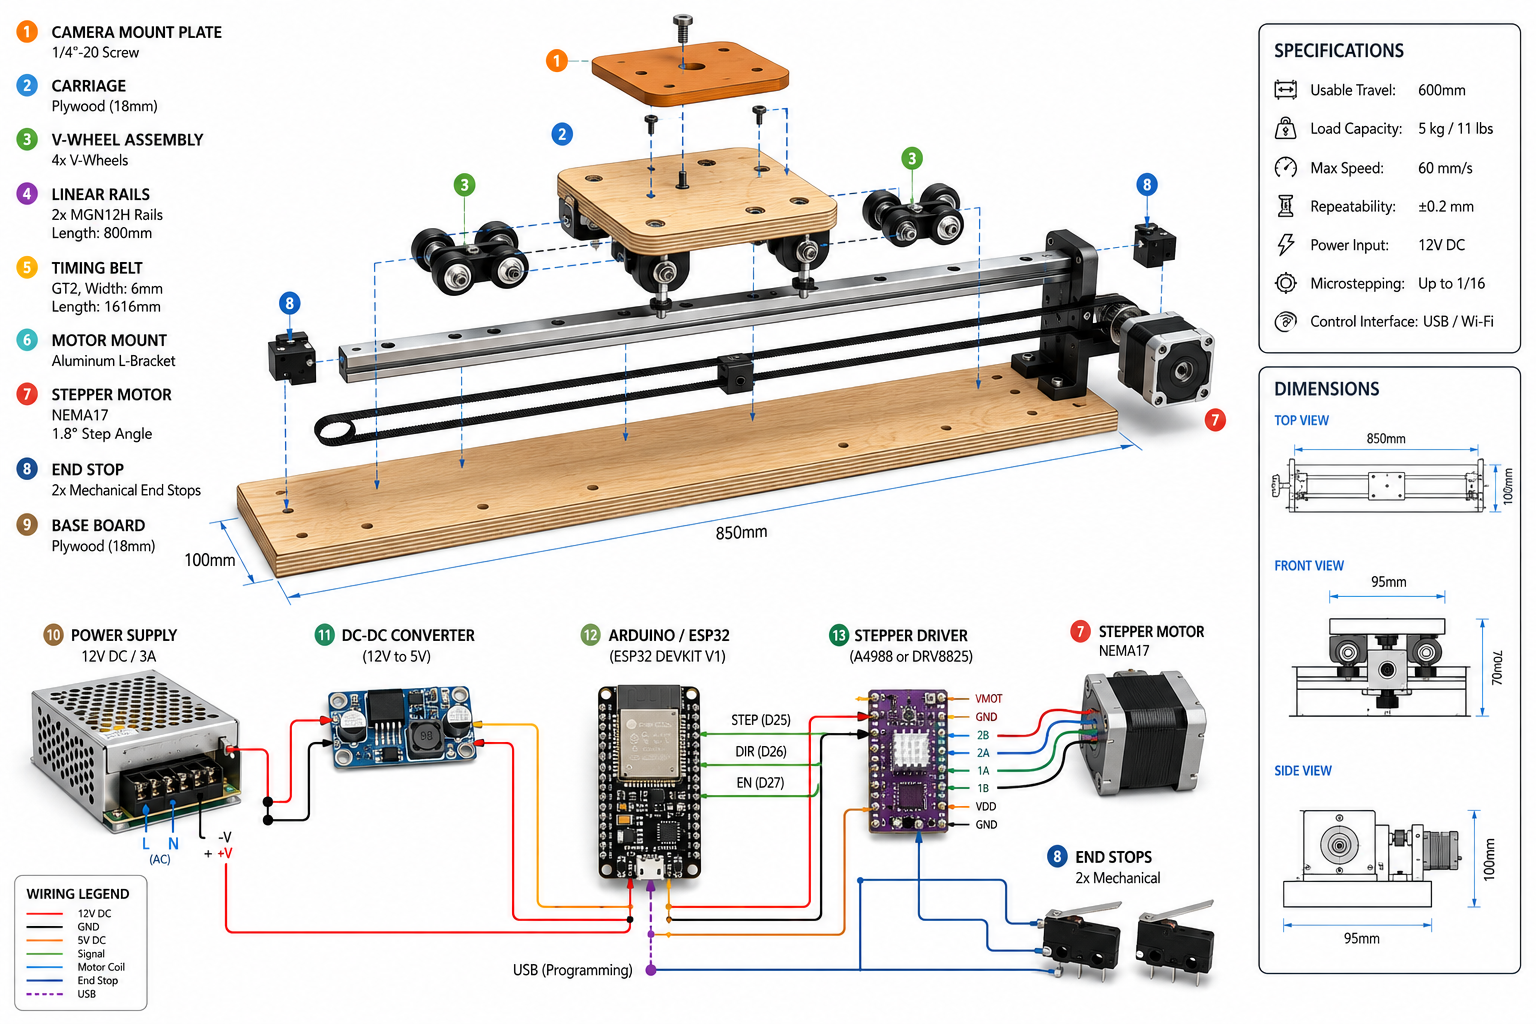
To embark on this project, a clear understanding of the necessary components—both mechanical and electronic—is vital. The mechanical assembly will focus on creating a stable track and a smooth-gliding carriage, while the electronic components will provide the motorization and control.
Mechanical Components:
- Base Rail/Track: This is the primary wooden beam that the camera carriage will traverse. It needs to be perfectly straight and rigid.
- Camera Carriage: A wooden platform that holds the camera and slides along the base rail.
- Linear Bearings/Rollers: These are crucial for smooth movement. Options include V-groove bearings running on metal rails, or even repurposed drawer slides if precision is less critical. For truly precision woodworking, custom wooden runners with a slick low-friction coating or embedded brass strips can also work.
- Tripod Mounts: Threaded inserts (1/4″-20 for camera, 3/8″-16 for tripod) on the carriage and base respectively.
- Lead Screw/Timing Belt: The mechanism that translates motor rotation into linear movement. A lead screw offers high precision and self-locking capabilities, while a timing belt offers faster, smoother movement for certain applications.
Electronic Components:
- Stepper Motor: Provides precise, repeatable motion. NEMA 17 motors are common and affordable.
- Stepper Motor Driver: Controls the stepper motor’s speed and direction (e.g., A4988 or DRV8825).
- Microcontroller: An Arduino Nano or ESP32 is ideal for programming the slider’s movements (speed, direction, duration, intervals for time-lapse).
- Power Supply: A 12V DC power supply (battery pack or wall adapter) to power the motor and microcontroller.
- Limit Switches (Optional but Recommended): To define the start and end points of the slider’s travel.
A project like this benefits immensely from power tool mastery to achieve the necessary precision. A router table, for instance, can be invaluable for creating perfectly straight dados or rabbets for linear rails, ensuring parallel alignment. For more on maximizing precision, explore choosing and using router tables.
Precision Woodworking Techniques for Optimal Performance
The success of your DIY Motorized Camera Slider for Time-Lapse and Product Photography: Precision Woodworking for Content Creators hinges on the precision of your woodworking. Even the slightest deviation in the track can cause wobbles or jerky movements in your camera footage. Attention to detail in cutting, joining, and finishing is non-negotiable.
Constructing the Base Rail and Carriage
The base rail must be perfectly straight and rigid. Start by selecting a suitable piece of hardwood, free from knots or warps. Dimensioning this piece accurately is paramount. Using a jointer and planer will ensure all faces are flat and parallel. For the track, consider routing a precise dado or groove along the length of the base rail where your linear bearings or guides will sit. This ensures consistent alignment.
For the camera carriage, precision in its construction ensures smooth movement and secure camera mounting. The carriage must fit snugly onto the base rail’s guides without binding or excessive play. Dovetail joints or rabbet joints for attaching sides can provide strong, accurate connections. Hand tool mastery for detail work can be beneficial here for fine-tuning joints and ensuring perfectly square components.
Key Precision Steps:
- Milling: Mill your chosen wood stock to exact dimensions, ensuring square and flat surfaces.
- Rout the Track: Use a high-quality router bit and a fence to create a consistent, straight track for your linear bearings. If using metal rails, drill and countersink mounting holes precisely.
- Carriage Assembly: Assemble the carriage, ensuring it is perfectly square. Test its fit on the track before final assembly and gluing.
- Hardware Mounting: Precisely mark and drill holes for the lead screw/timing belt, stepper motor, and tripod mounts. Misalignment here can cause binding and uneven movement. Use a drill press for vertical accuracy.
Integrating the Electronics and Software
Once the mechanical framework is complete, the electronic integration begins. This is where your slider transforms from a passive device into a dynamic, programmable tool.
- Mounting the Stepper Motor: Securely mount the stepper motor at one end of the base rail. Ensure its shaft is perfectly aligned with the lead screw or timing belt.
- Connecting the Lead Screw/Timing Belt: Attach the lead screw or timing belt to the motor’s shaft. For a lead screw, a flexible coupler is often used to absorb minor misalignments. The lead screw then passes through a threaded nut attached to the camera carriage. For a timing belt, secure it to the carriage using clamps or screws, ensuring proper tension.
- Wiring the Electronics: Connect the stepper motor to the motor driver, and the driver to the microcontroller. Include any limit switches or external controls (e.g., joystick, buttons). A breadboard can be useful for initial prototyping.
- Programming the Microcontroller: Write or upload code to the Arduino/ESP32. This code will dictate the slider’s movements:
- Time-Lapse Mode: Move a set distance, pause for a specified interval, trigger the camera shutter (often via an external cable connected to the camera’s remote port), then repeat.
- Video Mode: Move continuously at a user-defined speed.
- Product Photography Mode: Precise, repeatable movements for multi-angle shots.
Libraries for stepper motor control (e.g., AccelStepper) and camera shutter control are readily available. This part of the project can be the most challenging for pure woodworkers, but it’s also incredibly rewarding to see your code bring the mechanical components to life.
Applications and Enhancing Your Content Creation in 2026
A meticulously crafted DIY Motorized Camera Slider for Time-Lapse and Product Photography: Precision Woodworking for Content Creators opens up a new realm of possibilities for visual content. In 2026, compelling visuals are more important than ever for captivating audiences, whether for personal projects, client work, or showcasing your woodworking creations online.
Time-Lapse Photography
Time-lapses capture changes over time, condensing hours or days into a short video. Adding motion with a slider creates a “hyper-lapse” effect, making the scene more dynamic and engaging. Imagine capturing the entire build process of a live edge slab coffee table, with the camera slowly tracking along the workbench as the wood transforms. This slider allows you to automate that movement, achieving smooth, consistent pans that would be nearly impossible to execute manually. From natural phenomena like sunsets and blooming flowers to construction projects and artistic processes, the storytelling potential is immense.

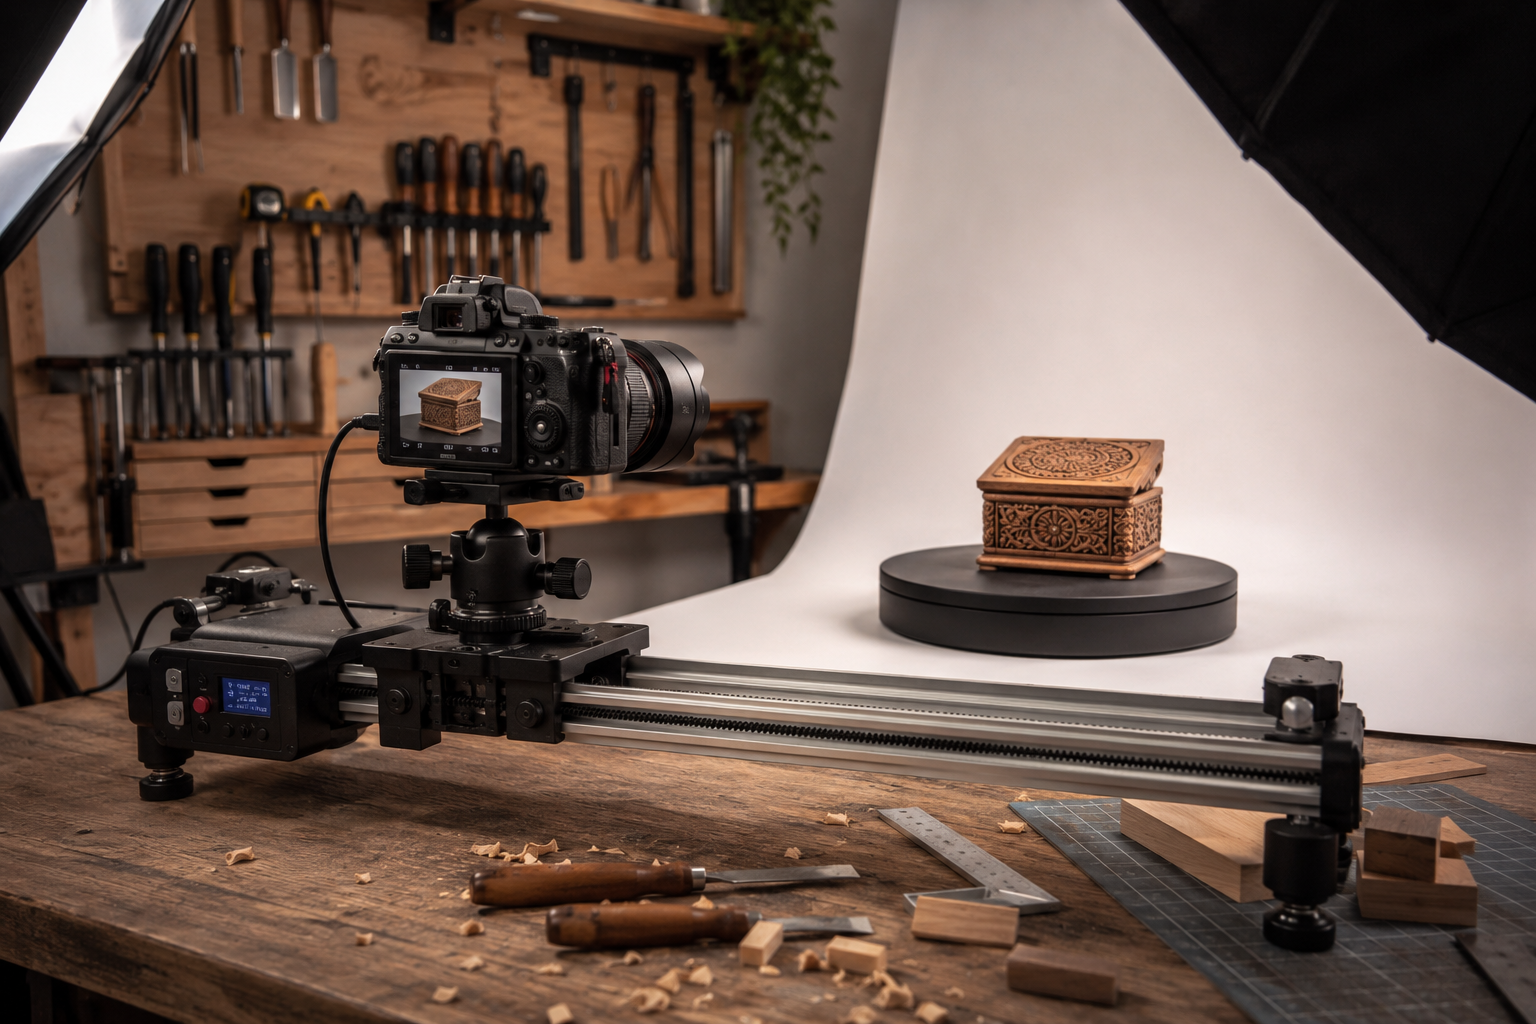
Product Photography and Videography
For woodworkers creating items like custom cutting boards, carved sculptures, or furniture, presenting these pieces with professional-grade photography and videography is crucial for marketing and sales. A motorized slider enables you to:
- Showcase Detail: Perform slow, controlled glides across the intricate details of your product, highlighting craftsmanship, grain patterns, and finishes.
- 360-Degree Views: Program the slider to move the camera in a repeatable arc, capturing multiple angles for a comprehensive product overview, perfect for e-commerce listings.
- Dynamic Introductions: Create captivating opening shots for product videos, adding a sense of luxury and professionalism.
- Consistency: Achieve identical camera movements for different products, ensuring a consistent visual style across your portfolio.
This tool is particularly useful for creators showcasing items that are popular in 2026, such as high-demand woodworking projects like artisanal cutting boards or unique wooden decorative pieces.
The investment in time and effort to build this slider is often recouped by the enhanced quality and perceived professionalism of your content. Moreover, the problem-solving skills honed during this build, from precision cuts to electronic wiring and coding, are invaluable for any content creator or maker. This project perfectly embodies the spirit of DIY, empowering you to create tools that amplify your creative output.
Conclusion
Building a DIY Motorized Camera Slider for Time-Lapse and Product Photography: Precision Woodworking for Content Creators is a challenging yet profoundly rewarding endeavor. It seamlessly integrates the timeless art of woodworking with the practical demands of modern digital content creation. By meticulously crafting the wooden components and carefully integrating the electronic controls, you equip yourself with a versatile tool capable of producing professional-quality time-lapses and stunning product photography.
The precision required in woodworking, combined with the logical thinking demanded by electronics and programming, offers a comprehensive skill-building experience. As content creation continues to evolve in 2026, having unique and high-quality visual assets is paramount. This DIY slider not only saves costs but provides a customizable solution perfectly adapted to your specific creative needs, allowing your content to stand out with dynamic, smooth, and engaging motion.
Actionable Next Steps:
- Plan Your Design: Sketch out your slider’s dimensions and desired features, considering the weight of your camera and desired travel length.
- Source Materials: Gather your chosen wood, linear bearings, stepper motor, microcontroller, and other electronic components.
- Master Your Tools: Ensure your woodworking tools are sharp and calibrated for precision cuts.
- Start Building: Tackle the mechanical components first, prioritizing straightness and smooth movement.
- Integrate Electronics: Carefully wire and program your microcontroller, testing each component thoroughly.
- Experiment and Refine: Practice using your new slider, adjusting settings and camera techniques to achieve your desired visual effects.
SEO Meta Title: DIY Motorized Camera Slider: Precision Woodworking for Content Creators SEO Meta Description: Build a DIY motorized camera slider for time-lapse & product photography. Master precision woodworking & electronics for pro content in 2026.
