
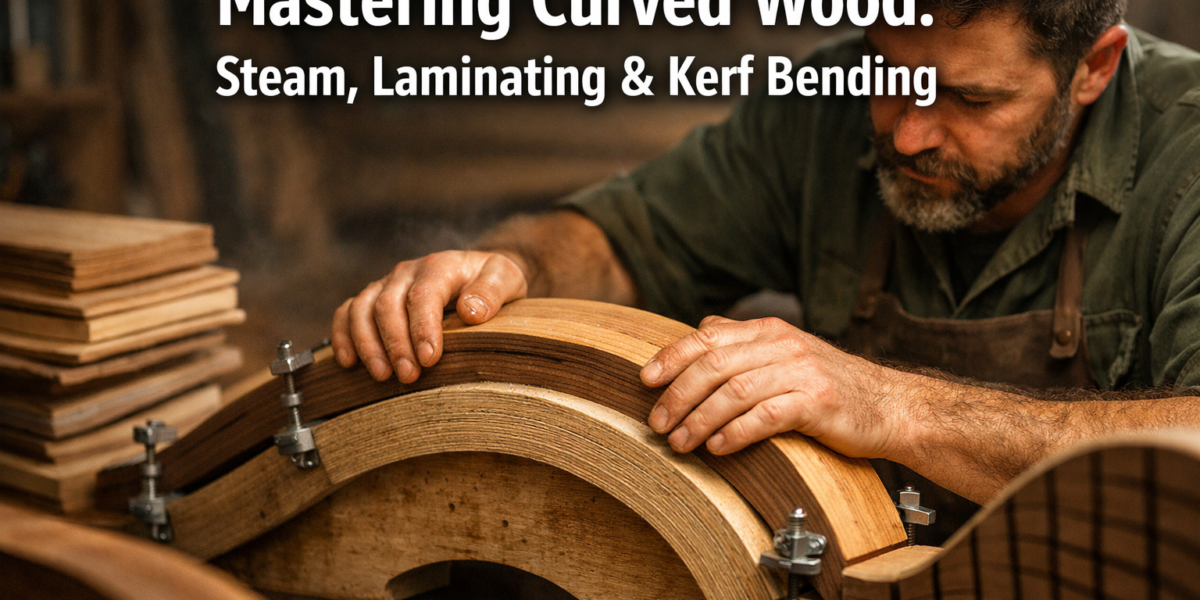

The perception that all woodworking projects must adhere to rigid, linear forms significantly limits creative potential. While straight lines and sharp angles define many traditional pieces, the ability to introduce sweeping curves and organic shapes elevates craftsmanship, turning ordinary wood into sculptural art. This guide provides an Introduction to Wood Bending Techniques: Steam Bending, Laminating, and Kerf Bending for Curved Designs, empowering woodworkers to break free from geometric constraints and explore a world of fluid aesthetics.
Key Takeaways
- Wood bending allows for complex, organic designs impossible with traditional joinery.
- Steam bending uses heat and moisture to soften wood fibers for temporary flexibility.
- Laminating involves gluing thin strips of wood to create strong, permanent curves.
- Kerf bending achieves curves by strategically cutting grooves into the wood’s surface.
- Each technique has distinct advantages, ideal applications, and material requirements.
Introduction to Wood Bending Techniques: Understanding the Fundamentals
Wood bending, at its core, involves manipulating wood fibers to achieve a desired curvature. This ancient craft, once essential for ship hulls and wagon wheels, remains a vital skill for furniture makers, sculptors, and hobbyists alike in 2026. The beauty of curved wood lies not only in its visual appeal but also in the inherent strength that some bending methods can impart. Unlike cutting a curve from a solid piece of wood, which severs wood fibers and reduces strength, bending techniques generally maintain the integrity of the grain, often resulting in stronger, more resilient components.

The choice of wood species is paramount for successful bending. Hardwoods, particularly those with interlocked grain, generally perform better. Oak, ash, walnut, and cherry are highly regarded for their bending properties. Softwoods, while sometimes bendable, tend to splinter or collapse more easily. Factors like grain direction, moisture content, and the presence of knots significantly impact a board’s suitability for bending. Straight-grained, defect-free stock with a relatively high moisture content (green or air-dried) is usually preferred for steam bending, while kiln-dried stock is typically used for laminating.
Why Bend Wood?
Beyond aesthetics, there are practical advantages to incorporating curved designs:
- Increased Strength: Bending wood often creates stronger parts than cutting a curve from a solid board, as the continuous grain resists breaking.
- Reduced Waste: Bending can be more material-efficient than cutting curves, especially for large radii, where a lot of material would otherwise be removed as waste.
- Unique Aesthetics: Curved forms add elegance, comfort, and a distinctive visual appeal to furniture and other wooden objects.
- Ergonomics: Curved backs, arms, and seats in chairs can significantly improve comfort.
This Introduction to Wood Bending Techniques: Steam Bending, Laminating, and Kerf Bending for Curved Designs will delve into the specifics of three primary methods, detailing their processes, advantages, and ideal applications.
Steam Bending: Softening Wood for Elegant Curves
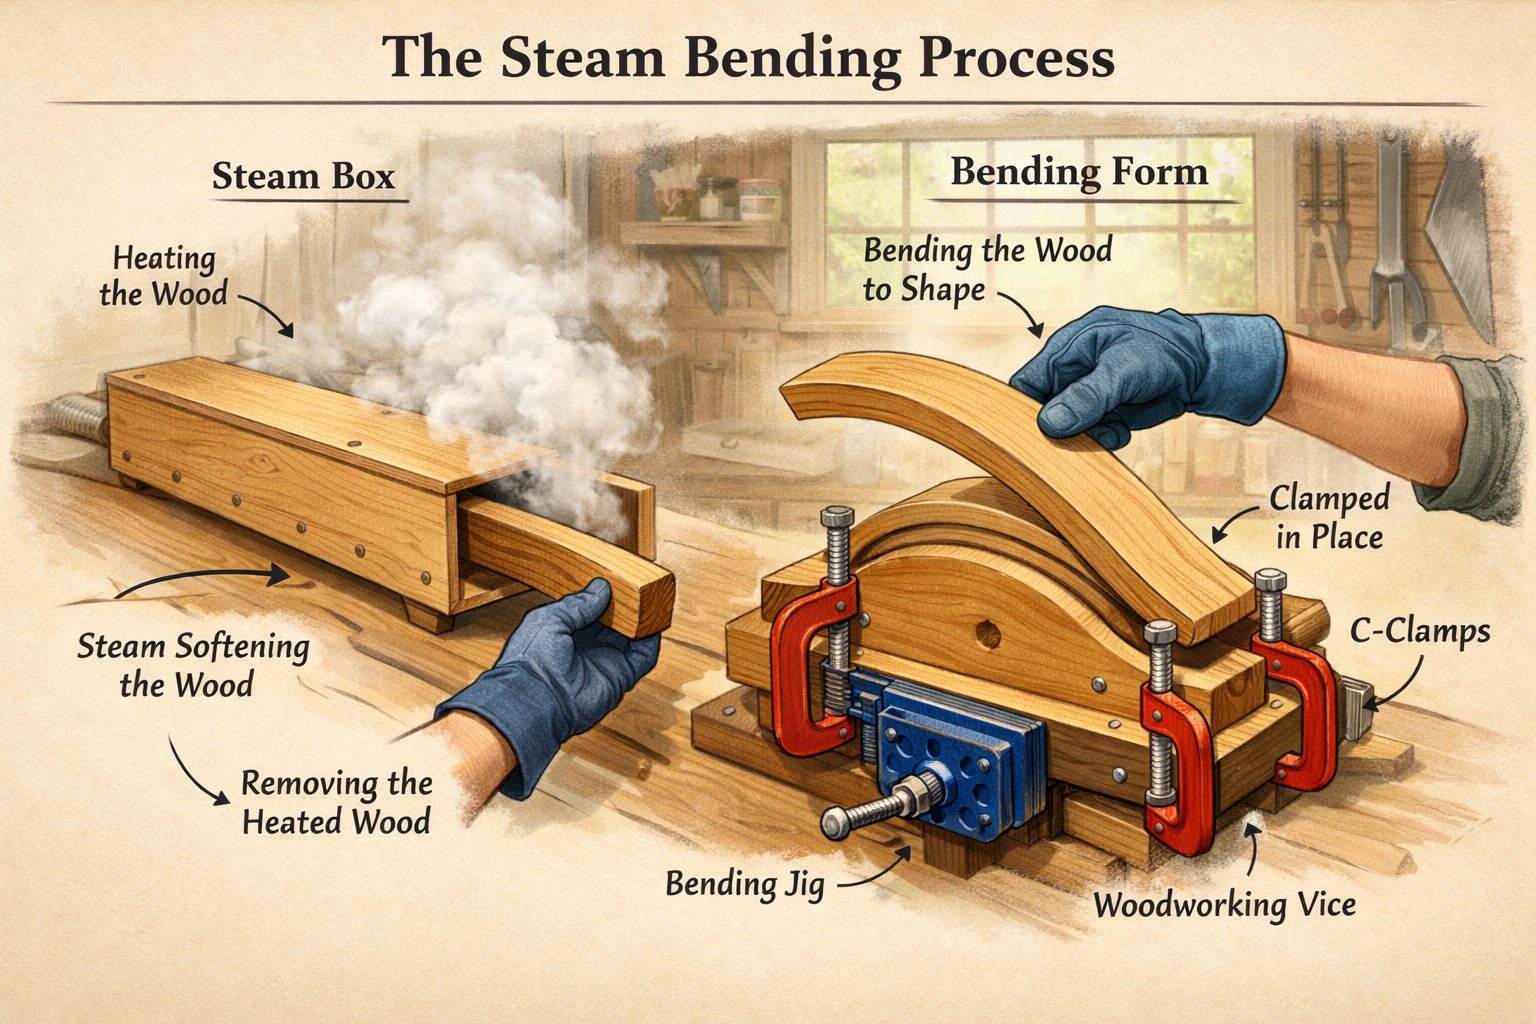
Steam bending is perhaps the most traditional and visually dramatic of all wood bending techniques. It involves using heat and moisture to plasticize the wood fibers, making them temporarily flexible enough to be bent around a form. Once cooled and dried in the bent shape, the wood retains its new curve. The process leverages the natural elasticity of wood.
The Steam Bending Process
- Material Selection: Select straight-grained, knot-free wood, ideally air-dried or green. Red oak, white oak, ash, and hickory are excellent choices due to their cellular structure, which responds well to steaming.
- Building a Steam Box: A simple steam box can be constructed from plywood, PVC pipe, or even an old water heater. It needs to be insulated to maintain a high temperature and have a steam inlet from a boiler or wallpaper steamer, and a small vent for circulation.
- Steaming the Wood: Place the wood in the steam box. The rule of thumb is to steam for approximately one hour per inch of thickness. The wood should be thoroughly saturated with steam, reaching an internal temperature sufficient to soften the lignin, the natural glue that binds wood fibers.
- The Bending Form: A sturdy form, typically made from plywood or MDF, is required. This form dictates the final curve of the wood. The radius of the curve should be achievable for the chosen wood species and thickness without excessive stress.
- Bending and Clamping: Immediately after removing the wood from the steam box, it must be quickly bent around the form. Speed is crucial as the wood cools and stiffens rapidly. A metal bending strap on the outer face of the bend helps prevent the outer fibers from tearing and compresses the inner fibers, preventing buckling. Clamp the wood tightly to the form.
- Drying: Allow the wood to dry completely on the form. This can take several days or even weeks, depending on the wood thickness and ambient conditions. Forced drying in a controlled environment can accelerate the process.
- Springback: Wood will always exhibit some “springback” — a slight tendency to return to its original straight shape after being released from the form. To counteract this, the bending form is often made with a slightly tighter radius than the desired final curve.
Advantages and Disadvantages of Steam Bending
| Feature | Advantages | Disadvantages |
|---|---|---|
| Strength | Maintains continuous grain, often resulting in very strong curved components. | Requires careful technique to prevent fracturing; prone to springback. |
| Aesthetics | Produces smooth, flowing curves with an unbroken grain pattern. | Limited to single-plane bends and certain wood species. |
| Cost | Relatively inexpensive, requiring minimal equipment beyond a steam box and forms. | Can be labor-intensive, especially for large or complex bends. |
| Material Use | Good for thicker pieces, less waste than cutting curves from solid stock. | Limited by the wood’s inherent bending properties; susceptible to defects. |
| Complexity | Best for simpler curves; complex, multi-axis curves are challenging. | Requires quick action and precise timing. |
For projects requiring graceful curves in solid wood, such as chair backs, boat ribs, or architectural details, steam bending is an invaluable technique. Learn more about working with tools for these kinds of projects in our guide to Mastering the Band Saw: Essential Techniques for Resawing, Curve.
Laminating: Building Strong, Permanent Curves
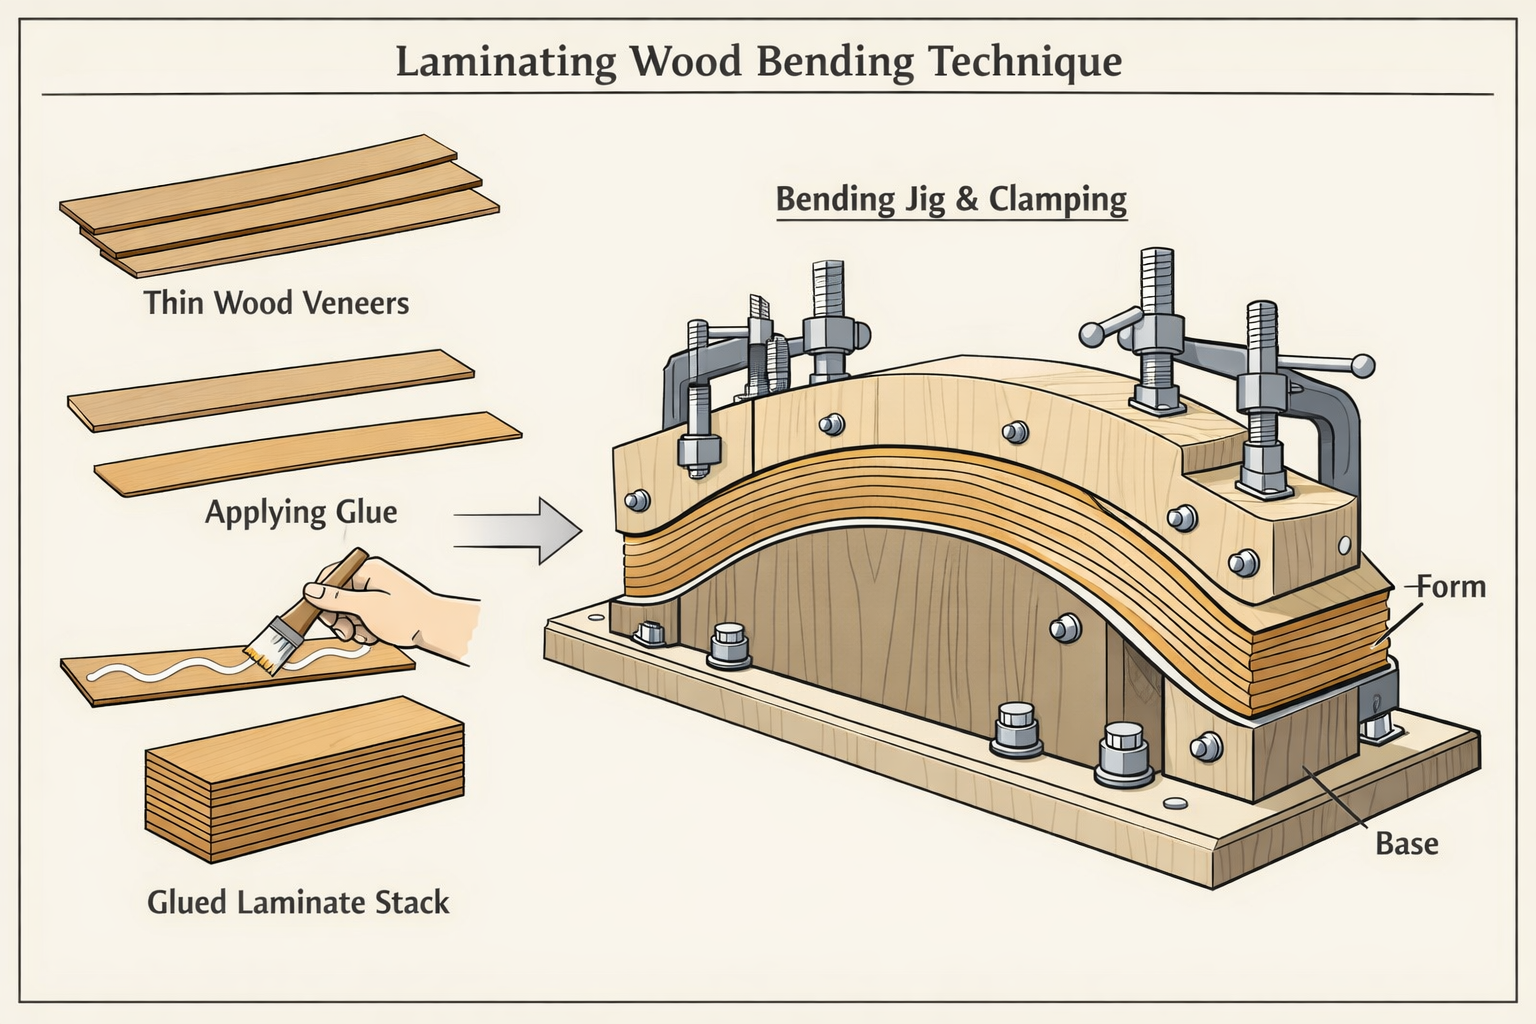
Laminating, often called bent lamination, is a versatile and robust wood bending technique where multiple thin strips of wood (veneers or solid wood strips) are glued together and clamped over a form until the adhesive cures. This method creates exceptionally strong and stable curved components, offering greater control over the final shape and reducing springback compared to steam bending.
The Laminating Process
Material Preparation:
- Stock Selection: Select flat, straight-grained wood. The species choice is less critical than for steam bending, but hardwoods like walnut, maple, cherry, and oak are commonly used.
- Milling Strips: The crucial step is to mill the wood into thin, consistent strips. The thickness of each strip depends on the desired radius and wood species; thinner strips bend more easily. A portable workbench with a planer or jointer is ideal for this. Aim for strips that can be bent easily by hand without breaking.
- Surface Preparation: Ensure all mating surfaces are perfectly flat and smooth for optimal glue adhesion.
Building the Bending Form: Create a robust female (concave) or male (convex) form from MDF, plywood, or solid wood, matching the exact desired final curve. Because there is minimal springback with laminating, the form can be precisely the desired shape.
Applying Adhesive: Spread a strong, slow-setting wood glue evenly on one side of each strip. Resorcinol, epoxy, or plastic resin glues are often favored for their strength, long open time, and resistance to creep under stress. PVA glues can work but may be more prone to creep over time. For more on choosing the right adhesive, see our guide on The Ultimate Guide to Wood Glue: Choosing the Right Adhesive for.
Stacking and Clamping: Stack the glued strips carefully, aligning the ends. Place the stack onto the bending form. Use numerous clamps (bar clamps, C-clamps, or vacuum presses) to apply even pressure across the entire length and width of the laminate, ensuring intimate contact between all surfaces and the form. Caul plates can help distribute clamp pressure.
Curing: Allow the glue to cure completely, following the manufacturer’s recommendations. This is critical for the strength and stability of the bent component.
Finishing: Once cured, remove the clamps and the laminated piece from the form. The edges will likely be uneven due to glue squeeze-out and slight misalignment, requiring trimming and sanding to the final dimensions.
Advantages and Disadvantages of Laminating
| Feature | Advantages | Disadvantages |
|---|---|---|
| Strength | Exceptionally strong due to multiple glue lines and continuous grain. | Requires strong adhesive and consistent milling of strips. |
| Versatility | Can achieve very tight radii and complex curves (compound bends). | Appearance shows glue lines, which may not be desirable for all aesthetics. |
| Control | Predictable results with minimal springback. | Requires a substantial number of clamps and a well-made form. |
| Material Use | Can use thinner, less perfect stock; good for maximizing material use. | Time-consuming due to glue application and clamping; longer curing times. |
| Aesthetics | Distinctive layered appearance; can mix different wood species for visual effect. | Can be messy with glue squeeze-out, requiring careful cleanup. |
Laminating is an excellent choice for projects like curved cabinet doors, elegant chair arms, arched entryways, or even crafting custom wooden record player consoles with unique contours.
Kerf Bending: Precision Cuts for Flexible Panels
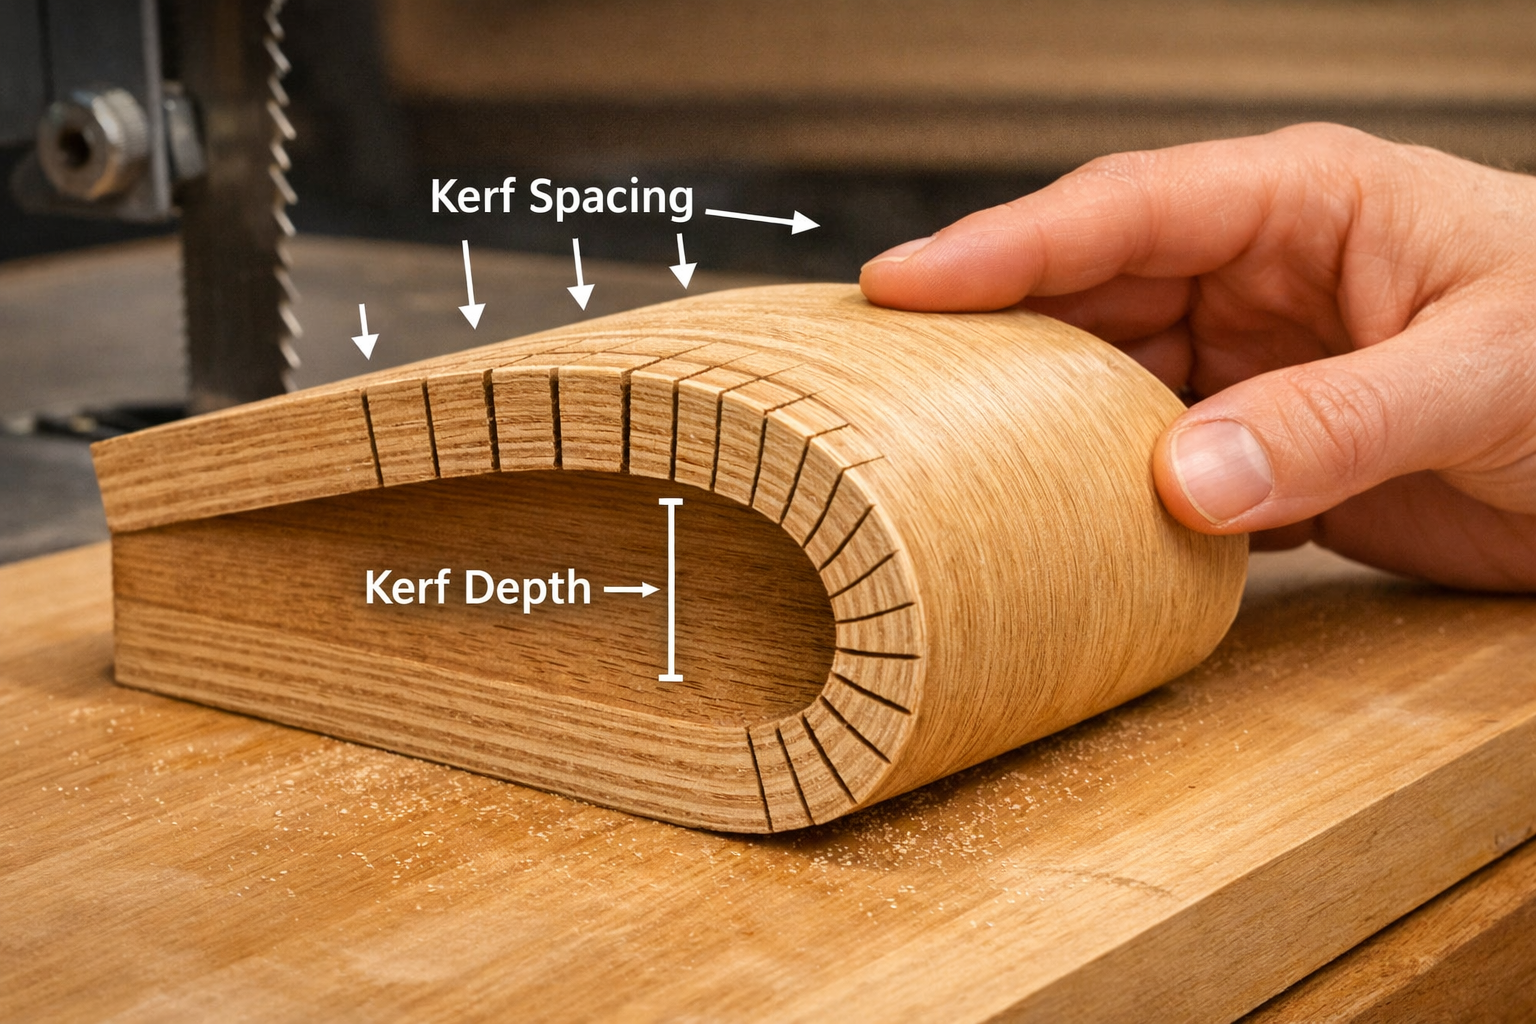
Kerf bending is a technique that allows flat sheet goods, such as plywood, MDF, or even solid wood panels, to be bent into curves by strategically removing material from one side. Unlike steam bending or laminating which alter the wood’s inherent flexibility, kerf bending mechanically enables the bend. This method is particularly useful for achieving smooth, consistent curves in applications where the bent face will be covered or where the kerfed side is hidden.
The Kerf Bending Process
Material Selection: Plywood, MDF, and particleboard are common choices for kerf bending due to their consistent thickness and stability. Solid wood can also be kerfed, though it requires more precise calculations and experimentation to prevent splitting.
Design the Curve and Kerf Pattern:
- Desired Radius: Determine the target radius of the curve.
- Kerf Depth: The depth of the kerf cuts is crucial. They should penetrate most of the material’s thickness, leaving a thin “skin” on the show face. For plywood, ensure the kerfs go through all but the final outer veneer.
- Kerf Spacing: Closer spacing allows for tighter curves and a smoother bend. Wider spacing creates a more angular, faceted curve. The spacing depends on the material thickness and desired bend.
- Kerf Type: Common patterns include parallel kerfs (for cylindrical bends), diagonal kerfs (for conical bends), or a grid pattern (for compound curves, though more complex).
Making the Cuts:
- Table Saw: The most common tool for making parallel kerfs. A dado blade or standard saw blade can be used. Jigs can be made to ensure consistent spacing and depth.
- Router: Can be used for custom kerf patterns or for kerfing solid wood with V-groove bits.
- CNC Router: Offers the ultimate precision and allows for highly intricate and complex kerf patterns, including those for compound curves.
- Safety: Always use appropriate safety precautions, including push sticks and featherboards, when making repeated cuts on a table saw.
Bending and Securing: Once the kerfs are cut, the material can be gently bent into the desired curve. The kerfed side will be compressed, and the un-kerfed side will stretch.
- Reinforcement: To secure the bent shape, glue can be applied into the kerfs, or a thin sheet of flexible material (like thin plywood, hardboard, or even fabric) can be glued and clamped to the kerfed side. This creates a strong, stable, and permanent curve.
- Internal Support: For large structures, internal ribs or bracing might be used to maintain the curve.
Advantages and Disadvantages of Kerf Bending
| Feature | Advantages | Disadvantages |
|---|---|---|
| Simplicity | Relatively straightforward for single-plane bends. | Exposed kerfs are generally not aesthetically pleasing unless intentionally featured. |
| Control | Precise control over the curve radius by adjusting kerf depth and spacing. | The un-kerfed face can be prone to splintering if cuts are too deep or material is weak. |
| Material Use | Excellent for sheet goods like plywood and MDF, creating large curved panels. | Strength is reduced compared to solid wood or laminations; relies on the thin skin. |
| Speed | Faster than laminating for simple curves once the setup is complete. | Requires accurate measurement and consistent cutting to achieve smooth curves. |
| Versatility | Can be used for curved cabinet backs, desk modesty panels, or display cases. | Limited aesthetic options; the kerfed side must often be hidden or covered. |
Kerf bending is an ideal solution for applications where a smooth, curved surface is needed on one side, and the other side can be hidden or finished over. This method is often used in cabinetry, architectural elements, or even to create curved sections for DIY wooden wall clocks.
Conclusion
The art of wood bending opens up a vast realm of creative possibilities for woodworkers in 2026. From the organic elegance achieved through steam bending to the robust stability of bent laminations and the mechanical precision of kerf bending, each technique offers unique advantages for incorporating curved designs into projects. Understanding the principles, material considerations, and processes behind steam bending, laminating, and kerf bending is fundamental for any woodworker looking to elevate their craft beyond the straight and narrow.
Experimentation is key to mastering these techniques. Start with smaller projects and readily available materials to gain confidence before tackling larger, more complex designs. As you hone your skills, you will discover new ways to shape wood, adding fluidity, strength, and aesthetic appeal that will truly set your creations apart. Embrace the challenge of working with curves, and you’ll unlock a new dimension in your woodworking journey.
References
Hoadley, R. B. (2000). Identifying Wood: Accurate Results with Simple Tools. The Taunton Press.

Maloof, S. (2001). Sam Maloof: Woodworker. Kodansha International.
SEO Meta Title: Wood Bending Techniques: Steam, Laminating & Kerf Bending SEO Meta Description: Explore steam bending, laminating, and kerf bending for curved wood designs. Master these techniques to create strong, beautiful, and unique woodworking projects in 2026.
