

The average kitchen often features cutting boards that quickly show knife marks, harbor bacteria, and require frequent replacement. However, a well-made end grain cutting board offers superior durability, self-healing properties, and aesthetic appeal, transforming a utilitarian object into a lasting kitchen essential. Crafting these robust pieces from reclaimed wood scraps not only provides visual interest with unique patterns, perfect for modern farm-to-table spaces, but also ensures a lifetime of reliable service. This comprehensive guide details the precise steps for Building End Grain Cutting Boards: Gluing, Flattening, and Food-Safe Finishes, providing the expertise needed to create a truly exceptional board.
Key Takeaways
- End grain cutting boards offer exceptional durability and knife-friendliness due to their unique fiber orientation.
- Precise gluing techniques, including adequate clamping pressure and glue selection, are critical for structural integrity.
- Flattening an end grain board requires specialized tools like a router sled or wide-belt sander to achieve a perfectly level surface.
- Applying food-safe finishes, such as mineral oil or a beeswax/oil blend, is essential for protection, longevity, and hygiene.
- Careful material selection, especially using various wood scraps, enhances the board’s visual appeal and sustainability.
Mastering the Art of Gluing End Grain Cutting Boards
The foundation of a durable end grain cutting board lies in meticulous gluing. Unlike long grain boards where wood fibers run parallel to the cutting surface, end grain boards present the fibers vertically, similar to a bundle of straws. This orientation is what gives them their “self-healing” properties and reduces dulling of knives. However, it also means the glue joints must be incredibly strong and precisely executed to withstand constant use and moisture.

The process begins with selecting suitable wood species. Hardwoods like maple, cherry, walnut, and oak are ideal due to their density and closed grain structure. Using a mix of these woods can create stunning visual patterns, adding to the board’s appeal. Consider sourcing wood scraps from other projects or local lumber mills to maximize sustainability and character.
Preparing Your Wood Strips for Optimal Gluing
Before any glue is applied, the wood must be perfectly prepared. Straight, flat, and square edges are non-negotiable for strong joints.
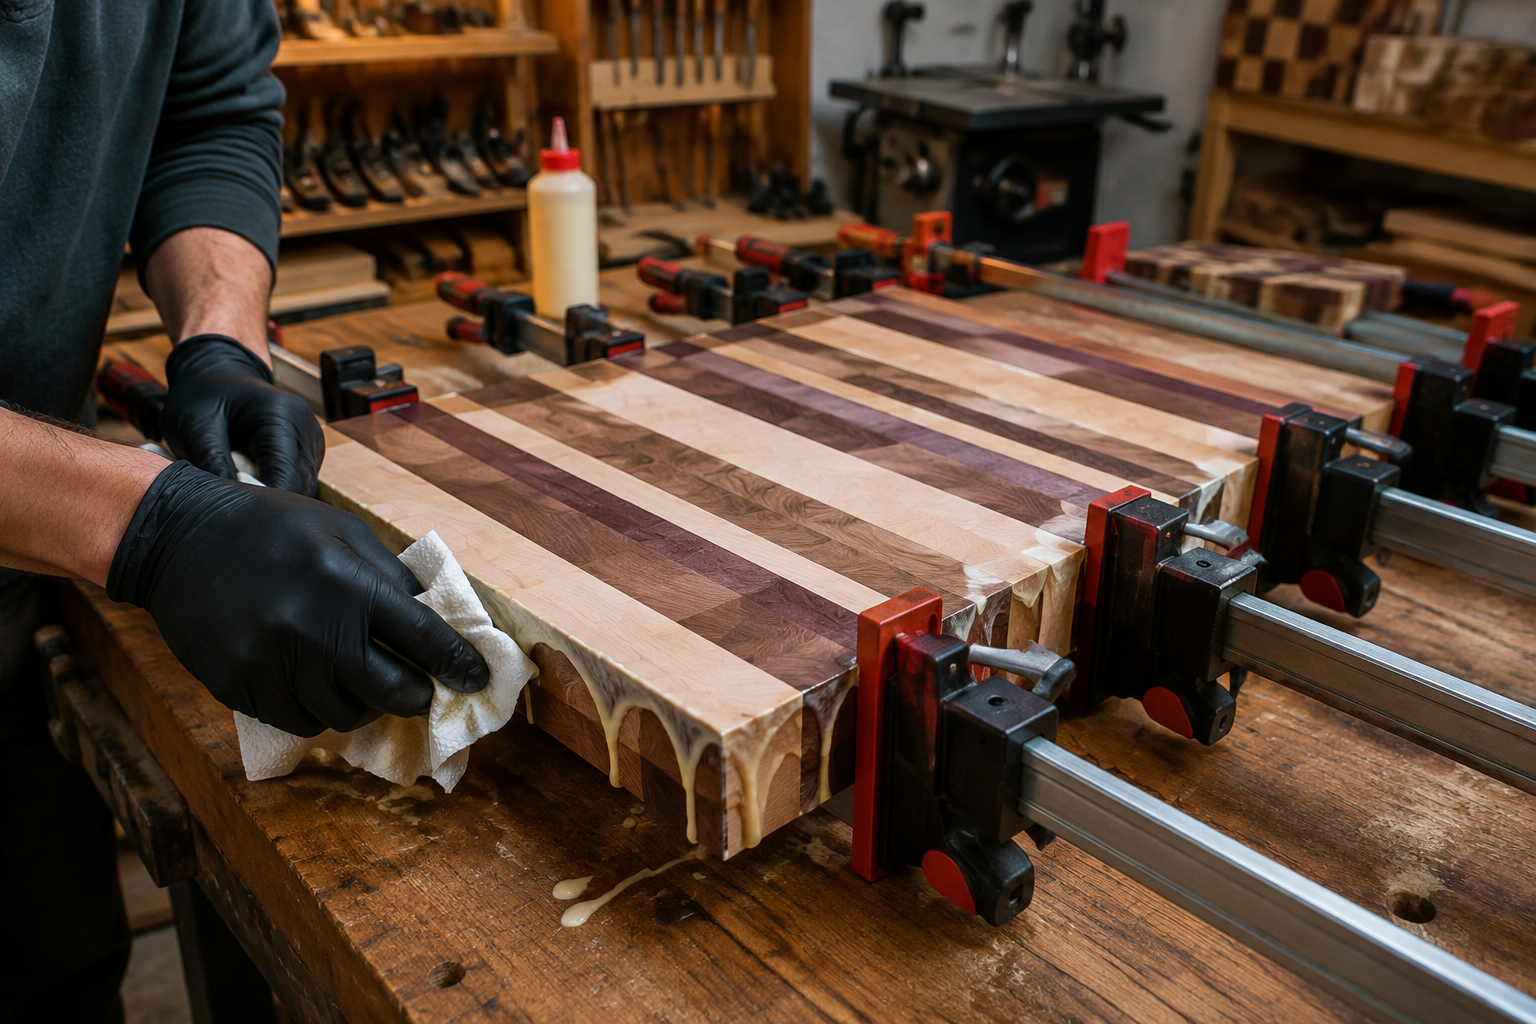
Table 1: Wood Preparation Checklist for End Grain Boards
| Step | Description | Essential Tools |
|---|---|---|
| Dimensioning | Cut your chosen hardwoods into strips of consistent thickness and width. These strips will later be cross-cut and re-glued to form the end grain pattern. | Table saw, planer, jointer |
| Edge Jointing | Ensure all mating edges are perfectly straight and square. Any gaps will compromise the strength of the glue joint. | Jointer, straightedge |
| Sanding (Optional but Recommended) | Lightly sand mating surfaces with 150-grit sandpaper to remove planer marks and provide better glue adhesion. Avoid going too fine. | Orbital sander |
| Dry Clamping | Arrange your strips in the desired pattern and dry clamp them. Check for gaps and ensure all surfaces are flush. | Bar clamps, pipe clamps, parallel clamps |
For a strong glue bond, use a high-quality, waterproof wood glue, such as Titebond III. This glue offers excellent moisture resistance, which is crucial for kitchen items. For more details on choosing the right adhesive, refer to our guide on The Ultimate Guide to Wood Glue: Choosing the Right Adhesive for Every Project, Joint, and Environmental Condition.
The First Glue-Up: Creating the Initial Panels
Once your strips are prepared, it’s time for the first glue-up. This involves gluing the long grain edges together to form wider panels.
- Apply Glue Evenly: Apply a thin, even bead of glue to one face of each mating edge. Avoid excessive glue, but ensure full coverage.
- Assemble and Clamp: Bring the glued strips together and apply clamping pressure. Use enough clamps to ensure even pressure across the entire length of the panel. Aim for approximately 250-300 PSI (pounds per square inch) for hardwoods. Use cauls (sacrificial strips of wood) on the top and bottom of your panel under the clamps to help keep the panel flat and prevent bowing.
- Wipe Squeeze-Out: Immediately wipe away any excess glue squeeze-out with a damp cloth. This saves significant sanding time later.
- Cure Time: Allow the glue to cure completely according to the manufacturer’s instructions, typically 24 hours. Do not rush this step.
After the first glue-up, plane the panels flat and square on all sides. This ensures uniform thickness and perfectly parallel faces, which is vital for the subsequent end grain glue-up. This precise milling is a critical step in Building End Grain Cutting Boards: Gluing, Flattening, and Food-Safe Finishes.
The Second Glue-Up: Forming the End Grain Block
This is where the magic happens. The wide panels from the first glue-up are now cross-cut into smaller strips, which are then rotated 90 degrees so the end grain faces upwards. These end grain pieces are then glued together to form the final board.
- Cross-Cutting: Using a table saw with a high-quality cross-cut blade, cut your panels into strips of the desired thickness for your cutting board. This thickness will become the width of your end grain blocks.
- Arranging the Pattern: Orient the cut strips so the end grain faces up. Arrange them in your desired pattern, paying close attention to color and grain orientation. Dry clamp again to confirm fit.
- Gluing End Grain: Gluing end grain can be challenging as end grain absorbs glue quickly. Apply a generous amount of glue to both mating end grain faces. Some woodworkers prefer to “size” the end grain by applying a thin coat of glue, letting it soak in for 5-10 minutes, then applying a second coat before clamping. This helps prevent “starved” joints.
- Clamping: Use plenty of clamps (bar clamps, pipe clamps, or parallel clamps are excellent for this) and cauls. Apply strong, even pressure to minimize gaps. Again, wipe away excess squeeze-out immediately.
- Final Cure: Allow the board to cure completely, again for at least 24 hours. The integrity of the board depends on these strong glue joints.
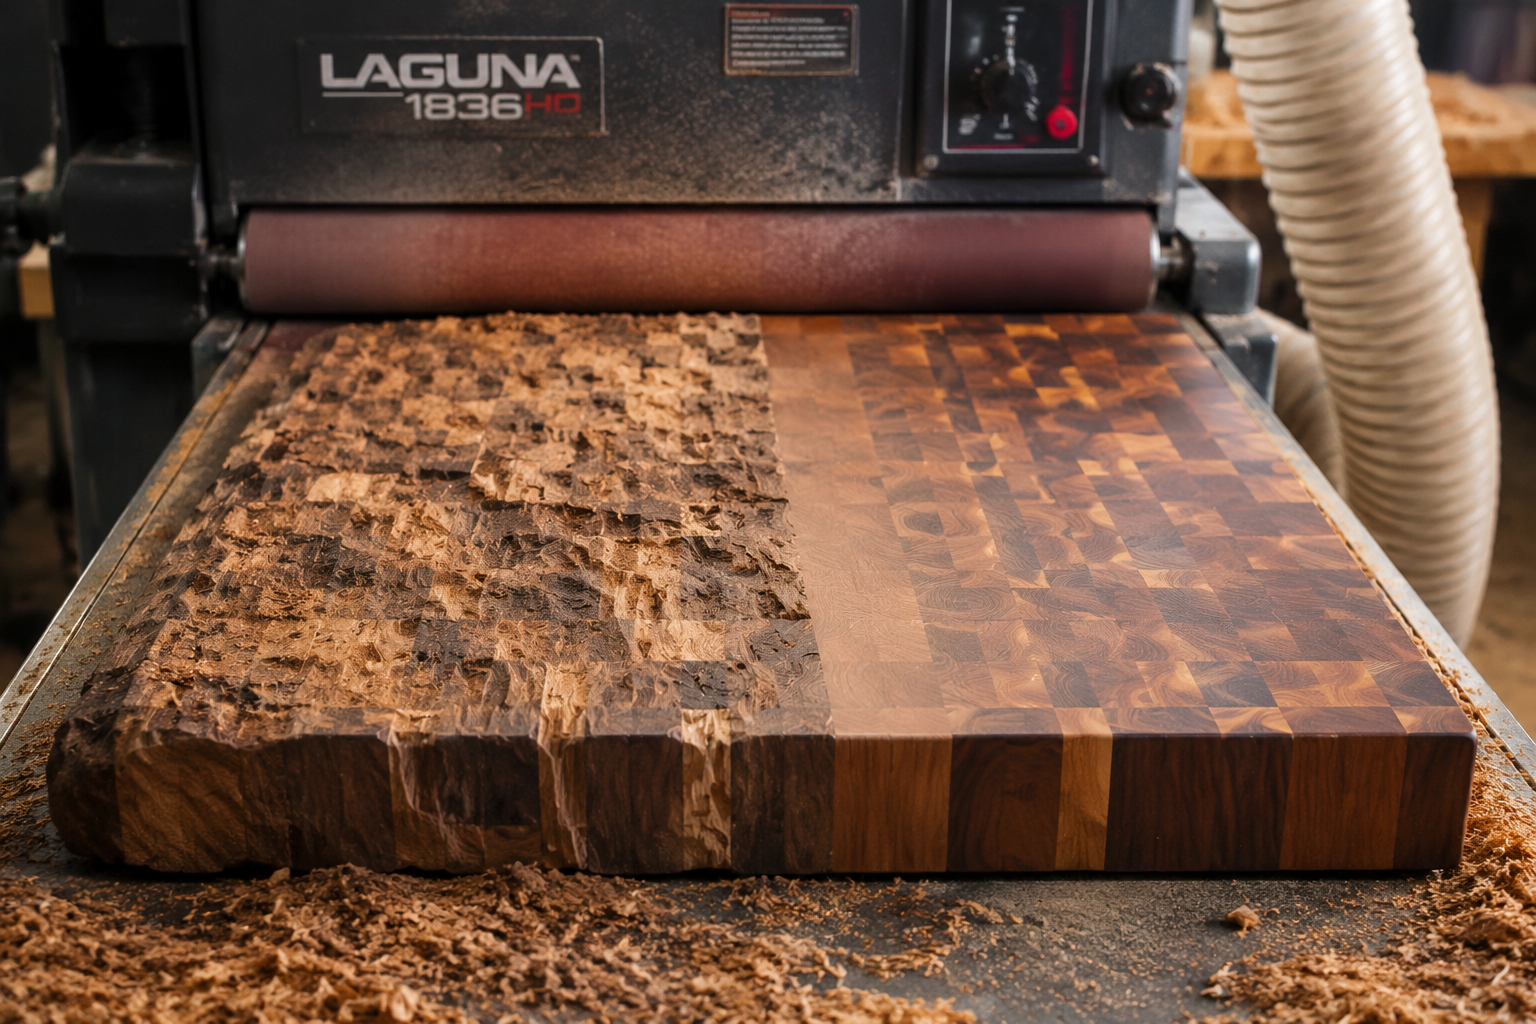
Flattening and Shaping the End Grain Cutting Board
Once the glue has fully cured, your end grain cutting board will likely be uneven. The clamping pressure and wood movement during drying can cause slight variations in height. Achieving a perfectly flat and smooth surface is crucial for both aesthetics and functionality. This stage is paramount in Building End Grain Cutting Boards: Gluing, Flattening, and Food-Safe Finishes.
The Challenges of Flattening End Grain
Flattening end grain presents unique challenges. Running an end grain board through a traditional planer is generally not recommended as it can cause tear-out, blow-out, or even catastrophic failure due to the grain orientation. Instead, specialized methods are required.
Common Methods for Flattening End Grain Boards:
- Router Sled: This is the most common and safest method for small to medium-sized end grain boards. A router sled consists of a base that holds the router, allowing it to move across two parallel rails that sit above the cutting board. The board itself is securely held in a jig or clamped to a workbench. As the router passes over the surface, it shaves off thin layers, progressively flattening the board. For optimal results, use a large-diameter, flat-bottomed router bit. For more information on router techniques, see our guide on Choosing and Using Router Tables: Maximizing Precision and Safety for Edge Profiling and Joinery.
- Wide-Belt Sander: For larger boards or production environments, a wide-belt sander offers exceptional flattening capabilities. These industrial machines can quickly and precisely flatten a board to a uniform thickness.
- Hand Planing/Scraping: While more labor-intensive, skilled woodworkers can flatten smaller boards using a well-tuned hand plane (specifically a scrub plane followed by a jointer plane) or a card scraper. This method requires considerable practice and a keen eye for flatness.
Regardless of the method, make light passes to gradually remove material. Aim for a consistently flat surface, checking frequently with a straightedge.
Sanding for a Smooth Finish
After flattening, the board will need extensive sanding. Start with a relatively coarse grit sandpaper (e.g., 80 or 100 grit) to remove any tool marks from the flattening process. Progress through finer grits (120, 150, 180, 220). For end grain, it’s often beneficial to sand up to 320 or even 400 grit to achieve a silky smooth surface that will readily accept a finish.
- Raise the Grain: After sanding with 220 grit, lightly dampen the board’s surface with a wet cloth. This will cause the wood fibers to swell and stand up (known as “raising the grain”). Let it dry completely, then sand again lightly with 220 or 320 grit. Repeat this process once or twice to minimize grain raising after the finish is applied.
- Edge Treatment: Once the main surfaces are smooth, consider adding a slight round-over to the edges and corners using a router with a round-over bit or by hand sanding. This makes the board more comfortable to handle and less prone to chipping.
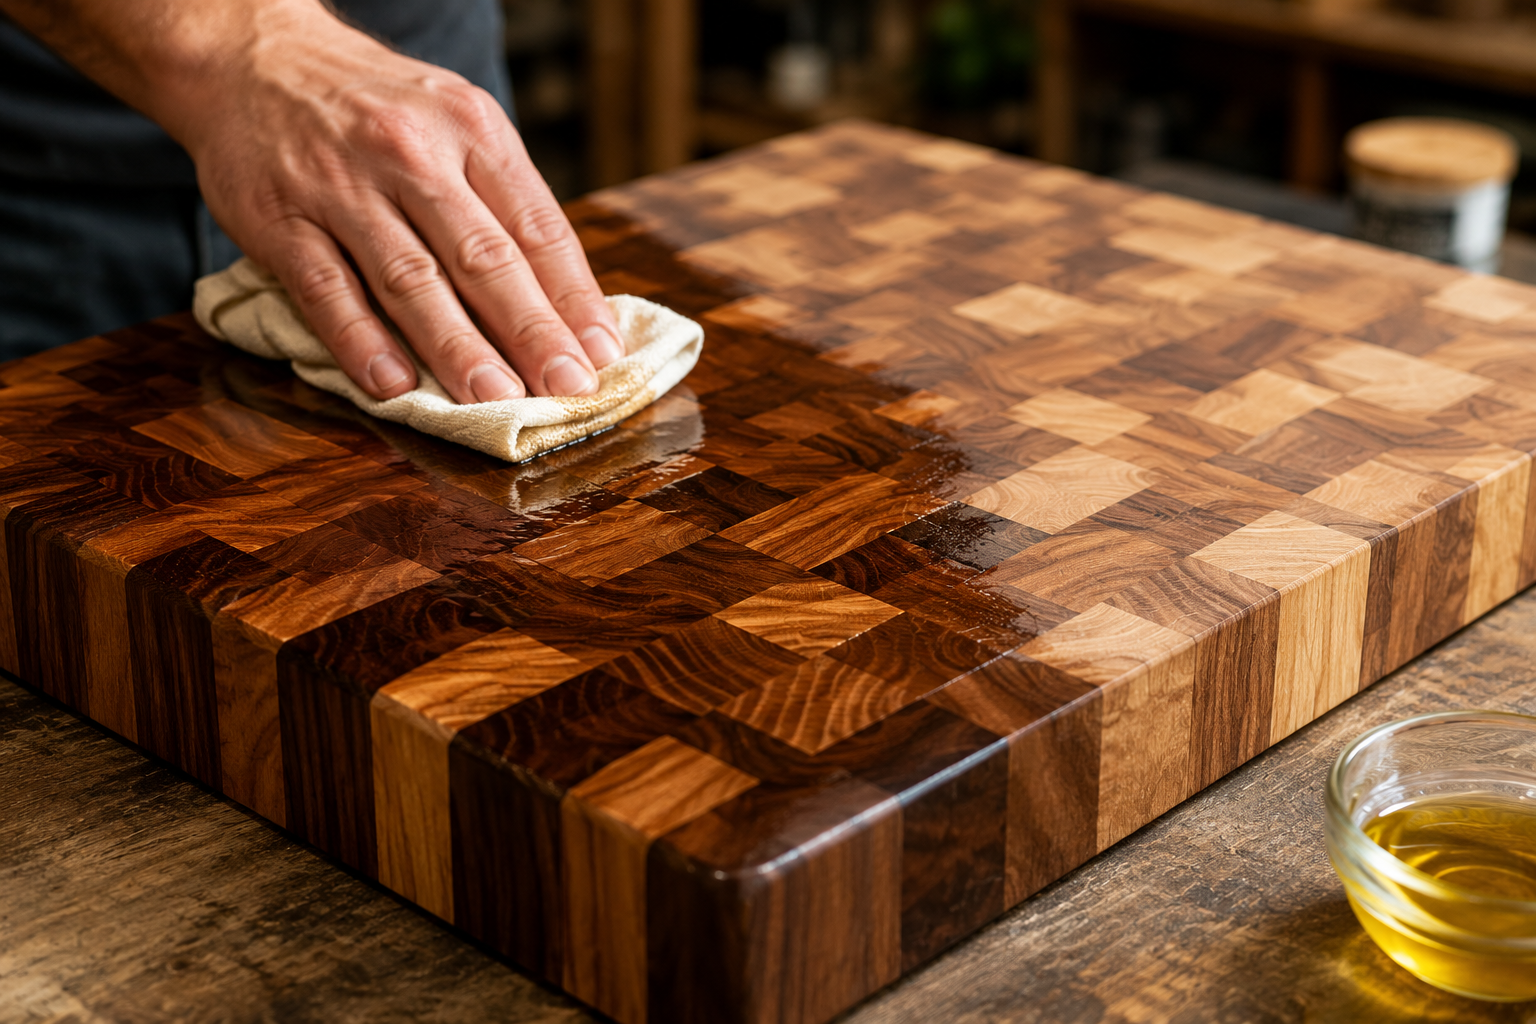
Applying Food-Safe Finishes for Longevity and Hygiene
The final and arguably most crucial step in Building End Grain Cutting Boards: Gluing, Flattening, and Food-Safe Finishes is applying a food-safe finish. This protects the wood from moisture, prevents bacterial growth, and brings out the natural beauty of the grain.
Choosing the Right Food-Safe Finish
Not all wood finishes are suitable for direct food contact. It is imperative to use finishes explicitly labeled as “food-safe” or those known to be non-toxic once cured.
Popular Food-Safe Finishes:

- Mineral Oil (Food-Grade): This is the most common and easiest finish to apply. Mineral oil is a non-drying oil that penetrates the wood, conditioning it and repelling water. It needs to be re-applied regularly (monthly or more, depending on use) to maintain protection.
- Application: Flood the board with mineral oil, let it soak in for several hours (or even overnight), then wipe off the excess. Repeat this process until the wood stops absorbing oil.
- Beeswax/Mineral Oil Blend: Many woodworkers prefer a blend of mineral oil and beeswax (or carnauba wax) for added durability and a more substantial feel. The wax provides a slight barrier on the surface, offering enhanced water resistance.
- Application: Warm the mixture slightly to ensure it’s liquid. Apply a generous amount, let it soak, then buff off the excess vigorously with a clean cloth.
- Walnut Oil or Tung Oil (Pure): These are natural drying oils that polymerize within the wood, offering a more durable, long-lasting finish than mineral oil. Ensure you use pure tung oil, not “tung oil finish,” which often contains varnishes and thinners that are not food-safe.
- Application: Apply thin coats, allowing each coat to dry completely before applying the next (can take 24-48 hours per coat). Several coats are usually required. Note: Tung oil and walnut oil are derived from nuts, so this finish should be avoided if there is a concern about nut allergies.
- Other Options: There are various proprietary food-safe cutting board oils and waxes available, often blends of the above. Always check the ingredients and ensure they are food-grade.
Important Considerations for Finishing
- Saturate the End Grain: End grain is incredibly absorbent. When applying oil, pay extra attention to the end grain sides, as they will soak up more finish than the face grain.
- Allow Adequate Curing: For drying oils like pure tung oil, allow ample time for the finish to fully cure before using the board. This can take several weeks. Mineral oil and wax blends are usable almost immediately after wiping off the excess.
- Maintenance: All cutting boards, especially end grain ones, require ongoing maintenance. Regularly wash with mild soap and water (never soak in water or put in a dishwasher). Re-oil monthly, or whenever the wood starts to look dry or dull.
- Integrated Feet: Consider adding small rubber feet to the underside of your cutting board. This allows for air circulation, preventing moisture buildup underneath and helping to prevent warping. These also keep the board stable during use.
- Router Table Applications: For adding juice grooves or decorative edge profiles, a router table is an invaluable tool. Our guide, Mastering the Router Table: Essential Jigs, Safety, and Advanced Techniques for Precision Joinery and Edges, offers comprehensive tips.
Proper maintenance and appropriate finishing will ensure your end grain cutting board remains a hygienic, beautiful, and functional centerpiece in your kitchen for many years to come.
Conclusion
Building an end grain cutting board is a rewarding woodworking project that culminates in a highly durable, knife-friendly, and aesthetically pleasing kitchen tool. From the initial precise cuts and multi-stage gluing to the meticulous flattening and the final application of a food-safe finish, each step demands attention to detail. The satisfaction of crafting such a substantial and beautiful item, especially when utilizing varied wood scraps to create unique patterns, is immense. These boards not only elevate your kitchen’s functionality in 2026 but also serve as a testament to your woodworking skill. Embrace the challenge, follow these detailed steps, and enjoy a custom cutting board that will last for generations, embodying the spirit of quality craftsmanship in every chop and slice.
