
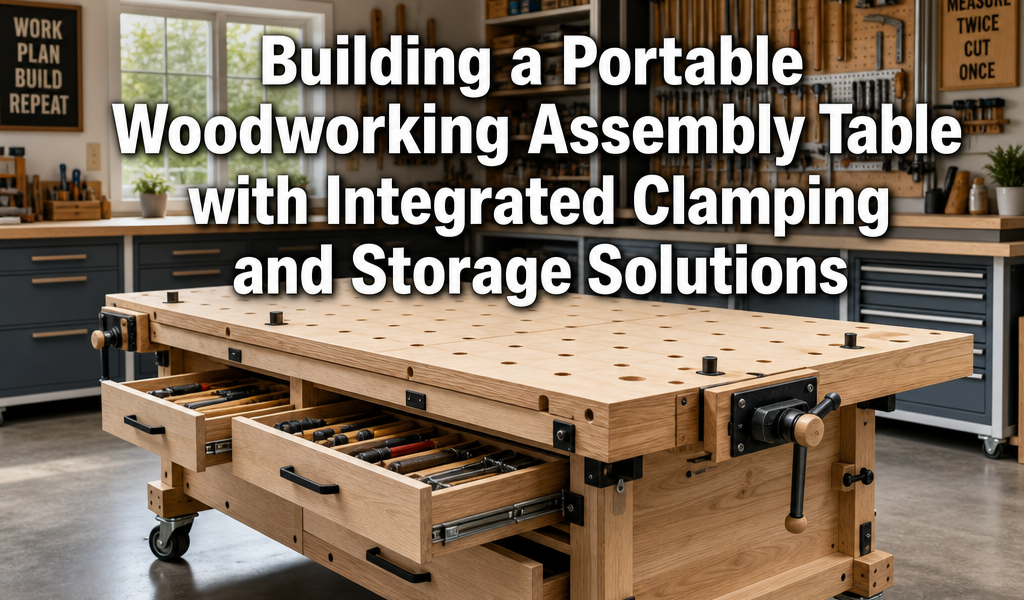

A common challenge facing woodworkers, from hobbyists to seasoned professionals, is the persistent battle against workspace limitations. Many workshops, whether a dedicated room or a shared garage, often lack the expansive, stable surface needed for assembly, along with convenient access to tools and clamping solutions. This article provides a comprehensive guide to Building a Portable Woodworking Assembly Table with Integrated Clamping and Storage Solutions, a project designed to transform your workflow by offering unparalleled versatility, stability, and organization. Imagine a workbench that not only holds your project securely but also keeps essential tools within arm’s reach, all while being effortlessly moved out of the way when not in use. This detailed guide outlines the construction process, material selection, and ingenious features that make this assembly table an indispensable asset for any woodworking endeavor in 2026.
Key Takeaways
- Optimized Workflow: A portable assembly table drastically improves efficiency by bringing clamping and storage directly to your project.
- Space Maximization: Mobility allows for easy repositioning or storage, freeing up valuable workshop space.
- Integrated Solutions: Built-in clamping options like T-tracks and dog holes provide versatile workpiece security.
- Enhanced Organization: Dedicated drawers and shelves keep frequently used tools and accessories orderly and accessible.
- Cost-Effective Customization: Building your own table allows for tailored dimensions and features specific to your woodworking needs.
Designing Your Portable Woodworking Assembly Table
The foundation of a highly functional assembly table lies in thoughtful design. Before cutting the first piece of lumber, consider the specific needs of your woodworking projects, available space, and desired features. A well-designed portable assembly table maximizes utility while minimizing its footprint, making it ideal for diverse workshop environments.

Essential Design Considerations
When embarking on Building a Portable Woodworking Assembly Table with Integrated Clamping and Storage Solutions, several critical design elements require attention:
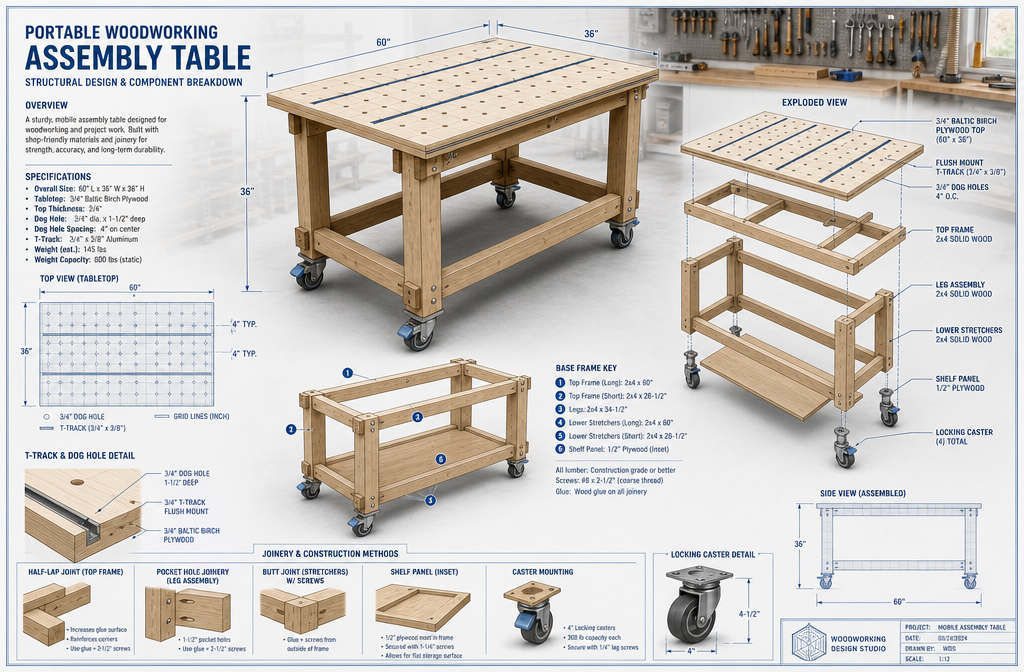
- Tabletop Size: The dimensions of your tabletop should balance between providing ample workspace for typical projects and remaining manageable for portability. A common recommendation is a top around 24×48 inches (60×120 cm) or 30×60 inches (75×150 cm), offering a good compromise. Consider the largest pieces you typically work with.
- Height: The ergonomic height of your assembly table is crucial for comfort and reducing strain during long periods of work. A standard workbench height is often between 34 and 38 inches (86-96 cm), but adjust this to your personal preference and height.
- Mobility: The “portable” aspect is key. Heavy-duty locking swivel casters are essential. Look for casters that can support the total weight of the table, tools, and the heaviest workpiece you anticipate. Swivel casters provide maneuverability, while locking mechanisms ensure stability during use.
- Integrated Clamping: This is a hallmark of an effective assembly table. Options include:
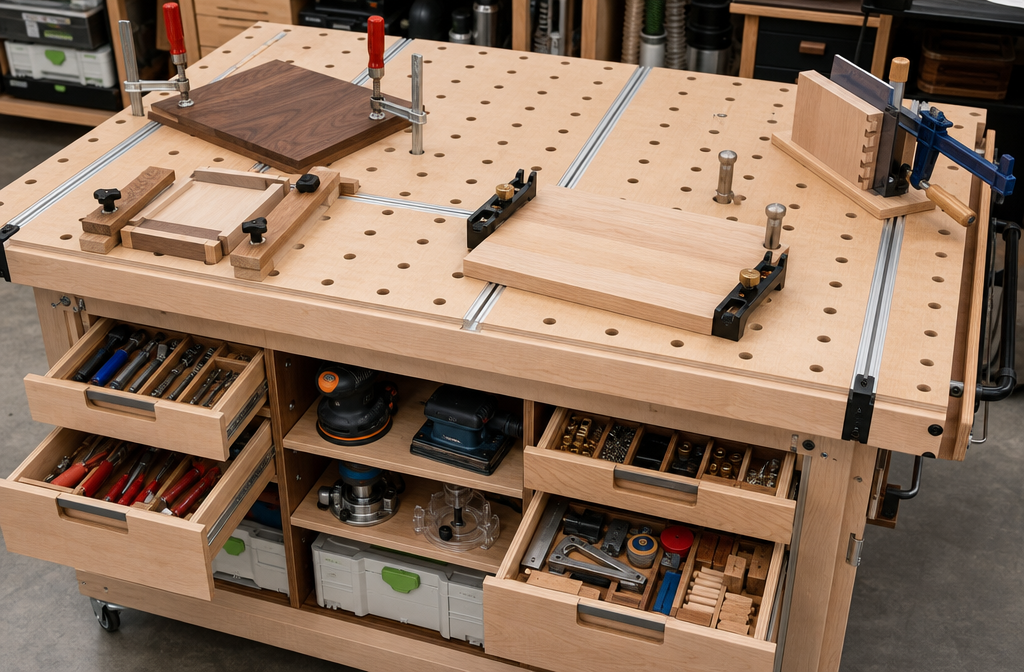
- Dog Holes: A grid of uniformly spaced holes (typically 3/4 inch or 19mm diameter) allows for the use of bench dogs, holdfasts, and specialty clamps. A 4-inch (10 cm) on-center spacing is common.
- T-Tracks: Recessed aluminum tracks provide infinite clamping points for various T-track clamps, stops, and jigs. These can be integrated flush with the tabletop surface.
- Integrated Vises: While less common on truly portable tables due to weight, small front vises or end vises can be incorporated if portability is a secondary concern.
- Storage Solutions: Efficient storage is vital for keeping tools organized and accessible.
- Drawers: Custom-sized drawers can house hand tools, fasteners, glues, and smaller jigs. Consider full-extension slides for easy access.
- Shelving: Open shelves beneath the tabletop can store larger items like power tool cases, lumber scraps, or project bins.
- Pegboard/French Cleats: Adding these to the sides of the table can provide vertical storage for frequently used hand tools. For more comprehensive storage ideas, consider exploring various smart workshop storage solutions.
Material Selection for Durability and Performance
Choosing the right materials is paramount for the longevity and functionality of your portable assembly table.
| Component | Recommended Material | Characteristics |
|---|---|---|
| Tabletop | Baltic Birch Plywood (3/4″ or 1″) | Extremely stable, flat, strong, multiple plies, excellent screw-holding. |
| MDF (Medium Density Fiberboard) | Very flat, economical, but less impact resistant and susceptible to moisture. | |
| Frame | Dimensional Lumber (2x4s, 2x6s) | Strong, cost-effective, readily available (e.g., pine, spruce). |
| Plywood (3/4″ – cabinet grade) | Very stable, less prone to warping than solid lumber, good for sheet goods. | |
| Storage | Plywood (1/2″ or 3/4″) | Stable, durable for drawers and shelves. |
| Hardware | Heavy-duty Locking Casters | Must support total load, ensure stability. |
| Full-extension Drawer Slides | Smooth operation, full access to drawer contents. | |
| T-Track & Bench Dog Hardware | Aluminum T-tracks, steel bench dogs, holdfasts. | |
| Wood Glue, Screws, Bolts | Strong joinery and assembly. Consider the ultimate guide to wood glue for selection. |
For a table that will withstand the rigors of woodworking, investing in quality materials like Baltic Birch plywood for the top is highly recommended. Its inherent stability reduces wood movement, a critical factor for maintaining a flat assembly surface. Understanding wood movement can inform better material choices and construction techniques.
Construction Steps: Building a Portable Woodworking Assembly Table
With your design finalized and materials gathered, the construction phase can begin. Precision and attention to detail at each step will ensure a sturdy, flat, and highly functional assembly table.
Step 1: Building the Base Frame
Start by constructing a robust base frame. This will provide the structural integrity for the entire table.
- Cut Lumber: Cut all dimensional lumber for the legs and aprons according to your design. Ensure all cuts are square for stable joints.
- Assemble Leg Assemblies: Create two end frames by joining two legs with an upper and lower apron using pocket hole joinery, mortise and tenon, or robust half-lap joints. Pocket hole joinery is often preferred for its speed and strength in shop furniture.
- Connect End Frames: Join the two end frames with additional aprons to form a rigid rectangular or square base. Verify that the frame is square and flat before securing all joints.
- Install Casters: Attach heavy-duty locking swivel casters to the bottom of each leg. Use appropriate lag screws or through-bolts with washers and nuts for maximum security. Ensure the casters can lock both the wheel and the swivel for complete immobility when desired.
Step 2: Constructing and Integrating Storage
Once the base frame is complete, focus on building the integrated storage solutions.
- Shelf Installation: If opting for open shelving, cut plywood shelves to size and install them within the frame using dadoes, cleats, or pocket screws. Ensure shelves are level and well-supported.
- Drawer Boxes: Construct drawer boxes from plywood. Simple butt joints reinforced with screws and glue are effective for shop drawers. Consider building a few different sizes to accommodate various tools. For instance, a shallow drawer for marking tools and a deeper one for chisels or small power tools.
- Drawer Slides: Install full-extension drawer slides on the drawer boxes and within the table frame. Take care to ensure they are parallel and level for smooth operation.
- Drawer Fronts: Attach false drawer fronts, ensuring even gaps for a clean appearance. Handles or pulls can be added for ease of use. For more custom organization, consider DIY modular desk organizers that can fit within these drawers.
Step 3: Creating and Attaching the Tabletop
The tabletop is the heart of your assembly table, requiring careful attention to flatness and the integration of clamping mechanisms.
- Cut Tabletop Material: Cut your chosen tabletop material (e.g., Baltic Birch plywood) to the desired dimensions.
- Route Dog Holes and T-Tracks: This is a critical step for integrated clamping.
- Dog Holes: Using a drill press with a Forstner bit or a hand drill with a guide, bore a grid of 3/4-inch (19mm) holes through the tabletop at consistent spacing (e.g., 4 inches on center). Precision here is key for compatibility with bench dogs and holdfasts.
- T-Tracks: Using a router with an appropriate straight bit, rout dados for T-tracks flush with the tabletop surface. Test fit the T-tracks to ensure a snug fit. Secure them with screws. Mastering techniques with the router table can greatly assist in this step.
- Edge Banding (Optional but Recommended): Apply solid wood edge banding to the tabletop perimeter. This protects the plywood edges, provides a more durable surface for clamping, and improves aesthetics. Glue and screw or nail the banding in place, then trim flush.
- Attach Tabletop to Frame: Secure the finished tabletop to the base frame. Use screws from underneath the aprons into the tabletop to allow for seasonal wood movement. Avoid directly screwing through the tabletop into the frame, as this can cause cracking.
Step 4: Finishing Touches and Enhancements
- Sanding: Thoroughly sand all surfaces, starting with a coarser grit (e.g., 100-120) and progressing to finer grits (e.g., 180-220) for a smooth finish.
- Finish Application: Apply a durable finish to protect the wood from spills, glue, and general wear. A few coats of polyurethane or a hard wax oil are excellent choices for a workshop surface. Ensure the finish cures completely before heavy use.
- Accessories: Populate your new assembly table with essential accessories:
- Bench dogs and holdfasts
- T-track clamps
- A good quality vise (if not integrated, a temporary clamp-on vise can be used)
- Consider adding a power strip with multiple outlets to the side of the table for easy access to power tools.
- Add hooks or small tool holders to the sides for frequently used items.
By following these steps, you will create a highly functional and durable assembly table. This project, like building custom workbenches, is an investment in your woodworking efficiency and enjoyment.
Maximizing the Utility of Your Portable Assembly Table
A well-built portable assembly table is more than just a flat surface; it’s a dynamic workstation that can adapt to a myriad of woodworking tasks. Understanding how to leverage its features can dramatically enhance your productivity and the quality of your projects in 2026.
Versatile Clamping Applications
The integrated clamping solutions are arguably the most valuable aspect of this table.
- Edge Work and Routing: Use bench dogs and a straight edge or T-track fence to secure workpieces for routing edges, cutting dados, or planing. This eliminates the need for bulky clamps hanging off the table. Precision in routing can be further enhanced by exploring techniques covered in choosing and using router tables.
- Assembly of Large Projects: For gluing up cabinet carcases, tabletops, or other large components, the grid of dog holes allows for custom clamping setups using F-clamps, pipe clamps, or specially designed clamping cauls. The ability to clamp from multiple directions ensures even pressure and flat assemblies.
- Finishing Operations: Secure small parts for sanding or finishing without marring surfaces by clamping them between bench dogs or using a thin sacrificial board beneath the workpiece.
- Jig Building and Use: The flat, stable surface with integrated clamping is ideal for building and using various jigs, such as crosscut sleds, tapering jigs, or specialized routing jigs. For beginners, a guide to essential woodworking jigs offers a great starting point.
Efficient Storage and Organization
The integrated storage solutions streamline your workflow by keeping tools and materials organized and readily available.
- Dedicated Tool Drawers: Assign specific drawers for categories of tools:
- Measuring and Marking: Rulers, squares, calipers, pencils, marking gauges.
- Hand Tools: Chisels, planes, files, rasps.
- Fasteners and Hardware: Screws, nails, dowels, hinges.
- Adhesives and Finishes: Glues, applicators, rags, small containers of finish.
- Power Tool Accessories: Keep router bits, drill bits, sanding discs, and jigsaw blades in clearly labeled compartments within drawers or on shelves.
- Project-Specific Bins: Utilize open shelves for storing bins dedicated to current projects, containing all the necessary components and smaller offcuts. This prevents clutter on the main tabletop.
- Dust Control Integration: While not directly part of the table, effective dust collection in your workshop is critical. The mobility of the table can facilitate connecting it to a DIY smart workshop dust collection system by moving it closer to a dust port.
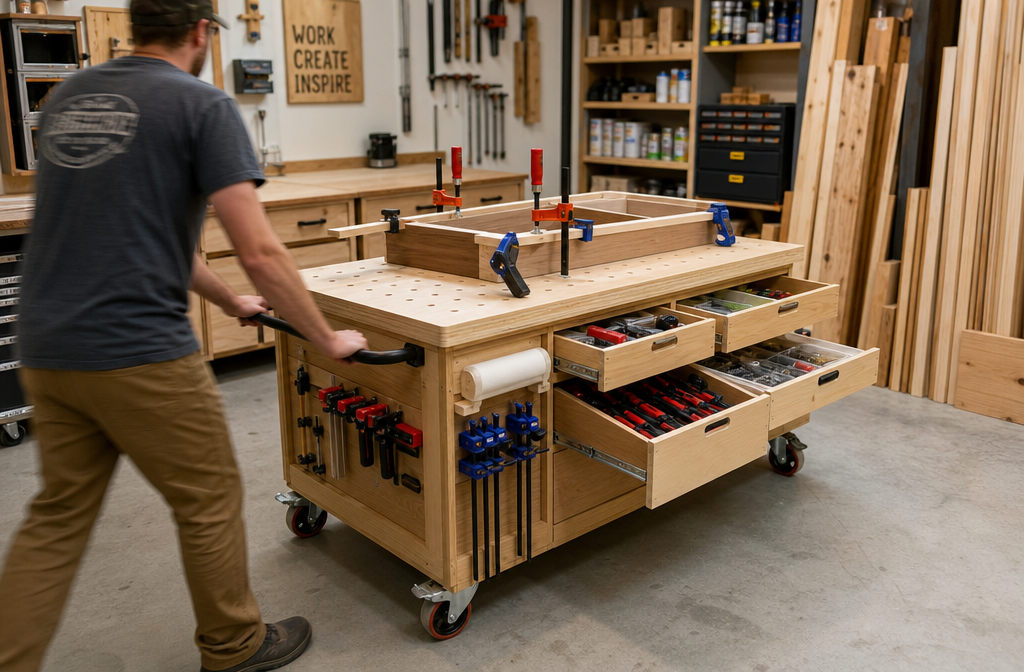
Portability and Space Management
The mobility of your assembly table is a game-changer for smaller workshops or multi-purpose spaces.
- Flexible Layouts: Easily move the table to gain better access around larger projects, or to clear space for other tools like a table saw or miter saw.
- Temporary Work Zones: Roll the table out for a specific task, then store it against a wall or in a corner when finished, optimizing floor space. This is especially useful in shared spaces like a garage.
- Collaborative Projects: If working with another woodworker, the table can be easily repositioned to facilitate collaboration and shared access to tools.
- Outdoor Work: For tasks involving messy finishes or a need for better ventilation, the table can be rolled outdoors (weather permitting).
By taking full advantage of the integrated clamping, well-organized storage, and inherent portability, your custom-built assembly table will become the central hub for many woodworking operations, making your workshop more efficient and enjoyable.

Conclusion
Building a Portable Woodworking Assembly Table with Integrated Clamping and Storage Solutions is a rewarding project that significantly upgrades any woodworking space. This versatile workstation addresses common challenges of limited space, disorganization, and inadequate clamping, empowering woodworkers to tackle projects with greater precision and efficiency. From the careful selection of durable materials and the precise execution of joinery to the thoughtful integration of clamping mechanisms and storage drawers, every aspect of this build contributes to a more productive and enjoyable crafting experience.
In 2026, a well-designed and executed assembly table is not merely a piece of shop furniture; it is an investment in your craft, providing a stable foundation for countless future projects. Embrace the opportunity to customize its features to perfectly match your workflow, and you will find this portable powerhouse quickly becomes the most indispensable tool in your workshop.
Actionable Next Steps:
- Assess Your Needs: Determine the ideal dimensions, clamping options, and storage requirements based on your typical projects and workshop size.
- Gather Materials: Source high-quality plywood (Baltic Birch for the top is recommended) and sturdy dimensional lumber for the frame. Don’t skimp on heavy-duty casters and drawer slides.
- Plan Your Layout: Draw a detailed sketch or create a 3D model of your table, including precise measurements for dog holes, T-tracks, and drawer compartments.
- Build with Precision: Follow the construction steps outlined, paying close attention to squareness, flatness, and the accurate placement of clamping features.
- Optimize with Accessories: Equip your new table with bench dogs, T-track clamps, and organize your tools within its integrated storage for immediate workflow improvement.
