
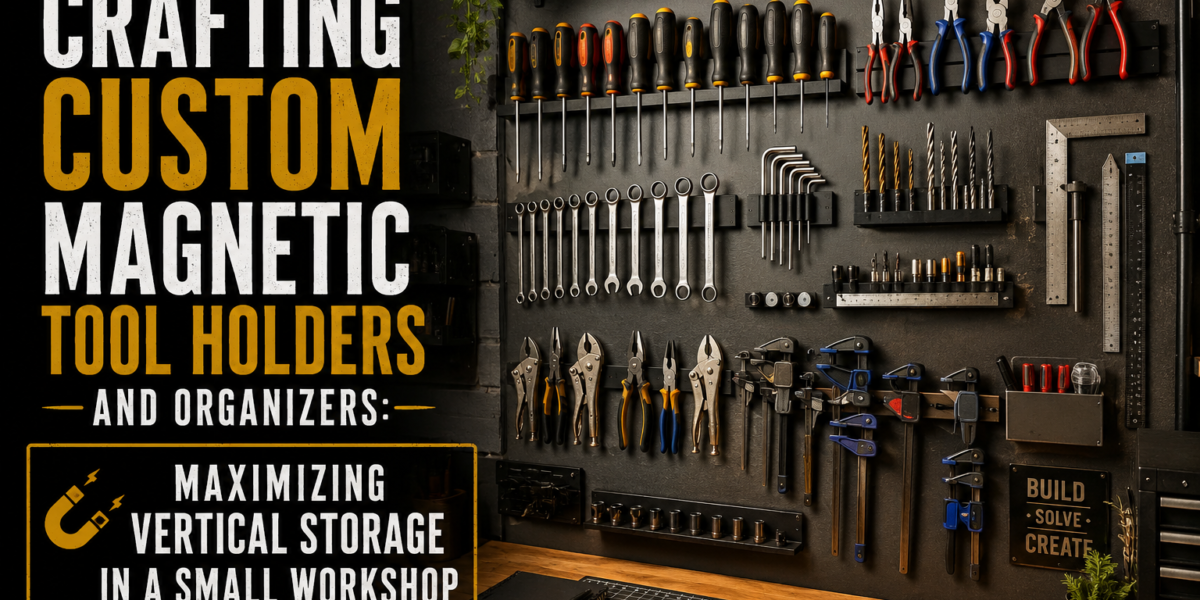

The persistent challenge of a cluttered workshop often stems not from a lack of tools, but from a deficit of intelligent storage. Imagine stepping into your small workshop, every hand tool precisely where you need it, suspended effortlessly on a custom-designed magnetic holder, liberating valuable benchtop space. This vision is not just achievable; it’s the core principle behind crafting custom magnetic tool holders and organizers, a powerful strategy for maximizing vertical storage in a small workshop. By leveraging the often-underutilized wall space, woodworkers can transform chaotic workspaces into models of efficiency, ensuring that chisels, screwdrivers, and wrenches are always within arm’s reach, reducing search time, and enhancing productivity.
Key Takeaways
- Custom magnetic tool holders dramatically improve organization and accessibility in small workshops.
- Vertical wall space is a prime, often overlooked asset for tool storage.
- DIY construction allows for tailored designs that perfectly fit specific tool collections and workshop layouts.
- Careful selection of magnets and materials ensures durability and effective tool retention.
- Implementing these systems leads to a more efficient, safer, and enjoyable woodworking environment.
The Foundation: Designing Your Custom Magnetic Tool Holders and Organizers

Effective workshop organization begins with a well-thought-out design. When embarking on crafting custom magnetic tool holders and organizers, the goal is not merely to get tools off the workbench, but to create a system that is intuitive, durable, and expandable. Consider the types of tools you use most frequently, their sizes, weights, and the wall space available.

Assessing Your Tool Collection and Workshop Layout
Before cutting any wood, perform a thorough inventory of your hand tools. Categorize them by type (e.g., chisels, screwdrivers, wrenches, pliers, measuring tools). This helps determine the scale and specific requirements for each holder.
Considerations for Tool Assessment:
- Weight: Heavier tools require stronger magnets and more robust mounting.
- Shape: Irregularly shaped tools might benefit from recessed magnets or custom profiles.
- Frequency of Use: Tools used daily should be placed at eye level and within easy reach.
- Sets: Keep tool sets (e.g., a set of chisels) together for logical organization.
Next, examine your workshop layout. Identify prime vertical real estate near your workbench, assembly areas, or power tools. Walls, cabinet sides, and even the backs of doors can be repurposed for storage. Sketch out potential layouts, marking where different tool categories might reside. Think about workflow: which tools do you reach for when performing specific tasks? Position those groups logically.
Material Selection: Wood, Magnets, and Hardware
The choice of materials is crucial for both aesthetics and functionality.
1. Wood: Hardwoods like oak, maple, or walnut offer excellent durability and a professional finish. Plywood can also be an economical and stable choice, especially for larger panels. The thickness of the wood should be sufficient to embed magnets without compromising structural integrity – typically 3/4 inch to 1 inch is ideal. The type of wood also influences the overall look of your workshop. For inspiration on integrating natural wood elements, explore our guide on Warm Minimalism in Woodworking: Balancing Clean Lines with T.
2. Magnets: Neodymium magnets are the preferred choice for their high strength-to-size ratio. They come in various shapes (discs, blocks) and strengths.
- Disc magnets: Ideal for embedding flush into the wood.
- Block magnets: Can be surface-mounted or embedded for stronger holding power over a larger area.
The strength of the magnets needed depends on the weight of the tools they will hold. A good rule of thumb is to use magnets with a pull force slightly greater than the tool’s weight, accounting for the wood thickness between the magnet and the tool.
3. Hardware: Mounting the organizers securely is paramount. Use appropriate screws and wall anchors for your wall type (studs, drywall, concrete). Ensure screws are long enough to penetrate well into the wall structure.
Essential Tools for Construction
To bring your designs to life, you’ll need a basic set of woodworking tools.
Table 1: Essential Tools for Crafting Magnetic Tool Holders
| Tool Type | Purpose |
|---|---|
| Miter Saw or Table Saw | Cutting wood to precise lengths and widths |
| Router or Drill Press | Creating recesses for magnets |
| Drill/Driver | Pre-drilling holes and fastening components |
| Measuring Tape/Ruler | Accurate measurements |
| Square | Ensuring precise 90-degree cuts and alignments |
| Clamps | Holding pieces securely during assembly and gluing |
| Sandpaper/Sander | Smoothing wood surfaces for a professional finish |
| Wood Glue | Securing joints and laminations |
| Safety Gear | Eye protection, ear protection, dust mask |
For more advanced joinery or detailed routing, consider familiarizing yourself with Choosing and Using Router Tables: Maximizing Precision and Safety for.
Building Your Custom Magnetic Tool Holders: Step-by-Step
With your design finalized and materials gathered, the construction phase can begin. Precision and attention to detail during this stage will ensure a functional and aesthetically pleasing outcome.
Step-by-Step Construction Guide
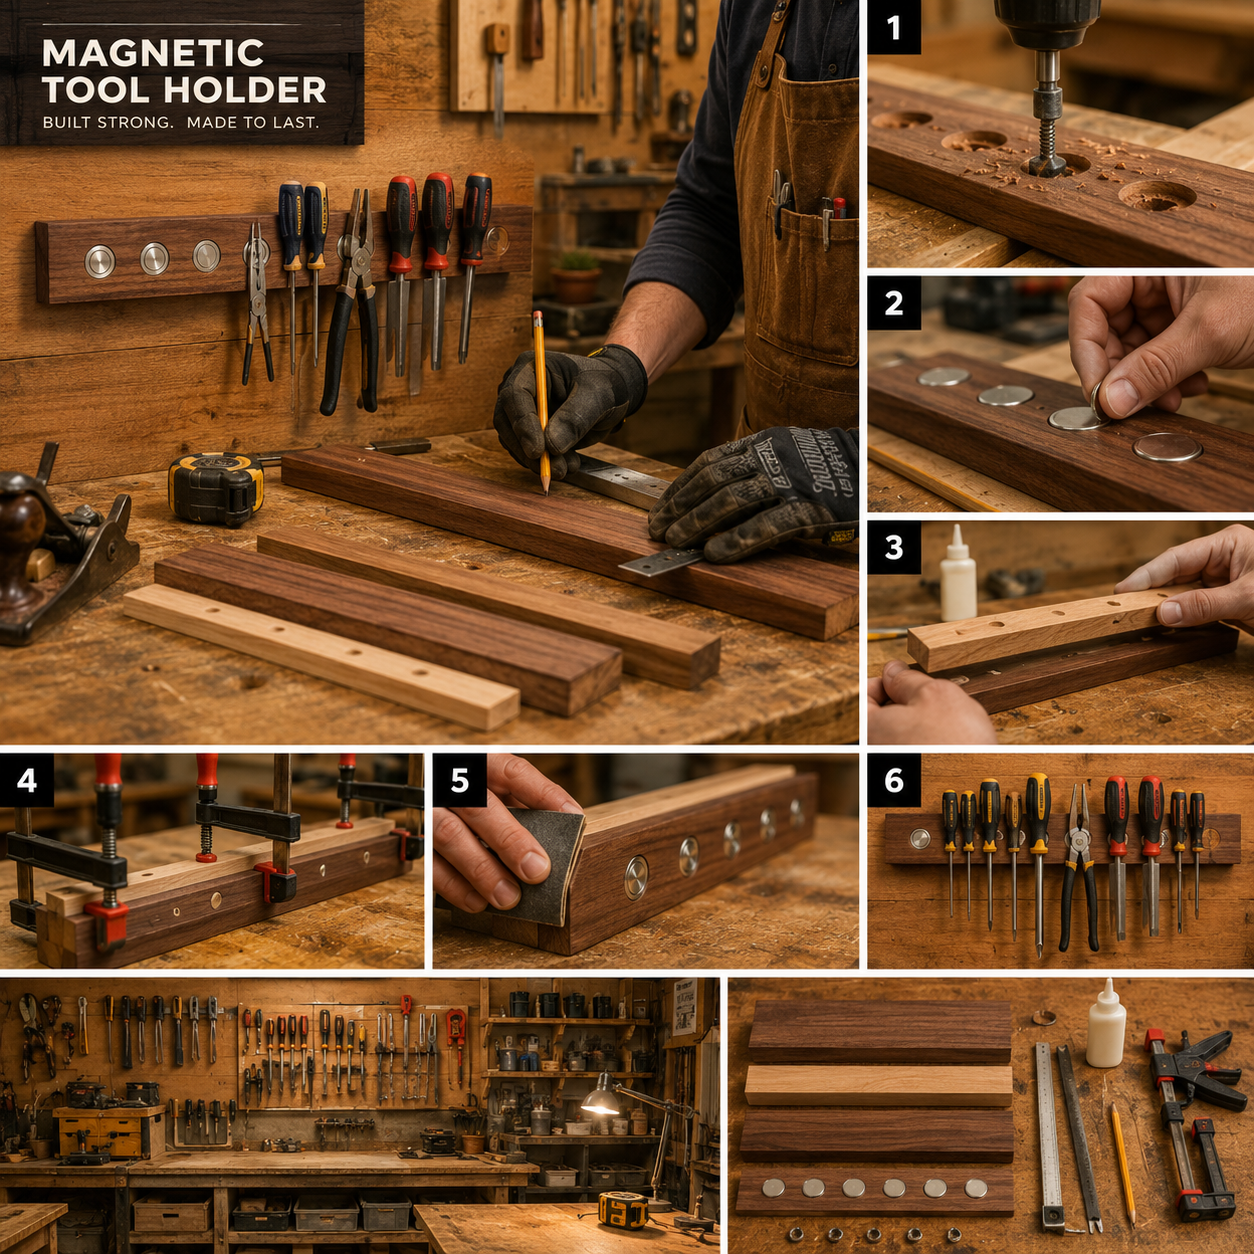
1. Cut Wood Blanks: Using your miter saw or table saw, cut your chosen wood (e.g., hardwood strips or plywood panels) to the desired lengths and widths for each tool holder segment. Remember to account for any specific tool profiles or lengths.

2. Prepare Magnet Recesses: This is the most critical step. Using a drill press with a Forstner bit or a router with a straight bit, create shallow pockets in the back of your wood strips where the magnets will sit.
- Depth: The recesses should be just deep enough for the magnets to sit flush or slightly below the surface. This ensures maximum magnetic field projection through the wood to hold tools securely.
- Spacing: Space the magnets according to the length of the tools they will hold. Longer tools might need two magnets for stability. Experiment with magnet placement on a scrap piece of wood to find optimal spacing.
3. Secure Magnets: Apply a strong adhesive, such as epoxy or CA glue, into each recess. Press the magnets firmly into place, ensuring they are flush with or just below the surface. Allow the adhesive to cure completely. Ensure the magnetic polarity is consistent if you are using multiple magnets in a row to avoid repelling tools.
4. Finish the Wood: Sand all surfaces smooth, starting with a coarser grit (e.g., 120-grit) and progressing to finer grits (e.g., 220-grit) for a professional finish. Apply a protective finish like polyurethane, tung oil, or lacquer to protect the wood from moisture, dust, and wear. This also enhances the wood’s natural beauty. For finishing tips, check out Natural Wood Finishing Techniques.
5. Mounting Options: Consider how each holder will attach to the wall.
- Keyhole slots: Can be routed into the back for a flush, invisible mount.
- Pre-drilled screw holes: Drill pilot holes through the front or back, counter-sinking screw heads if desired for a cleaner look.
- French cleat system: For heavier loads or modular flexibility, a French cleat offers a strong, removable mounting solution. This is an excellent way to organize tools and integrate with other modular systems in your workshop, as discussed in “Smart Workshop Storage Solutions: Maximizing Small Spaces with” – https://woodcraftwiz.com/smart-workshop-storage-solutions-maximizing-small-spaces-with-modular-systems-and-diy-organizers/.
Customizing for Specific Tools and Needs
The beauty of DIY magnetic tool holders lies in their adaptability.
- Chisel Racks: Create a long strip with magnets spaced to hold chisels of varying widths. You might also add a shallow dado along the bottom edge to cradle the chisel handles.
- Screwdriver Organizers: Use a single strip with magnets, or craft a block with angled holes for the handles and magnets for the shafts, preventing them from falling out.
- Wrench & Socket Holders: Design larger, more robust sections. For wrenches, a simple magnetic strip works well. For sockets, consider a wider board with stronger magnets or a dual-magnet system per socket for better grip.
- Specialty Tool Holders: For items like pliers, snips, or small squares, consider embedding magnets in a custom pattern to accommodate their unique shapes. Some tools, like measuring tapes, might also benefit from magnetic attachment, making them easily accessible.
By tailoring each holder, you create a system that truly complements your tools and workflow, further maximizing vertical storage in a small workshop.
Maximizing Vertical Storage: Integration and Advanced Tips in 2026
Simply installing magnetic strips is a good start, but truly maximizing vertical storage in a small workshop involves integrating these solutions into a cohesive, highly efficient system. This approach not only keeps your tools organized but also transforms your workshop into a productive and enjoyable space.
Strategic Placement and Grouping
Once built, the placement of your custom magnetic tool holders is key.
- Zone Organization: Group tools by function or project type. For instance, all marking and measuring tools might be together, while chisels and carving tools form another group. This reduces time spent searching for the right tool.
- Point-of-Use Storage: Place frequently used tools directly above or adjacent to the workbench or specific power tools where they are most often needed. This minimizes movement and improves workflow.
- Accessibility: Ensure all tools are within easy reach and at a comfortable height. Consider varying heights for different categories of tools or different users.
Combining Magnetic Holders with Other Vertical Solutions
Magnetic tool holders are just one component of a comprehensive vertical storage strategy.
- Pegboards: Integrate magnetic strips into a pegboard system. This offers the flexibility of pegboard hooks for oddly shaped tools, combined with the quick access of magnetic holding for metal tools.
- French Cleat Systems: Mount your magnetic tool holders onto French cleats. This allows for easy rearrangement and expansion of your storage as your tool collection grows or your needs change. Our guide on “Building Modular Wood Storage Systems for Small Workshops: Maximizing” – https://woodcraftwiz.com/building-modular-wood-storage-systems-for-small-workshops-maximizing-space-and-organization/ provides an excellent foundation for understanding modular systems.
- Shelving: Install shelves above or below magnetic strips to store larger items, cases, or less frequently used tools. Floating shelves, in particular, offer a clean aesthetic and robust storage capacity, as detailed in our article on “Robust Floating Shelves with Hidden Fasteners: Power Tool Techniques for 2026 Warm Minimalism” – https://woodcraftwiz.com/robust-floating-shelves-with-hidden-fasteners-power-tool-techniques-for-2026-warm-minimalism/.
- Cabinet Doors: Don’t overlook the inside of cabinet doors. These offer a perfect, often untapped, vertical surface for mounting smaller magnetic strips or even custom knife blocks for specialty blades, following designs like those in “DIY Wooden Knife Blocks: Custom Designs for Modern Kitchens with Safety-Focused Joinery” – https://woodcraftwiz.com/diy-wooden-knife-blocks-custom-designs-for-modern-kitchens-with-safety-focused-joinery/.
Maintenance and Evolution of Your System
A well-organized workshop is not a static achievement but an ongoing process.
- Regular Cleaning: Periodically wipe down your magnetic holders to remove dust and sawdust, which can accumulate on tools and reduce magnetic grip.
- Magnet Check: Over time, magnets can loosen. Occasionally check that all embedded magnets are securely glued. Re-glue if necessary.
- Expand and Adapt: As your tool collection grows or your projects evolve, be prepared to add new magnetic holders or reconfigure existing ones. The modular nature of custom solutions makes this easy. For example, if you acquire new hand tools, you can easily build and integrate a new section. For insights on managing and maintaining your essential hand tools, refer to “Essential Hand Tools for Every Woodworker: A Comprehensive Guide to” – https://woodcraftwiz.com/essential-hand-tools-for-every-woodworker-a-comprehensive-guide-to-selection-sharpening-and-maintenance/.
- Labeling: While magnetic holders offer visual organization, consider adding subtle labels for specific tools or categories, especially for less frequently used items, to further enhance efficiency.
By consistently refining and maintaining your magnetic tool holder system, you ensure that your small workshop remains a highly functional, clutter-free, and inspiring space for all your woodworking endeavors in 2026 and beyond.
Conclusion
Crafting custom magnetic tool holders and organizers is a transformative project for any small workshop. It’s an investment in efficiency, safety, and personal satisfaction. By strategically utilizing vertical wall space, you liberate precious benchtop area, making your workshop feel larger and more functional. The process of designing and building these holders not only hones your woodworking skills but also results in a bespoke storage system perfectly tailored to your unique collection of tools and working habits.

The key to success lies in careful planning, selecting appropriate materials and strong magnets, and meticulously executing each step of the build. Integrating these magnetic solutions with other vertical storage methods, such as pegboards and French cleats, will create a comprehensive organizational strategy that stands the test of time. As you implement these ideas, your workshop will evolve into a space where every tool has its place, readily accessible, and meticulously organized. Begin your journey toward a more efficient and enjoyable woodworking experience today by crafting your own custom magnetic tool holders.
SEO Meta Title: Custom Magnetic Tool Holders: Maximize Small Workshop Storage SEO Meta Description: Learn how to maximize vertical storage in your small workshop by crafting custom magnetic tool holders and organizers. DIY guide for a clutter-free space.
