


The average home in 2026 is becoming increasingly personalized, moving beyond mass-produced items to embrace unique, handcrafted elements that tell a story. Within this trend, the simple act of framing a photograph or piece of art presents an unparalleled opportunity for creative expression. This article will guide you through the process of creating DIY picture frames with decorative inlays, elevating simple designs with exotic woods and veneers to add a distinctive touch of elegance and craftsmanship to your living space. Far from being merely functional, these frames become art pieces in themselves, showcasing your skill and taste.
Key Takeaways
- Elevate Aesthetics: Decorative inlays using exotic woods and veneers transform basic picture frames into sophisticated decor items.
- Material Selection is Key: Choosing the right contrasting woods and veneers is crucial for creating visually striking and durable inlays.
- Precision is Paramount: Successful inlay work relies on accurate measurements, precise cutting, and careful assembly for seamless results.
- Tools and Techniques: Mastering specific tools like routers, chisels, and specialized clamps, along with inlay techniques, is essential.
- Finishing Touches: Proper sanding and finishing enhance the beauty of the woods and protect the frame and inlay for longevity.
Selecting Materials and Designing Your DIY Picture Frames with Decorative Inlays
The foundation of any exquisite woodworking project lies in the careful selection of materials. For DIY picture frames with decorative inlays, this choice is even more critical, as the contrasting colors and grains of different woods will define the visual impact of your finished piece. Exotic woods offer a vibrant palette and unique textures that can elevate a simple frame into a focal point.

Choosing the Right Woods for Frame and Inlay
When selecting wood for your frame, consider both its structural integrity and how it will complement the inlay. Lighter woods often provide an excellent canvas for darker inlays, while darker frames can make lighter inlays truly pop.
Here’s a comparison of popular wood choices for frames and inlays:
| Frame Wood (Base) | Common Characteristics | Ideal Inlay Contrast | Considerations |
|---|---|---|---|
| Maple | Light color, fine grain, very hard | Dark (Wenge, Walnut, Padauk) | Excellent for intricate work, takes finish well |
| Oak | Medium color, prominent grain, durable | Dark (Walnut, Mahogany), some reds (Padauk) | Strong, rustic appeal; grain can interfere with fine inlays |
| Cherry | Reddish-brown, smooth grain, ages beautifully | Light (Maple, Holly), contrasting darks (Wenge) | Mellows with age, elegant; moderately hard |
| Walnut | Dark brown, rich grain, moderately hard | Light (Maple, Holly, Boxwood), vibrant (Padauk, Purpleheart) | Classic, luxurious feel; can be expensive |
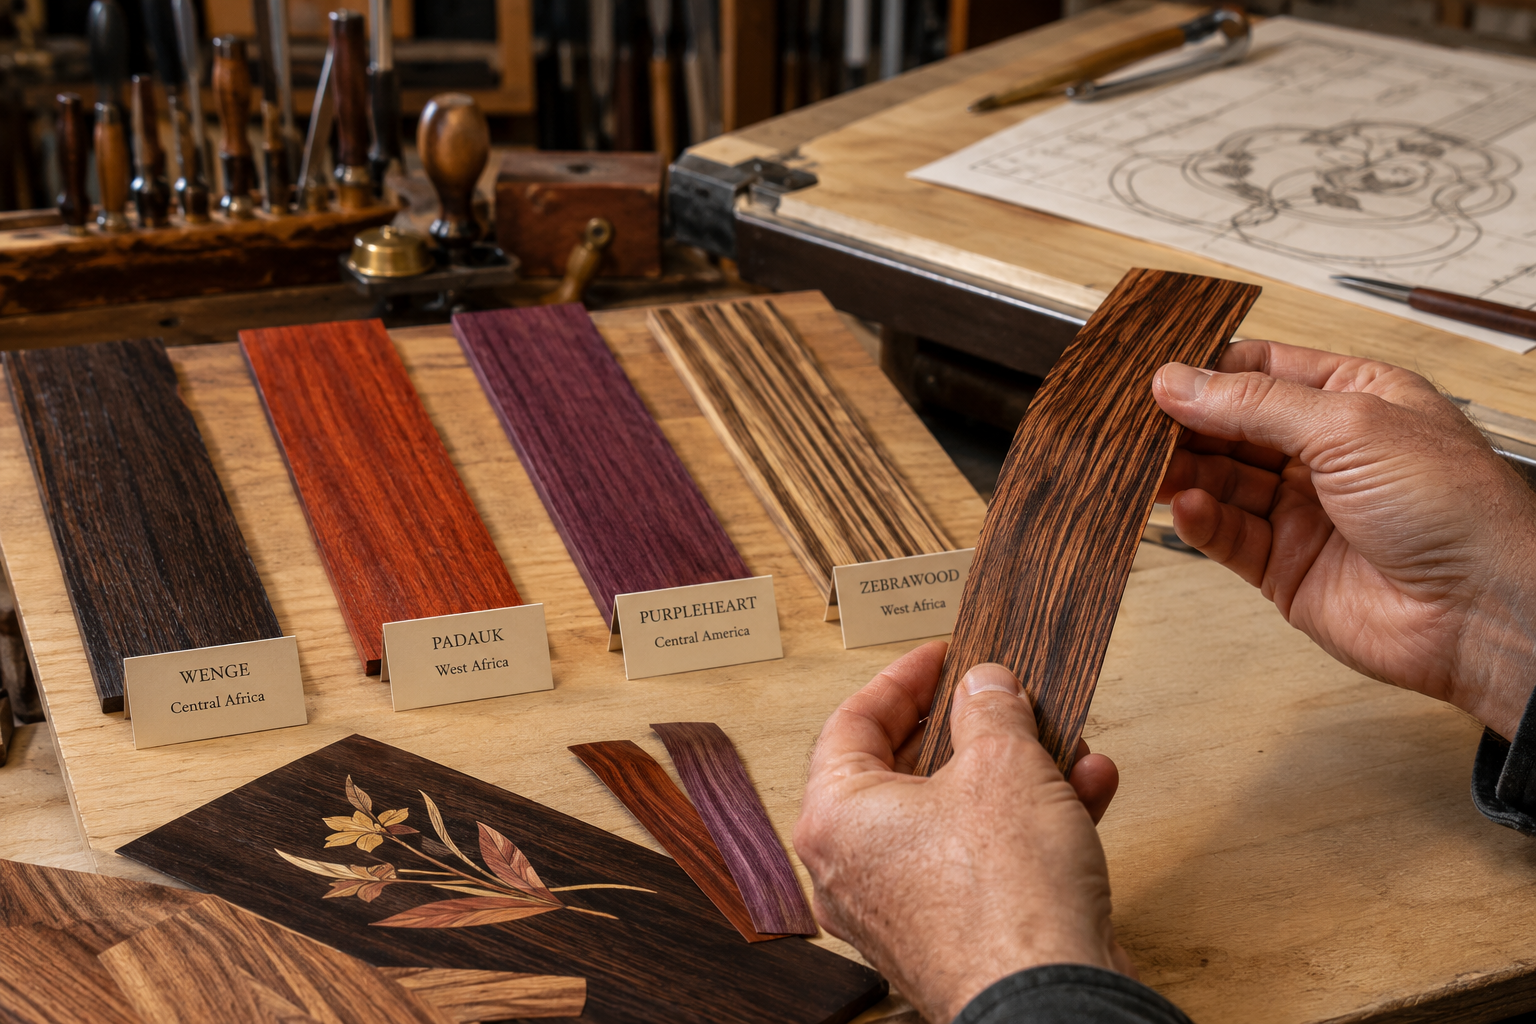
For the decorative inlays themselves, you’ll typically work with thinner strips of solid wood or veneers. Veneers are particularly useful for intricate patterns as they are easier to cut and manipulate, and a wide array of exotic options are available.
Exotic Wood Choices for Inlays:
- Wenge: Very dark brown to black, strong grain. Provides dramatic contrast.
- Padauk: Vibrant reddish-orange, which darkens over time. Adds a striking splash of color.
- Purpleheart: Distinctive deep purple, which can also darken. Offers a unique, rich hue.
- Zebrawood: Striking striped pattern, light brown with dark veins. Excellent for linear designs.
- Holly: Very light, almost white wood. Ideal for sharp contrast against dark frames.
- Ebony: Extremely dense and dark. Prized for its deep black color, though expensive and harder to work.
When sourcing these materials, consider visiting specialty woodworking stores or reputable online suppliers. For guidance on sustainable options, explore resources like Sustainable Wood Sourcing for the Modern Woodworker: Beyond Reclaimed.
Designing the Inlay Pattern
The design of your inlay can range from simple geometric patterns to complex curvilinear motifs. Start by sketching your ideas. Consider the size of the frame and the overall aesthetic you want to achieve.
Types of Inlay Patterns:
- Geometric: Simple lines, squares, diamonds, or repeated patterns. These are excellent for beginners.
- Bandings: Strips of contrasting wood or pre-made veneer bandings glued into a channel.
- Curvilinear: Flowing lines, leaves, or floral motifs. These require more advanced cutting techniques.
- Parquetry: Creating mosaic-like patterns by arranging small geometric pieces of wood.
For your initial projects in DIY picture frames with decorative inlays, a simple straight-line inlay or a repeated block pattern is recommended. Sketch your design directly onto the frame material or create a template. Remember, precision in design translates directly to the quality of the finished inlay.
Essential Tools and Step-by-Step Techniques for Crafting Inlaid Frames
Creating stunning DIY picture frames with decorative inlays requires a combination of common woodworking tools and a few specialized items, along with a methodical approach to each step. Precision is paramount in inlay work, as even slight misalignments can detract from the final appearance.
Required Tools
Before you begin, ensure you have the following tools readily available:
- Miter Saw or Table Saw: For accurate cutting of frame pieces to length and angle.
- Router with Inlay Kit or Laminate Trimmer: Essential for cutting the precise channels for your inlay. An inlay kit typically includes a bushing and a straight bit, allowing for accurate template routing.
- Chisels (Sharp): For cleaning out corners and fine adjustments. Learning how to sharpen these is key; refer to The Ultimate Guide to Sharpening Woodworking Chisels and Planes.
- Marking Gauge/Pencil: For accurately marking cutting lines.
- Clamps: Various sizes for securing workpieces and holding glued joints.
- Wood Glue: High-quality wood glue specifically designed for fine woodworking. Our guide, The Ultimate Guide to Wood Glue, offers detailed advice.
- Sanding Supplies: Various grits of sandpaper (120-400 grit), sanding blocks.
- Protective Eyewear and Hearing Protection: Always prioritize safety.
Step-by-Step Inlay Process
Prepare Frame Stock: Cut your chosen frame wood into the desired width and thickness. For simple designs, you might cut the channel for the inlay first, then miter the corners. For more complex patterns, the frame might be fully assembled first.
- Tip: If you’re building a new workbench, consider designing it to accommodate precision tasks like inlay work. Our guide on Building a Custom Wood Workbench can help.
Mark the Inlay Channel: Using a marking gauge or ruler, carefully mark the exact location and width of your inlay channel on the frame pieces. This line must be precise.
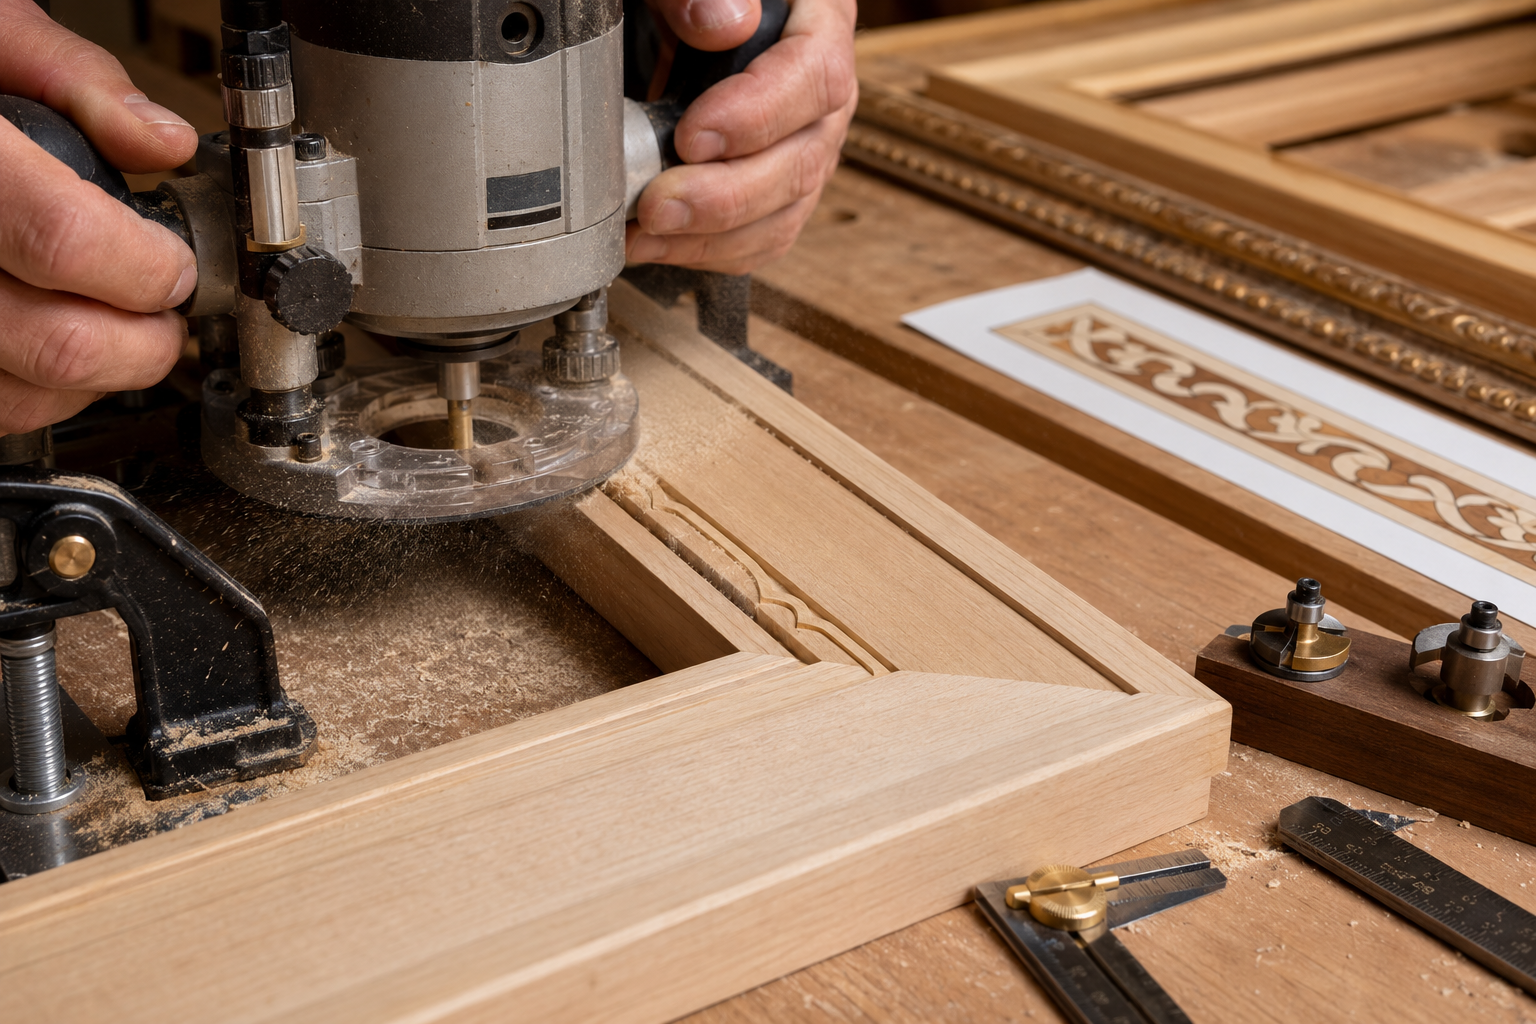
Cut the Inlay Channel:
- Router Method: This is the most common and precise method. Securely clamp your frame piece. Set your router depth to the thickness of your inlay material (usually veneer or a thin strip of wood). Use a straight bit and a fence or a template to cut the channel. For corners, you may need to finish the cut with a sharp chisel to square them up.
- Hand Tool Method (for thinner inlays): For very thin lines, you can use a marking knife and a dedicated inlay cutter, or a very thin chisel, to carefully incise and remove material. This method requires considerable skill and patience.
Prepare the Inlay Material: Cut your exotic wood or veneer strips to the appropriate width, matching the channel precisely. For geometric inlays, you’ll also cut these pieces to length and angle. For curvilinear designs, you might use a scroll saw or even a craft knife for veneers.
Test Fit the Inlay: Before gluing, test fit each piece of the inlay into its channel. It should fit snugly, but not require excessive force. Make minor adjustments with a chisel or sandpaper if necessary. A perfect fit is crucial for a seamless look.
Glue the Inlay: Apply a thin, even layer of wood glue to the bottom and sides of the inlay channel. Carefully press the inlay material into place.
- Important: Ensure no gaps exist between the inlay and the frame wood. Use clamps and cauls to apply even pressure if needed. Wipe away any excess glue immediately with a damp cloth.
Allow to Dry: Let the glue cure completely according to the manufacturer’s instructions. This is usually several hours or overnight.
Flush Trim and Sand: Once dry, the inlay may sit slightly proud of the frame surface. Use a flush trim router bit or a sharp hand plane to carefully level the inlay with the frame. Then, begin sanding, starting with 120-grit, progressing through finer grits (180, 220, 320, 400) until the surface is perfectly smooth and the inlay is seamlessly integrated.
Finishing and Assembly: Bringing Your Inlaid Frame to Life
With the inlay meticulously fitted and sanded, the final stages of finishing and assembly are where your DIY picture frames with decorative inlays truly come to life. A well-chosen finish will enhance the natural beauty of the woods and protect your craftsmanship for years to come.
Choosing the Right Finish
The type of finish you choose depends on the desired look and the level of protection required. For inlaid pieces, finishes that highlight the natural grain and contrast of the woods are often preferred.
- Oil Finishes (e.g., Tung Oil, Linseed Oil): These penetrate the wood, providing a natural, warm glow and enhancing the depth of the grain. They offer moderate protection and are easy to repair. Apply multiple thin coats, allowing each to dry thoroughly.
- Varnish/Polyurethane: These create a durable, protective film on the surface. They come in various sheens (matte, satin, gloss) and offer excellent resistance to moisture and scratches. Apply thin, even coats, sanding lightly between coats with very fine sandpaper (400-600 grit) to ensure good adhesion and a smooth finish.
- Shellac: A traditional finish that provides a beautiful, natural luster. It’s easy to apply and dries quickly but offers less protection than varnish. Often used as a sealer before other finishes.
Before applying any finish, ensure the wood surface is completely clean and dust-free. A tack cloth is ideal for this. Always test your chosen finish on a scrap piece of the same wood combination to see how it affects the colors and grain. For a deeper dive into finishing techniques, explore our comprehensive guide on Wood Finishing Techniques.

Assembling the Frame
If you cut the inlay channels and glued the inlay before assembling the frame, the next step is to join the frame pieces.
- Mitered Corners: The most common joint for picture frames is the 45-degree miter. Cut your frame pieces to the exact length with precise 45-degree angles.
- Joinery:
- Glue Only: For smaller frames, a strong wood glue with proper clamping can be sufficient.
- Splines: For added strength, cut a small slot across the miter joint and insert a thin spline of contrasting wood. This not only reinforces the joint but also adds another decorative element. Hand Tool Joinery for Visible Wood Joints offers insights into robust joinery.
- V-Nailers/Brad Nailers: These tools can help hold joints while the glue dries, or add mechanical strength, especially for larger frames.
- Clamping: Use specialized frame clamps or strap clamps to ensure even pressure around all four corners as the glue dries. Check that the frame remains square.
Adding Glass, Matting, and Backing
Once the frame is fully assembled and the finish cured, it’s time to add the necessary components to protect and display your artwork.
- Measure: Accurately measure the inside dimensions of your frame to determine the size of the glass, mat, and backing.
- Glass: Order custom-cut picture frame glass (or acrylic for safety/weight) from a local supplier. Ensure the edges are smooth.
- Matting: A mat board provides a visual border around your artwork and keeps it from touching the glass. Choose a color that complements both the art and the frame.
- Artwork: Carefully position your artwork behind the mat.
- Backing: Use acid-free foam core or cardboard for the backing.
- Securing Components: Use flexible points or glazier’s points inserted into the back of the frame to hold the glass, mat, artwork, and backing securely in place.
- Hanging Hardware: Attach appropriate hanging hardware (e.g., D-rings and wire) to the back of the frame, ensuring it’s centered and secure.
By following these steps, you will create not just a picture frame, but a unique piece of art that beautifully showcases cherished memories or artwork, all while reflecting your woodworking skill.
Conclusion
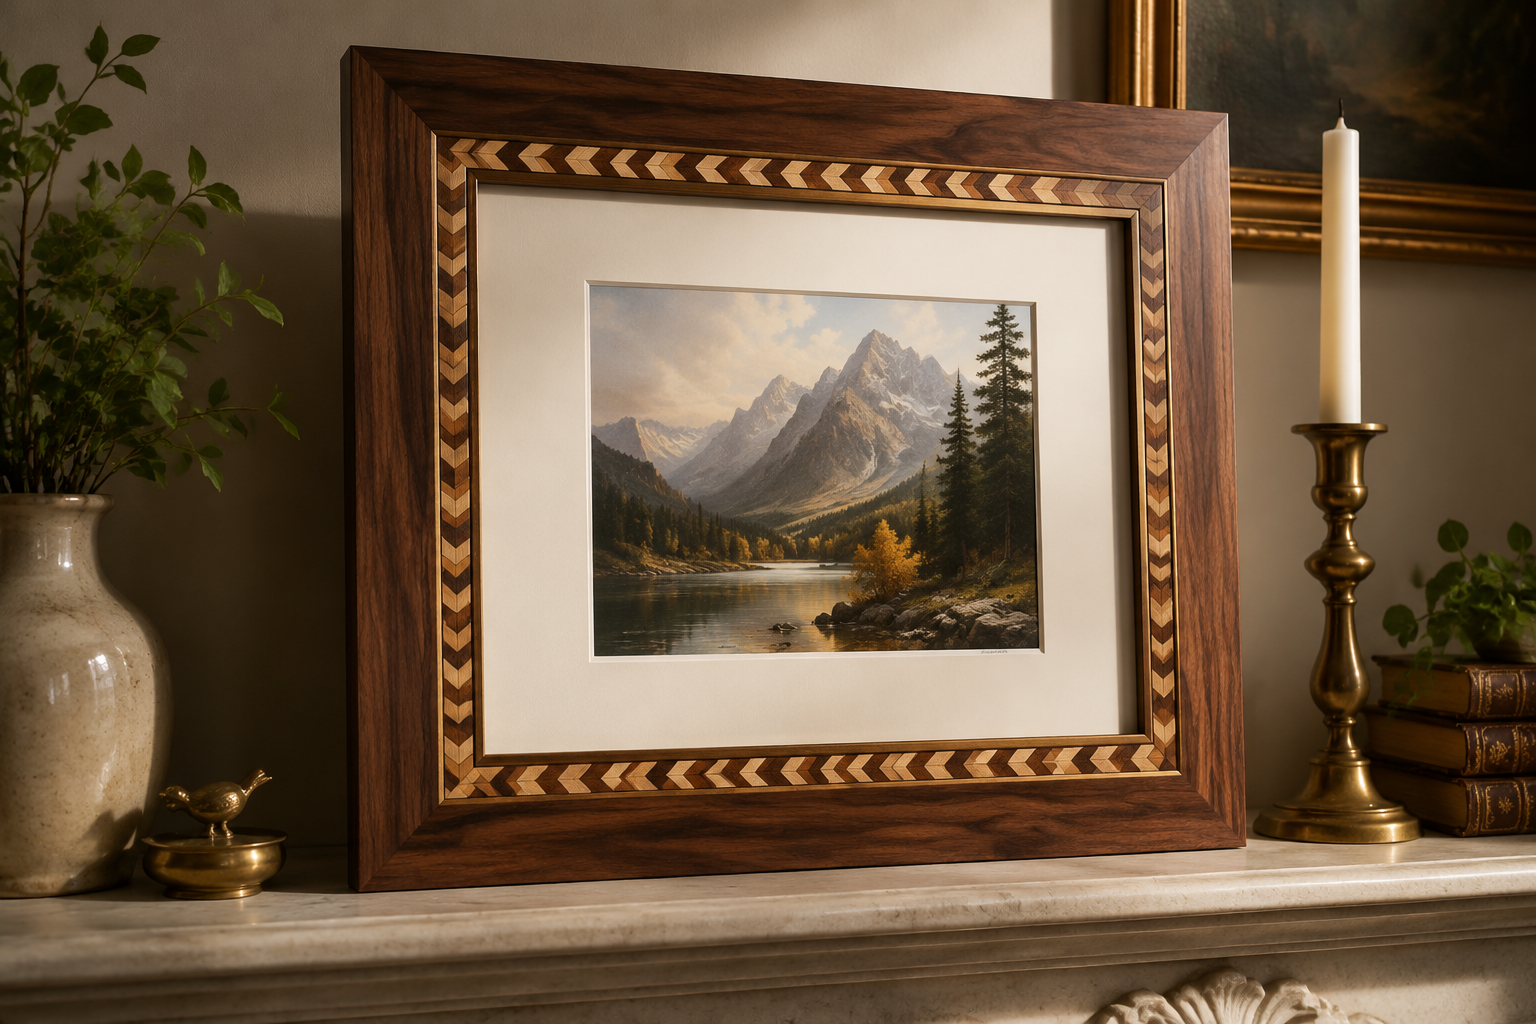
Creating DIY picture frames with decorative inlays offers a deeply satisfying woodworking experience, transforming ordinary picture frames into extraordinary pieces of home decor. By carefully selecting exotic woods and veneers, mastering precision cutting and inlay techniques, and applying a thoughtful finish, you can produce custom frames that highlight your photographs and artwork while simultaneously showcasing your craftsmanship. In 2026, where personalized interiors are highly valued, these handmade frames represent a significant step beyond generic, mass-produced alternatives, adding warmth, character, and a touch of bespoke elegance to any space.
For your next steps, consider starting with a simple geometric inlay pattern to build confidence in your routing and fitting skills. Experiment with different wood combinations to discover what striking contrasts you can create. As you gain experience, explore more intricate designs or even consider adapting these inlay techniques to other small projects, such as creating Mastering Wooden Napkin Holders: Foldable Designs with Brass or Wooden Candle Holders for Ambient Decor. The journey of woodworking is one of continuous learning and creative expression, and decorative inlays provide a rich avenue for both.
