
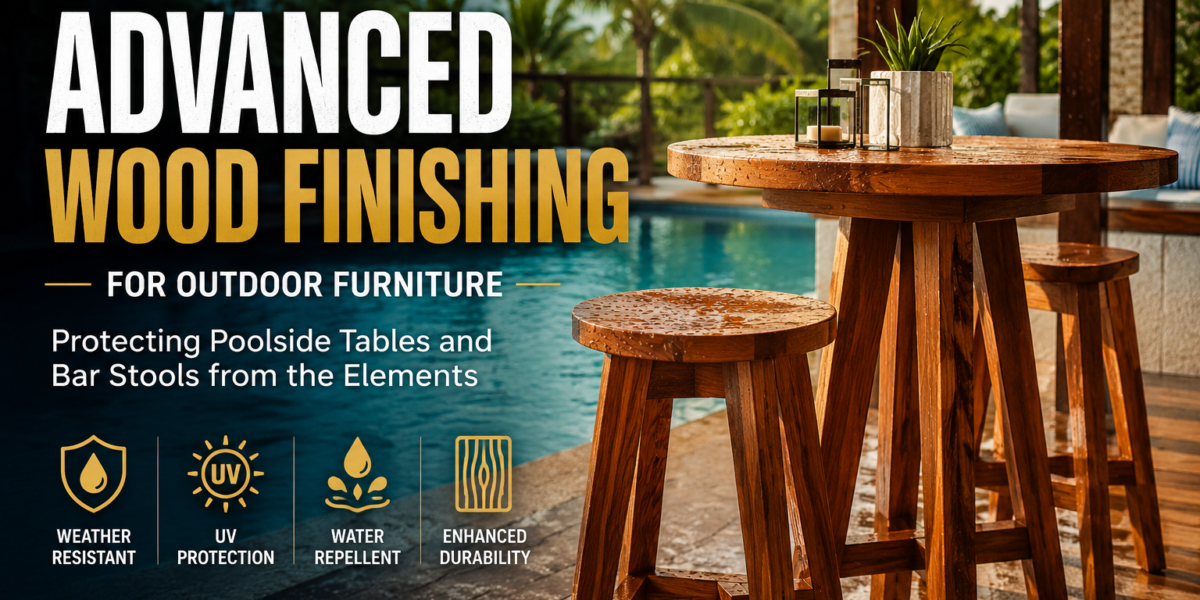

The average lifespan of unprotected outdoor wooden furniture exposed to harsh elements like relentless sun, pooling rain, and fluctuating temperatures is often shockingly brief – sometimes as little as two to three years before significant degradation sets in. Homeowners and hospitality businesses alike invest heavily in aesthetically pleasing poolside tables and bar stools, only to watch them succumb to warping, cracking, and fading. This article delves into Advanced Wood Finishing for Outdoor Furniture: Protecting Poolside Tables and Bar Stools from the Elements, offering expert insights and techniques to ensure your valuable wooden pieces not only survive but thrive in challenging outdoor environments. We aim to equip you with the knowledge to select and apply finishes that provide superior protection, extending the beauty and structural integrity of your outdoor investment for many years to come.
Key Takeaways
- Understand Environmental Threats: Recognize the combined impact of UV radiation, moisture, temperature shifts, and chemical exposure (like chlorine) on outdoor wood.
- Select Appropriate Wood Species: Choose naturally durable woods like teak, ipe, or cedar, which offer inherent resistance to decay and insects.
- Master Surface Preparation: Proper cleaning, sanding, and grain raising are foundational for any advanced finish to adhere effectively and last longer.
- Choose High-Performance Finishes: Opt for marine-grade varnishes, penetrating oils, or modern synthetic sealants specifically engineered for extreme outdoor conditions.
- Implement a Proactive Maintenance Schedule: Regular cleaning and reapplication of finishes are crucial for sustained protection against environmental wear.
Understanding the Unique Challenges for Poolside Wood Furniture
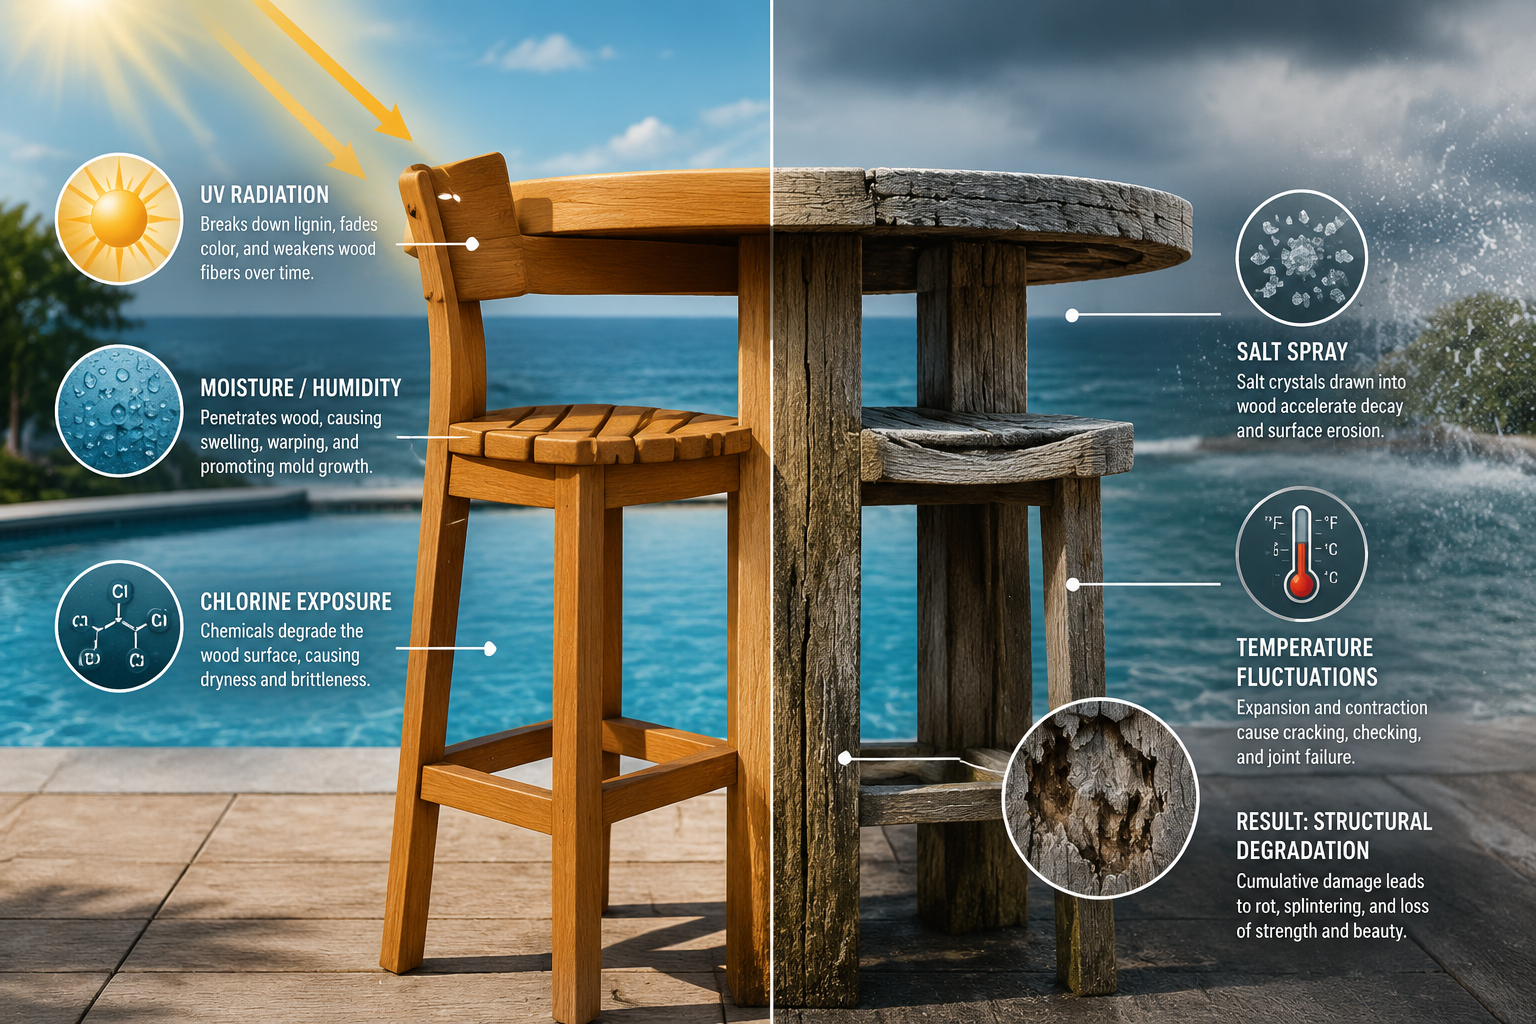
Outdoor wood furniture, particularly items situated poolside, faces a gauntlet of environmental assaults that far exceed typical indoor conditions. These relentless factors demand a finishing strategy that goes beyond basic protection. To truly achieve Advanced Wood Finishing for Outdoor Furniture: Protecting Poolside Tables and Bar Stools from the Elements, we must first dissect these specific threats.

The Triple Threat: UV, Moisture, and Temperature Fluctuations
The sun’s ultraviolet (UV) rays are perhaps the most insidious enemy of outdoor wood. UV radiation breaks down lignin, the natural glue that binds wood fibers together, leading to graying, fading, and eventually surface erosion. This process weakens the wood structure, making it more susceptible to further damage.
Moisture, in its various forms, presents another significant challenge. Rain, condensation, and splashes from the pool can penetrate the wood, causing it to swell. When the wood then dries, it shrinks. This continuous cycle of swelling and shrinking leads to warping, checking, and cracking – a common sight on neglected poolside furniture. Furthermore, persistent moisture creates an ideal breeding ground for mold, mildew, and fungi, which can cause unsightly stains and structural decay. For outdoor applications, especially in humid or wet conditions, ensuring wood is properly sealed is paramount. Consider exploring options like building Adirondack chairs with weather-resistant finishes for more insights into weatherproofing.
Temperature fluctuations, often coupled with humidity changes, exacerbate these issues. Rapid shifts from hot to cool or dry to wet put immense stress on wood fibers and any finish applied to them. Extreme heat can cause finishes to become brittle and crack, while cold can lead to delamination if moisture is trapped underneath.
Chemical Exposure and Abrasive Wear
Poolside furniture faces an additional threat: chemicals. Chlorine, salt, and other pool treatment chemicals can be corrosive to wood and its finishes, accelerating degradation. Splashes, even minor ones, can leave residues that break down protective layers over time.
Beyond chemicals, outdoor furniture endures significant abrasive wear. Constant use, movement, and exposure to wind-blown dust and debris can scratch, scuff, and erode the finish, compromising the underlying wood. Even simply dragging a bar stool can take its toll.
The Role of Wood Species and Quality
The inherent properties of the wood itself play a critical role in its longevity outdoors. Not all wood is created equal when it comes to battling the elements.
Table 1: Common Outdoor Wood Species and Their Characteristics
| Wood Species | Natural Properties | Best For | Considerations |
|---|---|---|---|
| Teak | High oil content, dense, naturally resistant to decay and insects | High-end furniture, marine applications | Expensive, grays if left unfinished |
| Ipe | Extremely dense, hard, durable, naturally resistant to rot and insects | Decking, heavy-duty furniture | Very hard to work with, can be expensive |
| Cedar | Lightweight, aromatic, good natural resistance to rot and insects | Furniture, siding | Softer, can dent easily, needs regular sealing |
| Redwood | Good natural resistance to rot and insects, stable | Decks, outdoor structures | Can be expensive, sometimes hard to source |
| Acacia | Durable, water-resistant, attractive grain | Furniture | Requires consistent finishing, susceptible to bug infestation if untreated |
Selecting a naturally durable wood species provides a strong foundation. For example, sourcing reclaimed and salvaged wood can sometimes yield excellent, resilient hardwoods. However, even the most robust woods benefit immensely from advanced finishing to maintain their aesthetic and prolong their structural integrity under constant exposure. Ignoring these factors leads to premature aging and the need for costly replacements, undermining the initial investment.
Preparing Wood for Advanced Outdoor Finishing
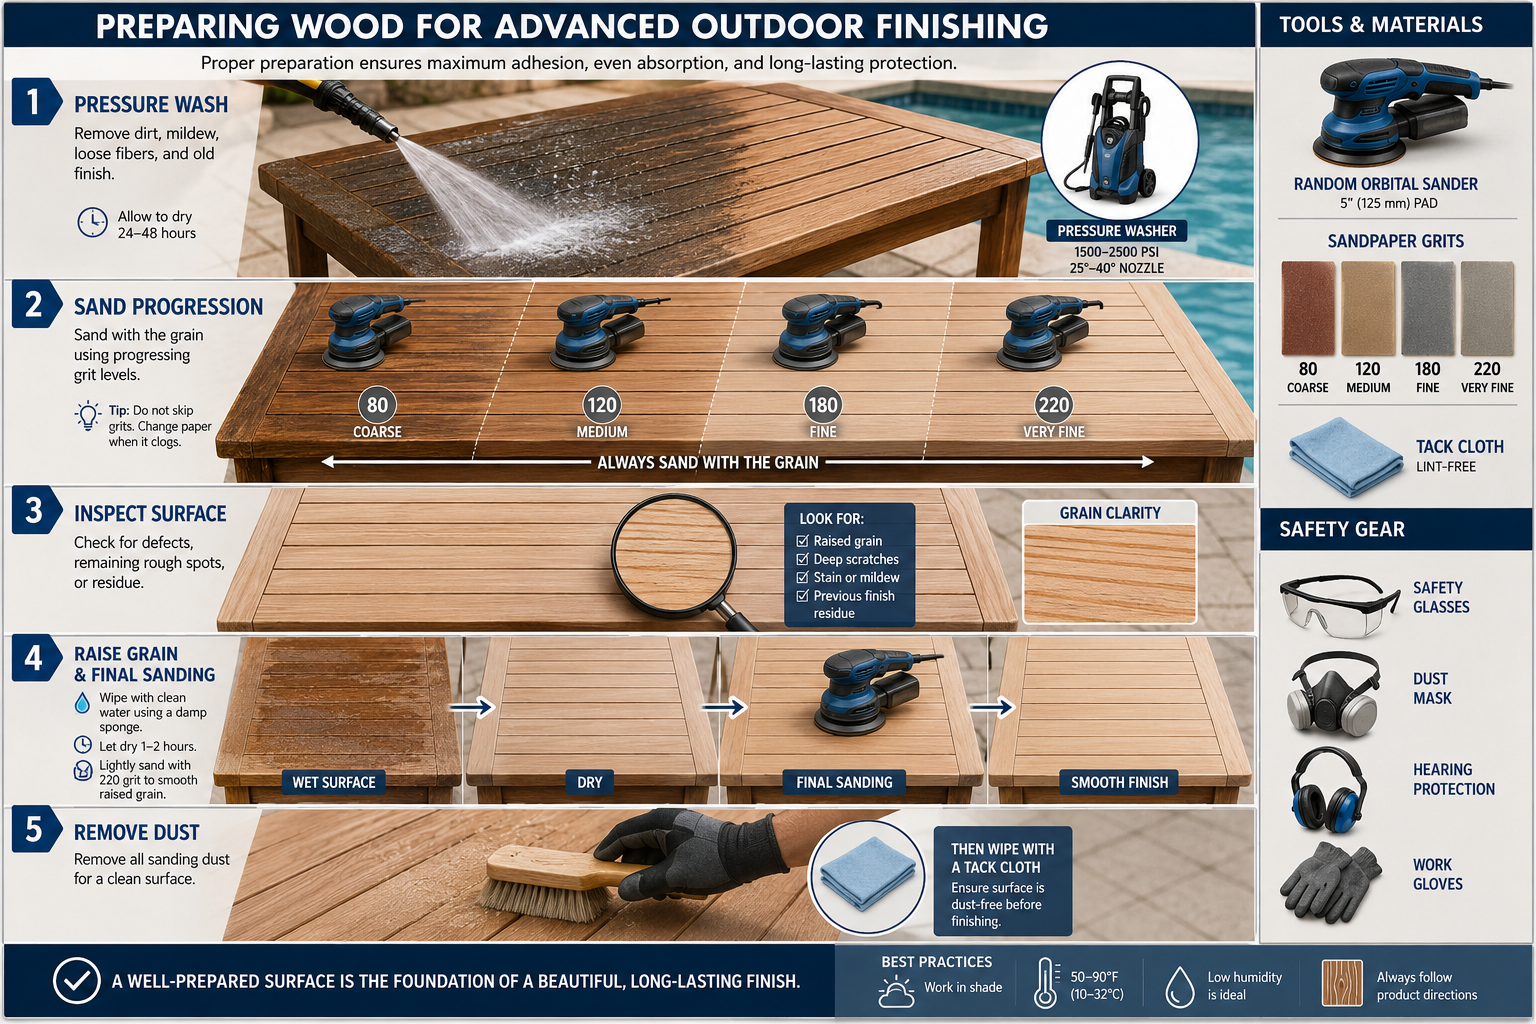
The success of any Advanced Wood Finishing for Outdoor Furniture: Protecting Poolside Tables and Bar Stools from the Elements hinges on meticulous surface preparation. Skipping or rushing these critical steps will compromise the finish’s adhesion, durability, and overall effectiveness. Proper preparation ensures that the chosen finish can bond optimally with the wood, providing maximum protection.
Deep Cleaning and Degreasing
Before any sanding or finishing, the furniture must be thoroughly cleaned. Outdoor furniture accumulates dirt, grime, mildew, and potentially old, failing finishes.
- Remove Loose Debris: Use a stiff brush or compressed air to remove loose dirt, dust, and spiderwebs.
- Wash Thoroughly: A solution of mild detergent (like dish soap) and warm water is often sufficient. For stubborn dirt or mildew, a specialized wood cleaner or a diluted solution of bleach (1 part bleach to 10 parts water) can be used, ensuring it’s safe for the specific wood type. Always test in an inconspicuous area first.
- Pressure Washing (with caution): A low-pressure washer can quickly clean large pieces, but use extreme caution. Too high pressure can damage wood fibers, raising the grain excessively or even gouging the surface. Maintain a safe distance and use a wide fan nozzle.
- Rinse and Dry Completely: Rinse the furniture thoroughly with clean water to remove all cleaning solution residue. Allow the wood to dry completely, which may take several days depending on humidity and temperature. Any residual moisture will be trapped by the new finish, leading to bubbling, peeling, or fungal growth.
For greasier residues, common with poolside snacks or sunscreen, a degreasing agent formulated for wood may be necessary. Ensure it’s fully rinsed off before proceeding.
Sanding for Optimal Adhesion and Smoothness
Sanding serves two primary purposes: creating a smooth, inviting surface and providing the necessary profile for the finish to adhere mechanically.
- Start with Coarse Grit (if needed): If the wood is heavily weathered, rough, or has an old, failing finish, begin with 80-100 grit sandpaper. This step removes imperfections and old coatings.
- Progress to Finer Grits: Gradually move to finer grits, typically 120-150 grit for the penultimate pass, and finish with 180-220 grit. Avoid going too fine (e.g., beyond 220 grit), as this can burnish the wood surface, making it too smooth for some finishes to penetrate or adhere properly.
- Sanding Technique: Always sand with the grain of the wood. Cross-grain sanding leaves visible scratches that are amplified by finishes. Use an orbital sander for large, flat surfaces and hand sanding blocks or contoured pads for curved areas and details. For intricate joinery, a router table can help with precise edge profiling before final hand sanding.
- Edge and Corner Preparation: Slightly ease all sharp edges and corners. Sharp edges tend to wear faster and finishes have difficulty adhering to them, leading to premature failure.
Grain Raising and Final Dust Removal
After initial sanding, apply a light mist of water to the wood surface. This technique, known as “grain raising,” causes any compressed wood fibers to swell and stand up. Once dry (typically a few hours), lightly sand the raised fibers with your final grit sandpaper (e.g., 220 grit). This ensures a smoother final finish and prevents a rough feel after the first coat of finish.

Finally, thoroughly remove all sanding dust. Use a vacuum cleaner with a brush attachment, followed by a tack cloth or a lint-free cloth dampened with mineral spirits or denatured alcohol (compatible with your chosen finish). Ensure the surface is impeccably clean and dry before applying any finish. Even a small amount of dust can compromise the finish’s smoothness and adhesion.
Selecting and Applying Advanced Finishes for Outdoor Durability
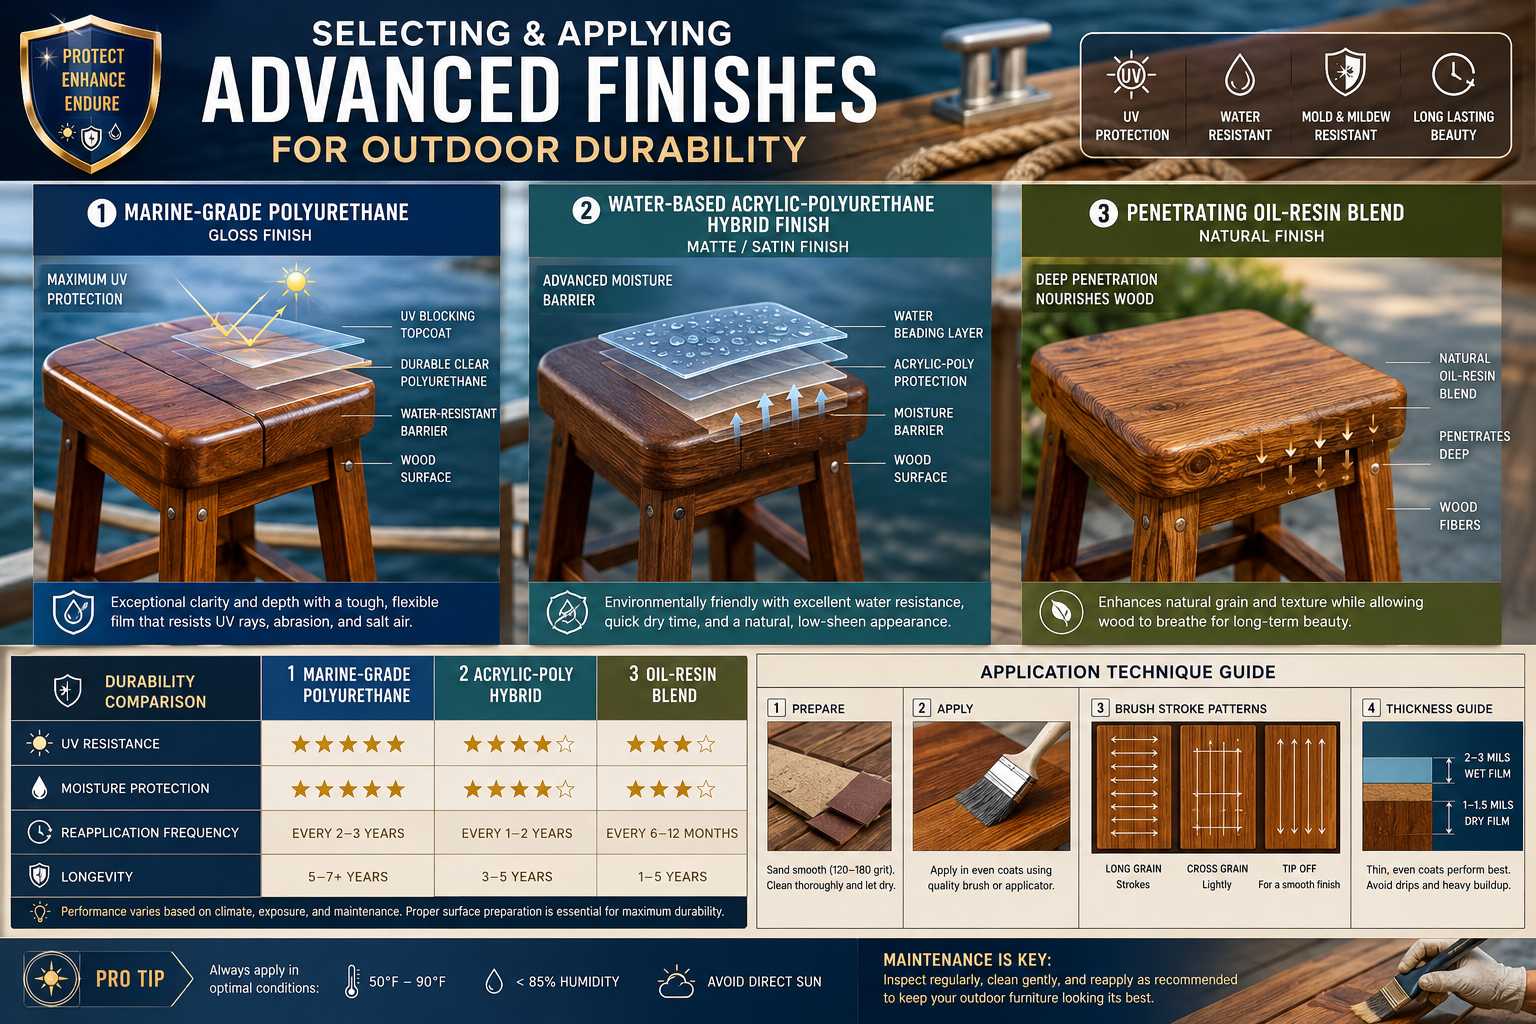
Choosing the right finish is the cornerstone of Advanced Wood Finishing for Outdoor Furniture: Protecting Poolside Tables and Bar Stools from the Elements. Not all finishes are created equal, and for the demanding poolside environment, high-performance options are essential.
Types of High-Performance Outdoor Finishes
Several categories of finishes offer superior protection against UV, moisture, and chemical exposure.
Marine-Grade Varnishes:
- Description: These are perhaps the most robust film-building finishes. They contain strong UV inhibitors and are formulated to be highly flexible, resisting cracking and peeling even with wood movement. They provide a glossy, hard-wearing surface that repels water exceptionally well.
- Pros: Excellent UV protection, superior water resistance, durable film, long-lasting.
- Cons: Can be challenging to apply without brush marks, requires multiple coats, future maintenance often involves sanding and reapplication, can chip or scratch.
- Application: Typically applied with a brush, requiring thin, even coats and light sanding between coats for optimal adhesion and smoothness.
Penetrating Oils (e.g., Teak Oil, Tung Oil Blends):
- Description: Unlike film-forming finishes, oils soak into the wood fibers, enhancing the natural beauty of the wood while providing water repellency and some UV protection. They typically don’t crack or peel.
- Pros: Easy to apply and maintain, enhances natural wood grain, penetrates deeply, doesn’t peel.
- Cons: Less UV protection than varnishes (especially traditional oils), requires more frequent reapplication (typically annually), offers less protection against abrasion. Modern formulations often include UV inhibitors and fungicides.
- Application: Wiped on with a cloth, allowed to penetrate, then excess wiped off. Multiple coats are often recommended.
Water-Based Polyurethanes/Acrylics (Outdoor Formulations):
- Description: Modern water-based finishes have come a long way, offering good durability, low VOCs, and easier cleanup. Outdoor formulations include strong UV absorbers and flex agents. They form a protective film, similar to varnish but often with faster drying times.
- Pros: Environmentally friendly, easy cleanup, good UV and moisture protection, often quicker drying.
- Cons: Can be less durable than oil-based varnishes in extreme conditions, sometimes more prone to scratching.
- Application: Applied with a brush, roller, or sprayer, typically requiring 2-3 coats with light sanding in between. If you are comfortable with spray applications, knowing about sprayable water-based polyurethane can be very beneficial.
Epoxy Sealers followed by Topcoat:
- Description: For the ultimate protection, especially for high-wear areas or softer woods, an epoxy sealer can be applied first. This creates an incredibly hard, waterproof, and dimensionally stable base, followed by a UV-resistant marine varnish.
- Pros: Unparalleled water and chemical resistance, excellent dimensional stability, long-term durability.
- Cons: Complex application, expensive, requires careful surface preparation, epoxy itself offers poor UV resistance and must be top-coated.
- Application: Two-part epoxy mixed and applied, then sanded smooth, followed by multiple coats of a UV-stable varnish.
Application Techniques for Longevity
Proper application is as important as the finish selection itself.
- Follow Manufacturer’s Instructions: Always read and adhere to the specific instructions provided by the finish manufacturer regarding temperature, humidity, dry times, and recoat windows.
- Thin, Even Coats: Regardless of the finish type, apply thin, even coats. Thick coats are prone to wrinkling, uneven drying, and poor adhesion.
- Intercoat Sanding: For film-building finishes (varnishes, polyurethanes), light sanding with 220-320 grit sandpaper between coats (after proper drying) is crucial. This abrades the surface, creating a mechanical bond for subsequent layers, leading to better adhesion and a smoother final result.
- End Grain Sealing: End grain (the exposed ends of wood fibers) absorbs and releases moisture at a much higher rate than face or edge grain. Applying extra coats of finish to end grain, or even a specialized end-grain sealer, dramatically improves water resistance and prevents checking.
- Full Coverage: Ensure every surface, including undersides, inside legs, and hidden areas, receives adequate finish. Any exposed, unfinished wood is an entry point for moisture and decay.
- Drying and Curing: Understand the difference between “dry to touch” and “fully cured.” Most finishes take weeks to fully cure and reach their maximum hardness and resistance. Avoid heavy use during the curing period.
For example, when exploring different wood types for your projects, understanding specific finishing techniques like those for mahogany wood finishing or maple wood finishing can inform your approach to outdoor furniture, even if the products differ. The principles of preparation and application often carry over.
Maintenance Schedule for Sustained Protection
Even the best finishes require maintenance. A proactive approach will dramatically extend the life of your poolside furniture.
- Regular Cleaning: Periodically wash the furniture with mild soap and water to remove dirt, pool chemicals, and environmental pollutants. This prevents buildup that can degrade the finish.
- Inspection: At least once a year (more frequently in harsh climates), thoroughly inspect all surfaces for signs of wear, fading, cracking, or peeling. Pay close attention to horizontal surfaces and end grain.
- Reapplication of Oils: Penetrating oil finishes typically need reapplication annually or biannually, depending on exposure. A light sanding (220-320 grit) may be beneficial before reoiling.
- Re-coating Film Finishes: Varnishes and polyurethanes can last longer, often 2-5 years. When they show signs of wear, a light scuff sanding and a fresh coat (or two) can restore protection. If the finish is severely compromised or peeling, full stripping and reapplication may be necessary.
- Winter Storage: If possible, store outdoor furniture in a sheltered area during the off-season to minimize exposure to extreme winter conditions.
Advanced Techniques and Long-Term Care for Poolside Furniture
Beyond the standard finishing processes, there are advanced techniques and considerations that can significantly enhance the longevity and appearance of your poolside tables and bar stools. Implementing these methods demonstrates a commitment to truly Advanced Wood Finishing for Outdoor Furniture: Protecting Poolside Tables and Bar Stools from the Elements.
Specialized Treatments for Enhanced Durability
- Wood Stabilizers: Before applying any finish, especially to new or highly porous wood, a wood stabilizer can be used. These products penetrate the wood, preventing excessive moisture absorption and dimensional movement. They are particularly useful for preventing checking and warping in less stable wood species. They essentially “pre-treat” the wood, making subsequent finishes more effective.
- Epoxy Filling for Cracks and Gaps: For furniture with existing cracks, checks, or gaps (common in natural wood), marine-grade epoxy can be used to fill and seal these imperfections. Once cured and sanded smooth, the epoxy creates a waterproof barrier, preventing further moisture ingress and structural weakening. This also provides a perfectly smooth substrate for the topcoats.
- UV-Resistant Additives: While many outdoor finishes contain UV inhibitors, for extreme sun exposure, you can sometimes find or add concentrated UV absorbers to certain clear finishes. Always verify compatibility with your chosen finish. These additives significantly bolster the finish’s ability to withstand sun degradation.
- Anti-Fungal and Mildewcides: Even with good moisture protection, humid environments can foster mold and mildew growth on the surface. Finishes with built-in mildewcides offer an extra layer of defense. If using a custom mix, ensure any added fungicides are compatible and safe.
Design Considerations for Longevity
The initial design and construction of outdoor furniture also play a role in its finished lifespan. While this article focuses on finishing, it’s worth noting how design choices impact durability.
- Drainage: Design features that allow water to drain quickly, preventing pooling on horizontal surfaces, are critical. Slanted tops, gaps between slats, and slightly sloped edges help.
- Elevated Bases: Raising legs off the ground using glides or small feet prevents direct contact with damp surfaces, reducing moisture wicking into the wood.
- Joinery: Robust, weather-resistant joinery is essential. Traditional mortise and tenon or dowel joints, secured with waterproof epoxy glue, will outlast simple screws or nails which can loosen with wood movement. For more on advanced joinery, explore beyond the basic box: advanced joinery for unique wooden gift boxes.
- Hardware: Use marine-grade stainless steel hardware (screws, bolts, hinges) to prevent rust stains and maintain structural integrity.
Ongoing Care and Troubleshooting Common Issues
Even with advanced finishing, proactive care is vital.
- Seasonal Deep Clean: At the beginning and end of the outdoor season, perform a deep clean. Use a soft brush, mild soap, and water. A gentle scrub can remove accumulated grime without harming the finish.
- Spot Treatment for Mildew: If mildew appears, gently clean the affected area with a diluted bleach solution (1:10) or a commercial mildew remover. Rinse thoroughly.
- Addressing Scratches and Dents:
- For Oil Finishes: Lightly sand the affected area with fine-grit sandpaper (e.g., 220-320 grit) and reapply the penetrating oil. The oil will blend seamlessly.
- For Film Finishes (Varnish/Polyurethane): Minor scratches can sometimes be buffed out with a fine abrasive compound. Deeper scratches may require light sanding and a spot application of the finish, feathered into the surrounding area. If the damage is extensive, a full re-coat of the affected section might be necessary after proper sanding.
- Preventing Water Rings: Use coasters! Even the most durable finishes can be stained by standing water, especially if it contains chemicals or is left for extended periods.
- Protective Covers: During extended periods of non-use, or during harsh weather, consider using breathable, waterproof covers for your furniture. Ensure the covers allow for air circulation to prevent moisture buildup underneath.
- Relocation: If possible, periodically rotate or relocate furniture to even out sun exposure and wear patterns.
By understanding the specific challenges and employing these advanced techniques for selection, application, and maintenance, you can ensure that your beautiful wooden poolside tables and bar stools remain a source of enjoyment and elegance for many seasons to come.
Conclusion
The allure of wooden outdoor furniture, particularly around a sparkling pool, is undeniable. However, without a dedicated strategy for Advanced Wood Finishing for Outdoor Furniture: Protecting Poolside Tables and Bar Stools from the Elements, their beauty and structural integrity will quickly diminish. We’ve explored the formidable adversaries—UV radiation, relentless moisture, dramatic temperature shifts, and chemical exposure—and highlighted how these factors necessitate a robust finishing approach.
From selecting inherently durable wood species like teak or ipe to the critical steps of deep cleaning, precise sanding, and grain raising, the foundation of a lasting finish is built on meticulous preparation. The choice of high-performance finishes, whether marine-grade varnishes, penetrating oils, or modern water-based polyurethanes, must be tailored to the specific environment and desired aesthetic, always applied with careful attention to manufacturer guidelines and proper technique. Furthermore, incorporating advanced strategies like wood stabilizers, epoxy crack filling, and UV-resistant additives can significantly elevate protection.

Ultimately, protecting your outdoor furniture is an ongoing commitment. With proactive maintenance, regular inspection, and prompt attention to wear, you can ensure your poolside tables and bar stools not only withstand the test of time but continue to enhance your outdoor living space for years, rather than seasons. Invest in advanced finishing, and enjoy the enduring elegance of your wooden pieces.
Actionable Next Steps:
- Assess Your Furniture: Evaluate the current condition and wood type of your poolside furniture.
- Research Finishes: Based on your wood type and local climate, research specific high-performance finishes (marine varnish, exterior oil, outdoor polyurethane) that align with your needs.
- Gather Supplies: Purchase necessary cleaning agents, sanding supplies, chosen finish, brushes/applicators, and safety gear.
- Dedicate Time to Preparation: Do not underestimate the importance of thorough cleaning, sanding, and dust removal. This is the most crucial step for success.
- Apply with Precision: Follow application instructions diligently, applying thin coats and allowing proper drying time between each.
- Implement a Maintenance Plan: Schedule regular cleaning and annual inspections to reapply finishes as needed, ensuring continuous protection.
Meta Title: Advanced Wood Finishing for Outdoor Furniture Protection 2026 Meta Description: Master advanced wood finishing for outdoor furniture in 2026. Protect poolside tables & bar stools from UV, moisture, and elements for lasting beauty.
