


The average household in 2026 relies on furniture not just for function, but as an expression of personal style and craftsmanship. For many, a coffee table serves as the focal point of a living space. While square or rectangular tables are commonplace, there’s an undeniable allure to a custom round coffee table, offering softer lines and improved traffic flow. However, crafting such a piece introduces unique challenges, particularly when it comes to creating perfectly circular tops and ensuring stable, aesthetically pleasing pedestal or multi-leg bases. This article will demystify the essential joinery techniques involved in Crafting a Custom Round Coffee Table: Joinery Techniques for Circular Tops and Pedestal Bases, transforming a complex project into an achievable one for dedicated woodworkers.
Key Takeaways
- Precision Circular Tops: Mastering router jigs, such as a trammel or circle-cutting jig, is crucial for achieving perfectly round tabletops. Edge banding or multi-piece glue-ups are common methods for forming the top itself.
- Strong Top-to-Base Joinery: Securely attaching the circular top to its base requires robust joinery like through mortise and tenon, threaded inserts with lag screws, or even half-lap joints, ensuring stability and longevity.
- Pedestal Base Joinery: Pedestal bases demand specialized techniques for centralizing weight and preventing wobble. Bridle joints, dadoes, and robust interlocking components are key for structural integrity.
- Multi-Leg Base Joinery: For multi-leg designs, precise angle cuts and strong joints like wedged mortise and tenon or through dovetails are essential for both stability and aesthetic appeal.
- Finishing and Aesthetics: Beyond structural integrity, careful sanding, appropriate finishes, and attention to detail in exposed joinery contribute significantly to the final look and durability of the custom table.
Creating the Perfect Circular Tabletop: Techniques for Crafting a Custom Round Coffee Table: Joinery Techniques for Circular Tops and Pedestal Bases
The foundation of any round coffee table is its perfectly circular top. Achieving this requires precision and understanding the properties of wood. There are several methods for forming the top, each with its own advantages and challenges.

Glue-Up Panels for Solid Tops
For a solid wood top, multiple planks are typically glued together to achieve the desired width and thickness. This process, known as a glue-up, is critical for stability and preventing warping.
- Material Selection: Choose flat, straight-grained lumber of consistent thickness. Consider species known for stability, such as hard maple, walnut, or oak.
- Edge Jointing: Each plank must have perfectly straight and square edges for a tight, strong glue joint. Use a jointer or a straight-edge jig with a router or table saw.
- Glue Application: Apply a thin, even coat of high-quality wood glue (e.g., Titebond III) to both mating surfaces. Avoid excessive squeeze-out, but ensure full coverage.
- Clamping: Use numerous pipe clamps or bar clamps to bring the planks together. Apply firm, even pressure until squeeze-out appears along the entire length of the joints. Allow ample drying time, typically 24 hours.
Once the glue has dried, the panel can be planed and sanded flat.
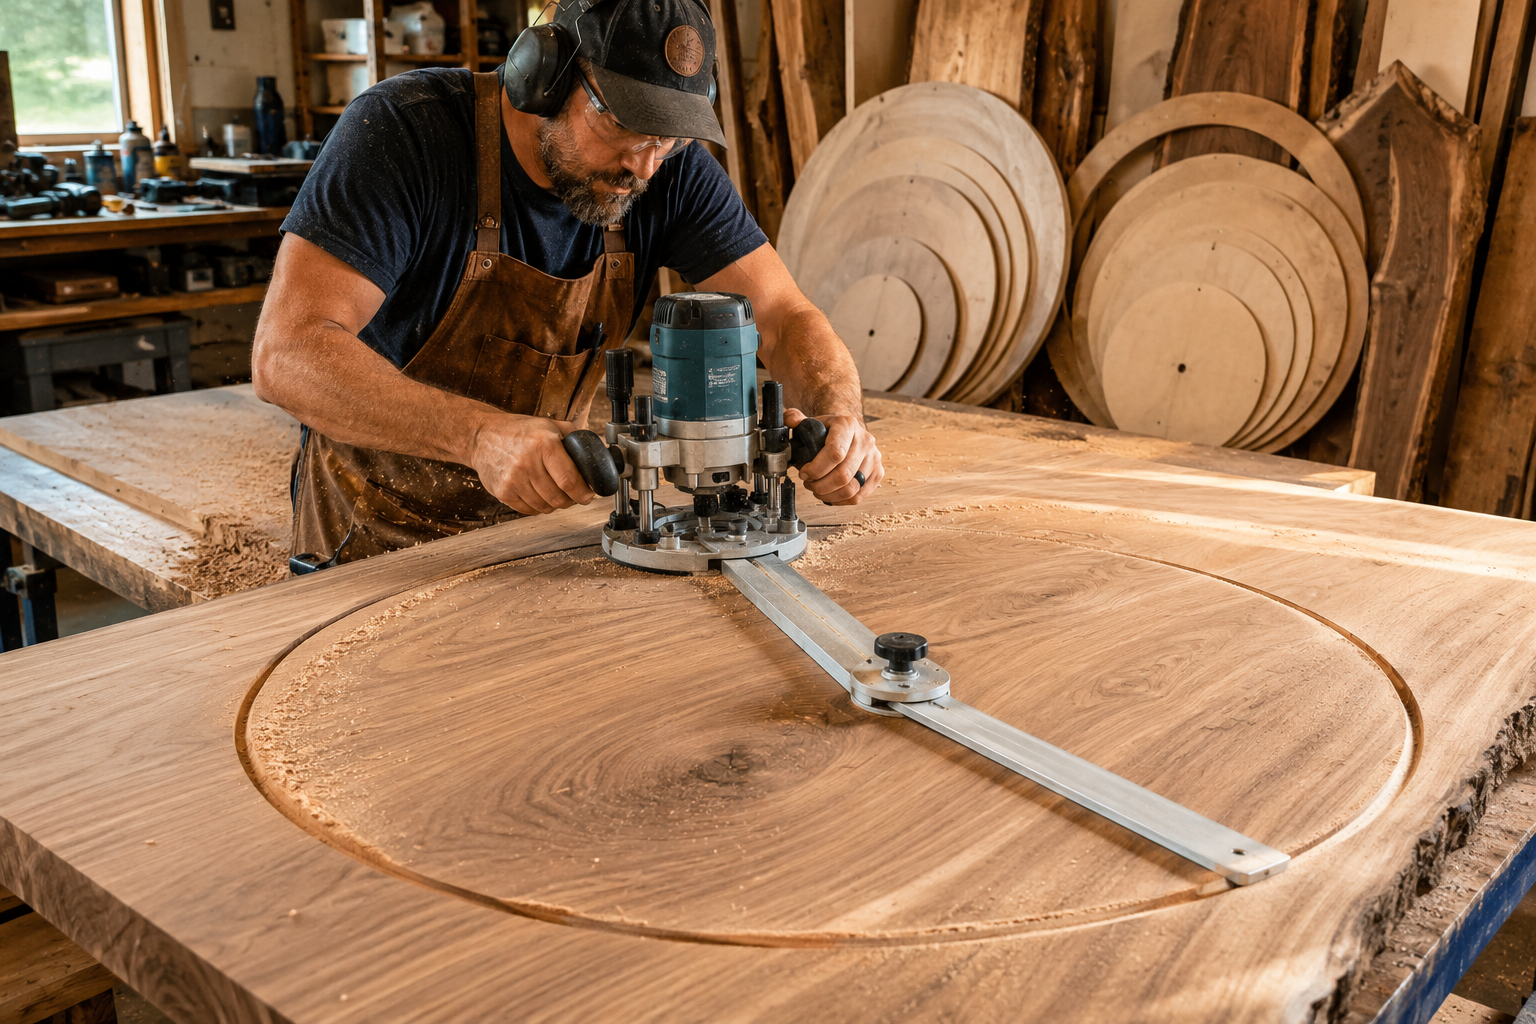
Router Jigs for Circular Cuts
A router is the most precise tool for cutting a large, perfect circle. A circle-cutting jig or trammel jig is indispensable for this task.
- Trammel Jig Construction: A simple trammel jig can be made from a piece of plywood or MDF. Attach your router to one end and drill a pivot hole at the desired radius from the router bit.
- Centering and Pivoting: Find the exact center of your glued-up panel. Drill a small pilot hole for the pivot pin of your jig.
- Router Setup: Install a sharp, straight router bit. Take shallow passes, incrementally increasing the depth of cut with each pass to avoid burning the wood or straining the router.
- Smooth Rotation: Maintain consistent pressure and a smooth rotation around the pivot point. Any hesitation can result in irregularities in the circle.
For those looking to refine their router skills, exploring resources on Mastering the Router Table: Essential Jigs, Safety, and Advanced Techniques for Precision Joinery and Edges can provide valuable insights.
Edge Banding and Veneer Tops
For a more economical or lightweight top, plywood or MDF can be used as a substrate. The exposed edges can be covered with solid wood edge banding to give the appearance of a solid top.
- Substrate Preparation: Cut the plywood or MDF into a rough circle, slightly oversized.
- Edge Banding Application: Cut thin strips of solid wood (e.g., 1/4″ to 3/8″ thick) to match the circumference. Miter the ends for a seamless joint. Glue and clamp the banding around the perimeter of the substrate.
- Flush Trimming: Once the glue is dry, use a flush trim bit in a router to trim the edge banding perfectly flush with the top and bottom surfaces of the substrate.
- Final Circular Cut: Use the router and trammel jig to make the final, perfect circular cut, shaping both the substrate and the edge banding simultaneously.
Joinery for Pedestal Bases
A pedestal base offers a clean, singular support for the tabletop, often creating a visually appealing sculptural element. The key challenge lies in making it robust enough to support the top without wobbling, especially at the connection points.
Central Post to Base Joinery
The central post, or column, of the pedestal needs to be firmly attached to a stable foot or cross-base.
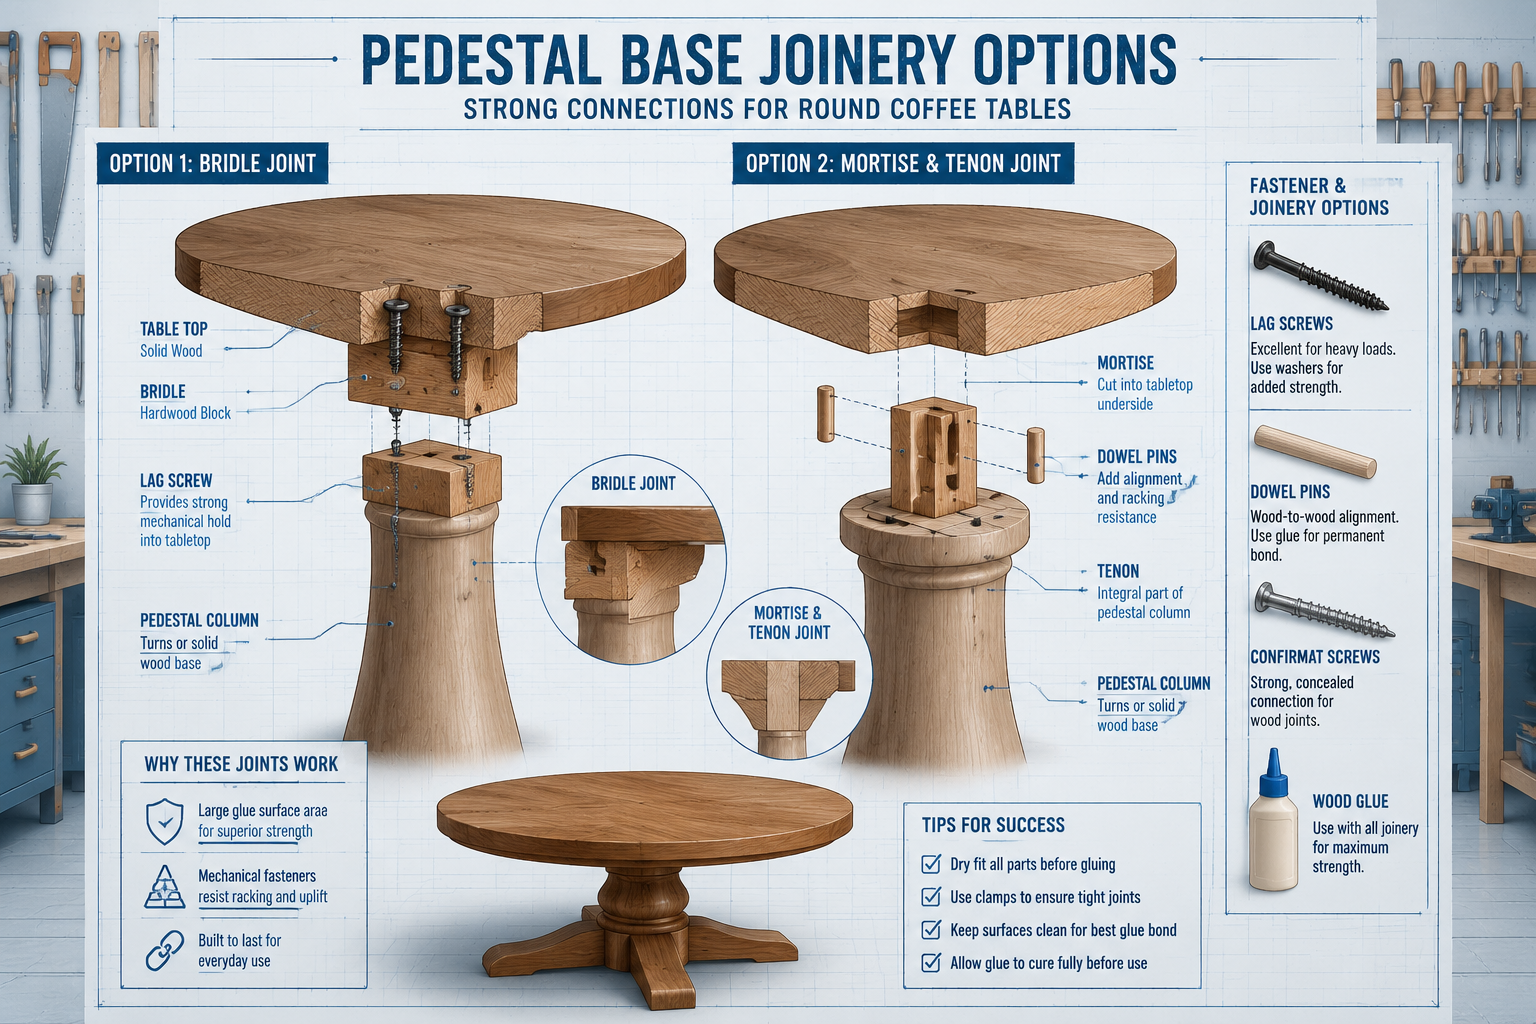
- Mortise and Tenon: This classic joint provides excellent strength. A large tenon on the bottom of the central post fits into a corresponding mortise in the base components. For large pedestals, consider a through mortise and tenon, which can be wedged for even greater strength and a visible design element. Hand Tool Joinery for Visible Wood Joints: Dovetails, Mortise and Tenon, and Box Joints details how to execute these joints.
- Bridle Joint: Similar to a mortise and tenon but with an open-ended mortise. It’s often used where the post meets a cross-shaped base, providing a large gluing surface and strong mechanical lock.
- Dado and Rabbet: If the central post rests on a wider platform, a dado joint can be used to seat it securely. Rabbet joints might be used for attaching vertical side panels to the central post structure.
Attaching the Pedestal to the Tabletop
This connection is crucial for stability. The method chosen depends on the pedestal’s design and the desired aesthetic.
- Mounting Blocks with Screws: For a hidden connection, create a sturdy mounting block (or multiple blocks) that is securely fastened to the top of the pedestal. The tabletop can then be attached to these blocks from underneath using screws, often through elongated holes to allow for wood movement.
- Figure-8 Fasteners or Z-Clips: These metal fasteners allow the tabletop to float slightly, accommodating seasonal wood movement, while keeping it securely attached. They are routed into the underside of the tabletop and screwed into the pedestal’s support structure.
- Threaded Inserts and Machine Screws: For a more robust, disassemblable connection, install threaded inserts into the underside of the tabletop. The pedestal can then be bolted to the top using machine screws or lag screws that engage with the inserts. This is particularly useful for larger, heavier tables.
- Domino or Dowel Joinery: For smaller, lighter tables, domino or dowel joints can provide alignment and some strength, though they are usually supplemented with screws or other fasteners for long-term stability.
“The success of a round coffee table, especially with a pedestal base, hinges entirely on the integrity of its joinery. It’s not just about aesthetics; it’s about engineering for longevity and stability.”
Joinery for Multi-Leg Bases and Tabletop Connections
Multi-leg bases offer a different aesthetic and can sometimes provide inherent stability through wider distribution of support. Crafting a Custom Round Coffee Table: Joinery Techniques for Circular Tops and Pedestal Bases with multiple legs involves careful angle calculations and robust joint selection.
Leg-to-Apron Joinery
Most multi-leg tables utilize an apron system, which is a frame that connects the legs and supports the tabletop.
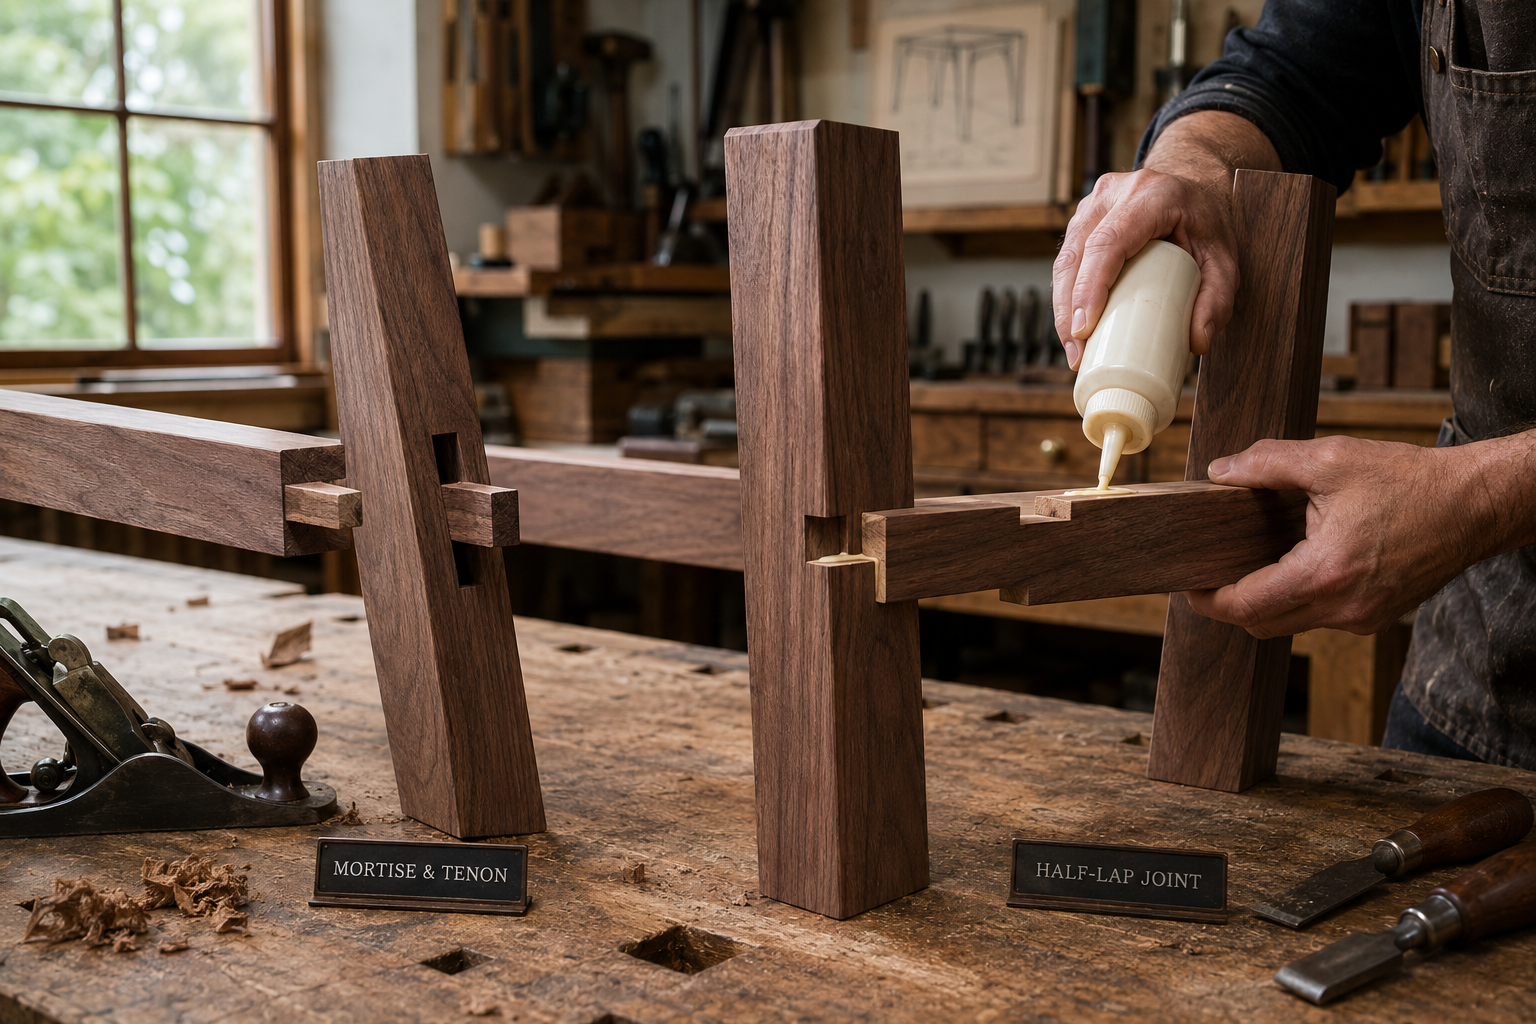
- Mortise and Tenon: This is the gold standard for leg-to-apron connections. A tenon on the end of each apron rail fits into a mortise cut into the legs. For round tables, the apron pieces might be curved or segmented to follow the tabletop’s contour. For those building larger furniture, understanding Mastering Dovetail Joinery for Drawers: Hand and Router Methods for Cabinet Builders offers insight into similar strong joint applications.
- Half-Lap Joints: Where aprons cross or meet at angles, half-lap joints provide a strong, flush connection. They are simpler to cut than mortise and tenons but offer less resistance to racking if not reinforced.
- Pocket Hole Joinery: For simpler constructions or where speed is a priority, pocket holes can be used to join aprons to legs. While strong for many applications, they are generally less robust than traditional mortise and tenon joints for furniture that will see heavy use.
Stretcher Bar Joinery
Stretcher bars, running between the legs closer to the floor, significantly increase the rigidity and stability of a multi-leg base.
- Through Mortise and Tenon: Visually striking and incredibly strong, a through mortise and tenon joint with wedges is an excellent choice for stretcher bars, locking them firmly into the legs.
- Blind Mortise and Tenon: If you prefer a cleaner look with no visible joint on the outside of the leg, a blind mortise and tenon is appropriate.
- Dowel Joints: Multiple dowels can also be used for stretcher connections, offering decent strength when properly executed with good glue.
Attaching Multi-Leg Bases to Circular Tops
Similar to pedestal bases, the tabletop needs to be securely fastened while allowing for wood movement.
- Tabletop Fasteners: Figure-8 fasteners, Z-clips, or wooden cleats with elongated screw holes are excellent choices. These methods allow the tabletop to expand and contract seasonally without cracking. The cleats are typically screwed to the inside of the apron, and the tabletop is then screwed to the cleats.
- Floating Tenons: For a very clean look, the apron can be joined to the tabletop using floating tenons (like those made with a Festool Domino jointer) that engage mortises in both the apron and the underside of the tabletop. This is often combined with other fasteners.
- Lag Screws with Washers: For very heavy tops or a more permanent attachment, lag screws can be driven through the apron into the underside of the tabletop, though this method offers less allowance for wood movement and can lead to cracking if not carefully implemented with oversized pilot holes in the apron.
When designing and building furniture like a custom coffee table, consider the overall aesthetic. Sometimes, exposed joinery like through tenons or contrasting wood dowels can become a decorative feature, adding character and showcasing the craftsmanship. For further inspiration on incorporating joinery into design, our article on Console Tables That Wow: Build Sleek Entryway and TV Stand Alternatives might offer relevant ideas for structural yet artistic design.

Finishing and Durability
Once the joinery is complete and the table is assembled, the finishing process is crucial for both aesthetics and durability.
- Sanding: Proper sanding is paramount. Work through progressively finer grits (e.g., 80, 120, 180, 220) to achieve a smooth surface. Any scratches left at lower grits will be magnified by the finish.
- Edge Treatment: Soften the sharp edges of the tabletop with a slight round-over or chamfer using a router or sanding block. This improves comfort and reduces chipping.
- Finish Selection: For a coffee table, a durable finish is essential to protect against spills, scratches, and daily wear.
- Polyurethane: A highly durable, water-resistant finish available in oil-based and water-based formulas. Oil-based typically offers more ambering and protection. Applying Polyurethane in High Humidity: Tips and Techniques can help ensure a perfect finish.
- Varnish: Offers excellent durability and UV protection, making it suitable for furniture near windows.
- Oil Finishes (e.g., Tung Oil, Linseed Oil): Penetrate the wood, providing a natural look and feel. They offer good protection but may require more frequent reapplication.
- Hardwax Oil: A modern finish that combines the natural look of oil with the durability of wax. Easy to repair and maintain.
- Application: Apply finishes according to the manufacturer’s instructions, typically in thin, even coats with light sanding between coats.
Remember that proper wood preparation and careful finish application will determine the longevity and beauty of your custom round coffee table.
Conclusion
Crafting a Custom Round Coffee Table: Joinery Techniques for Circular Tops and Pedestal Bases is a rewarding woodworking project that challenges and refines a woodworker’s skills. From precisely cutting the circular top using router jigs to executing robust joinery for a stable pedestal or multi-leg base, each step demands attention to detail and a commitment to quality. By understanding and applying the appropriate joinery techniques—whether traditional mortise and tenons, modern fasteners, or specific jigs—you can create a beautiful, durable, and unique piece of furniture that will be a cherished focal point in any home for years to come. Start by planning your design meticulously, select your materials wisely, and approach each joint with patience and precision. The satisfaction of a well-made custom piece is immeasurable.
SEO Meta Title: Crafting Custom Round Coffee Tables: Joinery & Bases (2026) SEO Meta Description: Master crafting custom round coffee tables in 2026. Learn precision joinery for circular tops and stable pedestal or multi-leg bases.
