

The average person spends over 3,000 hours a year in their bedroom, yet often, this sanctuary feels more like a tech graveyard than a peaceful retreat, especially in smaller homes. Disordered charging cables, overflowing outlets, and bulky nightstands can transform a vital space into a source of frustration. The challenge intensifies when attempting to integrate modern technology seamlessly into limited square footage. This article tackles that precise dilemma, focusing on Designing Nightstands and Side Tables for Small Bedrooms: Turning Any Night Side Table into a Charging Hub. We will explore innovative design principles, practical DIY modifications, and clever new-build strategies to create functional, aesthetically pleasing, and cable-free charging solutions right where you need them most.
Key Takeaways
- Prioritize slim profiles, wall-mounted options, and multi-functional designs for small bedroom nightstands.
- Integrate charging capabilities directly into the nightstand via hidden power strips, built-in USB ports, and wireless charging pads.
- Implement effective cable management solutions to keep wires out of sight, reducing clutter and improving aesthetics.
- Consider both retrofitting existing furniture and embarking on DIY new builds to customize charging hubs to your specific needs.
- Focus on design elements like material, finish, and lighting to enhance both functionality and the overall bedroom ambiance.
Maximizing Space with Smart Nightstand Design for Small Bedrooms
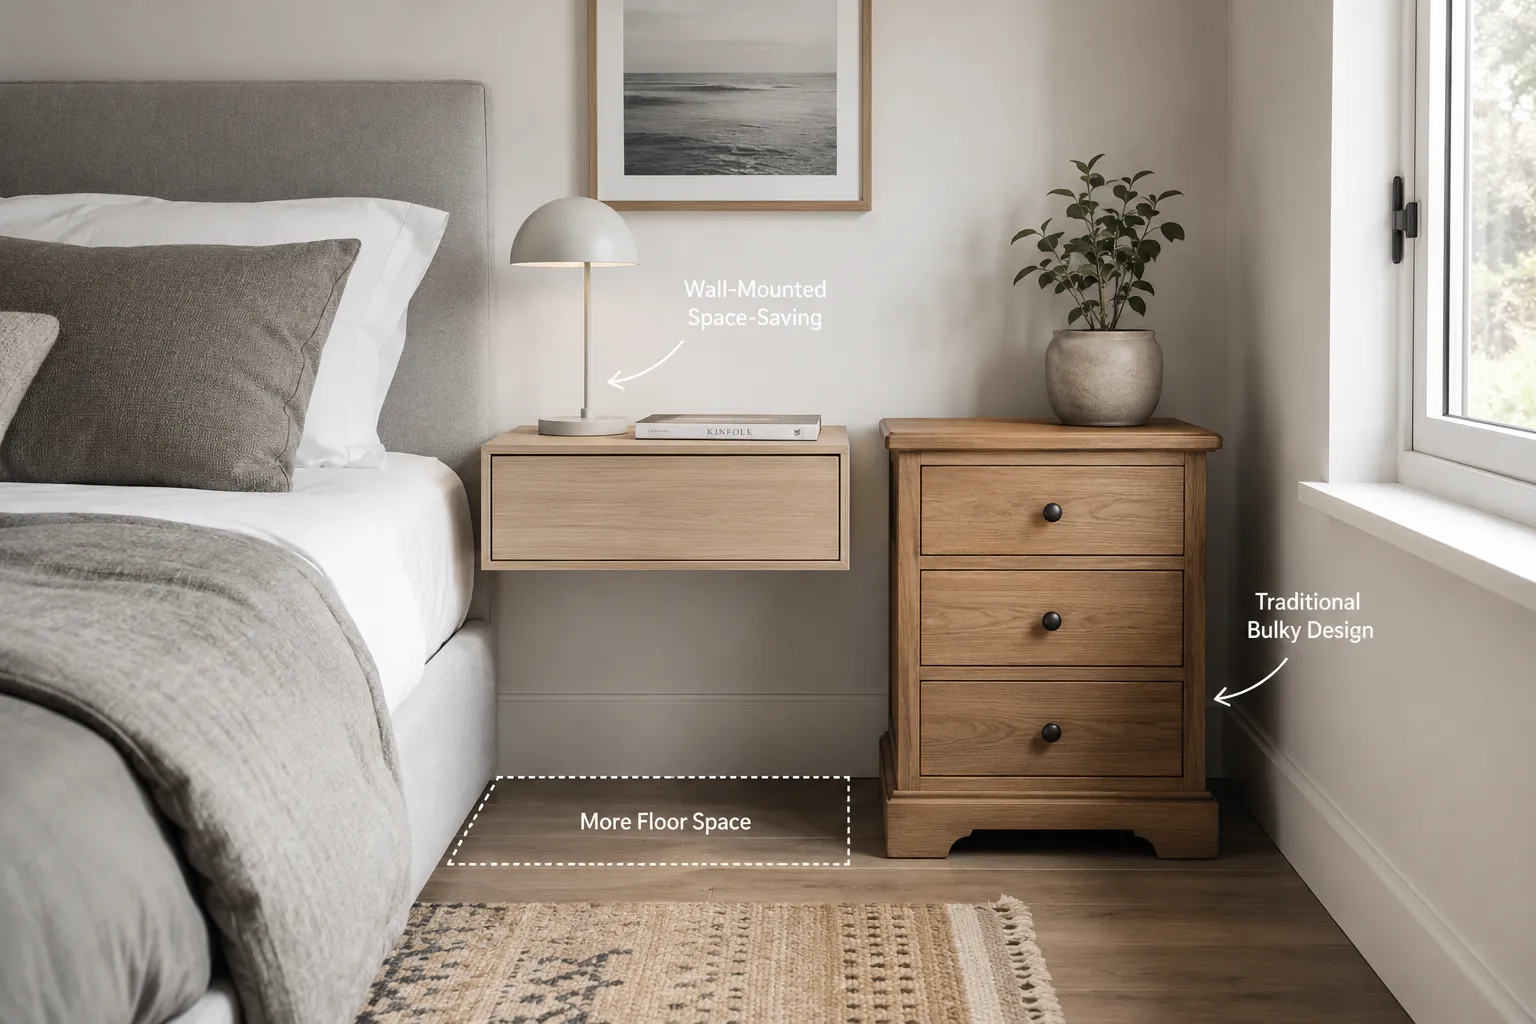
When space is at a premium, every piece of furniture must earn its place. Traditional bulky nightstands often consume valuable floor area, making a small bedroom feel even more cramped. The solution lies in smart design that emphasizes both form and function, directly addressing the core need for storage and a charging station without overwhelming the room.
Choosing the Right Footprint and Form Factor
The first step in Designing Nightstands and Side Tables for Small Bedrooms: Turning Any Night Side Table into a Charging Hub is selecting a nightstand with an appropriate footprint. Think vertically and strategically:
- Floating Nightstands: These are champions of space-saving design. Mounted directly to the wall, they free up floor space, making the room appear larger and easier to clean. They offer a sleek, modern aesthetic and can be customized in terms of size and features. For those interested in crafting their own, consider exploring guides on crafting custom floating nightstands.
- Slim Profile Tables: If a freestanding option is preferred, choose tables with narrow depths. A nightstand that is only 8-10 inches deep can still provide ample surface area for essentials like a lamp, book, and phone, without protruding too far into the room.
- C-shaped Side Tables: These ingenious designs can slide over the edge of the bed or a small armchair, providing a surface that is both functional and unobtrusive when not in use. They are particularly useful for beds without much side clearance.
- Stacking or Nesting Tables: While often used in living rooms, smaller versions can serve as adaptable nightstands. A larger table can hold a lamp, while a smaller one can be pulled out for extra surface area as needed.
- Wall-Mounted Shelves with Drawers: Combine the benefits of a floating shelf with the storage of a small drawer for a highly efficient setup.
| Design Type | Pros | Cons | Ideal For |
|---|---|---|---|
| Floating Nightstand | Maximizes floor space, modern aesthetic | Requires wall mounting, less portable | Very small rooms, minimalist design, ease of cleaning |
| Slim Profile Table | Freestanding, minimal intrusion | Limited storage depth | Any small bedroom, traditional or modern styles |
| C-shaped Side Table | Highly adaptable, slides over bed/sofa | Can be less stable if bumped | Beds with tight side clearance, multi-functional spaces |
| Stacking Tables | Flexible surface area, versatile | Can look cluttered if not managed well | Guest rooms, adaptable needs, dynamic styling |
| Shelf with Drawer | Combines display and hidden storage | Requires wall mounting, limited drawer capacity | Minimalists, those needing discreet storage |
Material and Finish Considerations
The choice of material and finish significantly impacts the visual weight and overall feel of a nightstand in a small space.
- Light Colors and Reflective Surfaces: Light-colored woods (like maple or birch), white lacquers, or finishes with a slight sheen can reflect light, making the room feel brighter and more open.
- Transparent Materials: Acrylic or glass nightstands offer practical surfaces without visually obstructing the space. They blend into the background, creating an airy feel.
- Minimalist Hardware: Opt for integrated pulls or discreet knobs to maintain clean lines and prevent visual clutter.
- Solid Wood Construction: Even for smaller pieces, quality craftsmanship ensures durability and longevity. Consider exploring high-demand woodworking projects for 2026 for inspiration on building sturdy furniture.
“In small bedrooms, every design choice reverberates. A well-chosen nightstand isn’t just furniture; it’s a strategic element that can enhance flow, light, and overall tranquility.”
Integrating Charging Capabilities: Turning Any Night Side Table into a Charging Hub
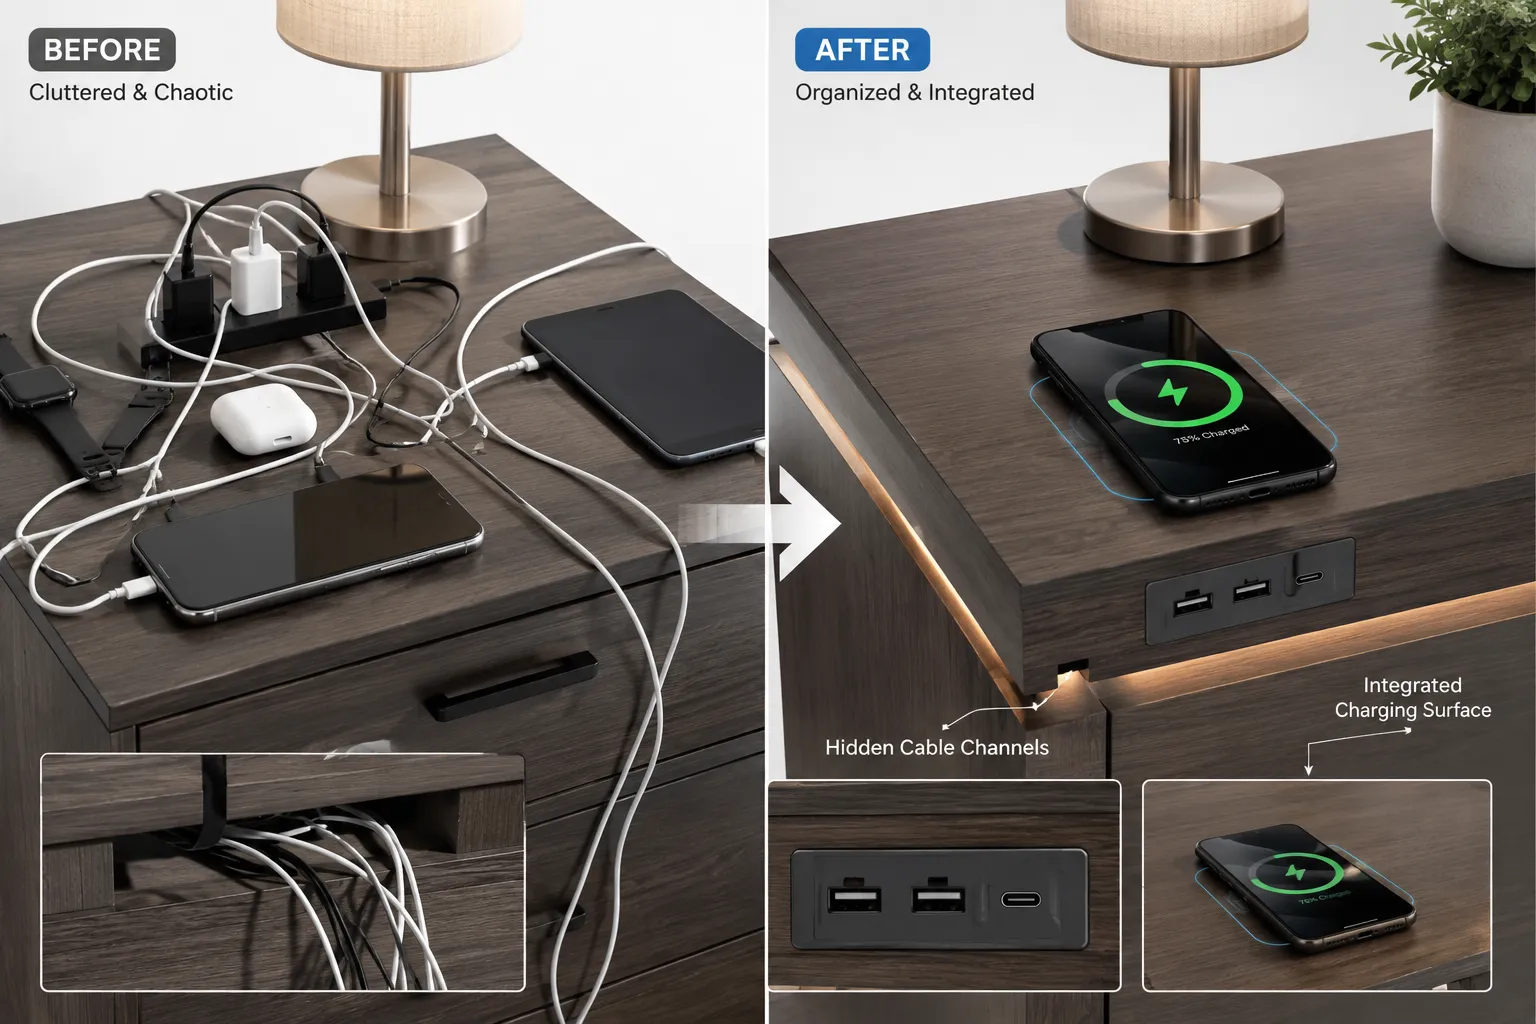
The modern bedside table is no longer just for lamps and books; it’s a command center for our devices. The key to successfully Designing Nightstands and Side Tables for Small Bedrooms: Turning Any Night Side Table into a Charging Hub lies in discreetly embedding charging functionality without creating a tangled mess of cords.
Essential Components for a Charging Hub
To convert a standard nightstand or side table into a functional charging station, consider these elements:
- Hidden Power Strip/Surge Protector: This is the heart of your charging hub. Choose a compact, flat-plug power strip with multiple outlets and, ideally, integrated USB ports. This allows you to plug in a lamp, alarm clock, and several charging cables into a single power source.
- USB Wall Charger/Hub: Many modern devices charge via USB. A dedicated USB hub, either integrated into the power strip or as a separate unit, can streamline charging for multiple phones, tablets, and wearables.
- Wireless Charging Pad (Qi Charger): For compatible devices, a wireless charging pad eliminates the need for a cable altogether. These can be surface-mounted, or even flush-mounted into the nightstand’s top for a truly seamless look. For DIY enthusiasts, a guide on DIY Modern Nightstands with Integrated Wireless Charging can provide detailed instructions.
- Cable Management Solutions: This is crucial for maintaining a clean aesthetic.
- Cable Clips/Ties: Secure cables to the back or underside of the nightstand.
- Cable Sleeves/Wraps: Bundle multiple cables together for a tidier appearance.
- Adhesive Cable Organizers: Small plastic or silicone clips that adhere to the table to hold charging cables in place when not in use.
- Drawer Organizers: If your nightstand has a drawer, use small bins to separate chargers and cables.
Retrofitting an Existing Nightstand
You don’t always need to buy new. Many existing nightstands or side tables can be transformed into charging hubs with a few modifications:
- Drilling Access Holes: Carefully drill small holes (just large enough for cable connectors) in the back panel or a discreet corner of the tabletop. These allow cables to pass through from devices to a hidden power source.
- Mounting Power Strips: Use strong adhesive strips or small screws to mount a power strip to the underside or inside the back panel of the nightstand. Ensure it’s easily accessible but out of sight.
- Creating a “Charging Drawer”: If your nightstand has a drawer, dedicate it to charging. Mount a power strip inside the back of the drawer, drill a small access hole in the back for the main power cord, and use drawer organizers to keep devices separated while charging.
- Adding a Charging Shelf: For open-shelf designs, consider adding a small, shallow shelf underneath the main surface to hide the power strip and excess cables.
- Building a Small Enclosure: For more advanced DIYers, a small, ventilated box can be built and attached to the back or underside of the nightstand to house the power strip and cables, completely out of sight. This also helps with heat dissipation.
“A truly integrated charging solution is one you barely notice until you need it. It’s about creating convenience through clever concealment.”
DIY New Builds and Advanced Charging Solutions for 2026
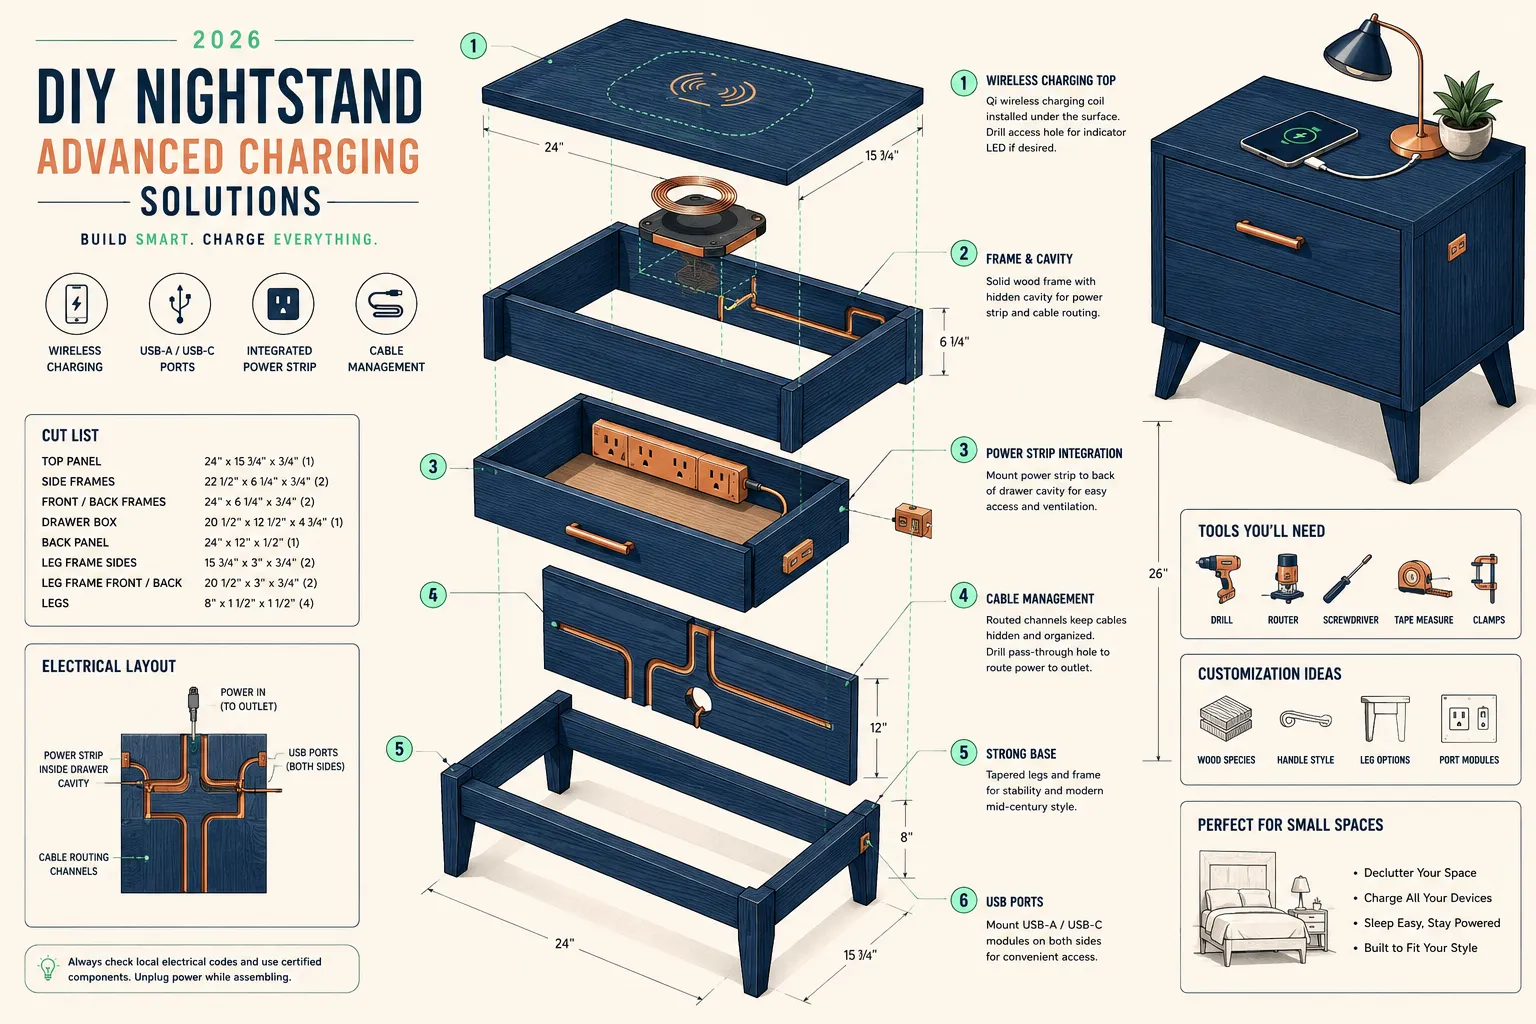
For those with woodworking skills or a desire for a truly bespoke solution, building a nightstand from scratch offers unparalleled customization. This section focuses on DIY projects that inherently support Designing Nightstands and Side Tables for Small Bedrooms: Turning Any Night Side Table into a Charging Hub from the ground up, incorporating advanced features for optimal functionality and aesthetics in 2026.
Designing a Nightstand with Built-In Cable Management
A new build allows for thoughtful integration of charging features:
- Routed Cable Channels: During construction, use a router to create channels or grooves on the underside of the top, back panel, or legs. These channels can guide charging cables neatly to a central power hub, keeping them completely out of sight.
- Dedicated Charging Compartment: Design a small, ventilated compartment within the nightstand, perhaps at the back or side, specifically to house a power strip and adapters. This compartment can have a hinged door or a removable panel for easy access.
- Integrated USB Ports and Outlets: Instead of relying on a power strip, consider installing flush-mount USB charging ports and even a standard electrical outlet directly into the nightstand’s surface or side. These components are readily available from hardware stores and online retailers.
- Wireless Charging Cutouts: Precisely cut a recess into the nightstand top to flush-mount a Qi wireless charging pad. This creates an invisible charging surface, requiring only that the device be placed on the designated spot.
- Concealed Cable Entry/Exit Points: Plan for small, strategically placed holes or slots that allow cables to enter and exit the nightstand, leading devices to their charging points without excessive visible wiring.
Materials and Tools for DIY Charging Nightstands
For a successful DIY project, the right materials and tools are essential.
- Wood Choices: Consider durable yet workable woods like pine, poplar, or plywood for structural components. For a premium finish, hardwoods like oak, maple, or walnut can be used, especially for visible surfaces.
- Joinery: Depending on your skill level, simple screw and glue joinery, or more advanced techniques like dadoes, rabbets, or even dovetails, can be employed for strength and aesthetics. Our guide on the ultimate guide to wood glue can help with adhesive selection.
- Tools:
- Table Saw: Essential for precise cuts. For small workshop setups, exploring options like the TS2412 Ridgid table saw or best table saw under $1500 is valuable.
- Router: Crucial for creating cable channels, flush-mount recesses, and decorative edges. Learn more about building your first router table or mastering the router table.
- Drill: For pilot holes and access holes for wiring.
- Sander: For smooth finishes.
- Measuring Tools: Squares, tape measure, calipers for accuracy.
Advanced Ideas for 2026
- Smart Home Integration: Design nightstands with a small, hidden compartment for smart home hubs (like Echo Dot or Google Nest Mini) or smart lighting controls, allowing them to blend seamlessly into the furniture. For inspiration, consider DIY smart home integration with custom woodwork.
- UV Sanitizing Drawer: Incorporate a small, shallow drawer with an integrated UV-C light for sanitizing phones and other small items while they charge.
- Motion-Activated Under-Table Lighting: Install a discreet LED strip on the underside of a floating nightstand that activates when you get out of bed, providing subtle pathway lighting without disturbing a partner.
- Modular Designs: Create nightstands with interchangeable components or modular shelves that can be reconfigured as your charging needs evolve.
By planning these features from the design phase, you can create a highly functional and integrated charging hub that truly complements a small bedroom.
Conclusion
Designing Nightstands and Side Tables for Small Bedrooms: Turning Any Night Side Table into a Charging Hub is more than just a matter of convenience; it’s about reclaiming peace and order in your personal space. By thoughtfully considering compact designs, implementing effective cable management, and integrating charging capabilities, whether through clever retrofits or ambitious new builds, you can transform a cluttered bedside into a functional and aesthetically pleasing hub. In 2026, technology continues to evolve, making seamless integration into our living spaces not just a luxury, but a necessity for modern living. Embrace these design principles to create a bedroom that is both highly functional and a true sanctuary.
Actionable Next Steps:
- Assess Your Needs: Catalog the devices you typically charge bedside and the amount of space available.
- Measure and Plan: Accurately measure your bedroom space to determine the maximum dimensions for your nightstand. Sketch out potential designs.
- Choose Your Approach: Decide if retrofitting an existing piece or building a new one best suits your skills and budget.
- Gather Materials and Tools: Purchase power strips, USB hubs, wireless chargers, and any necessary woodworking materials or tools.
- Implement Cable Management: Even before a full build, start with simple cable ties and clips to tidy up existing wires.
- Start Small: If building, consider a simpler design first, such as a floating shelf with a hidden power strip, before moving to more complex integrations.
Meta Title: Small Bedroom Nightstands: Charging Hub Design & DIY Guide 2026 Meta Description: Maximize space in 2026 with clever nightstand designs for small bedrooms. Learn to integrate charging hubs, manage cables, and DIY custom solutions.