

It’s a common misconception that intricate woodworking joints and perfectly profiled edges require industrial-grade machinery. In reality, with a well-designed router table, your existing handheld router can transform into a precision powerhouse, rivaling the capabilities of much more expensive dedicated tools. This article is your definitive guide to Building Your First Router Table: Essential Features and DIY Construction for Precision Routing, empowering you to unlock advanced capabilities in your workshop without breaking the bank.
A router table provides a stable, controlled environment for your router, allowing you to manipulate the workpiece with both hands while guiding it against a fence and through the cutter. This setup dramatically increases accuracy, safety, and the versatility of your router, making tasks like cutting dados, rabbets, cope-and-stick joinery, and decorative profiles not only possible but enjoyable.

Key Takeaways
- A DIY router table enhances a handheld router’s precision, safety, and versatility.
- Essential features include a flat, low-friction tabletop, a robust fence, a router lift or quick-mount system, and effective dust collection.
- Plywood and MDF are ideal materials for DIY construction due to their stability and workability.
- Safety is paramount; always incorporate features like featherboards and push blocks.
- Proper planning, accurate cuts, and secure assembly are crucial for a functional and durable router table.
Understanding the Essential Features for Precision Routing
When contemplating Building Your First Router Table: Essential Features and DIY Construction for Precision Routing, understanding the core components is paramount. These features dictate the table’s accuracy, ease of use, and ultimately, the quality of your work. Think of each element as a building block for consistent, repeatable results.
1. The Tabletop: Foundation of Precision
The tabletop is the most critical surface. It needs to be perfectly flat, rigid, and durable. Any warp or unevenness will directly translate to inaccuracies in your routed work.
- Material: High-quality Baltic birch plywood (¾-inch to 1-inch thick) or MDF (Medium Density Fiberboard) are excellent choices. MDF is often preferred for its exceptional flatness and density, though it requires sealing to prevent moisture absorption. A laminated surface (like high-pressure laminate or even a simple coat of polyurethane) will reduce friction, allowing workpieces to glide smoothly.
- Size: A common size ranges from 24×32 inches to 32×48 inches. Larger tops offer more support for bigger workpieces, while smaller tops save space.
- Insert Plate Recess: This is a crucial cutout designed to accept a router insert plate. The recess must be perfectly square and flat to ensure the insert plate sits flush with the tabletop. A slight lip or unevenness here will cause the workpiece to snag or tilt.
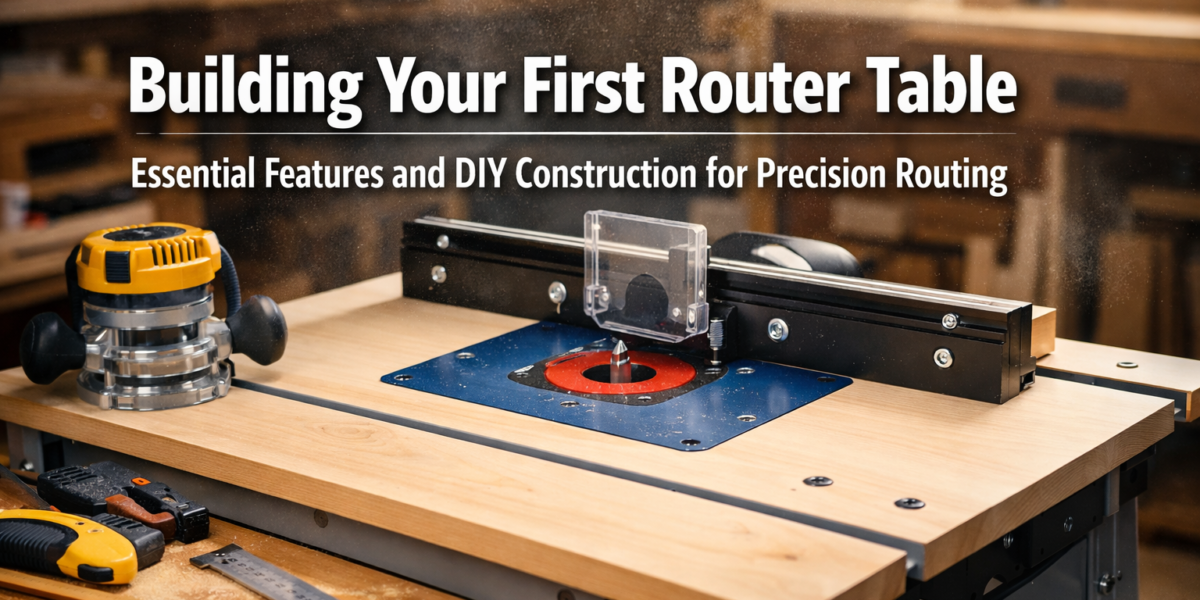
2. The Router Insert Plate: Connecting Router to Table
The router insert plate is the intermediary between your router and the tabletop. It allows for quick router installation and removal, and often facilitates bit changes from above the table.
- Material: Typically made from phenolic resin, aluminum, or thick plastic. Phenolic is a popular choice due to its strength, flatness, and resistance to warping.
- Leveling Mechanisms: Good insert plates include set screws or other mechanisms to precisely level the plate flush with the tabletop.
- Bit Openings: Many plates come with interchangeable reducing rings, allowing you to minimize the opening around the router bit for better dust collection and workpiece support, especially for smaller bits.
3. The Fence: Guiding Your Workpiece
A robust and precisely adjustable fence is non-negotiable for accurate routing. It guides your workpiece consistently past the router bit.
- Construction: A two-piece fence (split fence) is highly recommended. This design allows you to offset the outfeed fence to support the workpiece after a full-depth cut, crucial for jointing operations.
- Material: Again, high-quality plywood or MDF is suitable. Ensure the faces are perfectly flat and square to the tabletop.
- Adjustability: The fence should easily slide back and forth across the table and lock securely without deflecting. T-tracks embedded in the tabletop for clamping are a common and effective solution.
- Dust Port Integration: A dust collection port integrated into the fence is essential for capturing chips and dust right at the source, improving visibility and air quality.
4. Router Mounting and Adjustment: Power and Control
How your router is mounted and adjusted impacts convenience and precision.
- Fixed Base Mounting: For a permanent setup, a fixed-base router is often preferred, as it simplifies mounting to the insert plate.
- Router Lift (Optional but Recommended): While not strictly essential for your first table, a router lift dramatically enhances usability. It allows for precise height adjustments and bit changes from above the table without reaching underneath. For a DIY approach, a simple screw-drive mechanism can be built, or you can opt for a router with through-the-table adjustment capabilities.
5. Dust Collection: Keeping it Clean and Safe
Routing generates a tremendous amount of dust and chips. Effective dust collection is crucial for a clean shop, clear visibility, and your health.
- Primary Port: A 2.5-inch or 4-inch dust port integrated into the fence is the primary collection point.
- Under-Table Collection: Enclosing the area around the router underneath the table and adding a second dust port can significantly improve chip evacuation.
- Cabinet Enclosure: A fully enclosed cabinet below the tabletop creates a plenum effect, boosting dust collection efficiency.
6. Safety Accessories: Preventing Accidents
Safety should always be your top priority. Incorporate these accessories.
- Featherboards: Essential for holding workpieces firmly against the fence and tabletop, preventing kickback.
- Push Blocks/Sticks: Keep your hands away from the spinning bit, especially for narrow workpieces.
- Power Switch: A prominently located, easy-to-reach power switch (with a large paddle or foot pedal) that can quickly shut off the router in an emergency.
 image illustrating a schematic exploded view of a DIY router table, highlighting essential components like the](https://zsxkvszxbhpwnvzxdydv.supabase.co/storage/v1/object/public/generated-images/kie/2509b5d6-c8e9-4d1e-96ab-a30d01274fae/slot-1-1776573235687.png) )
)
DIY Construction Steps for Your First Router Table
Building Your First Router Table: Essential Features and DIY Construction for Precision Routing is a rewarding project that combines fundamental woodworking skills with careful attention to detail. This section outlines the key steps to construct a sturdy and accurate router table.
Step 1: Planning and Design 📐
Before cutting any wood, thorough planning is essential.
- Drawings: Sketch out your design, including dimensions for the tabletop, fence, and cabinet. Consider the space available in your workshop and the size of your typical workpieces.
- Material List: Create a detailed list of all materials (plywood, MDF, hardware, screws, bolts, T-tracks, dust port components, router plate).
- Router Compatibility: Confirm your router’s baseplate hole pattern matches the chosen insert plate or plan to drill new holes.
Step 2: Constructing the Cabinet 🏗️
The cabinet provides stability and houses the router, offering potential for enclosed dust collection.
- Cut Panels: Accurately cut the sides, top, bottom, and back panels from ¾-inch plywood or MDF. Precision is key here; use a track saw or a table saw with a crosscut sled for square cuts.
- Assembly: Join the panels using strong joinery methods like dados, rabbets, or pocket screws combined with wood glue. Ensure the cabinet is square and rigid. A strong cabinet prevents vibrations that can lead to inaccurate cuts. For structural integrity, refer to principles found in “Understanding Wood Movement: How to Design and Build Furniture That” when considering long-term stability.
- Internal Bracing: Add internal bracing as needed to support the tabletop and ensure overall rigidity.
Step 3: Preparing the Tabletop ⬆️
This is where precision is paramount.
- Cut Tabletop: Cut your chosen tabletop material to its final dimensions.
- Router Plate Recess: This step requires extreme accuracy.
- Using a template and a router, cut the recess for the insert plate. The depth must be precisely the thickness of your insert plate so it sits perfectly flush.
- Ensure the corners are square if your insert plate is square.
- Drill holes for the leveling screws that come with your insert plate.
- T-Tracks (Optional but Recommended): If you plan to use T-tracks for fence clamping or featherboards, rout grooves for them now.
- Laminate (Optional): If applying a high-pressure laminate, do so before mounting it to the cabinet.
Step 4: Building the Fence 🚧
A versatile fence is critical for accurate routing.

- Cut Fence Components: Cut the front and back fence pieces, and the top and bottom supports.
- Dust Port Hole: Rout a hole for your dust collection port in the back fence piece.
- Assembly: Assemble the fence, ensuring the faces are perfectly flat and square to the tabletop. Use glue and screws for strength. If building a split fence, ensure the two halves can be adjusted independently.
- Mounting System: Design a reliable clamping mechanism for the fence to the tabletop. This could involve T-bolts and knobs running in T-tracks, or simple C-clamps.
Step 5: Final Assembly and Finishing Touches ✨
Bring all the components together.
Mount Tabletop to Cabinet: Securely attach the tabletop to the cabinet. Use screws driven from the inside of the cabinet into the underside of the tabletop, allowing for slight wood movement.
Install Insert Plate: Place your router insert plate into its recess. Install and adjust the leveling screws until the plate is perfectly flush with the tabletop.
Mount Router: Attach your router to the insert plate according to the manufacturer’s instructions.
Dust Collection: Connect your dust collection system to the router table’s port(s).
Finishing: Apply a durable finish to all exposed wood surfaces, especially if using MDF, to protect against moisture and wear. A few coats of polyurethane or lacquer will create a slick, low-friction surface.
Accessories: Add featherboards, push blocks, and ensure your power switch is easily accessible and wired correctly.
“A router table isn’t just a stand for your tool; it’s an extension of your craftsmanship, demanding precision in its own construction to deliver precision in your projects.”
image demonstrating key construction steps for a DIY router table. This composite image shows three distinct stages: 1)](https://zsxkvszxbhpwnvzxdydv.supabase.co/storage/v1/object/public/generated-images/kie/2509b5d6-c8e9-4d1e-96ab-a30d01274fae/slot-2-1776573211399.png))
Maximizing Precision and Safety with Your Router Table
Having completed Building Your First Router Table: Essential Features and DIY Construction for Precision Routing, the next step is mastering its use to achieve unparalleled accuracy and maintain a safe working environment. Precision routing relies not just on the tool, but on the techniques and practices employed.
Achieving Precision Routing
- Bit Selection: Always choose the correct router bit for the task. Sharp, high-quality bits produce cleaner cuts and are safer. Match the bit’s rotation speed to the material and bit diameter.
- Test Cuts: Before routing a valuable workpiece, always make test cuts on scrap material. This allows you to fine-tune the bit height, fence position, and router speed.
- Feed Rate: Maintain a consistent, moderate feed rate. Feeding too fast can lead to tear-out, burning, and put excessive strain on the router. Feeding too slow can also cause burning. Listen to the router; it will tell you if you’re pushing it too hard.
- Multiple Passes: For deep or wide cuts, take multiple shallow passes. This reduces strain on the router and bit, minimizes tear-out, and results in a much cleaner cut.
- Climb vs. Conventional Cut: For most operations, use a conventional cut (feeding the workpiece against the rotation of the bit). A climb cut (feeding with the rotation) can be useful for reducing tear-out on difficult grain, but it requires much more control and can be dangerous if the router “grabs” the wood. Only use climb cuts with extreme caution and experience.
- Backer Boards: When routing across the end grain or performing operations prone to tear-out, use a backer board. This piece of scrap wood behind your workpiece prevents blow-out as the bit exits the material.
- Jigs and Fixtures: Embrace jigs and fixtures to enhance precision and repeatability. Custom jigs for specific tasks like raised panels, dovetails, or box joints can elevate your work significantly. For more on creating custom workshop solutions, consider exploring our guide on DIY Modular Desk Organizers: Custom Solutions for a Clutter-Free Woodworking Workspace.
Prioritizing Safety
Router tables, while incredibly useful, involve a spinning cutter that demands respect.
- Eye and Ear Protection: Always wear safety glasses or a face shield and hearing protection. The noise of a router can cause permanent hearing damage.
- Dust Mask/Respirator: Even with good dust collection, fine dust particles can become airborne. Wear a dust mask or respirator to protect your lungs.
- Clear Work Area: Keep your router table free of clutter. Ensure there’s enough space around the table for safe operation.
- Secure Router Bit: Before every use, double-check that the router bit is securely tightened in the collet. A loose bit can become a dangerous projectile.
- Proper Grip and Control: Always use push blocks, push sticks, and featherboards to keep your hands away from the spinning bit and maintain firm control over the workpiece. Never rely solely on your hands to guide small pieces.
- Unplug When Changing Bits: Always unplug the router or turn off the power at the main switch before changing bits, adjusting the router, or making any adjustments to the fence or insert plate.
- Emergency Stop: Know where your router table’s power switch is and ensure it’s easily accessible for a quick shutdown in an emergency.
- Workpiece Support: For long or heavy workpieces, use outfeed and infeed supports to maintain stability throughout the cut. This prevents the workpiece from tipping or binding.
- Router Bit Maintenance: Keep your router bits clean and sharp. Dull bits increase the risk of kickback, burning, and produce poor-quality cuts.
By integrating these precision techniques and safety protocols, your DIY router table will become an invaluable tool, allowing you to execute complex joinery and decorative profiles with confidence and finesse. From crafting intricate components for DIY Wooden Birdhouses: Advanced Designs with Precision Joinery to creating custom profiles for larger furniture pieces, your router table opens up a world of possibilities.
image depicting various precision routing operations being performed on a completed, functional DIY router table. The](https://zsxkvszxbhpwnvzxdydv.supabase.co/storage/v1/object/public/generated-images/kie/2509b5d6-c8e9-4d1e-96ab-a30d01274fae/slot-3-1776573206247.png))
Conclusion
Embarking on Building Your First Router Table: Essential Features and DIY Construction for Precision Routing is a transformative journey for any woodworker. It’s a project that not only yields a highly functional and indispensable tool but also sharpens your own woodworking skills in the process. By carefully considering the essential features – a flat tabletop, a robust fence, an effective router mounting system, and excellent dust collection – you lay the groundwork for a tool that will elevate the accuracy and sophistication of your future projects.
The DIY construction process, though demanding precision and patience, is incredibly rewarding. From selecting stable materials like plywood or MDF to meticulously cutting and assembling the components, each step contributes to a router table that is tailored to your needs and built to last. Remember, the investment of time and effort in creating a high-quality router table pays dividends in the form of cleaner cuts, more consistent results, and a safer woodworking experience.
Now that you have the knowledge to build and optimize your router table, take the next step. Gather your materials, plan your design, and start constructing this foundational tool for your workshop. The precision and versatility it unlocks will empower you to tackle more ambitious projects and refine your craft.
Actionable Next Steps:
- Review Plans: Revisit your chosen router table plans or draw up a detailed plan based on the essential features discussed.
- Source Materials: Purchase high-quality plywood or MDF, router insert plate, T-tracks, dust port components, and all necessary hardware.
- Prioritize Safety: Gather all necessary personal protective equipment (PPE) before you begin construction and commit to using it during all routing operations.
- Start Building: Begin with the cabinet, focusing on squareness and rigidity, then move to the tabletop and fence, emphasizing flatness and precision.
- Practice: Once built, practice on scrap wood to get accustomed to your new router table’s feel and capabilities before tackling your main projects.
