

The average person spends nearly 7 hours a day on their phone, often charging it overnight right next to their bed. This reliance on bedside charging, while convenient, frequently leads to a tangle of unsightly cables, bulky power strips, and cluttered surfaces, especially in compact living areas. The challenge intensifies in small bedrooms where every inch of space is precious and visual clutter can significantly detract from a sense of calm and order. Addressing this common modern dilemma, the solution lies in a thoughtful approach to bedroom furniture: DIY Floating Nightstands with Integrated Charging and Cable Concealment: Clean Bedroom Setups for Small Spaces. This article will guide you through creating functional, aesthetically pleasing, and space-saving nightstands that revolutionize your bedroom organization.
Key Takeaways
- Space Optimization: Floating nightstands free up floor space, making small bedrooms feel larger and more open.
- Integrated Technology: Design includes dedicated compartments for power strips and hidden cable channels for seamless device charging.
- Aesthetic Appeal: Achieve a minimalist, clean look by concealing all wires and chargers, enhancing bedroom tranquility.
- Customization Potential: DIY allows for tailoring dimensions, materials, and finishes to perfectly match your decor.
- Enhanced Functionality: Incorporate features like device pockets and wireless charging capabilities for modern convenience.
Designing Your DIY Floating Nightstands with Integrated Charging and Cable Concealment
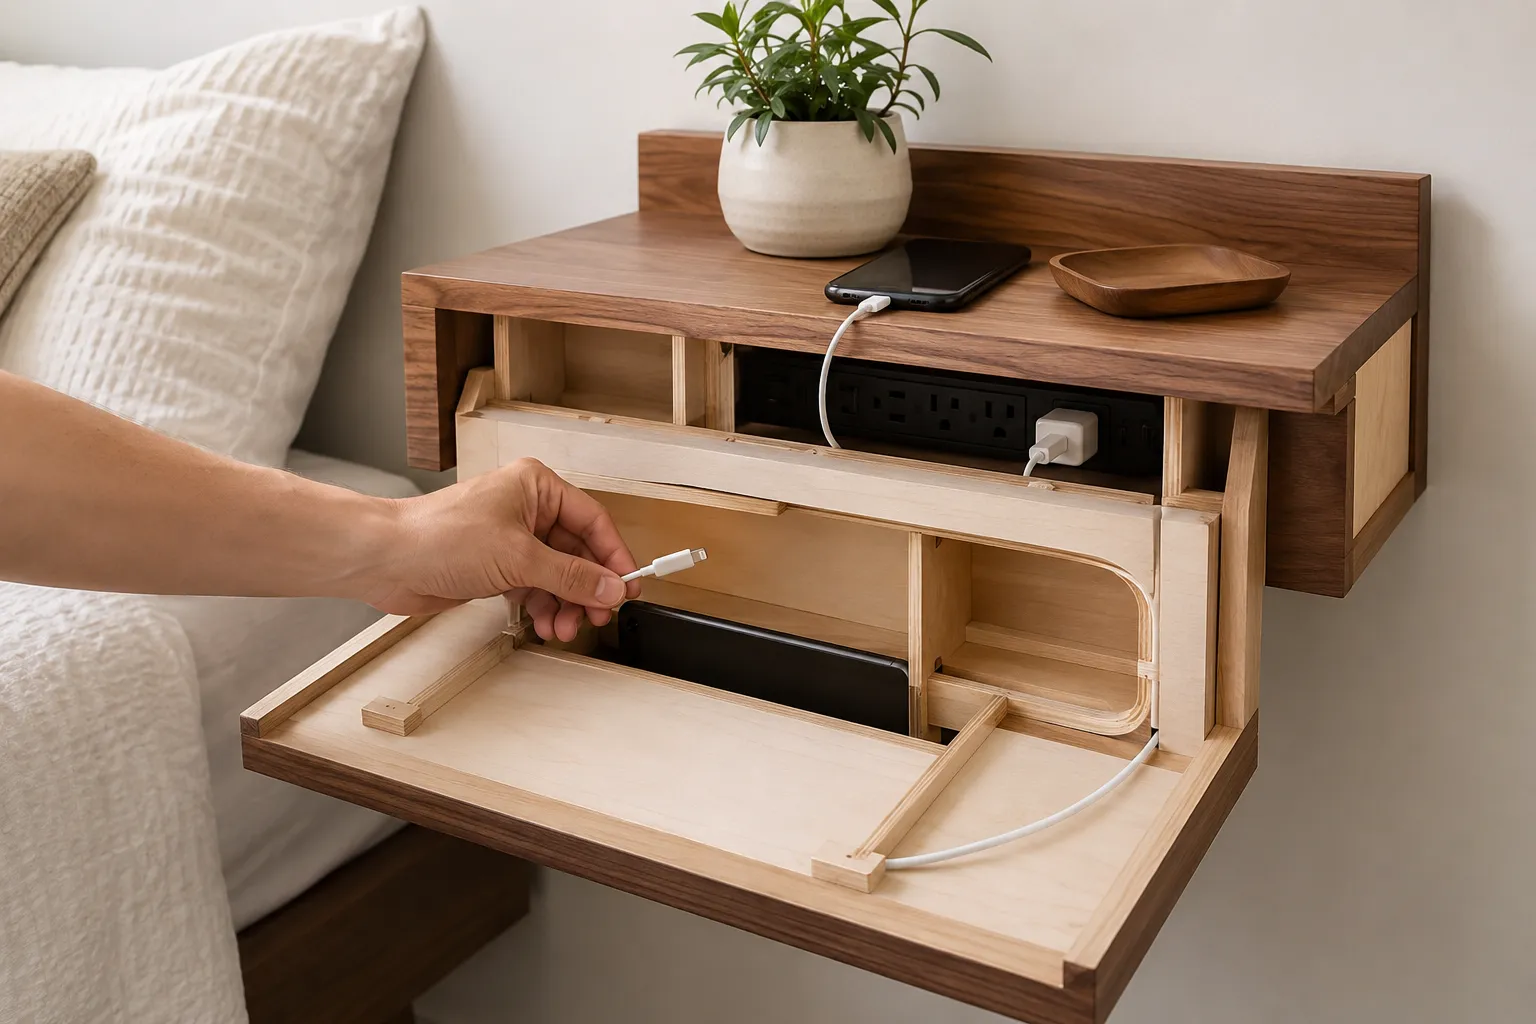
The foundation of a successful floating nightstand project begins with meticulous design. Unlike traditional nightstands, a floating design must consider not only aesthetics but also structural integrity for wall mounting and clever integration of electrical components. For small spaces, every design choice should prioritize compactness and multi-functionality.
Planning Dimensions and Style
Begin by measuring your available wall space beside the bed. Consider the height of your mattress and the ideal reach for items placed on the nightstand. A common height is level with or slightly above the mattress top. For small bedrooms, a depth of 8-12 inches and a width of 12-18 inches is often sufficient, providing surface area without overwhelming the room. Think about the style: a sleek, modern look with clean lines, a rustic feel with reclaimed wood, or perhaps a more intricate design with subtle curves. The chosen style will inform your material selection.
Materials like plywood, MDF, or solid wood boards are excellent choices. Plywood offers stability and can be finished beautifully, while solid wood provides durability and a premium feel. For a truly integrated look, consider matching the wood species or finish to existing furniture or trim in your bedroom.
Integrating Power and Cable Management
This is where the “integrated charging and cable concealment” truly comes to life. Your design must include specific areas for a compact power strip and pathways for cables.
Hidden Power Strip Compartment: Design an enclosed cavity, typically on the underside or back of the nightstand, large enough to house a small, surge-protected power strip. Ensure there’s a cutout for the main power cord to exit discreetly towards a wall outlet. This compartment should ideally have a removable panel for easy access to the power strip.
Cable Channels and Device Pockets:
- Internal Channels: Create grooves or routed pathways within the nightstand’s structure that lead from the power strip compartment to the top surface or side edges. These channels will guide charging cables.
- Device Pockets/Cutouts: For devices like smartphones, e-readers, or smartwatches, design small, recessed pockets on the top surface or along the front edge. These pockets can have small holes at their base, directly connecting to the internal cable channels, allowing charging cables to emerge only where needed and disappear when not in use.
- Wireless Charging Integration: For an even cleaner look, consider recessing a wireless charging pad directly into the top surface of the nightstand. The charging pad’s cable would then run through the internal channels to the hidden power strip. This is a highly effective way to achieve a truly wire-free top surface. For inspiration on organizing tech, consider how custom wood charging stations and desk organizers achieve similar clean aesthetics.
Diagram of Key Components for Cable Concealment:
| Component | Purpose | Design Consideration |
|---|---|---|
| Power Strip Compartment | Houses surge protector; central hub for power | Rear or underside, with removable access panel and ventilation. |
| Cable Channels | Routes individual charging cables discreetly | Routed grooves or hidden conduits, leading to device access points. |
| Device Pockets/Cutouts | Securely holds devices while charging | Recessed areas on top surface or front edge, with cable entry holes. |
| Main Power Cord Exit | Guides power strip cord to wall outlet | Small, strategically placed hole on the back panel, near the bottom. |
| Optional: Wireless Charger | Eliminates visible charging cables for compatible devices | Recessed flush into the top surface, cable routed internally. |
When planning your DIY Floating Nightstands with Integrated Charging and Cable Concealment: Clean Bedroom Setups for Small Spaces, remember that functionality and aesthetics must go hand-in-hand. A well-designed nightstand not only provides a place for your essentials but also actively contributes to a serene and organized bedroom environment.
Construction and Installation Techniques for a Clean Setup
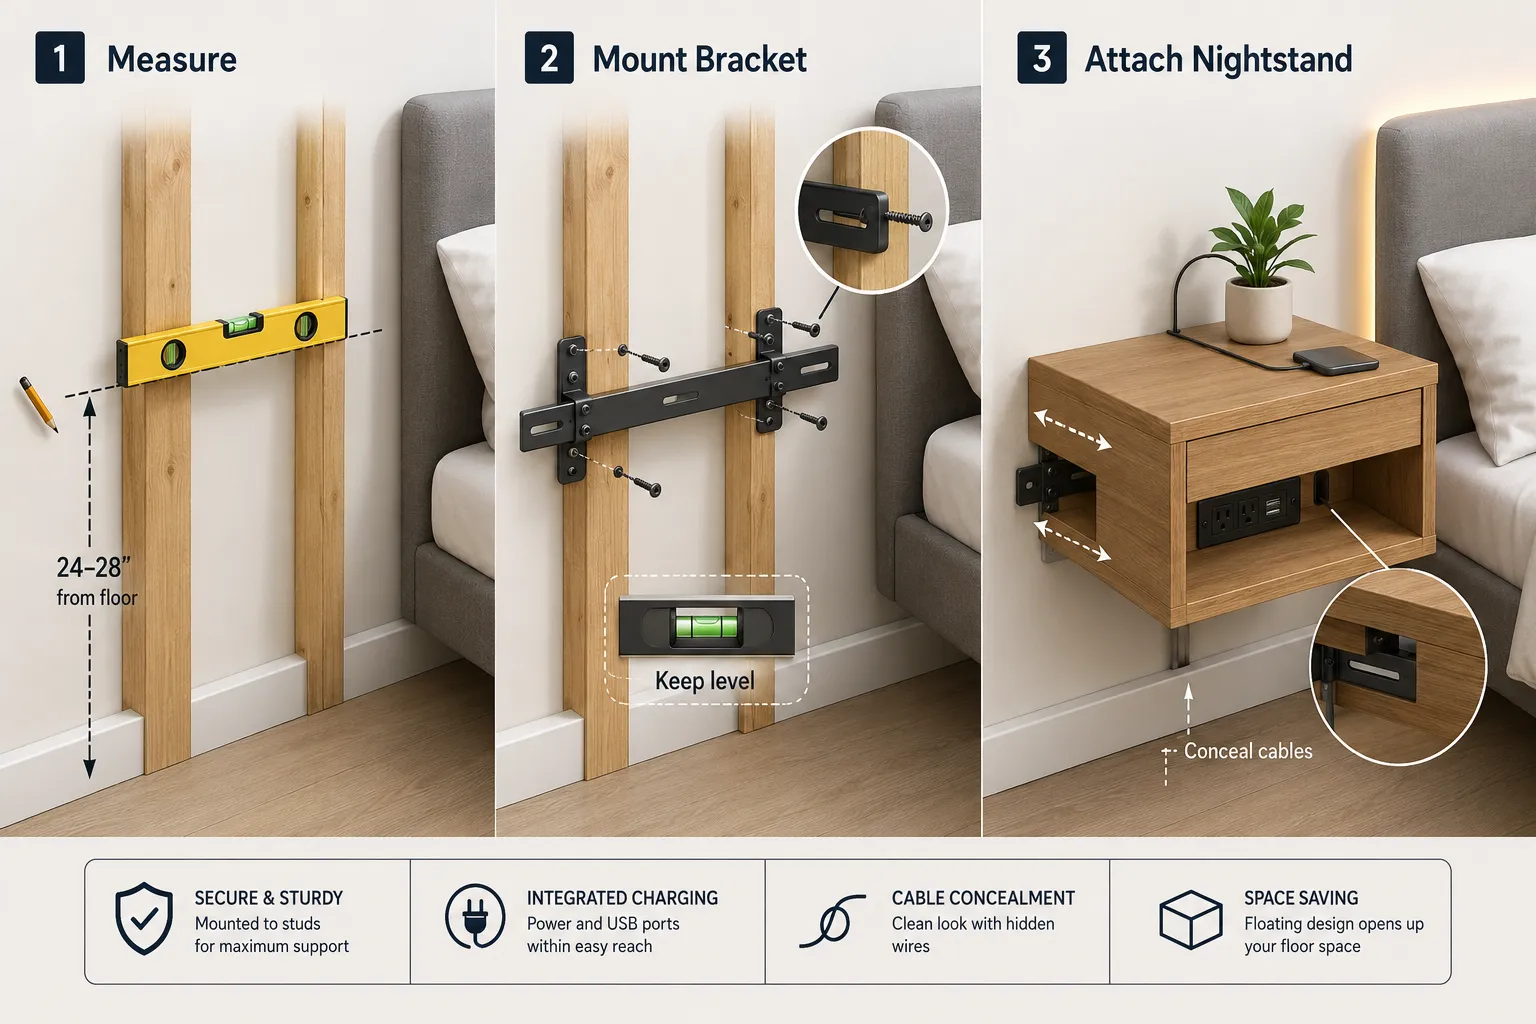
Building and installing DIY Floating Nightstands with Integrated Charging and Cable Concealment: Clean Bedroom Setups for Small Spaces requires precision, especially when dealing with wall mounting and electrical integration. Safety and stability are paramount for a lasting and functional piece.
Building the Nightstand Structure
Start by cutting your chosen wood to the dimensions planned. For strength and a clean finish, consider using joinery techniques appropriate for your skill level. Dovetail joints or dado and rabbet joints can provide excellent stability and a professional look, especially if you’re aiming for hidden drawers. For those newer to woodworking, pocket hole joinery offers a strong, fast alternative.
- Cutting and Assembling: Use a table saw or circular saw with a guide for accurate cuts. Assemble the main box structure first. Dry-fit all pieces before applying wood glue and fasteners.
- Creating Cable Channels: If routing channels for cables, do this before final assembly of the top and bottom panels. A router with a straight bit is ideal for creating clean grooves. Ensure channels are wide enough for your cables but not so wide that they compromise structural integrity.
- Power Strip Compartment: Construct the hidden compartment, often located at the back or underside. Ensure proper ventilation if you’re concerned about heat buildup from a power strip, though most modern power strips produce minimal heat. Drill precise holes for device cables to emerge on the top surface.
- Sanding and Finishing: Achieving a flawless finish is crucial for the overall aesthetic. Start with a coarser grit sandpaper (e.g., 80 or 100), progressively moving to finer grits (220 or 320). For guidance on achieving smooth surfaces, review techniques for beyond basic sanding. Apply your chosen finish, stain, paint, or clear coat, in thin, even layers.
Secure Wall Mounting and Cable Routing
The key to a truly “floating” nightstand is a robust and invisible mounting system.
- Locate Wall Studs: Use a stud finder to precisely locate wall studs. Floating furniture must be anchored into studs for stability. Mark their locations clearly.
- Choose Mounting Hardware:
- French Cleats: A popular choice for floating furniture, a French cleat consists of two interlocking pieces of wood, each with a 45-degree bevel. One piece attaches to the wall studs, the other to the back of the nightstand. This provides strong, easy-to-install support.
- Heavy-Duty Brackets: Metal L-brackets or hidden shelf brackets offer another secure option. Ensure they are rated for the weight of your nightstand and its contents. For more on secure shelf installation, see our guide on robust floating shelves.
- Install Mounting System: Attach the wall-side component of your chosen mounting system securely into at least two wall studs using appropriate lag screws or heavy-duty anchors. Use a level to ensure perfect alignment. If installing two nightstands, carefully measure and mark their positions to ensure symmetry and proper spacing from the bed.
- Attach Nightstand: Carefully lift the nightstand and align it with the wall-mounted hardware. Secure it firmly. Double-check for wobbling.
- Route Main Power Cable: Once mounted, route the power strip’s main cord down the wall. For a truly clean look, consider using an in-wall cable management kit, which involves cutting small holes in the drywall to run the cable behind the wall to a lower outlet. Always ensure this is done safely and according to local electrical codes. Alternatively, use paintable surface-mount cable channels that blend seamlessly with your wall.
By carefully executing these construction and installation steps, your DIY floating nightstands will not only look professionally made but also provide the integrated charging and cable concealment necessary for a truly clean bedroom setup.
Achieving a Clean Bedroom Aesthetic with Integrated Charging and Cable Concealment
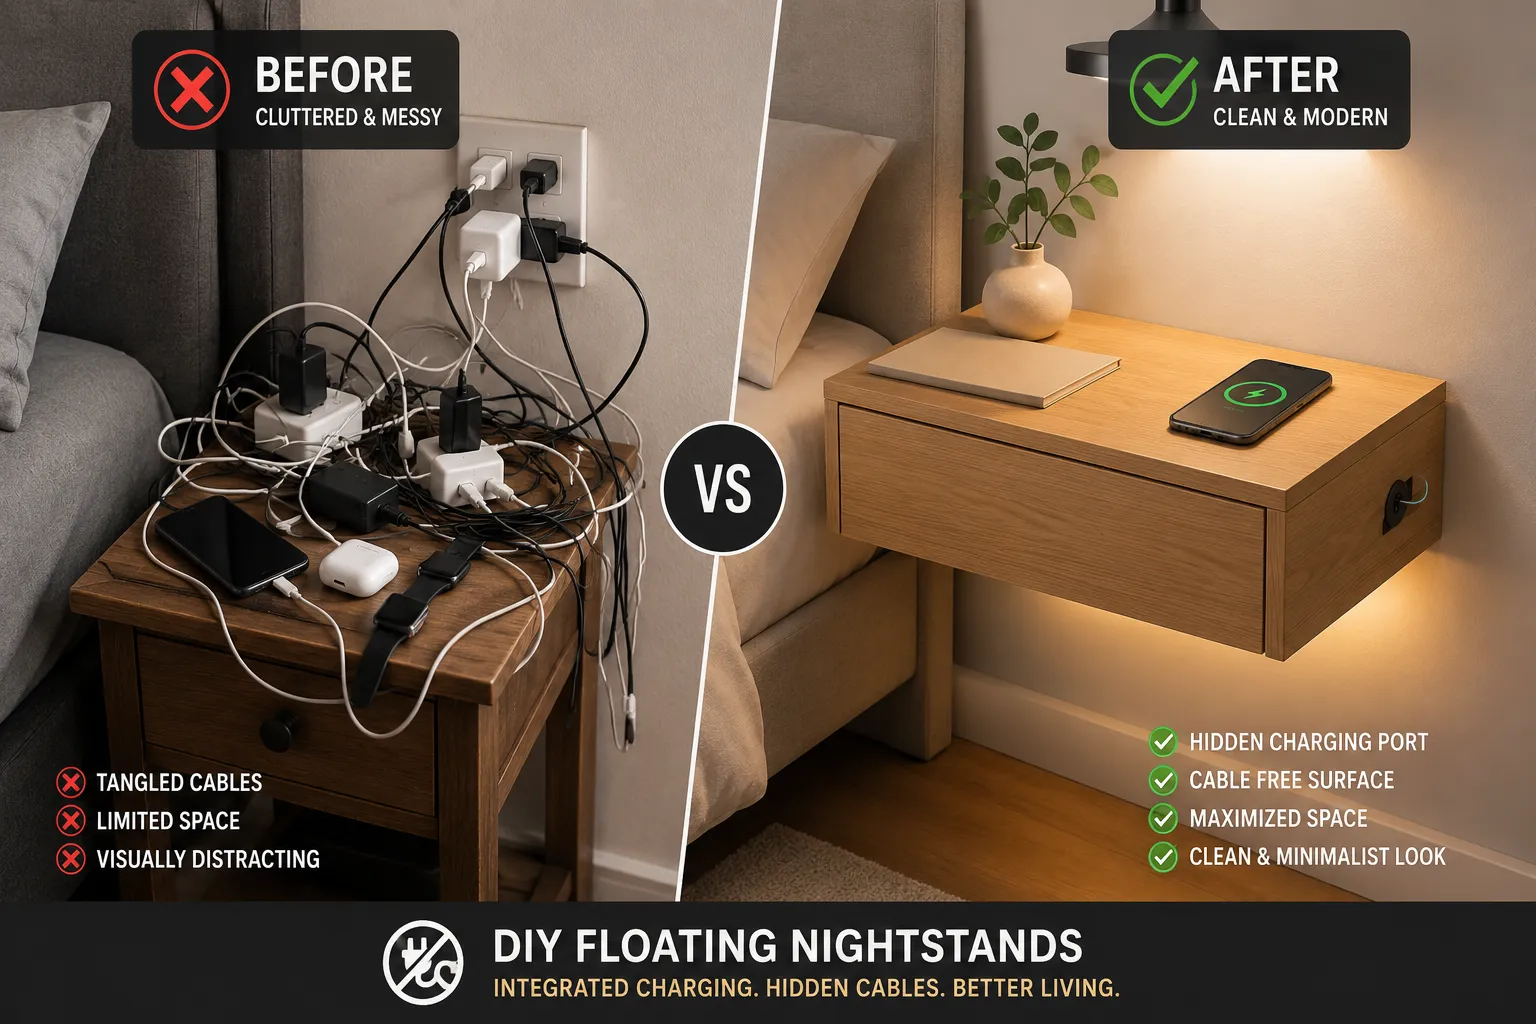
The ultimate goal of building DIY Floating Nightstands with Integrated Charging and Cable Concealment: Clean Bedroom Setups for Small Spaces is to transform your sleeping area into a sanctuary of calm and order. With your new nightstands installed, the focus shifts to maximizing their benefits for a minimalist and functional aesthetic.
Maximizing Storage and Minimizing Clutter
Floating nightstands, by their very nature, free up floor space, contributing to an airy feel. The integrated charging and cable concealment actively works against clutter on the surface.
- Dedicated Device Storage: Utilize the device pockets you designed. Place your phone, smartwatch, or earbuds directly into these recesses when charging. This keeps them off the main surface and prevents them from being accidentally knocked off.
- Minimalist Decor: Resist the urge to over-decorate the nightstand surface. One or two thoughtfully chosen items, a small plant, a minimalist alarm clock, or a framed photo, are usually sufficient.
- Drawer Organization: If your design includes a drawer, use drawer organizers to keep smaller items (pens, notepads, glasses, remote controls) neatly sorted. This prevents the “junk drawer” phenomenon and ensures everything has its place.
- Vertical Space: In small bedrooms, consider extending the clean aesthetic upwards with wall-mounted shelving above the nightstands for books or decorative items, further enhancing the sense of space. For more creative storage solutions, explore ideas like crafting multi-functional entryway organizers.
Safety and Maintenance for Your Integrated Charging System
While the hidden charging system is convenient, safety and proper maintenance are crucial.
- Power Strip Selection: Use a reputable, surge-protected power strip that is appropriately sized for the hidden compartment. Avoid overloading it.
- Cable Quality: Invest in high-quality charging cables that are less prone to fraying or overheating. Regularly inspect cables for any signs of wear and replace them as needed.
- Ventilation: Ensure the power strip compartment has adequate airflow, especially if multiple devices are charging simultaneously. Small ventilation holes or a slightly gapped access panel can help prevent heat buildup.
- Accessibility: Design the power strip compartment for easy, though discreet, access. This allows you to reset the power strip, unplug devices, or swap out chargers without damaging the nightstand or struggling with tight spaces.
- Regular Cleaning: Dust and debris can accumulate in cable channels and device pockets. Use a can of compressed air or a thin brush to keep these areas clean, preventing dust buildup that could impact charging efficiency or pose a fire risk.
Embracing the principles of DIY floating nightstands means more than just building furniture; it’s about curating a more organized, serene, and functional living space. These integrated solutions make your bedroom not just a place to sleep, but a truly clean and modern oasis.
Conclusion
The pursuit of a tidy, functional, and aesthetically pleasing bedroom, particularly in small spaces, often feels like an uphill battle against ubiquitous cables and encroaching clutter. DIY Floating Nightstands with Integrated Charging and Cable Concealment: Clean Bedroom Setups for Small Spaces offer a powerful, elegant, and personalized solution to this modern challenge. By taking control of your bedside environment through thoughtful design and careful execution, you can transform a cluttered corner into a minimalist haven.
These projects not only provide practical benefits like hidden power and streamlined charging but also contribute significantly to the overall sense of calm and spaciousness in your bedroom. The process empowers you to tailor every detail, from the choice of wood and finish to the precise placement of device pockets, ensuring the final product perfectly aligns with your style and needs. Beyond the immediate satisfaction of a clean bedside, you gain a custom piece of furniture that genuinely enhances your daily living.
For those ready to embark on this journey, begin by sketching your ideal design, considering the specific dimensions of your space and the devices you intend to charge. Gather your tools, select your materials, and approach each step, from cutting and assembly to mounting and cable routing, with precision and an eye for detail. The reward will be a beautifully organized, highly functional bedroom that promotes relaxation and eliminates cable chaos, a true testament to intelligent design and DIY ingenuity.
SEO Meta Title: DIY Floating Nightstands with Charging & Cable Concealment SEO Meta Description: Build DIY floating nightstands with integrated charging and hidden cables. Perfect for clean, minimalist bedroom setups in small spaces. Get organized in 2026.