
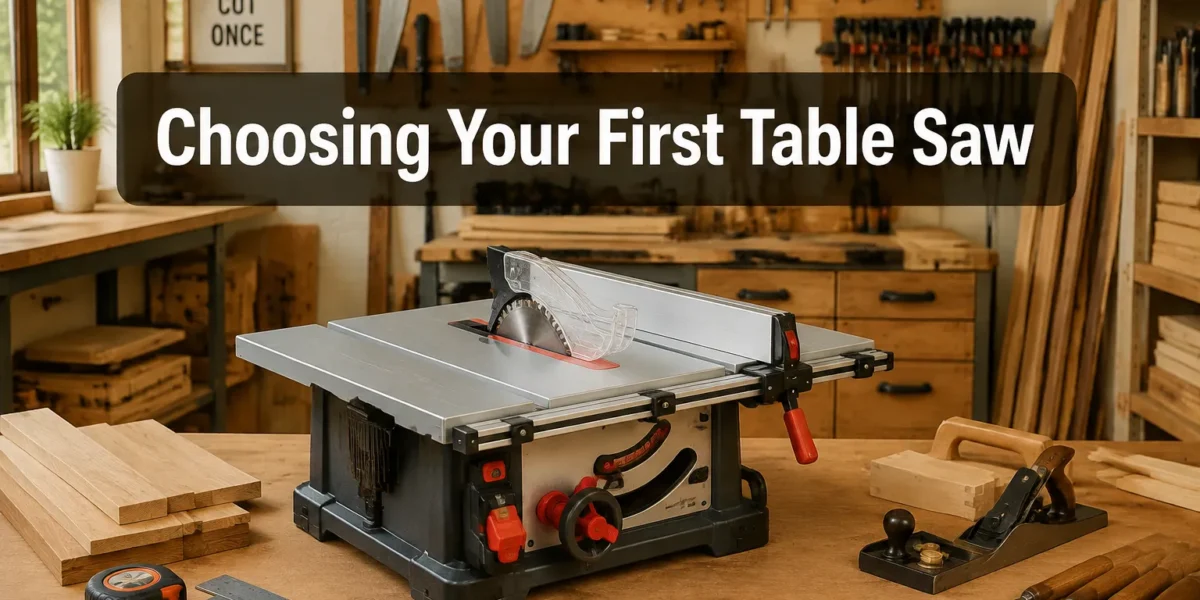
The notion that a beginner woodworker must spend a fortune on tools, especially a table saw, is a common misconception that often deters aspiring craftspeople. In reality, with careful consideration of features, unwavering commitment to safety, and a clear budget for small workshops, it’s entirely possible to select a first table saw that perfectly meets initial needs without breaking the bank or overwhelming a limited space. This guide provides a comprehensive overview for those looking to make an informed decision in 2026.
Key Takeaways
- Prioritize Safety Features: Always choose a table saw with essential safety mechanisms like a blade guard, riving knife, and anti-kickback pawls.
- Match Saw Type to Workspace: Benchtop and jobsite saws are ideal for small workshops due to their compact size and portability.
- Balance Features and Budget: Determine essential features for your projects and set a realistic budget, understanding that higher price often means better precision and durability.
- Understand Power Requirements: Consider the amperage and motor type to ensure the saw can handle the types of wood and cuts you plan to make.
- Don’t Skimp on Accessories: Factor in the cost of crucial accessories like a good quality blade, push sticks, and hearing/eye protection.
Beginner’s Guide to Choosing Your First Table Saw: Understanding Types and Key Features
Selecting your first table saw can feel like navigating a maze of specifications and jargon. For those with small workshops, the primary concerns typically revolve around space, power, and versatility. Understanding the different types of table saws available and their core features is the first step in making an informed choice.
Types of Table Saws for Small Workshops
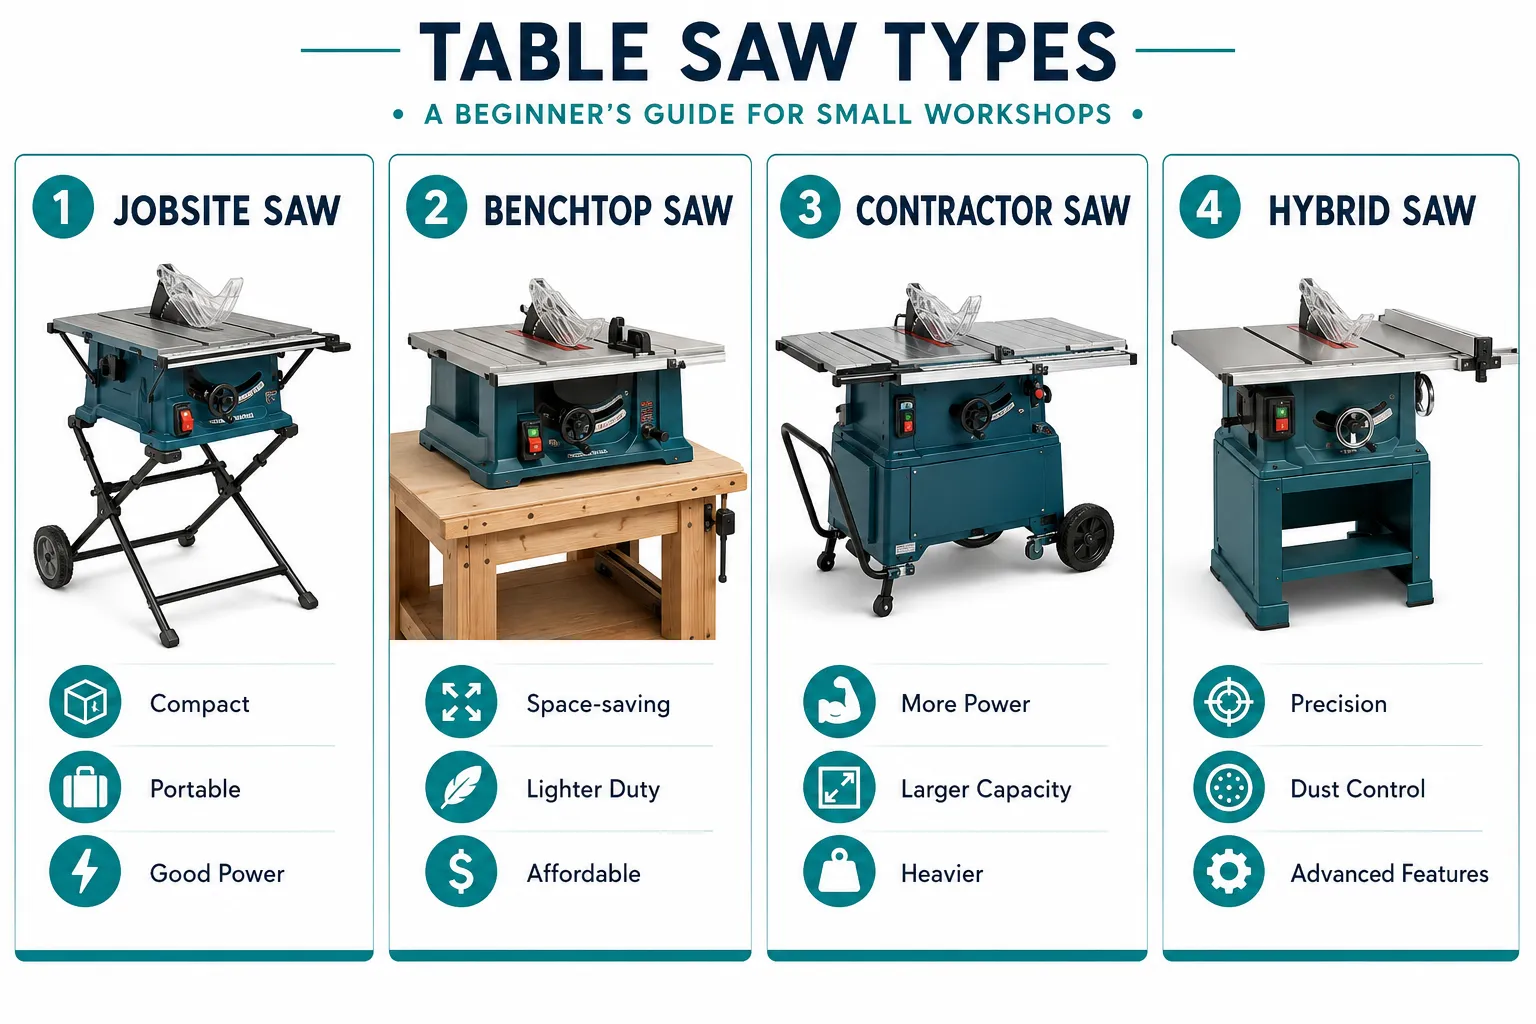
For beginners, especially those working in limited spaces, three main types of table saws are most relevant:
- Benchtop Table Saws: These are the smallest and most affordable option. They are designed to be placed on an existing workbench or a dedicated stand.
- Pros: Highly portable, excellent for very small workshops, generally the lowest cost.
- Cons: Less powerful motors, smaller table surface, often lower build quality, limited rip capacity.
- Best For: Light-duty projects, occasional use, extreme space constraints.
- Jobsite Table Saws: A step up from benchtop models, jobsite saws are designed for portability and often come with integrated folding stands with wheels. They offer a good balance of power and portability.
- Pros: More powerful motors than benchtop saws, larger rip capacity, sturdy enough for most DIY projects, easy to move around.
- Cons: Still more compact than full-size saws, can be noisy, dust collection can be less efficient.
- Best For: DIY enthusiasts, frequent use in small or shared spaces, those needing to move their saw often.
- Contractor Table Saws: While larger than jobsite saws, some compact contractor models can fit into small workshops, especially if placed on a mobile base. These offer more power and precision.
- Pros: More robust construction, larger cast-iron tables, better precision, typically more efficient dust collection.
- Cons: Less portable, require more dedicated space, higher price point.
- Best For: Serious hobbyists, those doing more intricate work, or those with slightly more permanent workshop space.
Essential Features to Look For
When considering any table saw, specific features will directly impact its performance, ease of use, and your overall woodworking experience.
- Motor Power (Amperage/Horsepower): For most beginner and small workshop tasks, a 10-amp to 15-amp motor (or 1.5-2 HP for contractor saws) is sufficient. This allows you to cut through common hardwoods and softwoods without bogging down.
- Rip Capacity: This refers to the maximum width of material you can cut to the right of the blade using the fence. For general woodworking, a rip capacity of 24 inches or more is highly desirable, allowing you to cut down full sheets of plywood or large boards.
- Table Size and Material: A larger, flatter table provides better support for your workpieces and improves accuracy. Cast iron is ideal for stability and reduced vibration, but aluminum or steel are common on lighter models.
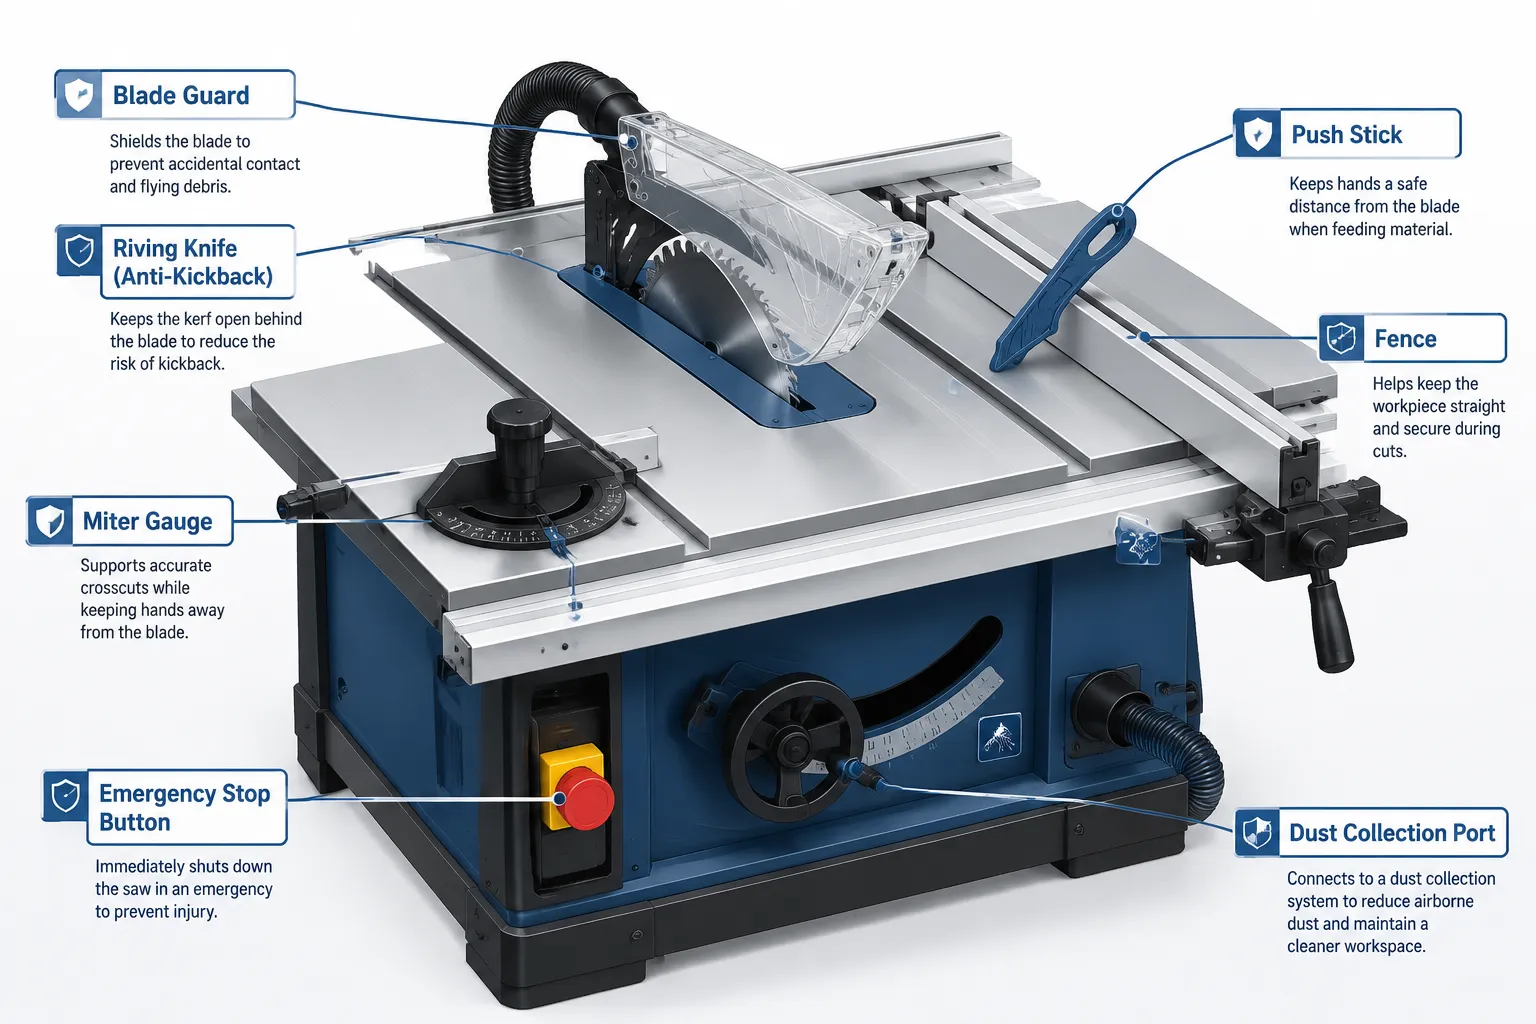
- Fence System: The fence is critical for accurate rip cuts. Look for a fence that locks securely at both ends, moves smoothly, and remains parallel to the blade. A T-square style fence is generally preferred over a weaker cam-lock style.
- Miter Gauge: Used for cross-cutting and angled cuts, a basic miter gauge is included with most saws. However, often the stock gauges are flimsy; consider upgrading to an aftermarket precision miter gauge for better accuracy.
- Blade Rake and Depth Adjustment: Ensure the controls for adjusting blade height and angle (for bevel cuts) are smooth, easy to operate, and lock securely.
- Dust Collection Port: Table saws generate a lot of sawdust. A good dust port (typically 2.5 inches for smaller saws, 4 inches for larger) allows you to connect a shop vacuum or portable dust collection system to keep your workspace cleaner and protect your lungs.
- Onboard Storage: For small workshops, storage for the fence, miter gauge, and other accessories is a convenient feature that helps keep your space organized.
Prioritizing Safety in Your First Table Saw Purchase
No feature is more important than safety when it comes to a table saw. These powerful machines can cause serious injury if not used correctly and if key safety mechanisms are absent or ignored. When choosing your first table saw, scrutinize its safety features above all else.
Essential Table Saw Safety Features
Modern table saws come equipped with several critical features designed to prevent common accidents, such as kickback and blade contact.
- Blade Guard: This transparent cover sits over the blade, preventing accidental contact with the spinning blade and helping to contain sawdust. It is designed to lift as the material passes through.
- Riving Knife: This thin piece of metal, slightly thinner than the blade, sits directly behind it. Its primary function is to prevent the kerf (the cut slot) from closing up and pinching the blade, which is a major cause of kickback. Always ensure the riving knife is aligned with the blade.
- Anti-Kickback Pawls: Located on the blade guard assembly, these toothed pawls dig into the workpiece if it tries to move backward (kickback), helping to stop the material.
- Push Sticks and Push Blocks: While often considered accessories, a quality push stick and push block are indispensable safety tools. They keep your hands away from the blade when cutting narrow pieces or the end of a long board.
- Emergency Stop Button: A large, easily accessible button that quickly cuts power to the saw is a crucial feature, allowing you to shut down the machine instantly in an emergency.
- Power Switch Location: The power switch should be easy to reach from your operating position and, ideally, should require a deliberate action (like lifting a cover) to turn on, preventing accidental startups.
- Blade Brake: Some higher-end saws include a blade brake that stops the blade almost instantly after the power is cut, significantly reducing the chance of accidental contact.
- Flesh-Sensing Technology: High-end saws like SawStop models incorporate advanced technology that detects contact with skin and stops the blade within milliseconds. While these saws are typically outside a beginner’s budget, they represent the pinnacle of table saw safety.
“Safety should never be an afterthought when operating a table saw. The investment in a saw with robust safety features and the commitment to proper technique are paramount for any woodworker, especially beginners.”
Beyond Built-in Features: Safe Practices
Even with the best safety features, user practice is critical. For a beginner’s guide to choosing your first table saw, it’s important to also consider how the saw design supports safe operation.
- Stability: A stable saw that doesn’t wobble is safer. For benchtop saws, ensure your workbench is sturdy. For jobsite saws, make sure the stand is locked properly.
- Adequate Outfeed Support: When cutting long pieces, the material exiting the saw needs support. This can be an outfeed table, rollers, or a second workbench. Neglecting outfeed support can lead to dangerous kickback. Consider building a dedicated wooden work table for this purpose.
- Clear Workspace: Maintain a clean and uncluttered area around your table saw. Obstacles can lead to tripping or hinder material flow, creating hazards.
Beginner’s Guide to Choosing Your First Table Saw: Budgeting for Small Workshops
Budgeting for your first table saw for a small workshop involves more than just the saw’s price tag. You need to account for essential accessories, potential upgrades, and ongoing costs. A well-planned budget ensures you get a functional and safe setup without overspending or cutting corners where it matters most.
Setting a Realistic Budget
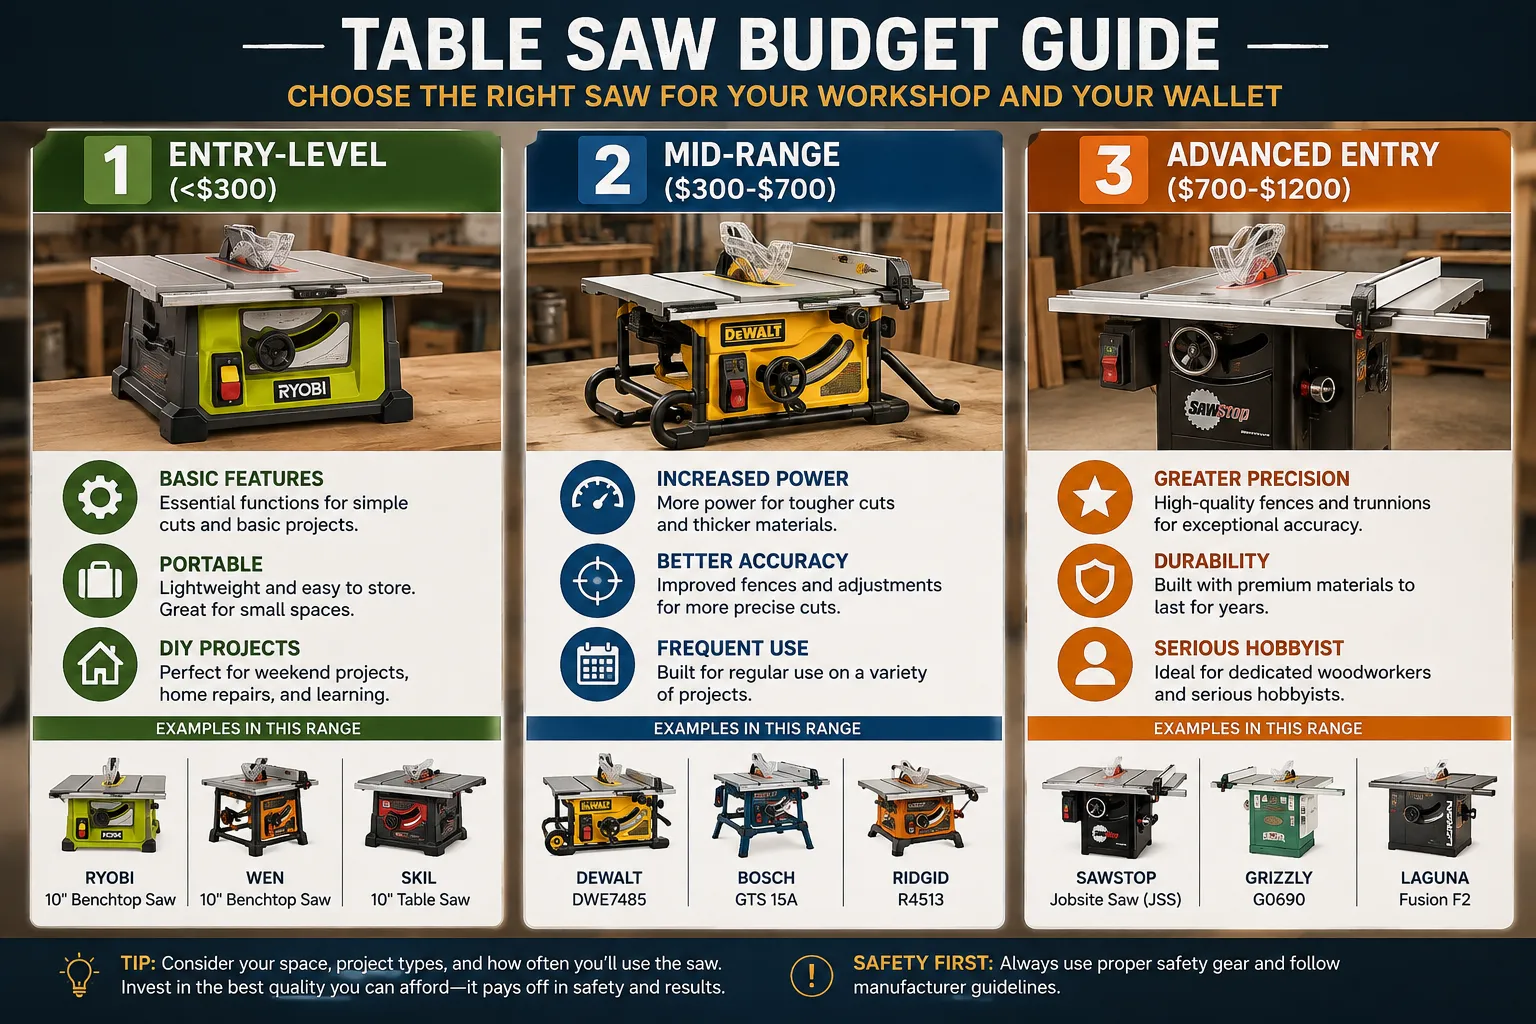
Table saw prices vary widely, from under $150 for basic benchtop models to several thousand for cabinet saws. For a beginner in a small workshop, a realistic budget typically falls within the $200 to $700 range for a quality benchtop or jobsite saw.
- Entry-Level Benchtop Saws ($150-$300): These are the most budget-friendly. They’re good for occasional DIY projects and small cuts. Expect basic features, less power, and often less precision. Brands like Ryobi or Skil offer options in this range. For specific options, see our guide on Ryobi tools for DIY woodworkers.
- Mid-Range Jobsite Saws ($300-$700): This is often the sweet spot for many beginners. You get significantly more power, better fence systems, and greater rip capacity. Brands like DeWalt, Bosch, and occasionally Ridgid (such as the Ridgid TS2412) offer excellent value here.
- High-End Entry/Compact Contractor Saws ($700-$1200): If your budget allows and you anticipate more serious or precise work, stepping into this range offers higher quality components, better dust collection, and enhanced precision. These might include models like the Delta 36-600 or certain SawStop jobsite models if you find a good deal. For those specifically looking at options under $1500, check out our best table saw under $1500 guide.
Don’t Forget Essential Accessories and Upgrades
The price of the saw itself is just part of the equation. Allocate a portion of your budget for these crucial items:
- High-Quality Blade ($40-$80): The stock blade that comes with most saws is often a general-purpose, lower-quality blade. Investing in a good thin-kerf combination blade (e.g., 40-tooth or 50-tooth ATB) will dramatically improve cut quality and reduce tear-out. A dedicated rip blade or crosscut blade can be added later.
- Safety Gear ($30-$60): Eye protection (safety glasses), hearing protection (earmuffs or earplugs), and a good dust mask are non-negotiable.
- Push Sticks/Push Blocks ($15-$40): While some saws include one, having a variety of high-quality push sticks and blocks is essential for safe cutting.
- Dust Collection ($50-$200+): At a minimum, you’ll need a shop vacuum and appropriate hose adapters to connect to your saw’s dust port. For more serious dust control, consider a dedicated portable dust collection system.
- Mobile Base ($50-$100): Even for jobsite saws, a mobile base can make moving a heavier saw around a small workshop much easier and more efficient, allowing you to reclaim floor space when the saw isn’t in use.
- Aftermarket Miter Gauge/Fence ($70-$200+): If your chosen saw has a weak stock fence or miter gauge, budgeting for an upgrade can significantly improve accuracy and safety. However, this can be a later upgrade once you’re comfortable with the saw.
Maximizing Your Small Workshop Space
Choosing the right table saw also means considering its footprint. Benchtop and jobsite saws are naturally better suited for small spaces because of their compact size and portability. Many jobsite saws come with integrated folding stands that allow them to be stored vertically against a wall when not in use, a huge advantage for tight workshops. Additionally, considering your overall small workshop layout for 2026 can help you integrate your new table saw effectively.
Conclusion
Choosing your first table saw for a small workshop is a significant step in your woodworking journey. By carefully evaluating the types of saws, prioritizing essential safety features, and setting a realistic budget that includes crucial accessories, you can confidently select a tool that will serve you well for years to come. Remember that a table saw is an investment not just in your projects, but in your safety and the quality of your craft. Take your time, do your research, and always err on the side of caution. With the right table saw, your small workshop will become a hub of creativity and precision in 2026.
Actionable Next Steps:
- Assess Your Needs: List the types of projects you plan to tackle, the materials you’ll use, and the frequency of use.
- Measure Your Space: Accurately measure your available workshop space, including storage options, to determine the maximum footprint your saw can occupy.
- Set Your Budget: Define a clear budget range, remembering to account for essential accessories beyond the saw itself.
- Research Models: Based on your needs and budget, research specific benchtop or jobsite table saw models from reputable brands. Read reviews and watch demonstrations.
- Prioritize Safety: Confirm that any model you consider includes a blade guard, riving knife, and anti-kickback pawls.
- Plan for Accessories: Factor in the cost of a good blade, safety gear, push sticks, and basic dust collection into your total budget.