


In 2026, respiratory health in woodworking environments remains a critical concern, with studies consistently linking airborne wood dust to various health issues, including asthma and certain cancers (American Thoracic Society, 2022). For the hobbyist or professional working in a compact space, the challenge of maintaining pristine air quality without breaking the bank can seem daunting. However, it is entirely possible to construct an effective and affordable solution. This article focuses on Building a DIY Dust Collection System for a Small Workshop: Optimizing Air Quality and Efficiency on a Budget, providing comprehensive guidance to help woodworkers breathe easier and work cleaner. This guide will walk through designing, sourcing, and assembling a system that not only captures fine dust but also enhances overall workshop efficiency.
Key Takeaways
- Prioritize Air Quality: Fine wood dust poses significant health risks; an effective dust collection system is crucial for a safe working environment.
- Budget-Friendly Components: DIY systems leverage affordable materials like PVC, trash cans, and repurposed shop vacs, making effective dust collection accessible.
- Strategic Design is Key: Optimizing ductwork layout, minimizing turns, and positioning collection points strategically maximize efficiency in small workshops.
- Two-Stage Filtration is Essential: Implementing a cyclone separator before the main filter drastically improves performance and extends filter life.
- Regular Maintenance is Non-Negotiable: Consistent cleaning of filters, emptying dust bins, and inspecting ductwork ensures long-term system effectiveness.
Designing Your DIY Dust Collection System for a Small Workshop: Optimizing Air Quality and Efficiency on a Budget
The cornerstone of any effective dust collection system, especially in a small workshop, is careful planning. Building a DIY Dust Collection System for a Small Workshop: Optimizing Air Quality and Efficiency on a Budget starts with understanding your needs, the types of dust generated, and the layout of your space.

Assessing Your Workshop’s Needs and Dust Sources
Before sketching out a design, take stock of your workshop.
- Tool Inventory: List every dust-producing tool you use, from a table saw and miter saw to sanders and planers. Note their dust port sizes.
- Dust Type: Different tools create different kinds of dust. Saws produce larger chips and coarse dust, while sanders generate extremely fine, harmful particles. Your system must handle both effectively.
- Space Constraints: Small workshops demand creative solutions. Measure your available wall space, ceiling height, and floor footprint.
- Power Availability: Consider the electrical requirements for your dust collector motor. Most DIY systems can run on standard 15-amp circuits.
For example, a small workshop primarily focused on fine detail work might need a system optimized for capturing ultra-fine dust, whereas a shop dedicated to dimensioning lumber would prioritize chip collection.
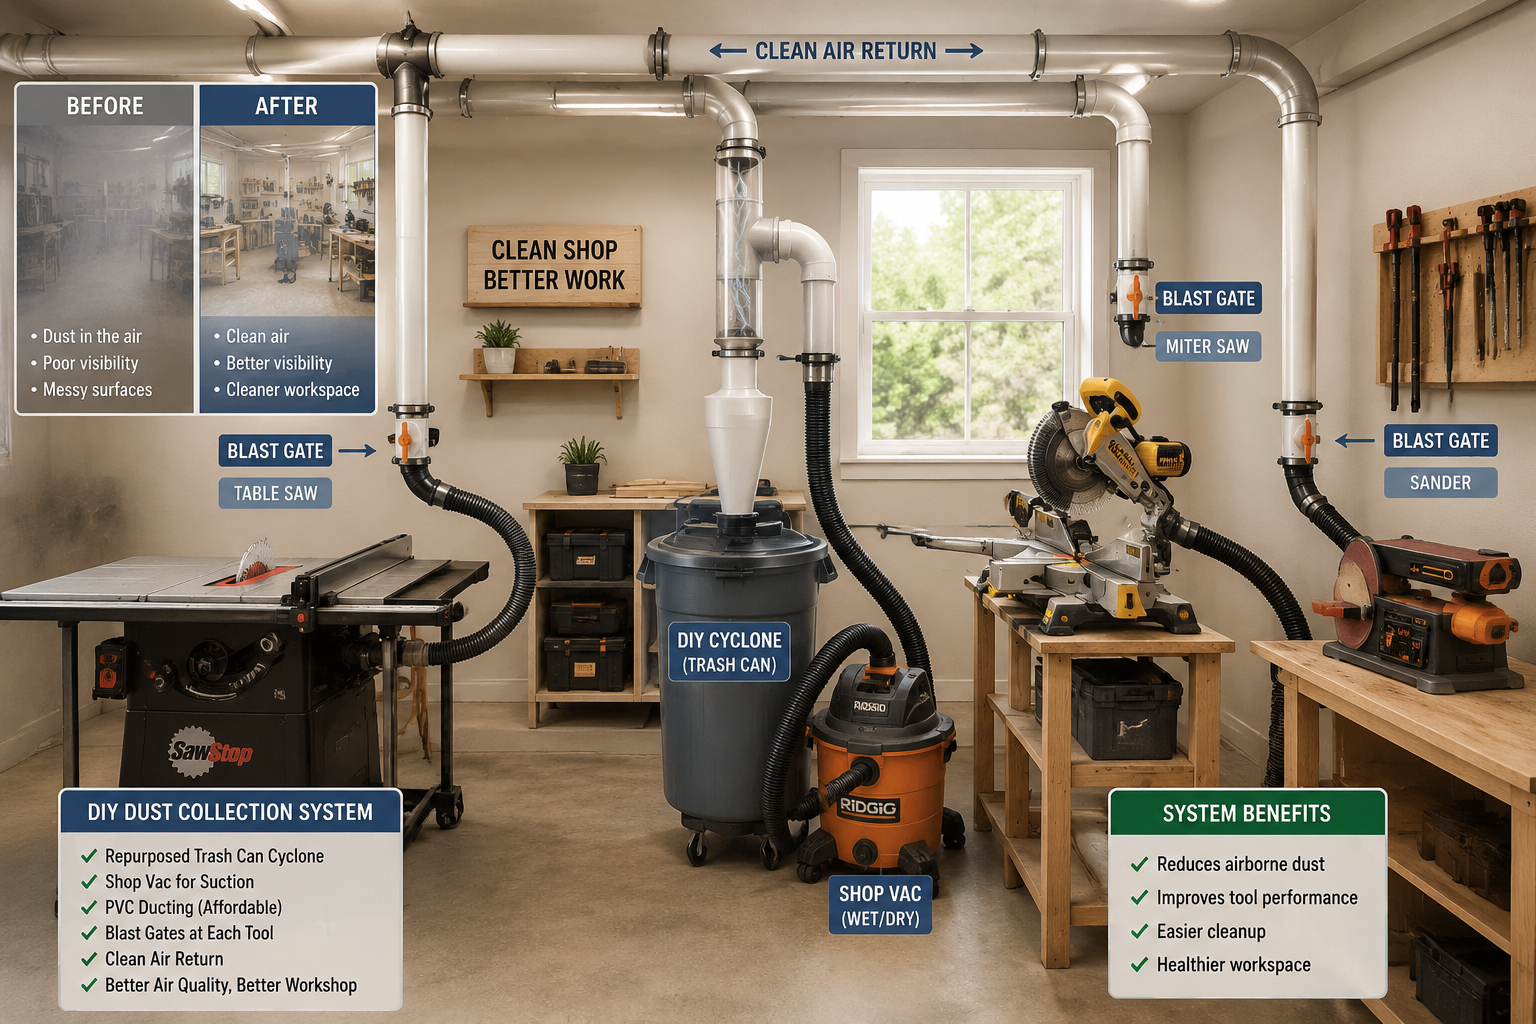
Essential Components of a DIY System
A robust DIY dust collection system typically consists of several key elements:
- Dust Collector/Vacuum Unit:
- Shop Vacuum: For budget-conscious setups or for tools that produce less volume, a standard shop vacuum can be adapted. Look for models with higher CFM (Cubic Feet per Minute) and W/A (Air Watts).
- Dedicated Dust Collector: For larger tools and more frequent use, a 1HP to 1.5HP dust collector unit offers superior airflow. Used units can often be found at a significant discount.
- Pre-Separator (Cyclone or Thien Baffle): This is arguably the most critical component for a DIY system’s efficiency and filter longevity.
- Cyclone: A conical or cylindrical device that spins air, causing heavier dust particles to drop into a collection bin before reaching the main filter. This dramatically reduces filter clogging.
- Thien Baffle: A simpler, flat baffle installed in a trash can lid that achieves similar separation.
- Ductwork:
- Rigid Ducting: PVC pipes (typically 4-inch or 6-inch diameter) are popular for their affordability and smooth interior, which minimizes airflow resistance. Metal ductwork is also an option but often more expensive.
- Flexible Hoses: Used for connecting tools to the rigid ductwork, allowing for movement and quick connections.
- Blast Gates: These essential valves allow you to open and close specific branches of your ductwork, directing airflow to the active tool and maximizing suction.
- Filtration:
- High-Efficiency Filters: Crucial for capturing fine dust. Look for filters rated for 1 micron or less (e.g., HEPA filters). Cartridge filters are more efficient than bag filters.
Planning Your Layout and Ductwork
Efficient layout minimizes static pressure loss and maximizes suction where you need it most.
- Central Location: Position your main dust collector unit as centrally as possible to minimize duct run lengths.
- Main Trunk Line: Run a primary, larger-diameter duct (e.g., 6-inch) along a wall or ceiling. Branch off to individual tools with smaller ducts (e.g., 4-inch).
- Minimize Bends: Every 90-degree bend significantly reduces airflow. Use two 45-degree elbows instead of one 90-degree where possible.
- Shortest Runs: Connect high-dust-producing tools (table saw, planer) with the shortest, straightest runs to the main trunk.
- Tool-Specific Connections: Ensure each tool has a dedicated connection point with a blast gate. Consider quick-connect fittings for frequently moved tools.
- Future Expansion: Even in a small shop, think about where you might add tools later and leave provisions for future branches.
For workshops embracing technology, consider integrating smart sensors for automated dust collection activation, a concept explored further in articles like Building a DIY Smart Workshop Dust Collection System: Integrating IoT.
Building and Assembling Your Budget-Friendly Dust Collection System
Once your design is complete, the next phase in Building a DIY Dust Collection System for a Small Workshop: Optimizing Air Quality and Efficiency on a Budget involves bringing that plan to life. Focus on smart material choices and careful assembly.
Sourcing Materials on a Budget
This is where the “budget” aspect truly shines.
- PVC Pipe: Schedule 20 or Schedule 40 PVC drain pipe is an excellent, affordable choice for rigid ducting. Fittings (elbows, wyes) are readily available.
- Trash Cans/Drums: Robust plastic or metal trash cans make ideal collection bins for cyclone separators. Look for sturdy ones with tight-fitting lids.
- Plywood/MDF Scraps: These are perfect for making custom lids for dust bins, mounting plates for cyclones, or even simple carts for your dust collector. For more on optimizing material use, check out Sourcing Reclaimed and Salvaged Wood: Quality Assessment, Re.
- Used Equipment: Keep an eye out for used shop vacuums or small dust collectors on online marketplaces. You can often find fully functional units at a fraction of the new price.
- DIY Cyclone Construction: Instead of buying a commercial cyclone, consider building one from scratch using a plastic bucket, a trash can, and custom-cut plywood pieces.
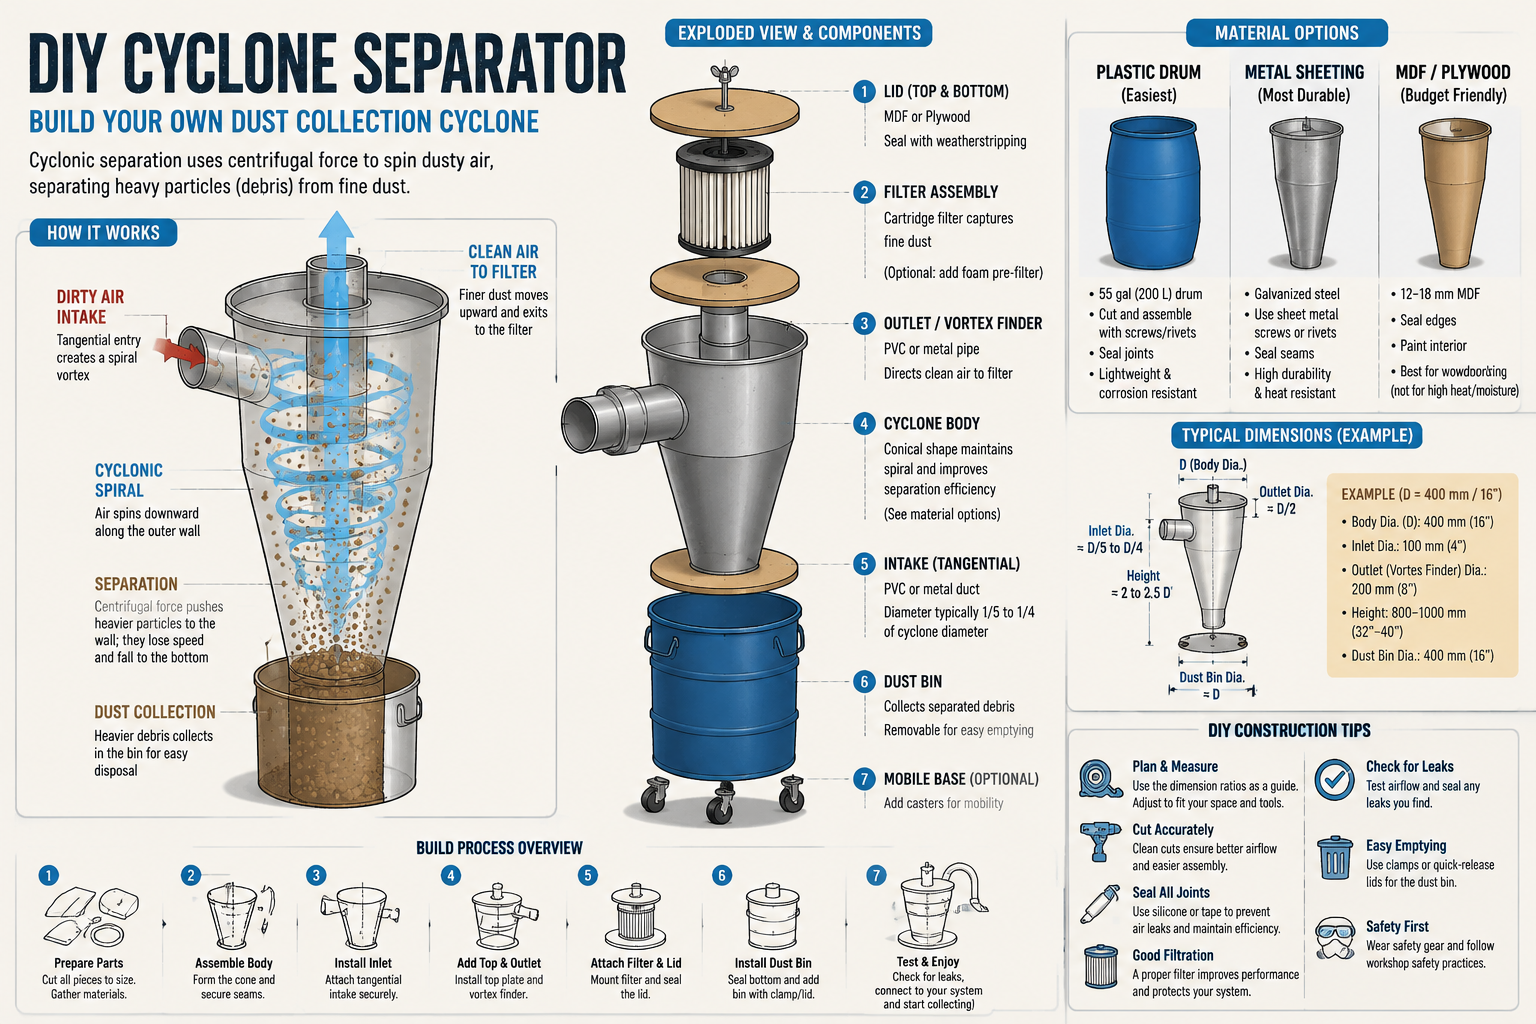
Constructing the Cyclone Separator
A DIY cyclone separator is a game-changer for budget systems. It works by creating a vortex that slings heavier dust particles to the outside wall, where they lose momentum and fall into a collection bin below, leaving only fine dust to reach your main filter.
Steps for a Basic DIY Cyclone:
- Choose Your Bins: You’ll need two containers – one for the cyclone body (e.g., a 5-gallon bucket or small trash can) and a larger one as the dust collection bin.
- Create the Lid: Cut a sturdy lid from plywood or MDF for the collection bin. This lid will support the cyclone body.
- Inlet and Outlet Ports: Cut two holes in the cyclone body’s upper section: one tangential inlet for the dust-laden air (creating the spin) and one central outlet for the cleaned air to go to the filter.
- Conical Insert (Optional but Recommended): A conical insert within the cyclone body improves separation efficiency by guiding dust downwards. This can be fashioned from sheet metal or sturdy plastic.
- Seal Everything: Use silicone caulk or weatherstripping to ensure all connections are airtight. Leaks severely reduce efficiency.
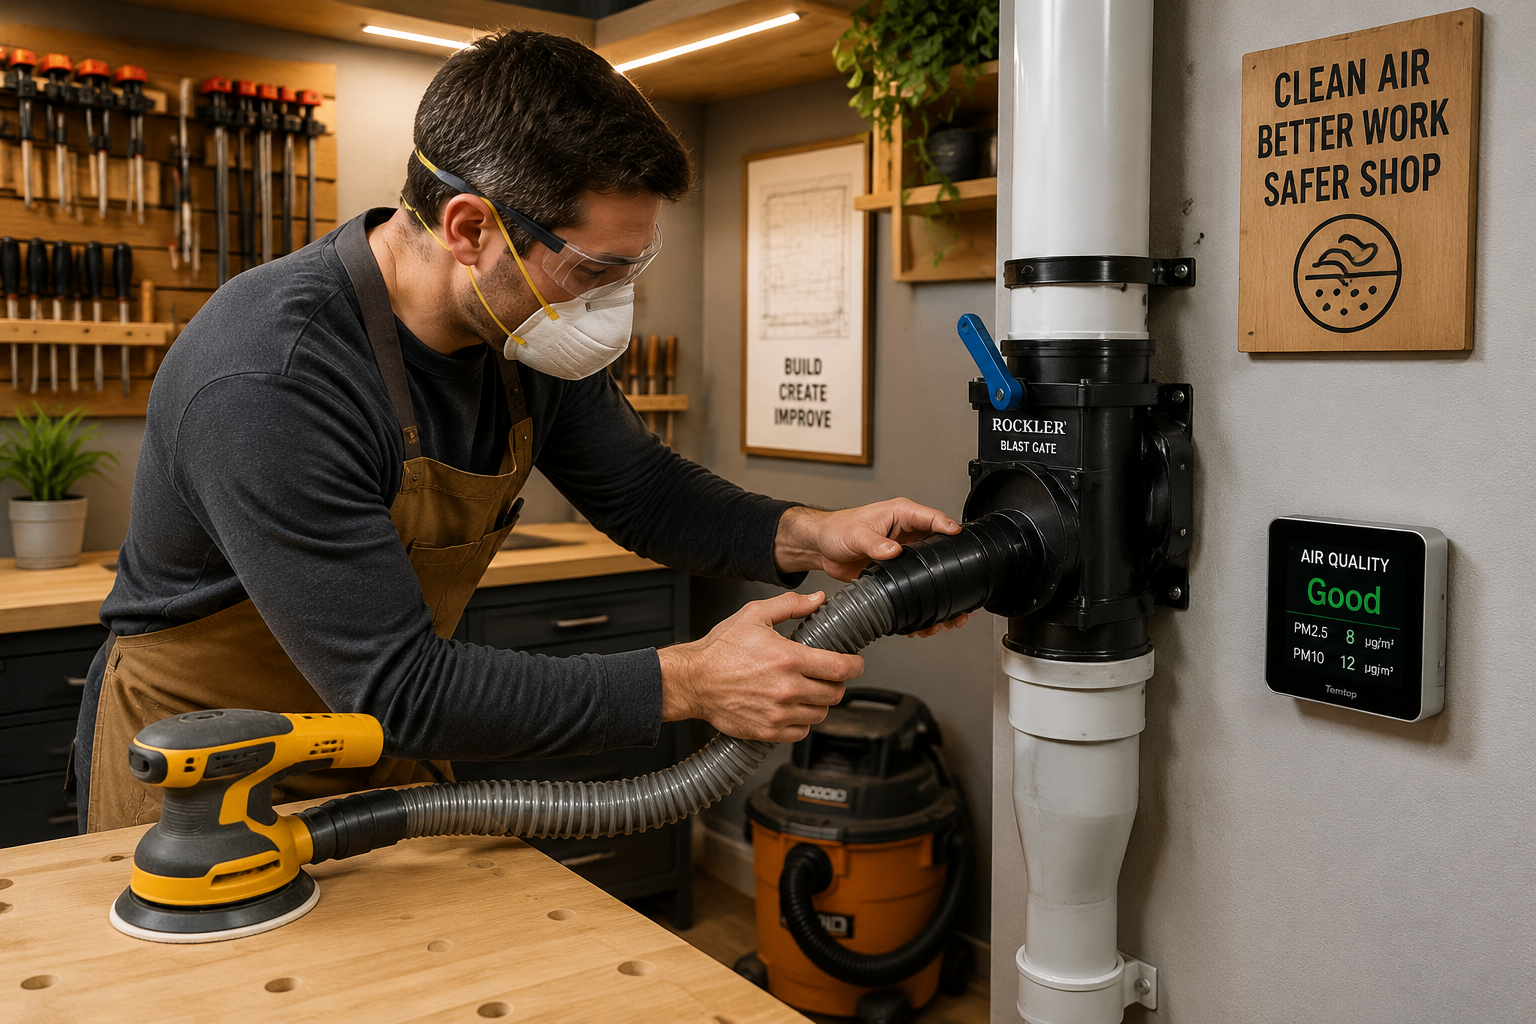
Installing Ductwork and Blast Gates
Installation is where your layout plan truly pays off.
- Mounting: Secure rigid PVC ductwork to walls or ceilings using pipe hangers or custom-made wood blocks. Ensure a slight downward slope towards the dust collector to aid chip movement.
- Joining Sections: Use PVC couplings and cement for permanent connections. For sections you might need to disassemble for cleaning, use rubber couplers with hose clamps.
- Blast Gates: Install a blast gate at each tool’s connection point. These can be purchased commercially or made from wood scraps. Ensure they slide smoothly and seal tightly.
- Flexible Hoses: Use appropriately sized flexible hoses to connect tools to the rigid ductwork. Keep these runs as short as possible to minimize friction loss.
- Tool Adaptations: Many tools have odd-sized dust ports. Use flexible rubber couplings, hose clamps, or custom-made wooden adapters to ensure a tight seal with your ductwork.
For other smart workshop integrations that improve efficiency, exploring concepts like Creating Ergonomic Workshop Furniture: Building Custom Workbenches can also enhance your overall workspace.
Optimizing Efficiency and Maintaining Your DIY System
Once your system is built, the ongoing process of Building a DIY Dust Collection System for a Small Workshop: Optimizing Air Quality and Efficiency on a Budget shifts to maximizing its performance and ensuring its longevity.
Maximizing Airflow and Collection Efficiency
A powerful system is only as good as its weakest link.

- Minimize Leaks: Regularly check all connections, joints, and blast gates for leaks. Even small air leaks can significantly reduce suction. Use caulk, tape, or gaskets to seal them.
- Keep Ducts Clean: Periodically inspect and clean your ductwork, especially turns and junctions, for clogs caused by large chips or accumulated fine dust.
- Open Only One Gate: Always ensure only the blast gate for the actively used tool is open. This concentrates all suction power where it’s needed most.
- Proper Tool Connections: Ensure dust ports on your tools are clear and your hose connections are tight. Sometimes, improving the shroud or hood around a tool can drastically improve capture.
- Air Filters: Use the highest efficiency filter your system can handle without severely restricting airflow. For fine dust, a 1-micron filter is a good starting point, but aiming for 0.5 microns or HEPA is even better for health.
Essential Maintenance Practices
Regular maintenance is key to keeping your DIY system running effectively and safely.
- Empty Dust Bins Regularly: Do not let your cyclone or dust collector bins overfill. An overfilled bin will reduce separation efficiency and can allow dust to pass to your main filter.
- Clean Filters: Filters will eventually clog with fine dust, reducing airflow. Tap bag filters vigorously, or use compressed air (outdoors and with proper PPE) to clean cartridge filters. Follow manufacturer guidelines for cleaning frequency and replacement.
- Inspect Ductwork: Periodically check inside your ducts for blockages, especially after using tools that produce large volumes of chips.
- Motor Inspection: Listen for unusual noises from your dust collector motor and inspect it for signs of wear.
- Grounding: Wood dust can create static electricity, posing a fire risk. Ensure all plastic ductwork is properly grounded using a bare copper wire run inside the pipe and connected to earth ground.
Safety Considerations
Working with wood dust always requires vigilance.
- Personal Protective Equipment (PPE): Even with a good dust collection system, always wear eye protection and a respirator (N95 or better) when operating dust-producing tools.
- Ventilation: A dust collection system removes dust at the source. It does not replace general room ventilation. Consider an ambient air cleaner for ultra-fine dust that escapes capture, or open a window when sanding.
- Fire Hazards: Dust is flammable. Never allow large accumulations of dust, especially fine dust. Empty collection bins regularly. Ensure your system does not generate sparks.
By consistently applying these optimization and maintenance strategies, your DIY dust collection system will serve you well for years to come, keeping your small workshop a healthier and more productive environment. For those looking to further refine their shop with handcrafted tools, guides such as Hand Tool Mastery for Detail Work: Chisels, Hand Planes, and offer valuable insights into maintaining sharp, efficient equipment.
Conclusion
Building a DIY Dust Collection System for a Small Workshop: Optimizing Air Quality and Efficiency on a Budget is an achievable and highly rewarding endeavor for any woodworker. By carefully planning your layout, strategically sourcing affordable components, and committing to regular maintenance, you can create a system that significantly improves your workshop’s air quality and enhances your working environment. The health benefits alone are priceless, protecting your lungs from harmful airborne particulates. Remember, an efficient system not only keeps your shop cleaner but also contributes to the longevity of your tools and the quality of your finished projects. Start by assessing your needs, sketch out a design, and begin building a safer, more efficient space in your workshop for 2026 and beyond.
Actionable Next Steps:
- Conduct a Workshop Audit: Make a detailed list of all dust-producing tools and their dust port sizes.
- Sketch Your Layout: Draw a rough schematic of your workshop, marking tool locations and planning optimal duct runs.
- Research Components: Identify local sources for PVC pipe, trash cans, and potential used dust collector units.
- Start Small: Begin by building your cyclone separator, as it offers the most significant immediate benefit for filter life.
- Prioritize Safety: Always wear appropriate PPE and ensure electrical safety during installation and operation.
References
American Thoracic Society. (2022). Guidance on the Medical Management of Occupational Lung Diseases. American Journal of Respiratory and Critical Care Medicine, 205(10).
SEO Meta Title: Build a DIY Dust Collection System: Small Workshop & Budget SEO Meta Description: Learn to build a DIY dust collection system for your small workshop in 2026. Optimize air quality, boost efficiency, and save money with this comprehensive guide.
