

The average home office, despite its digital nature, is often a tangled monument to visible cables. This chaotic reality, far from promoting productivity, can subtly increase stress and detract from a minimalist aesthetic. For those seeking a truly streamlined workspace, Building Floating Shelves with Hidden Cable Management: Minimalist Home Office Organization for Monitors and Speakers offers an elegant solution. This guide will walk through designing and constructing custom floating shelves that not only elevate your monitors and speakers but also completely conceal their associated wiring, transforming your desk into a haven of calm and efficiency in 2026.
Key Takeaways
- Custom floating shelves provide a sophisticated, space-saving solution for monitor and speaker placement.
- Integrating hidden cable management within the shelf design is crucial for a truly minimalist aesthetic.
- Careful planning of bracket type and load calculations ensures shelf stability and safety for your equipment.
- Selecting the right wood and finish allows for seamless integration with existing home office decor.
- This DIY project enhances workspace organization, reduces visual clutter, and boosts productivity.
Designing Your Floating Shelves with Integrated Cable Management
The foundation of a successful floating shelf project with hidden cable management lies in meticulous design. Before cutting any wood, a comprehensive plan is essential, accounting for your specific equipment, wall structure, and desired aesthetic.
Assessing Your Equipment and Workspace Needs
Begin by identifying exactly what your shelves need to hold. Measure your monitors and speakers, noting their dimensions and weight. Consider any other items like docking stations, external hard drives, or LED strip lighting that you might want to integrate.
Monitor Considerations:
- Weight: Crucial for calculating shelf load and bracket requirements.
- Vesa Mount Compatibility: If you plan to mount monitors directly to the shelf or through it, check VESA standards.
- Cable Locations: Note where power and display cables exit your monitors.
Speaker Considerations:
- Size and Weight: Similar to monitors, these impact shelf dimensions and stability.
- Cable Type: Speaker wires can vary in thickness.
- Acoustic Placement: Consider optimal height and separation for sound quality.
Other Devices: Plan for any USB hubs, chargers, or smart home devices. For example, if you’re building a DIY smart home automation hub from wood, consider how it might integrate into or onto the shelf.
Once you have your equipment details, measure the wall space. Determine the ideal height for your monitors (eye-level when seated comfortably) and speakers. Sketch out different shelf configurations. Will it be a single long shelf, or two separate ones for each monitor? Consider a multi-tiered approach if you have many devices.
Planning Internal Channels for Hidden Wires
This is where the “hidden cable management” aspect comes to life. Your floating shelf should act as a conduit, guiding cables from your devices to the wall, and then down to outlets or your PC, completely out of sight.
Channel Design Principles:
- Size: Channels must be wide and deep enough to accommodate all cables easily, including future additions. Think about power cords, HDMI, DisplayPort, USB, and speaker wires.
- Access Points: Design entry and exit points for cables on the top surface, bottom, and rear of the shelf. These should be strategically placed to align with your monitor and speaker ports.
- Smooth Edges: Ensure all internal channel edges are smooth to prevent cable damage during installation or over time. Use a router with a round-over bit or sand thoroughly.
- Separation (Optional): For those concerned about electromagnetic interference, consider separate channels for power cables and data/audio cables. This is often overkill for a home office but can be implemented if desired.
A common approach is to create a hollow box construction for the shelf itself. This hollow interior then serves as the primary cable channel. You can route cables through holes drilled into the top surface, guide them internally, and then exit them through a larger opening at the back, close to the wall. This exit point should ideally align with a wall cutout that leads to an in-wall cable management system or a desk grommet.
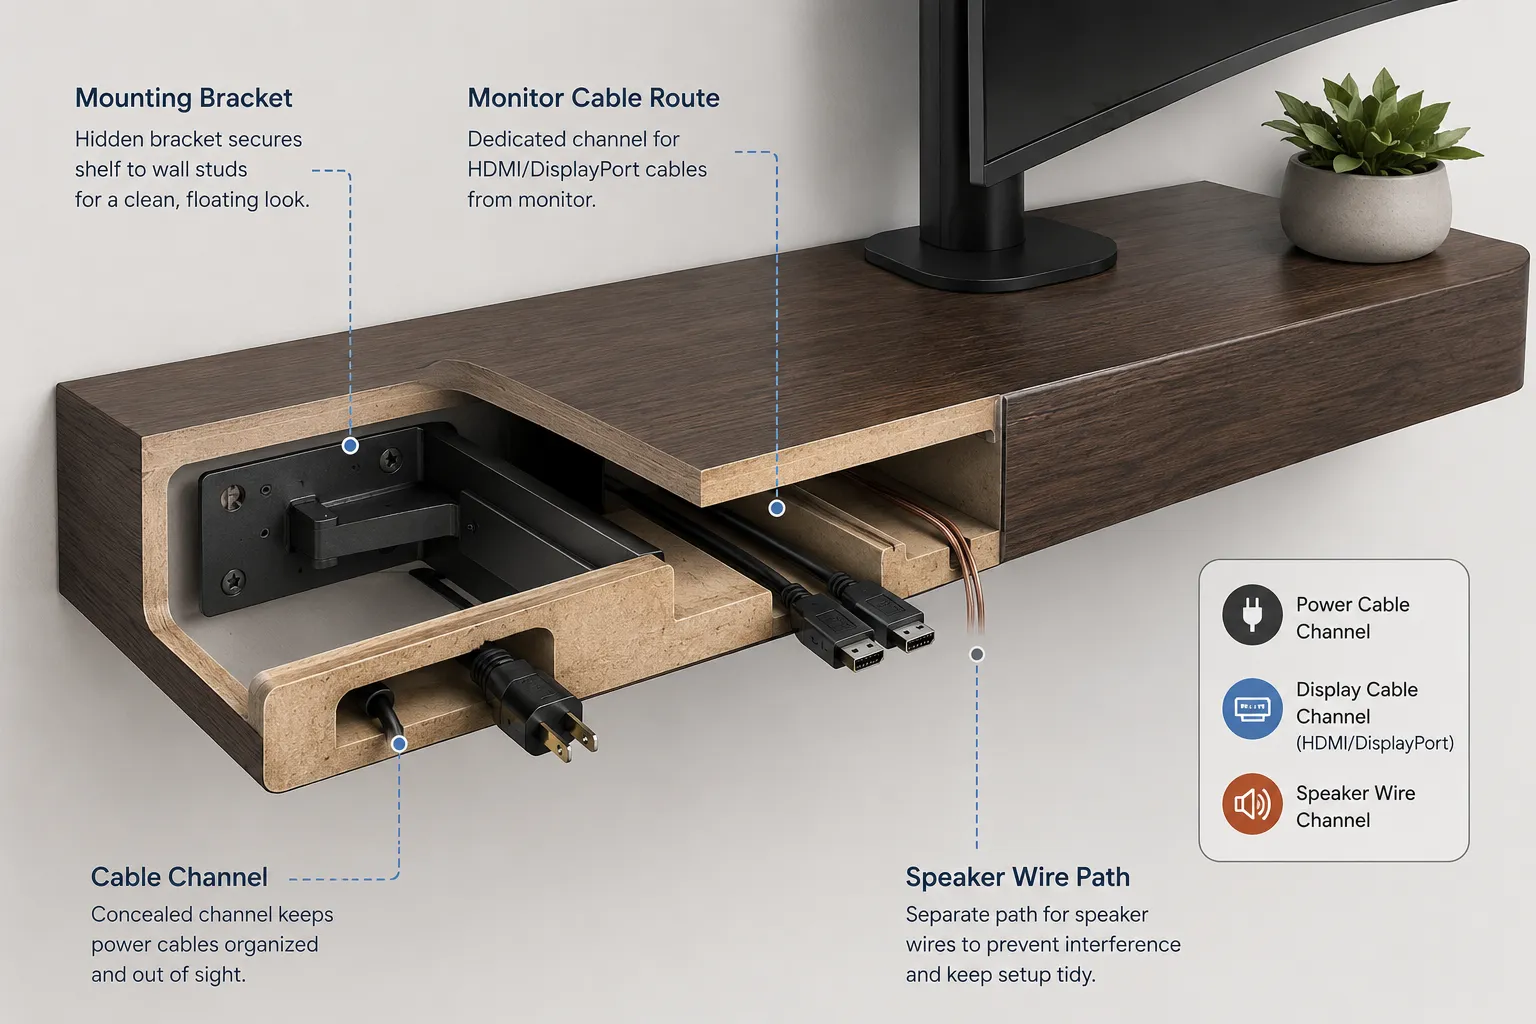
Table: Typical Cable Channel Dimensions
| Cable Type | Recommended Channel Width (min) | Recommended Channel Depth (min) | Notes |
|---|---|---|---|
| Standard Power Cord | 1 inch | 0.75 inch | For monitors, speakers, and power strips. |
| HDMI/DisplayPort | 0.75 inch | 0.5 inch | Digital display cables. |
| USB Cables | 0.5 inch | 0.5 inch | For peripherals, chargers. |
| Speaker Wire | 0.5 – 1 inch | 0.5 inch | Depends on gauge. |
| All Combined | 2-3 inches | 1.5 – 2 inches | For a single large conduit, consider a wider box. |
Consider using flexible cable sleeves or conduits within the channels to further protect wires and make future additions easier.
Materials and Construction for Robust Floating Shelves
Selecting the right materials and employing sound construction techniques are vital for creating durable, aesthetically pleasing, and safe floating shelves.
Wood Selection and Preparation
The choice of wood significantly impacts the shelf’s strength, appearance, and ease of workability.
Popular Wood Choices:
- Plywood (Cabinet Grade): Excellent stability, readily available, and can be veneered or painted for various finishes. Birch or maple plywood is a strong choice.
- Solid Hardwoods (Oak, Maple, Walnut): Offers superior strength and beauty, especially when stained or clear-coated. Requires more advanced woodworking skills.
- MDF (Medium-Density Fiberboard): Economical and perfectly smooth for painting, but less durable and prone to moisture damage. Not ideal for heavy loads without significant internal bracing.
For a project focused on Building Floating Shelves with Hidden Cable Management: Minimalist Home Office Organization for Monitors and Speakers, plywood or solid hardwood provides the best balance of strength and finish quality. If using plywood, edge banding will be necessary to conceal the plies for a clean, finished look.
Wood Preparation:
- Cut to Size: Precisely cut all components (top, bottom, sides, internal supports) according to your design.
- Route Channels: Before assembly, use a router to create the cable channels in the top or bottom pieces, as planned. Ensure channel depths accommodate cables and the mounting system.
- Sand: Thoroughly sand all surfaces and edges. Start with a coarser grit (e.g., 80-100) and progressively move to finer grits (e.g., 180-220) for a smooth finish, especially if you plan to stain.
Choosing and Installing Hidden Mounting Brackets
The “floating” aspect relies entirely on robust, concealed mounting hardware. This is arguably the most critical component for safety and stability.
Types of Hidden Brackets:
- Rod/Pin Brackets: These consist of metal rods that are securely anchored into wall studs. The shelf is then drilled with corresponding holes and slides onto these rods. They offer a truly invisible look.
- Pros: Completely hidden, minimalist aesthetic.
- Cons: Requires precise drilling, limited weight capacity depending on rod diameter and embedment.
- Heavy-Duty Blind Shelf Supports: Similar to rod brackets but often more robust, featuring a mounting plate that attaches to the wall, from which sturdy pins or arms extend. Some designs allow for slight adjustments after installation.
- Pros: Stronger than simple rods, some adjustability.
- Cons: Still requires very precise shelf construction.
- French Cleat System: While not entirely “hidden” in the same way as rod brackets, a well-made French cleat can be very discreet and offers immense strength. One cleat piece attaches to the wall, and a corresponding piece on the shelf hooks over it.
- Pros: Extremely strong, easy to hang and remove, great for heavy loads.
- Cons: A portion of the cleat might be visible, or the shelf needs to be significantly thicker to conceal it completely.
Calculating Load Capacity: This is paramount. Sum the weight of all your monitors, speakers, and any other items you intend to place on the shelf. Then, refer to the manufacturer’s specifications for your chosen brackets. Always err on the side of caution and exceed the calculated requirements. If using rod brackets, ensure they are anchored directly into wall studs, not just drywall.
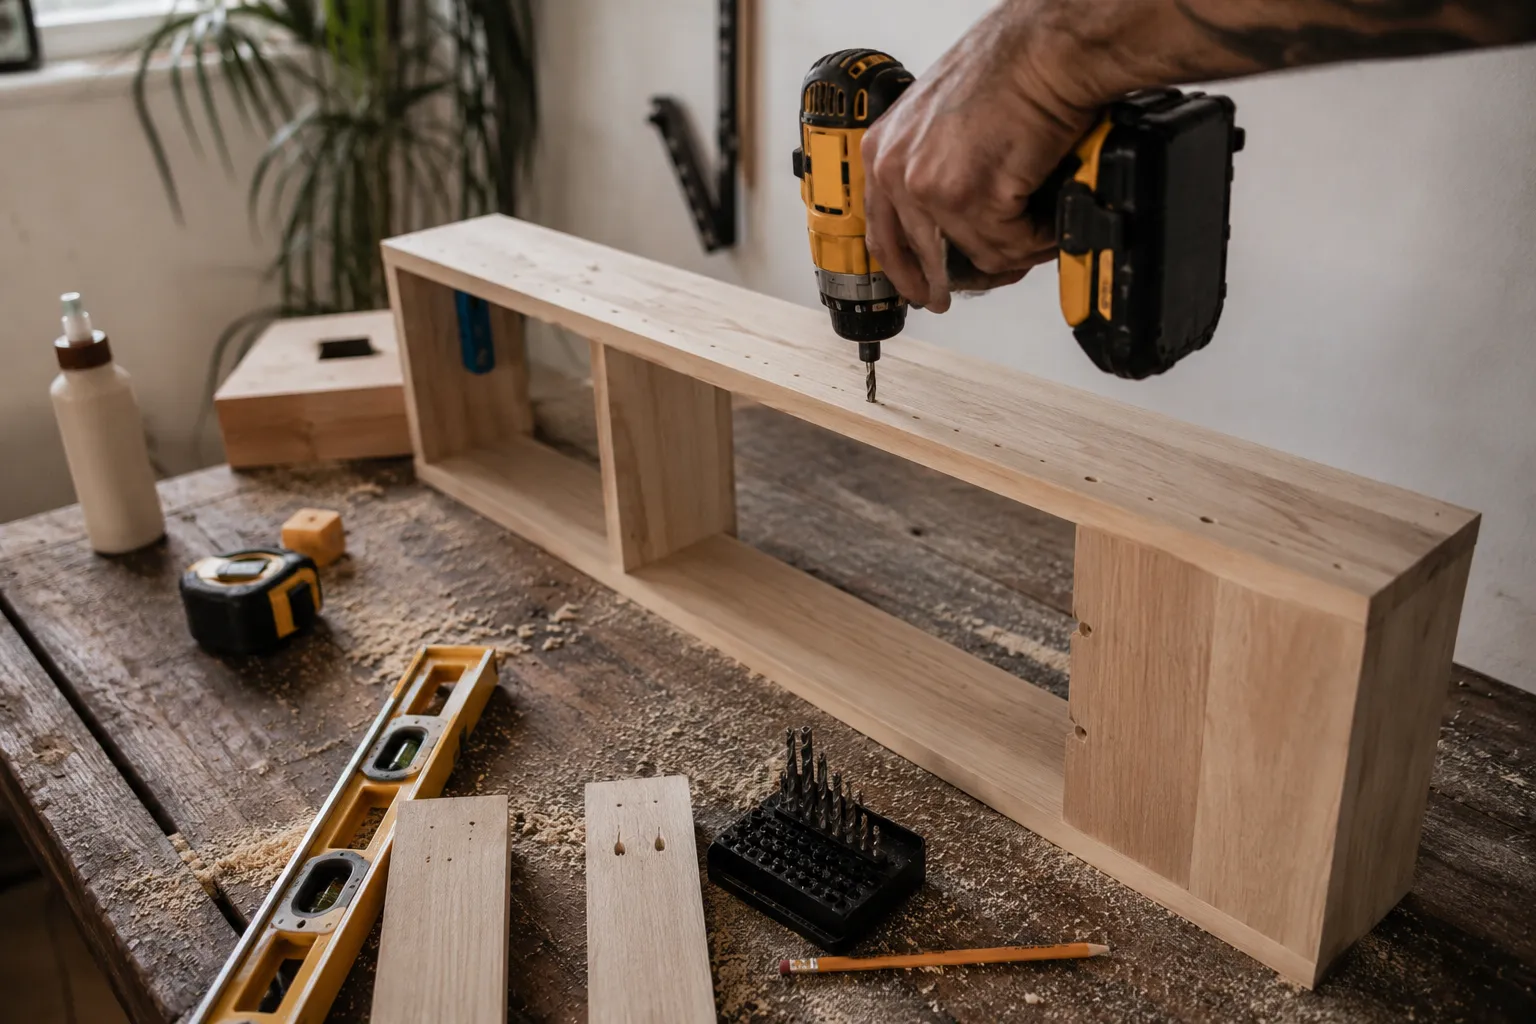
Installation Steps (for Rod/Pin Type Brackets):
- Locate Studs: Use a stud finder to accurately locate and mark the center of wall studs. This is non-negotiable for strength.
- Mark Bracket Positions: Transfer your shelf design measurements to the wall, marking the exact points where brackets will be installed. Use a level for perfect horizontal alignment.
- Install Brackets: Drill pilot holes into the studs and securely fasten the bracket hardware according to manufacturer instructions.
- Prepare Shelf: Drill corresponding holes into the rear of your assembled shelf, ensuring they align perfectly with the installed wall brackets. Use a drill press for accuracy if possible.
- Test Fit: Carefully slide the shelf onto the brackets. Adjust as needed.
- Secure (Optional): Some bracket systems include grub screws or set screws to lock the shelf onto the pins.
Remember that proper joinery for the shelf box itself contributes significantly to its overall strength. Techniques like dado joints, rabbet joints, or even simple butt joints reinforced with screws and glue will create a robust structure. For more on crafting strong and beautiful joints, explore The Complete Guide to Hand Tool Joinery.
Finishing and Integrating Your Floating Shelves
With the construction complete, the final steps involve finishing the wood and seamlessly integrating the shelves into your minimalist home office, ensuring all cables truly vanish.
Applying Finishes for Aesthetics and Protection
The finish not only protects the wood but also defines the shelf’s aesthetic. Consider your existing decor and the type of wood you’ve chosen.
Finish Options:
- Stain: Enhances the natural grain of hardwoods. Choose a color that complements your desk or other furniture. Always test on a scrap piece first.
- Paint: Offers endless color possibilities. Use a primer, then apply multiple thin coats for a durable, smooth finish. Ideal for plywood or MDF to achieve a clean, modern look.
- Clear Coat (Polyurethane, Lacquer, Oil): Protects the wood while allowing its natural beauty to shine through. Polyurethane is very durable, while oils provide a more natural feel.
- Wax: A softer, more traditional finish that provides some protection and a subtle sheen. Often used over oil or directly on certain woods.
Application Tips:
- Work in a Clean, Ventilated Area: This prevents dust contamination and ensures proper drying.
- Follow Manufacturer Instructions: Adhere to drying times and application methods for each product.
- Multiple Thin Coats: Better than one thick coat, as it provides a more even and durable finish.
- Light Sanding Between Coats: For paints and clear coats, a light sanding with fine-grit sandpaper (e.g., 320-400) between coats creates a smoother final surface.
For those interested in natural, eco-friendly options, explore Natural Wood Finishing without Chemicals.
The Art of Hidden Cable Management
This is the magic touch that completes your minimalist setup. Once the shelves are installed and finished, it’s time to route the cables.
Steps for Seamless Cable Integration:
- Pre-Thread Cables: Before pushing the shelf fully onto its mounts, feed your monitor, speaker, and power cables through the internal channels.
- Connect Devices: Plug in your monitors and speakers. Route their cables directly into the nearest channel entry point on the shelf.
- Utilize Wall Cutouts: If you’ve planned for in-wall cable management, feed the cables from the shelf’s rear exit point into the wall cutout. This might involve integrating smart storage and organization with bespoke wooden solutions for your home office.
- Cable Ties and Clips: Inside the channels or behind the shelf, use small cable ties or adhesive clips to bundle cables neatly and prevent them from rattling or sagging.
- Power Strips: If needed, a slim power strip can be secured to the underside of the shelf or hidden within a larger channel to power multiple devices with a single cord descending to the wall outlet.
- Cable Sleeves: For the short run of cables exiting the wall to your PC or power outlet, consider braided cable sleeves that blend with your wall color or add a touch of sophistication.
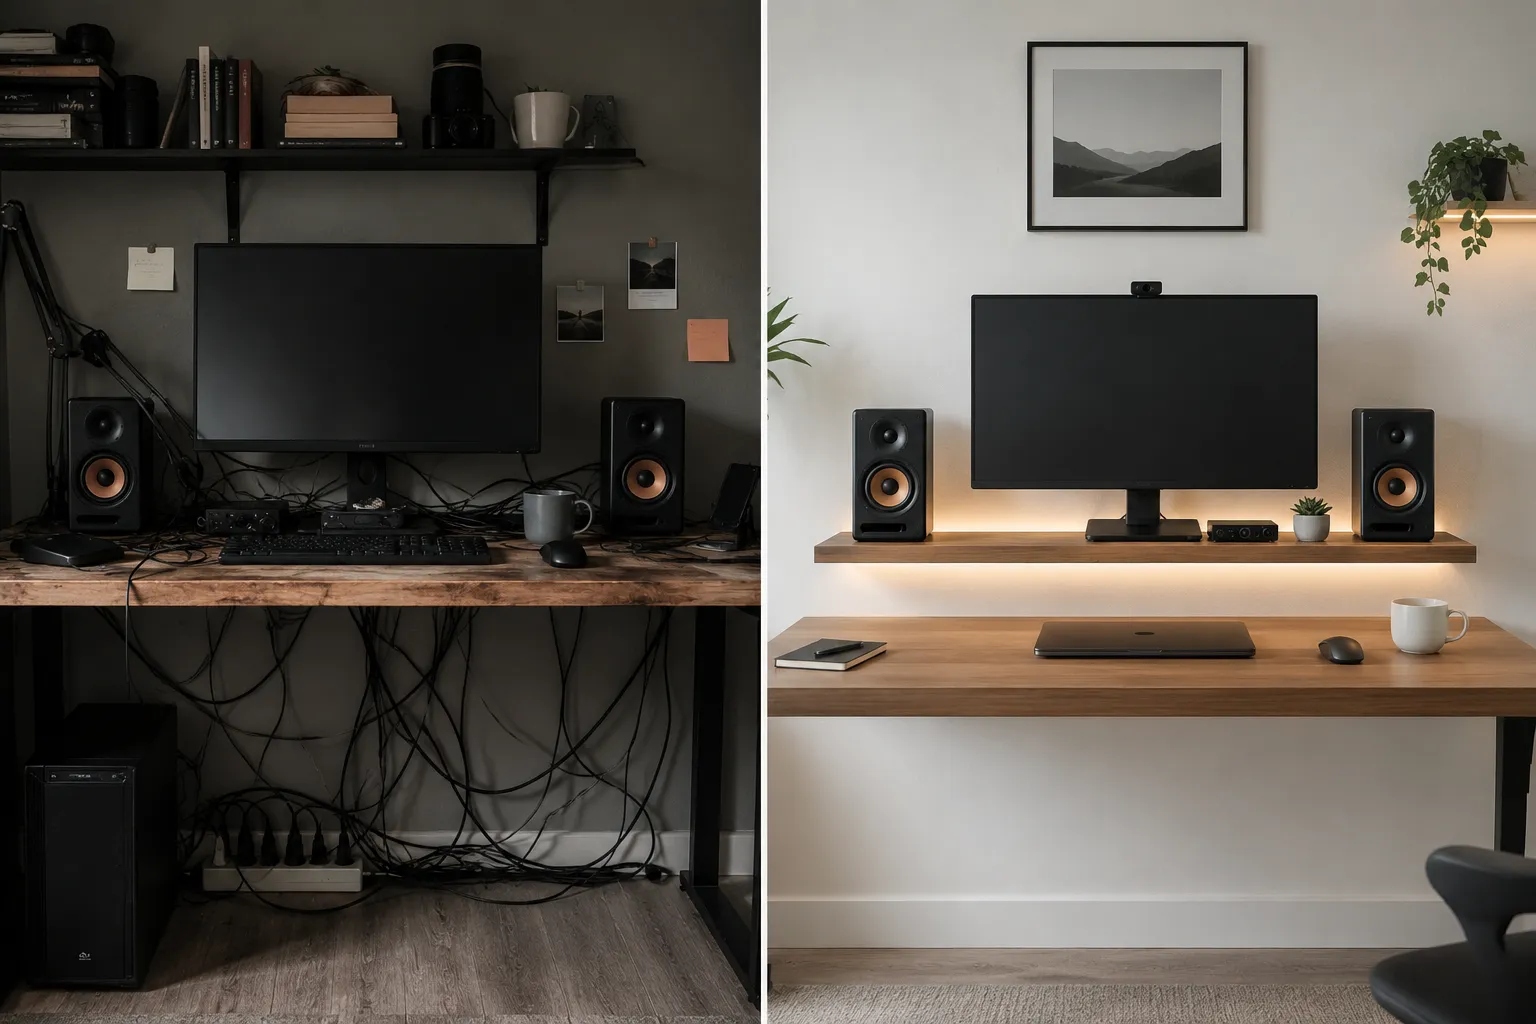
The goal is to eliminate any visible wires from the moment they leave your monitor or speaker until they reach their destination. This attention to detail is what truly differentiates a well-executed floating shelf system from a merely functional one. The result is a clean, calm, and highly organized workspace that enhances focus and productivity, fulfilling the promise of Building Floating Shelves with Hidden Cable Management: Minimalist Home Office Organization for Monitors and Speakers.
Conclusion
Transforming a cluttered home office into a minimalist sanctuary is an achievable goal with custom floating shelves designed for hidden cable management. By carefully planning your shelf dimensions, integrating internal channels for wires, selecting robust materials and mounting hardware, and applying a suitable finish, you can create a highly functional and aesthetically pleasing workspace. This DIY project not only organizes your monitors and speakers but also dramatically reduces visual clutter, fostering a more productive and serene environment in 2026. The satisfaction of a clean desk and seamlessly integrated technology is immeasurable.
Actionable Next Steps
- Measure and Plan: Accurately measure your monitors, speakers, and wall space. Sketch out your desired shelf configuration, including all cable entry and exit points.
- Choose Your Wood: Select the wood type that best suits your aesthetic and budget.
- Source Brackets: Purchase high-quality hidden floating shelf brackets, ensuring their load capacity exceeds your total equipment weight.
- Gather Tools: Ensure you have the necessary woodworking tools, including a drill, router (for channels), saw, level, and stud finder.
- Build and Install: Follow the construction and installation steps outlined above, prioritizing precision and safety.
- Finish and Route: Apply your chosen finish and meticulously route all cables to achieve a truly hidden, minimalist setup.
meta title: Build Floating Shelves: Hidden Cable Management for Monitors meta description: Master building floating shelves with hidden cable management for monitors and speakers. Get a minimalist home office in 2026 with our DIY guide.