
The average piece of DIY furniture endures only a fraction of the lifespan of its professionally built counterpart, not due to material quality, but often because of fundamental structural shortcomings. Home woodworkers, while adept at cutting and assembly, frequently overlook the core engineering principles that impart lasting strength and stability. Understanding these foundational concepts from traditional carpentry is crucial for transforming a functional item into an enduring piece. This article, “Carpentry Basics for Home Woodworkers: 7 Structural Techniques That Improve Your DIY Furniture,” will bridge that gap, empowering you to build more robust and resilient furniture that stands the test of time and use in 2026.
Key Takeaways
- Load Path Understanding: Recognize how forces transfer through your furniture to design for optimal strength.
- Essential Joinery Mastery: Learn and apply strong wood joints like mortise and tenon, dado, and dovetails for superior connections.
- Strategic Reinforcement: Utilize blocking, gussets, and stretchers to prevent racking and enhance rigidity.
- Effective Fastening: Combine screws, nails, and adhesives correctly for maximum holding power and durability.
- Material Selection Matters: Choose the right wood and hardware to complement your structural design.
Mastering Essential Joinery for Durable DIY Furniture
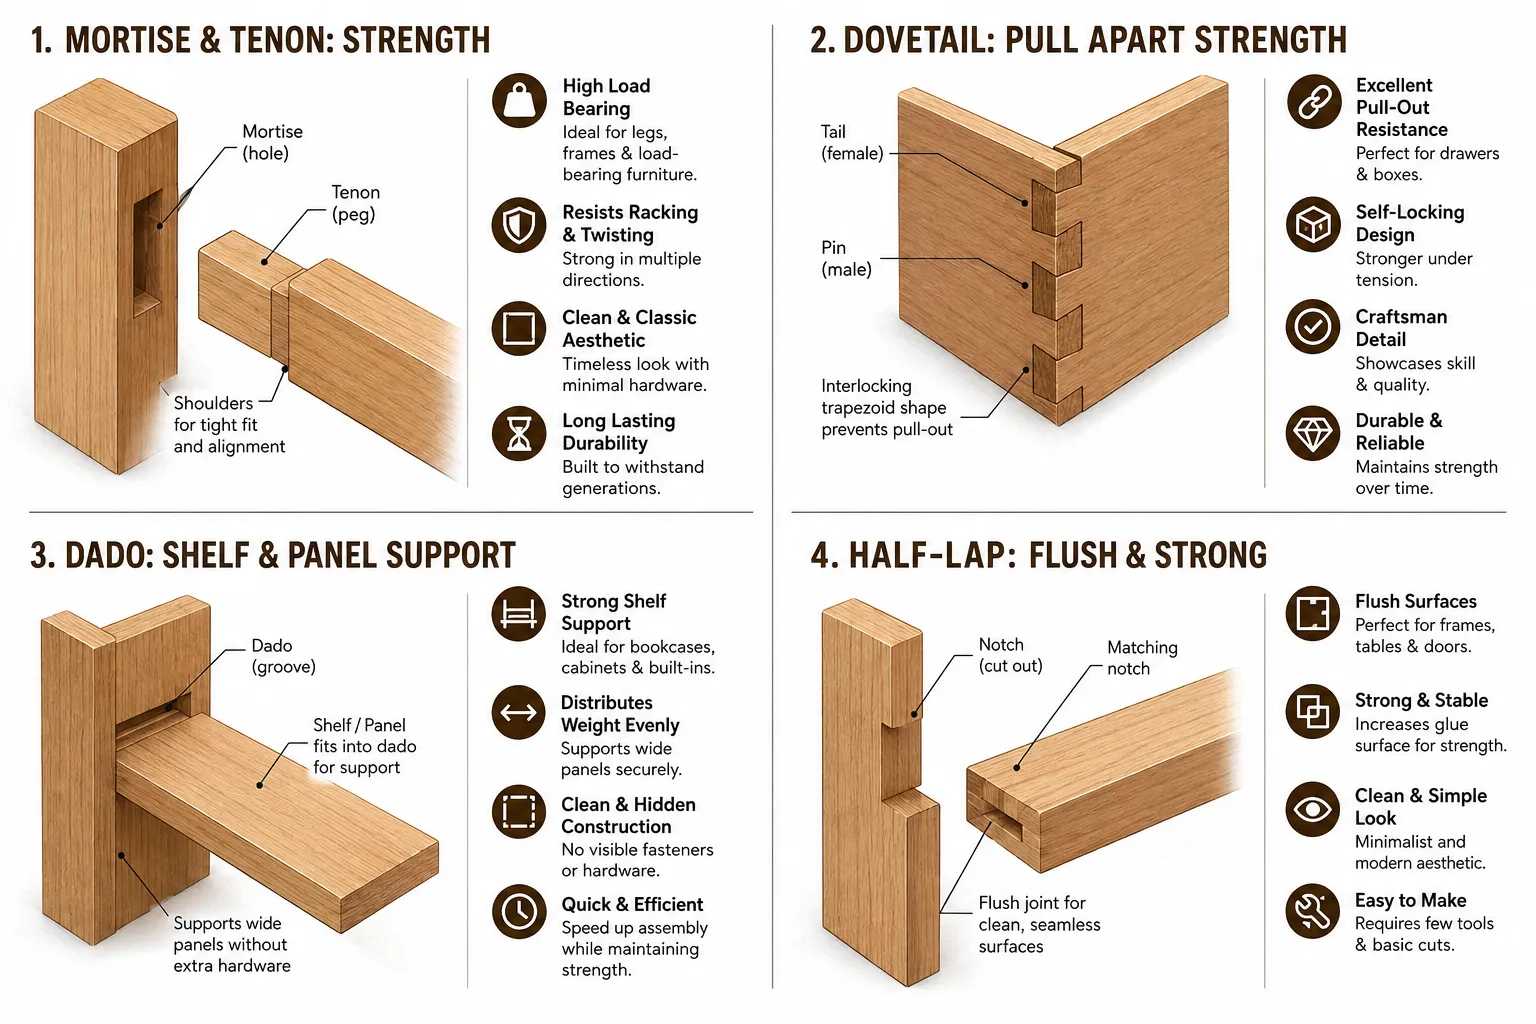
The strength of any wooden structure lies in its joints. While screws and nails offer convenience, relying solely on them often results in furniture that loosens, wobbles, or fails over time. Incorporating traditional woodworking joints significantly improves the load-bearing capacity, racking resistance, and overall longevity of your DIY projects. For “Carpentry Basics for Home Woodworkers: 7 Structural Techniques That Improve Your DIY Furniture,” we’ll focus on four indispensable joint types:
1. Mortise and Tenon Joint
This classic joint involves cutting a rectangular hole (mortise) into one piece of wood and a corresponding projecting tab (tenon) on another. The tenon fits snugly into the mortise, forming an incredibly strong mechanical lock, especially when secured with wood glue. It’s ideal for connecting rails to legs in tables, chairs, and beds. The broad gluing surface and interlocking nature make it highly resistant to withdrawal and racking forces.
2. Dovetail Joint
Renowned for its beauty and exceptional strength, the dovetail joint uses trapezoidal pins and tails that interlock. This design makes it incredibly resistant to being pulled apart, particularly along the axis of the joint. It’s the gold standard for drawer boxes and carcass construction, where resistance to shear forces and a clean aesthetic are paramount. While traditionally cut by hand, jigs and routers can simplify the process for home woodworkers.
3. Dado and Rabbet Joints
- Dado Joint: A dado is a groove cut across the grain of a board, into which another board fits. This creates a strong, self-supporting shelf or divider connection, commonly used in bookcases, cabinets, and drawer bottoms. It provides excellent support and minimizes deflection.
- Rabbet Joint: Similar to a dado, a rabbet is a channel cut along the edge or end of a board. It’s often used to create a recess for back panels, drawer bottoms, or for forming corners in box construction. When combined with fasteners and glue, it provides a stable and clean connection.
4. Half-Lap Joint
A half-lap joint involves removing half the thickness from each of two pieces of wood, allowing them to overlap and create a flush surface when joined. This joint is simpler to make than a mortise and tenon but still offers good strength and a larger gluing surface than a simple butt joint. It’s suitable for frame construction, cross-braces, and where members intersect at right angles, providing both lateral stability and a degree of rigidity.
When choosing wood for your projects, consider the properties of different species. For instance, mastering the art of wood selection: choosing the right lumber for your projects durability and aesthetics can guide you in selecting the best material to complement these strong joints.
Understanding Load Paths and Strategic Reinforcement
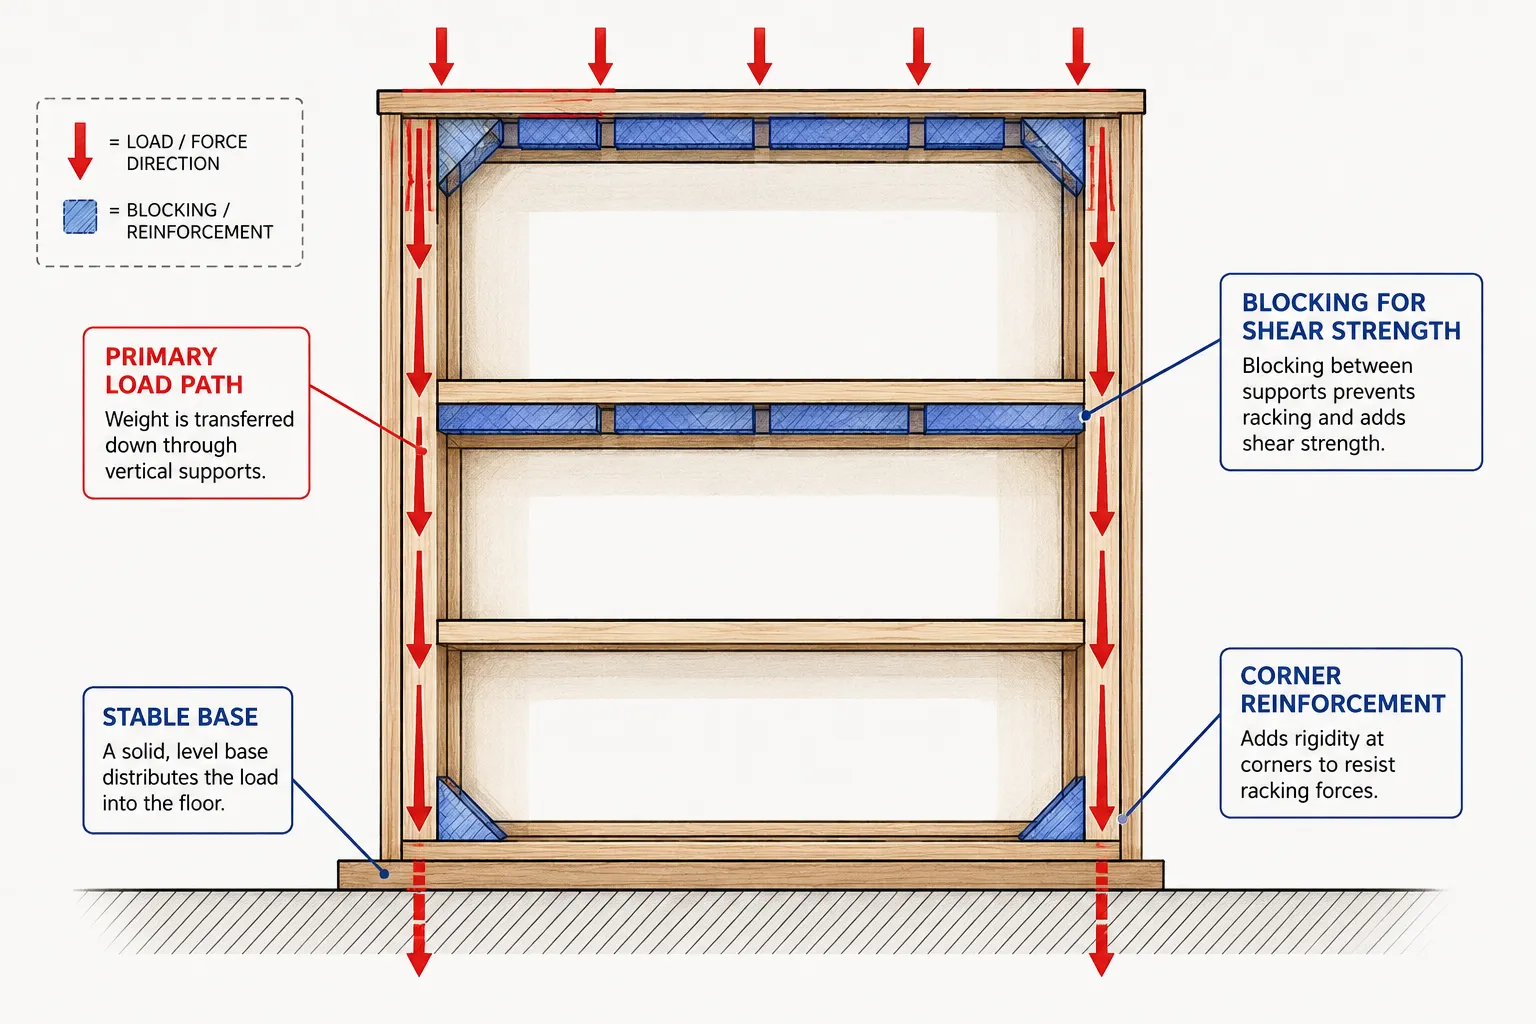
Beyond individual joints, the overall structural integrity of your furniture depends on how forces (loads) are distributed and resisted throughout the piece. This concept, known as “load paths,” is fundamental in carpentry. Thinking about how weight travels from the top surface to the floor allows you to strategically reinforce areas that experience the most stress. This is one of the most vital “Carpentry Basics for Home Woodworkers: 7 Structural Techniques That Improve Your DIY Furniture” principles.
5. Incorporating Blocking and Gussets
- Blocking: These are short pieces of wood strategically placed between frame members to prevent racking (sideways movement) and distribute loads more effectively. For instance, in a table, blocking between the legs and apron can significantly stiffen the structure. In a shelf unit, adding blocking behind the uprights where shelves attach can prevent bowing and increase overall rigidity.
- Gussets: Gussets are triangular or L-shaped reinforcement pieces added to inside corners. They act as braces, converting a simple butt joint into a much stronger, more rigid connection, effectively transferring forces over a larger area. They are particularly useful for strengthening table legs, cabinet corners, and frame assemblies.
6. Utilizing Stretchers and Cross-Braces
Stretchers and cross-braces are horizontal or diagonal members designed to resist racking and provide additional rigidity to frames.
- Stretchers: These are typically horizontal pieces connecting legs or uprights, often found near the bottom of tables, chairs, and benches. They prevent the legs from splaying outwards or inward under stress, forming a strong, stable base.
- Cross-Braces: Diagonal bracing, often seen as an “X” or “V” shape, is incredibly effective at preventing racking, especially in tall, narrow structures like bookshelves or open cabinets. Even a single diagonal brace can significantly stiffen a frame by triangulating the forces.
For heavier projects, like a DIY outdoor wood pizza oven stand and storage building a functional and durable base for your backyard cooking, these reinforcement techniques become even more critical to ensure stability and safety.
Optimal Fastening and Material Considerations
Even the strongest joints and most well-planned load paths can fail if the fastening methods are inadequate or the wrong materials are chosen. The seventh structural technique for improving your DIY furniture focuses on these critical supporting elements.
7. Combining Fasteners with Adhesives
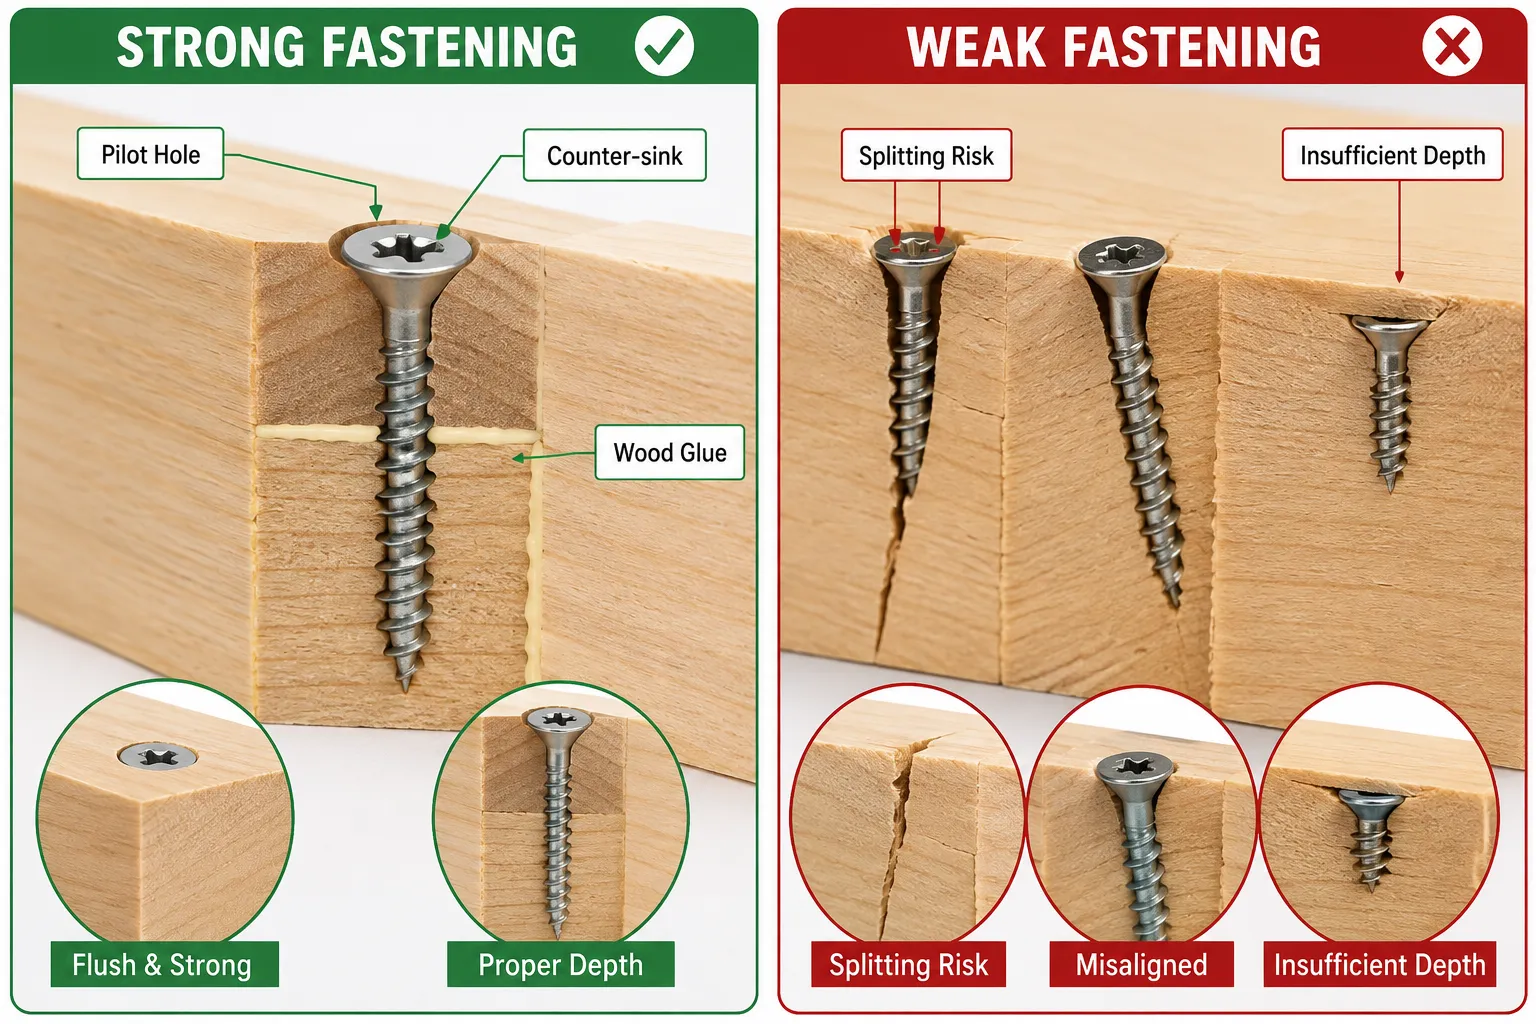
Relying solely on mechanical fasteners like screws or nails is often insufficient for long-term strength. Wood moves with changes in humidity, and over time, screws can loosen, and nails can pull out.
- The Power of Wood Glue: High-quality wood glue creates a bond stronger than the wood fibers themselves. When used correctly in conjunction with joints or mechanical fasteners, it dramatically increases the joint’s load-bearing capacity and resistance to racking. Always apply glue to both mating surfaces, clamp the joint firmly until dry, and wipe away excess squeeze-out.
- Screws vs. Nails:
- Screws: Offer excellent clamping force and withdrawal resistance, making them ideal for structural connections that might need to be disassembled or where significant holding power is required. Always pre-drill pilot holes to prevent splitting, especially in hardwoods or near edges. Consider using doweling jigs a comprehensive guide to types setup techniques and best practices for perfectly aligned holes when using dowel joinery in conjunction with screws.
- Nails: Best for quickly securing components, temporary fastening, or in applications where shear strength is prioritized over withdrawal resistance (e.g., attaching thin back panels). They are generally less strong than screws for structural connections but can be very effective when combined with glue.
- Specialty Fasteners: For specific applications, consider specialty fasteners like threaded inserts for machine screws (allowing repeated assembly/disassembly), or structural connectors for heavy-duty framing. For building substantial items like robust floating shelves with hidden fasteners power tool techniques for 2026 warm minimalism, specialized hardware is key.
Selecting the Right Materials
The type of wood and hardware you choose plays a significant role in your furniture’s structural integrity.
- Wood Species: Hardwoods (oak, maple, cherry) offer greater strength and durability than softwoods (pine, fir). However, even softwoods can be used structurally if properly dimensioned and joined. For projects requiring specific aesthetic or performance qualities, like live edge wood slabs from forest to finished furniture, material choice becomes part of the design.
- Grain Direction: Always orient wood grain for maximum strength. For example, the long grain of a board is much stronger in tension and compression than the end grain. Avoid connecting directly into end grain where significant strength is required.
- Hardware Quality: Invest in good quality screws, bolts, and other hardware. Cheap fasteners can strip, bend, or corrode, compromising the structure. Choose appropriate lengths and gauges for the load.
Combining these “Carpentry Basics for Home Woodworkers: 7 Structural Techniques That Improve Your DIY Furniture” principles allows for the creation of truly robust pieces. For instance, when constructing a custom floating shelves design fabrication and installation of substantial solid wood shelving, understanding how to combine strong joinery with appropriate fasteners and a suitable wood species is paramount to ensuring they hold weight without sagging or pulling away from the wall.
Conclusion
Building durable, long-lasting furniture as a home woodworker requires more than just assembling pieces; it demands an understanding of fundamental structural carpentry. By integrating these “Carpentry Basics for Home Woodworkers: 7 Structural Techniques That Improve Your DIY Furniture” into your projects, you move beyond mere construction to true craftsmanship. Mastering essential joinery like mortise and tenon, dovetails, dados, and half-laps provides a strong foundation. Understanding load paths and strategically incorporating blocking, gussets, stretchers, and cross-braces will prevent racking and improve rigidity. Finally, combining high-quality fasteners with powerful wood adhesives, and making informed material selections, ensures your creations stand firm against the rigors of everyday use.
As you plan your next DIY furniture piece in 2026, take a moment to visualize the forces at play and consider which of these techniques will best contribute to its strength and stability. The effort invested in applying these principles will be rewarded with furniture that not only looks good but also serves reliably for years to come, a testament to thoughtful design and sound construction.
SEO Meta Title: Carpentry Basics: 7 Structural Techniques for DIY Furniture SEO Meta Description: Enhance your DIY furniture in 2026 with 7 essential carpentry basics. Learn structural techniques like strong joinery, load paths, and proper fastening for durable builds.