

The average woodworker spends 15-20% of their project time searching for tools, a statistic that underscores the profound impact of disorganization on productivity. For many, a workshop begins with a few essential tools, quickly evolving into a sprawling collection that demands smarter storage solutions. This guide delves into Crafting Modular Workshop Cabinets: A Flexible Storage System for Evolving Tool Collections, offering a robust, adaptable framework that grows with your needs, transforming chaos into a highly efficient workspace. The core principle lies in designing units that can be easily rearranged, expanded, or repurposed, ensuring your workshop remains functional and clutter-free, no matter how much your arsenal of tools expands.
Key Takeaways
- Modular workshop cabinets offer unparalleled flexibility, adapting to growing tool collections and changing project demands.
- Careful planning, material selection, and joinery techniques are crucial for building durable, reconfigurable units.
- Standardized dimensions and interlocking systems ensure seamless expansion and customization.
- Integrating smart organization features like specialized drawers, custom inserts, and integrated power streamlines workflow.
- A well-designed modular system significantly reduces time spent searching for tools, boosting overall workshop productivity.
The Philosophy of Flexibility: Why Modular Cabinets Reign Supreme
The conventional fixed workshop storage often falls short. What starts as a perfect layout for a beginner’s kit quickly becomes a cramped, inefficient space as new tools, jigs, and materials accumulate. This is where Crafting Modular Workshop Cabinets: A Flexible Storage System for Evolving Tool Collections truly shines. A modular approach embraces change, allowing for easy reconfiguration and expansion without the need for a complete overhaul. Think of it as building blocks for your workshop – each cabinet unit is a self-contained module that can be combined, stacked, or relocated as needed.

Consider the dynamic nature of woodworking: one month you might be focused on small, intricate projects requiring precise hand tools and tiny fasteners; the next, you could be tackling large furniture pieces that demand robust power tools and bulky lumber. A fixed storage system struggles to accommodate such shifts. Modular cabinets, however, can be redesigned in a weekend. Need more drawer space for router bits? Simply add another drawer module. Acquired a new benchtop planer? Reconfigure two smaller base units to create a stable, dedicated home for it. This adaptability not only optimizes space but also enhances workflow, ensuring that your most-used tools are always within easy reach.
The benefits extend beyond mere adjustability. Standardized modular designs also facilitate:
- Improved Organization: Each module can be tailored for specific tool types (e.g., dedicated cabinet for power tools, another for hand saws).
- Enhanced Accessibility: Tools can be stored closer to their point of use.
- Scalability: Start small and add units as your budget and collection grow.
- Portability: Some modules, especially smaller drawer units, can be moved to different work areas or even taken on-site for projects.
- Cost-Effectiveness: Building in modules can be less daunting and more budget-friendly than a single, massive storage build. You can build one unit at a time.
Choosing the right materials is paramount for durability. Plywood, particularly Baltic birch or cabinet-grade hardwood plywood, is an excellent choice due to its stability, strength, and ease of working. MDF can be suitable for drawer boxes or painted finishes, but for structural components, plywood offers superior screw-holding ability and moisture resistance.

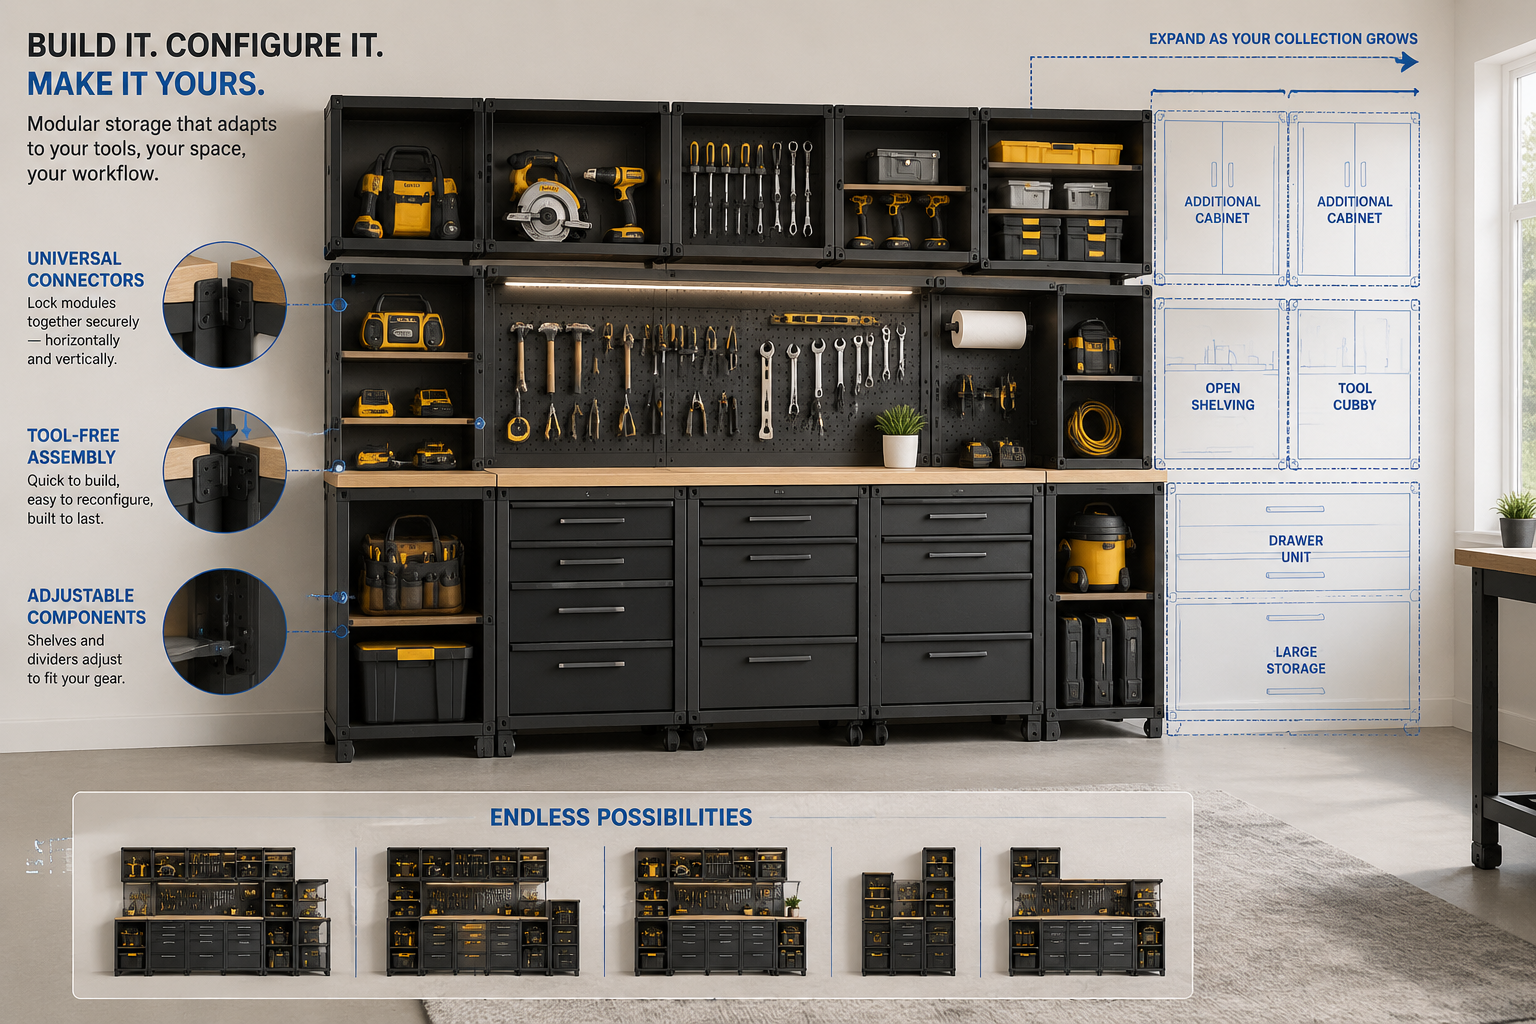
A crucial element in modular design is the standardization of dimensions. By maintaining consistent widths, depths, or heights across your modules, you ensure that they can be interchanged and stacked effortlessly. For instance, designing all base cabinets to be a uniform height (e.g., 34.5 inches for a standard countertop) allows for a cohesive workspace when topped with a workbench surface. Similarly, creating modules with widths that are multiples of a common unit (e.g., 18-inch and 36-inch units) provides maximum layout flexibility. Learn more about effective workshop layouts and space utilization by exploring Smart Workshop Storage Solutions: Maximizing Small Spaces with.
Design and Construction of Modular Workshop Cabinets: A Flexible Storage System for Evolving Tool Collections
The journey of Crafting Modular Workshop Cabinets: A Flexible Storage System for Evolving Tool Collections begins with meticulous design. Before cutting a single piece of wood, sketch out your ideal workshop layout, considering current tool storage needs and anticipating future acquisitions. Think about the types of tools you own: bulky power tools, delicate hand tools, small fasteners, long lumber, and sheet goods. Each category might benefit from a different type of module – drawers, open shelves, or custom cubbies.
Key Design Considerations:
- Standardized Footprint: Establish a common width and depth for your base and wall units. For example, base units could be 24 inches deep and come in 18, 24, or 36-inch widths. Wall units might be 12 inches deep.
- Accessibility: Design drawers and shelves that fully extend for easy access. Consider pull-out shelves for heavy equipment.
- Durability: Choose appropriate materials and joinery. Pocket hole joinery, dadoes, and rabbets are excellent for strong cabinet construction.
- Mobility: Incorporate heavy-duty locking casters on base units for easy rearrangement and cleaning.
- Integrated Solutions: Plan for electrical outlets, dust collection ports, and task lighting within your system.
- Flexibility within Modules: Design adjustable shelves using shelf pin holes. For drawers, consider removable dividers or custom inserts.
Material Selection:
- Plywood: As mentioned, 3/4-inch (18mm) cabinet-grade plywood is ideal for cabinet boxes. 1/2-inch (12mm) plywood works well for drawer bottoms and back panels. For budget-friendly options, construction-grade plywood can be used for hidden areas or painted finishes. Consider 12 Plywood for Cabinets: Strength, Durability, and Design Considerations for more insights.
- Drawer Slides: Heavy-duty, full-extension ball-bearing drawer slides are essential for smooth operation and carrying heavy loads.
- Hardware: Quality hinges, pulls, and casters contribute to the longevity and functionality of your cabinets.
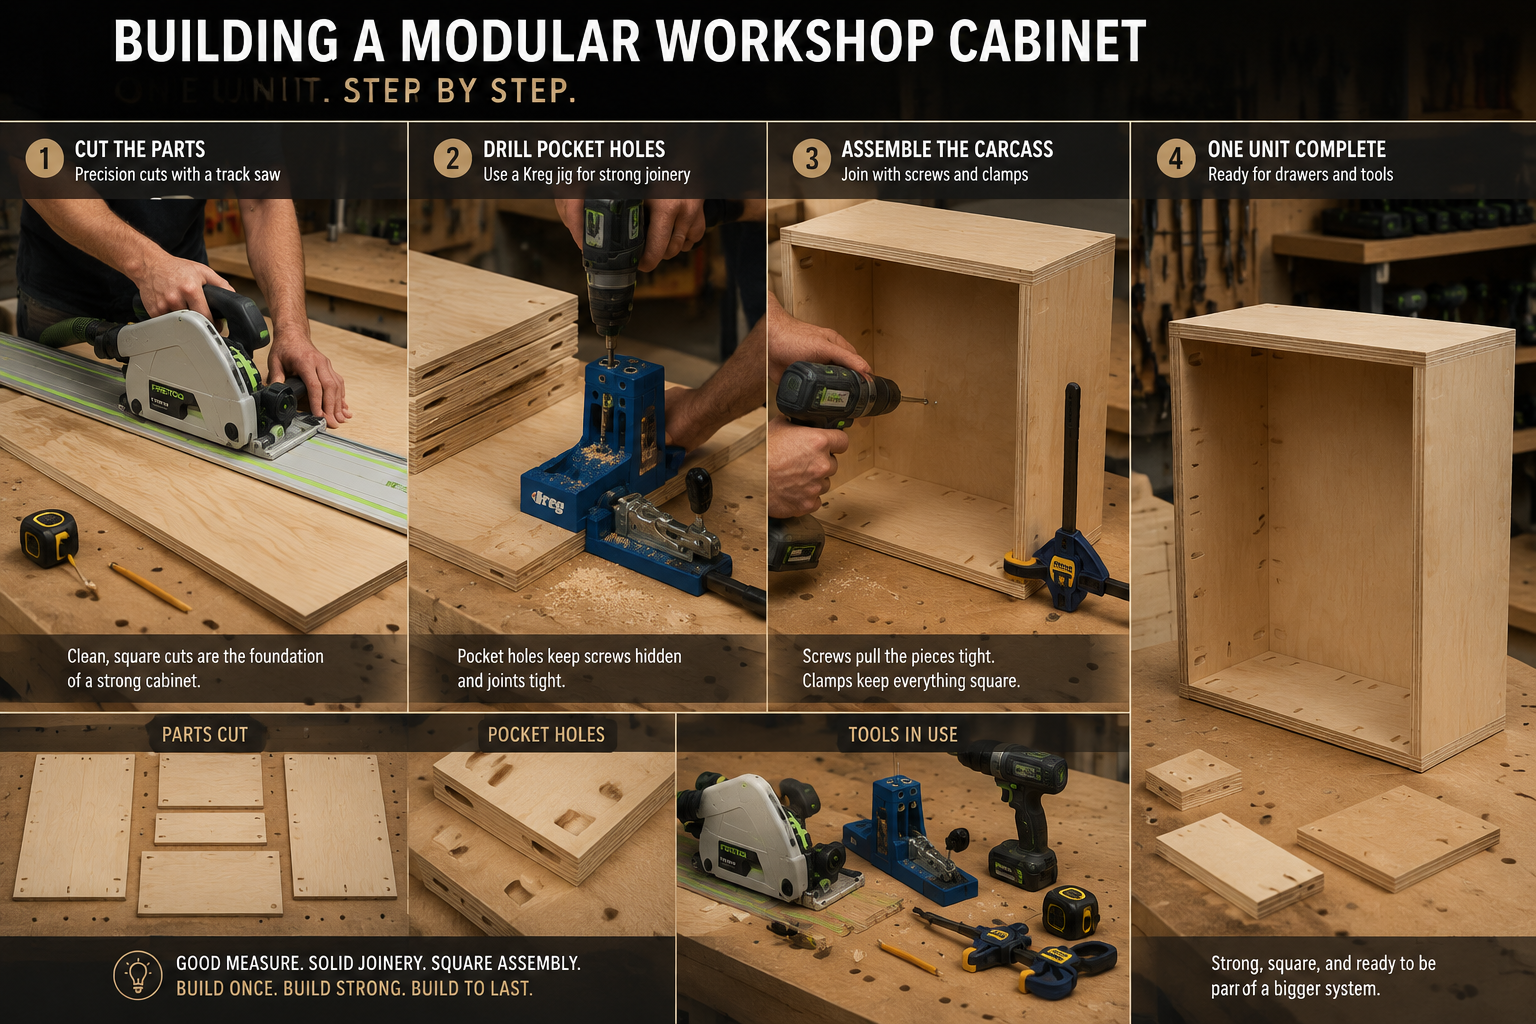
Step-by-Step Construction Overview (Basic Drawer Module):
- Cut Plywood Panels: Based on your design, cut the side, top, bottom, and back panels for each module.
- Create Joinery: Use a table saw, router, or pocket hole jig to create strong joints. Pocket hole joinery is fast and effective for workshop furniture. Learn more about improving accuracy with Beginner’s Guide to Essential Woodworking Jigs: Improve Accuracy and.
- Assemble Cabinet Box: Glue and screw the panels together, ensuring squareness. Use clamps to hold components while fasteners are driven.
- Construct Drawer Boxes: Build simple five-sided drawer boxes from 1/2-inch plywood, using butt joints, rabbets, or pocket holes.
- Install Drawer Slides: Precisely install the drawer slides on both the cabinet interior and the drawer boxes. Accuracy here is crucial for smooth operation.
- Attach Drawer Fronts: This is a critical step for aesthetics. Use spacers to maintain consistent gaps between drawer fronts.
- Add Back Panel and Casters: Secure a 1/4-inch or 1/2-inch plywood back panel. Attach heavy-duty locking casters to the base for mobility.
- Finish: Sand all surfaces smooth and apply a protective finish, such as polyurethane, paint, or a durable oil finish. For inspiration, check out Cool Wood Finishing Techniques.
When designing, consider how your modules will interact with other workshop elements. For example, if you’re building a dedicated workbench, ensure some base cabinet units can slide underneath it, or that their tops can serve as extensions. For ideas on building a sturdy workbench, refer to Building a Custom Wood Workbench: Design Considerations and.
Optimizing Your Modular System: Smart Storage and Future-Proofing
The true power of Crafting Modular Workshop Cabinets: A Flexible Storage System for Evolving Tool Collections lies in its optimization. Once the physical units are built, the next step is to maximize their utility and ensure they remain functional for years to come. This involves thoughtful internal organization and planning for future growth.
Internal Organization Strategies:
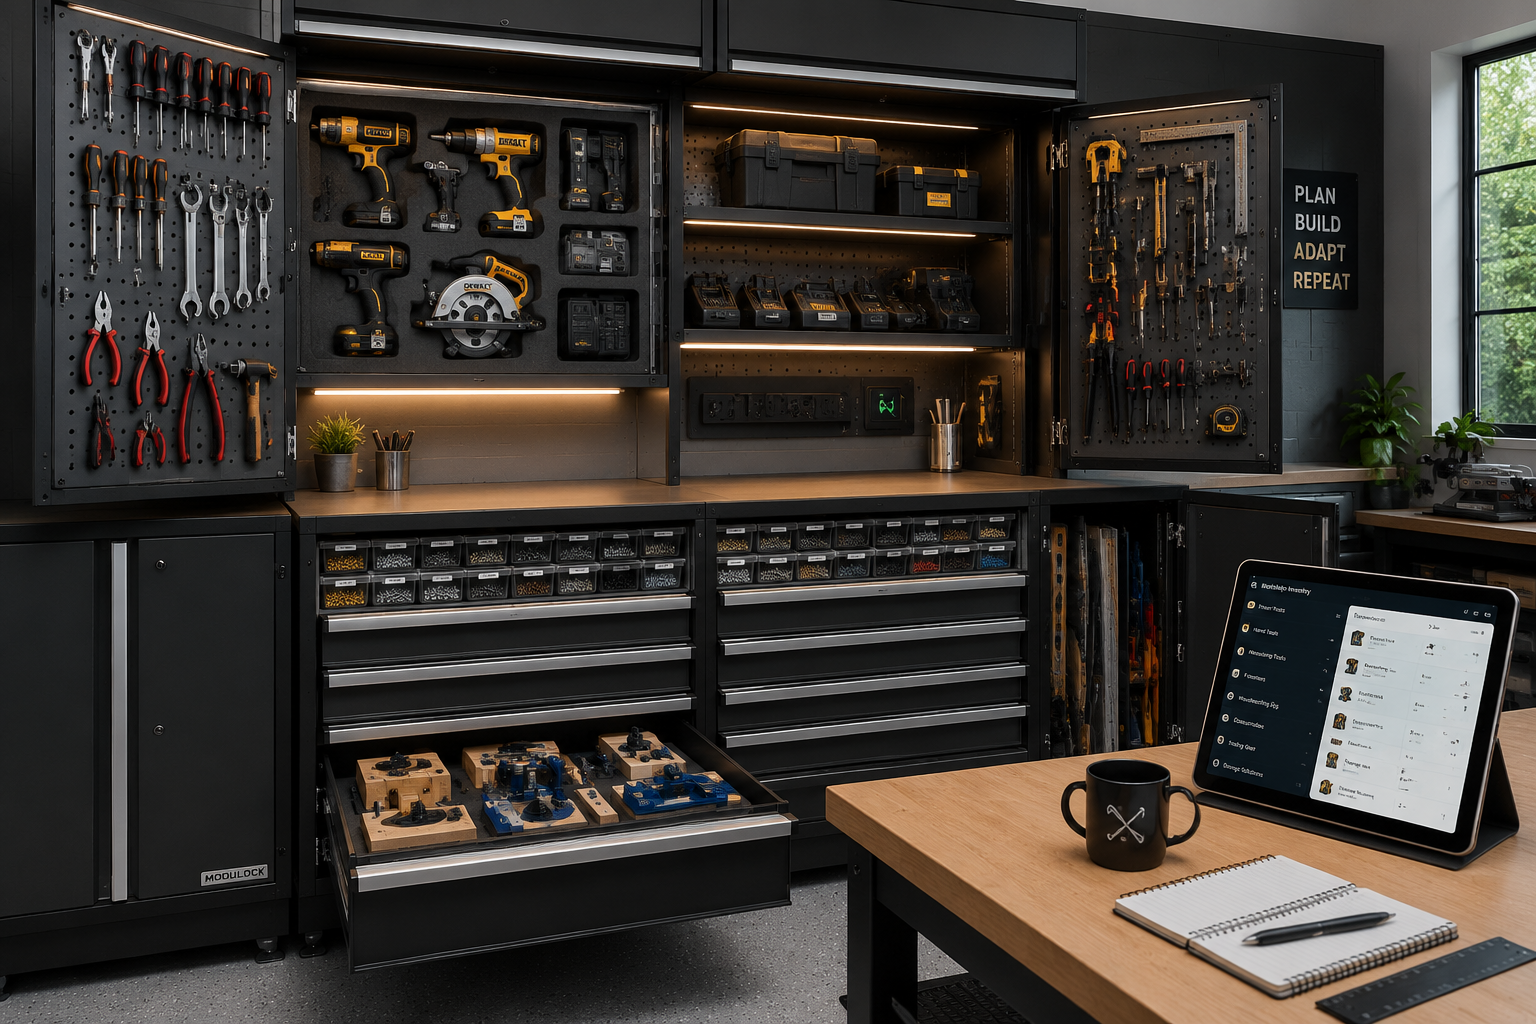
- Custom Drawer Inserts: Cut foam or plywood inserts to cradle specific tools. This prevents tools from shifting, protects them from damage, and makes inventory quick and easy.
- Dividers: Use adjustable dividers in drawers for fasteners, sandpaper, or smaller hand tools.
- Pegboard and French Cleats: Incorporate pegboard sections on cabinet interiors or on exposed sides of units. A French cleat system mounted above or between cabinets provides incredibly flexible wall storage for jigs and frequently used tools.
- Tool-Specific Storage: Design dedicated cubbies or holders for power tool accessories, router bits (The Essential Guide to Router Bits: Choosing the Right Profile,), or chisels.
- Labeling: Clear and consistent labeling on drawer fronts and shelves is non-negotiable for an efficient system. Use a label maker or stencil for professional results.
- Vertical Storage: Utilize vertical space with narrow pull-out cabinets for long clamps, straightedges, or sheet goods.
Future-Proofing Your Workshop:
- Empty Space Strategy: Don’t fill every square inch immediately. Leave some empty drawers or shelves to accommodate new tools.
- Universal Mounting Points: Design your modules with consistent mounting points (e.g., pre-drilled holes for optional accessories like vice mounts or power strips).
- Power Integration: Run conduit or install surface-mounted electrical boxes with outlets on or within your cabinets. This is crucial for charging cordless tools and powering small appliances. Consider integrating these with smart workshop solutions detailed in DIY Smart Workshop Upgrades: Integrating AI and IoT for Enhanced.
- Dust Collection Integration: If your workshop has a central dust collection system, design specific modules to integrate with it, perhaps with designated hose ports or cutouts for shop vacs. For more information, see Building a DIY Smart Workshop Dust Collection System: Integrating IoT.
- Digital Inventory: Consider maintaining a digital inventory of your tools. This can help you track what you have, where it’s stored, and when it needs maintenance, especially as your collection grows.
Regular review of your workshop layout is essential. As your projects change or you acquire new skills and tools, take time in 2026 to assess whether your current cabinet configuration still serves your needs optimally. Don’t be afraid to pull out your modules, rearrange them, and find a new, more efficient layout. This iterative process is the hallmark of a truly flexible storage system. The investment in Crafting Modular Workshop Cabinets: A Flexible Storage System for Evolving Tool Collections pays dividends in saved time, reduced frustration, and a more enjoyable woodworking experience.
Conclusion
The journey of Crafting Modular Workshop Cabinets: A Flexible Storage System for Evolving Tool Collections is an investment in efficiency, organization, and peace of mind. By embracing a modular design philosophy, woodworkers can create a dynamic workspace that effortlessly adapts to changing needs and a growing arsenal of tools. From meticulous planning and material selection to robust construction and smart internal organization, every step contributes to a workshop that enhances productivity and reduces wasted time. In 2026, there’s no longer a need to settle for static, restrictive storage. Build a system that evolves with you, ensuring your focus remains on the craft, not on the search for a misplaced tool.
Actionable Next Steps:
- Assess Your Current Needs: Catalog your existing tools and materials. Identify areas of chronic disorganization.
- Sketch Your Ideal Layout: Begin with rough sketches, focusing on work zones and tool proximity.
- Standardize Dimensions: Decide on universal widths, depths, and heights for your core modules.
- Source Quality Materials: Invest in good quality plywood and hardware for durability.
- Build a Prototype Module: Start with one basic module (e.g., a simple base cabinet with a drawer) to refine your techniques and design before committing to the full build.
- Iterate and Expand: Continually evaluate your system’s effectiveness and add new modules as needed, incorporating smart storage solutions as you go.
