


The average power tool battery, if improperly stored or charged, can lose up to 50% of its usable life over just a few years. This significant degradation often stems from environmental factors, disorganization, and inconsistent charging practices. Fortunately, implementing DIY Custom Storage Solutions for Power Tool Batteries and Chargers: Maximizing Efficiency and Longevity offers a robust answer to these challenges, transforming chaos into order and extending the lifespan of valuable investments. By taking a proactive approach to storage, woodworkers and DIY enthusiasts can ensure their batteries are always ready, safe, and performing at their peak.
Key Takeaways

- Custom storage solutions protect power tool batteries from damage, extreme temperatures, and moisture.
- Proper organization significantly reduces downtime spent searching for batteries and chargers.
- Integrating smart charging practices into storage designs extends battery lifespan and prevents overcharging.
- DIY projects allow for tailored solutions that fit specific tool brands, battery types, and workshop spaces.
- Investing time in building these solutions pays dividends in convenience, safety, and equipment longevity.
Designing Optimal DIY Custom Storage Solutions for Power Tool Batteries and Chargers: Maximizing Efficiency and Longevity
Creating effective storage for your power tool batteries and chargers goes beyond just tidiness; it’s about safeguarding your equipment and streamlining your workflow. A well-designed system prevents accidental damage, keeps chargers accessible, and creates an environment conducive to battery health. This section explores the core principles for designing such a system in 2026.
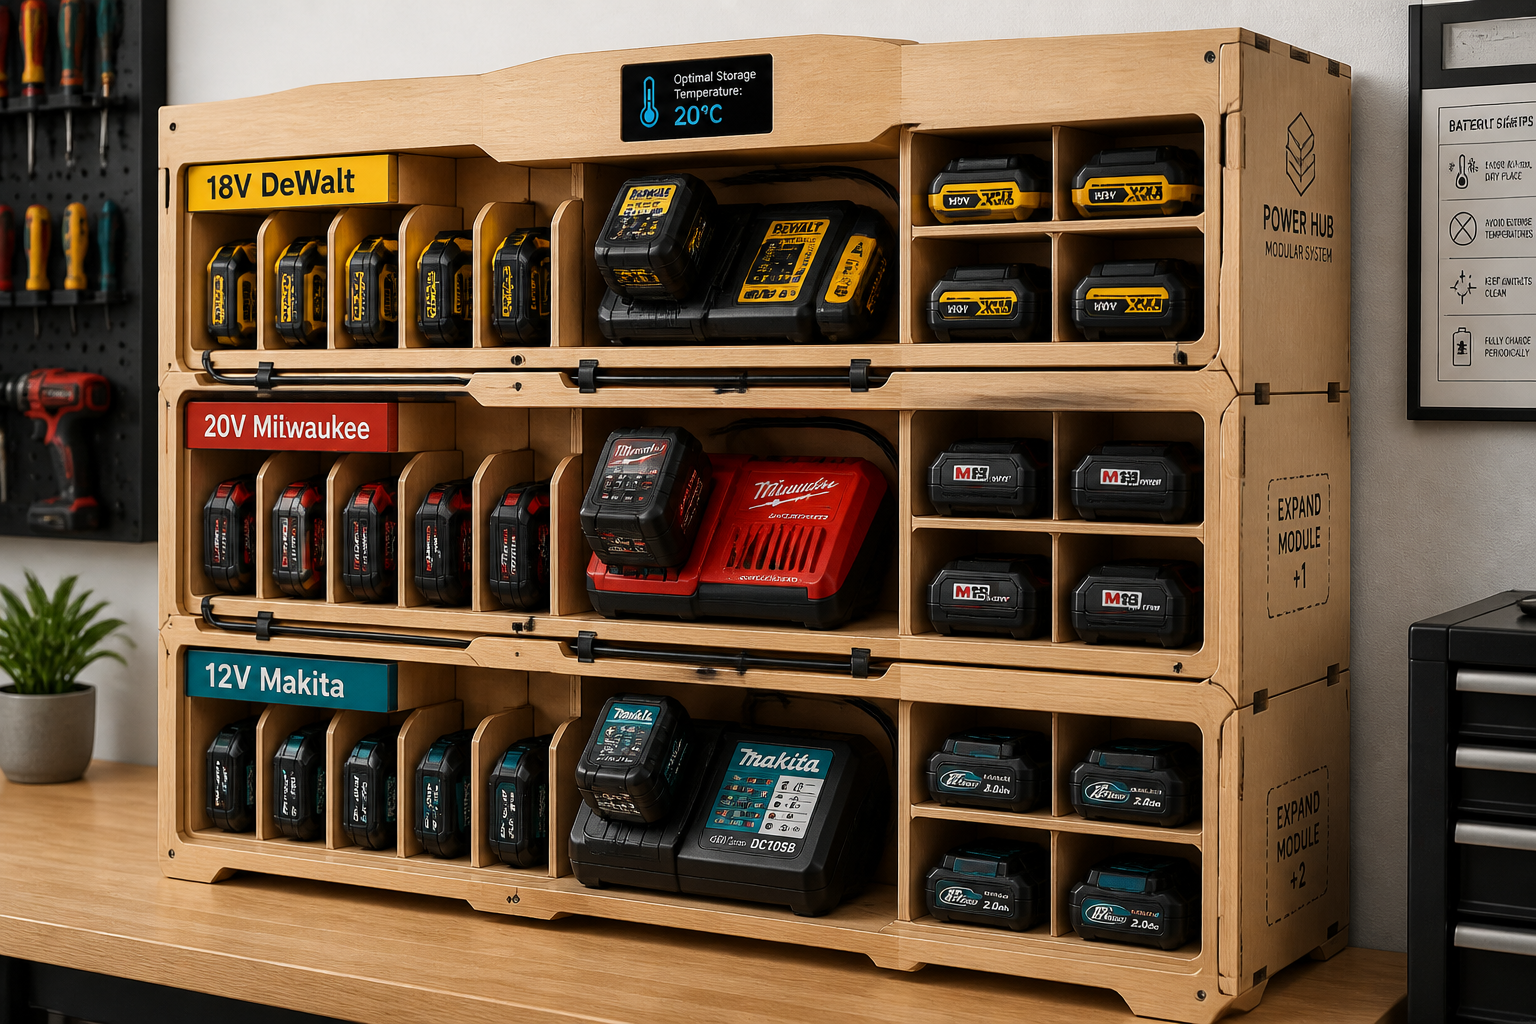
Understanding Battery Chemistry and Storage Needs
Modern power tool batteries primarily use Lithium-ion (Li-ion) technology. These batteries are powerful but also sensitive to extreme conditions.
Optimal Storage Conditions for Li-ion Batteries:
- Temperature: Store between 0°C and 20°C (32°F and 68°F). High temperatures accelerate degradation, while extremely low temperatures can reduce immediate performance.
- Charge Level: For long-term storage (over a month), aim for a 30-50% charge. Storing fully charged or completely depleted can stress the battery.
- Moisture: Keep batteries and chargers in a dry environment to prevent corrosion and short circuits.
- Physical Protection: Protect terminals from shorting and the battery casing from impact.
Knowing these needs forms the foundation of any effective DIY storage design. For instance, an enclosed cabinet might protect against dust and physical damage, but without ventilation, it could trap heat.
Essential Design Considerations for Custom Storage
When planning your DIY storage, consider the following elements to create a truly efficient and long-lasting solution:
- Modularity and Scalability: Your tool collection will likely grow. Design a system that can be easily expanded or reconfigured. Modular units, like those found in DIY modular desk organizers, allow for flexibility.
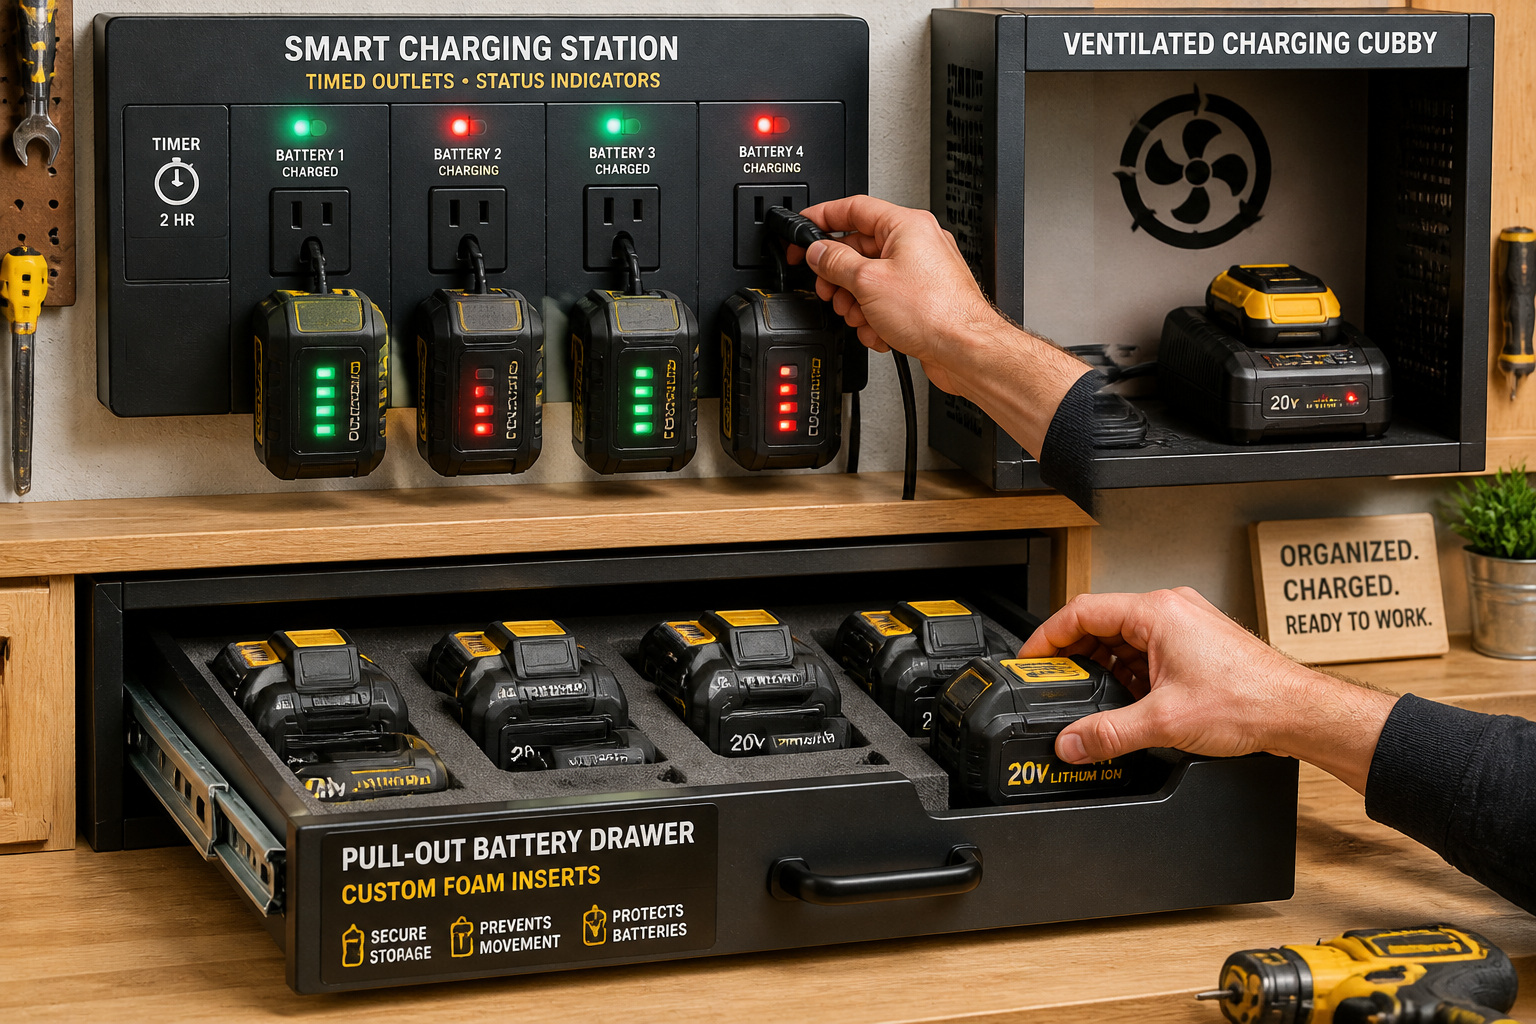
- Ventilation: Chargers generate heat, especially during operation. Ensure adequate airflow to prevent overheating, which can harm both batteries and chargers. Louvered panels or small integrated fans can be beneficial.
- Cable Management: Tangled cords are a safety hazard and a nuisance. Design channels, clips, or wraps to keep cables neat and out of the way.
- Accessibility and Visibility: Batteries and chargers should be easy to access and identify. Labeling specific slots for different brands or voltages can save time.
- Safety Features: Consider features like individual power switches for chargers or surge protection. For extremely humid environments, a small desiccant pack in an enclosed compartment could be useful.
- Material Choice: Wood (plywood, MDF, or solid wood) is a popular choice for DIY storage due to its workability and aesthetic appeal. Ensure the material is sturdy enough to hold the weight of your batteries and chargers.

Different Approaches to DIY Battery & Charger Storage
Several popular DIY storage concepts can be adapted to your specific needs:
- Wall-Mounted Charging Stations:
- Pros: Saves workbench space, keeps items visible and accessible.
- Cons: Requires sturdy wall mounting, potential for visible cables if not managed well.
- Design Idea: A cleat system or robust custom floating shelves can support individual battery/charger docks.
- Drawer Organizers:
- Pros: Protects batteries from dust and debris, clean aesthetic.
- Cons: Less visible, requires dedicated drawer space.
- Design Idea: Custom foam inserts or dividers within drawers ensure batteries don’t shift or get damaged.
- Cabinet Integration:
- Pros: Fully enclosed, provides maximum protection and a neat appearance.
- Cons: Can lead to heat buildup if not ventilated, requires larger footprint.
- Design Idea: Incorporate pull-out shelves or trays within a cabinet, with strategically placed ventilation holes or a small fan. For inspiration, consider designs from creating ergonomic workshop furniture.
- Portable Charging Boxes/Caddies:
- Pros: Ideal for transporting batteries to job sites or between work areas.
- Cons: Limited capacity, may not be suitable for long-term storage.
- Design Idea: A sturdy wooden box with internal dividers, a carrying handle, and perhaps a power strip for charging on the go.
Pull Quote: “Optimized storage for power tool batteries isn’t just about organization; it’s a strategic investment in the longevity and peak performance of your entire tool ecosystem.”
By carefully considering these design elements and approaches, you can create a personalized DIY Custom Storage Solution for Power Tool Batteries and Chargers: Maximizing Efficiency and Longevity that perfectly fits your workshop and protects your valuable tools.
Building and Customizing Your Battery and Charger Storage
Once your design is finalized, the next step is the actual construction and customization. This hands-on phase brings your blueprint to life, ensuring functionality, safety, and visual appeal.
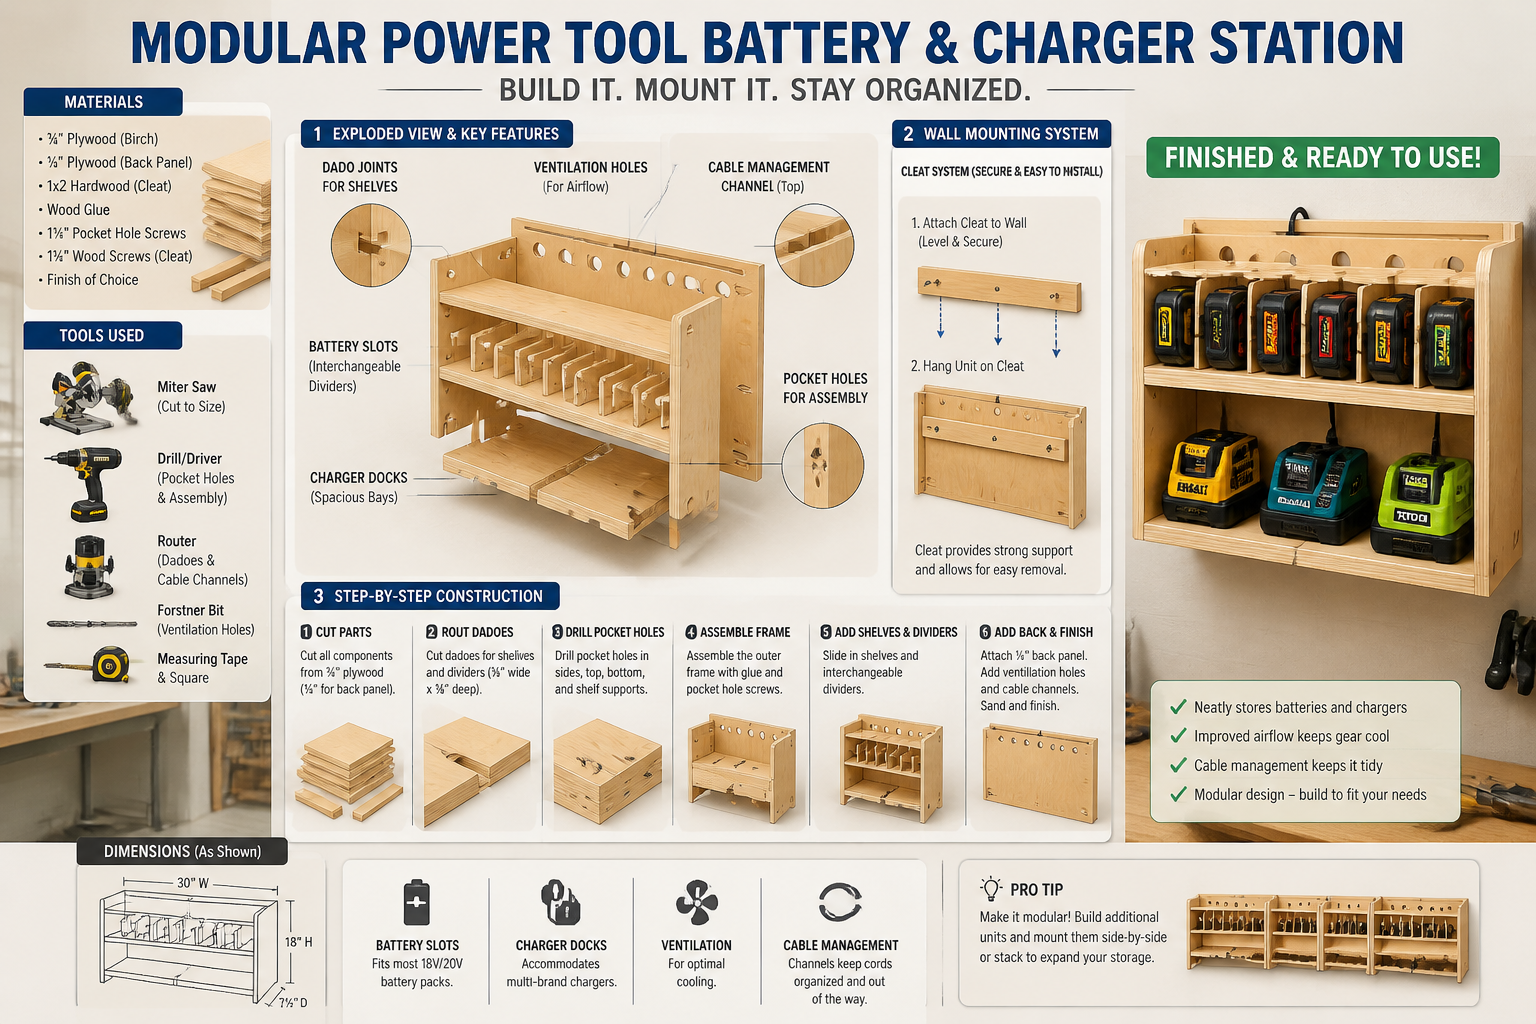
Material Selection and Basic Construction Techniques
The choice of materials significantly impacts the durability and aesthetics of your storage solution.
Common Materials:
- Plywood (¾-inch or ½-inch): Excellent for structural components, shelves, and cabinet carcasses. Stable and relatively inexpensive.
- MDF (Medium-Density Fiberboard): Good for painted finishes and precise cuts, but not as strong as plywood for load-bearing applications.
- Solid Wood: Offers superior aesthetics and durability, but can be more costly and requires careful joint work to account for wood movement.
- PVC Pipes/Conduit: Useful for creating individual slots or holders for batteries.
- Pegboard/French Cleat: Great for modular, adaptable wall-mounted systems.
Basic Woodworking Techniques You’ll Use:

- Measuring and Cutting: Precision is key. Use a miter saw or table saw for accurate cuts.
- Joinery: Depending on your design, you might use:
- Butt Joints: Simple, reinforced with screws or glue.
- Dado Joints: Strong and clean for shelves.
- Pocket Holes: Fast and effective for strong joints, especially for cabinets.
- Rabbets: For back panels or inset doors.
- Assembly: Screws, wood glue, and clamps will be your primary tools.
- Finishing: Sanding, priming, painting, or staining to protect the wood and enhance appearance.
Step-by-Step Construction Example: Wall-Mounted Charging Shelf
Let’s outline a common DIY Custom Storage Solutions for Power Tool Batteries and Chargers: Maximizing Efficiency and Longevity project: a wall-mounted charging shelf.
Materials Needed:
- ¾-inch plywood (for shelves and back panel)
- ½-inch plywood (for battery dividers/slots)
- Wood glue
- Wood screws
- French cleat hardware or heavy-duty L-brackets
- Power strip with surge protection
- Drill, miter saw, router (optional)
- Sanding paper, paint/stain
Construction Steps:
- Measure and Cut:
- Determine the dimensions based on your number of batteries and chargers.
- Cut the main shelf pieces, side panels, and a back panel from ¾-inch plywood.
- Cut smaller pieces for battery dividers from ½-inch plywood.
- Create Charger Bays:
- On the top shelf, mark out individual slots for each charger.
- Use a jigsaw or router to cut out openings large enough for the chargers to sit securely, allowing for proper airflow around them.
- Drill holes for cable routing from each charger slot to a common area where the power strip will be mounted.
- Build Battery Slots:
- On the lower shelves, create dividers that form individual pockets for each battery. These can be simple ½-inch plywood strips glued and screwed into place, or more elaborate custom-fit dados if you have a router. Ensure snug but not tight fit.
- Assemble the Frame:
- Attach the side panels to the main shelves using wood glue and screws (pocket holes work well here).
- Attach the back panel, ensuring the structure is square.
- Cable Management:
- Mount the power strip securely to the underside or side of a shelf, ensuring it’s accessible but protected.
- Route all charger cables neatly to the power strip, using cable ties or clips to secure them.
- Finishing:
- Sand all surfaces smooth.
- Apply a finish – paint, stain, or clear coat – to protect the wood.
- Mounting:
- Attach a French cleat to the back of the unit and the wall, or use sturdy L-brackets, ensuring it’s level and securely anchored into studs.

Customization and Smart Features
To truly maximize efficiency and longevity, consider integrating smart features:
- Smart Plugs: Connect your charger power strip to a smart plug (e.g., Wi-Fi enabled). This allows you to set charging schedules or turn off power remotely, preventing overcharging.
- LED Indicators: Add small LEDs (e.g., green for charged, red for charging) next to each battery slot for quick visual status checks.
- Temperature Monitoring: For larger collections or enclosed cabinets, a simple digital thermometer can help monitor the internal temperature, reminding you to improve ventilation if needed.
- Labeling: Clear, durable labels for each battery and charger slot dramatically improve organization and reduce guesswork.
- Tool-Specific Holders: Beyond batteries and chargers, integrate specific holders for frequently used tools, creating a cohesive workstation. This aligns with principles found in building a custom wood workbench or a compact and ergonomic workbench for small workshops.
These additions elevate a basic storage unit into a highly efficient and protective system, a true DIY Custom Storage Solution for Power Tool Batteries and Chargers: Maximizing Efficiency and Longevity.
Maintenance and Longevity Best Practices for Your Storage System
Building a fantastic DIY Custom Storage Solution for Power Tool Batteries and Chargers: Maximizing Efficiency and Longevity is only half the battle. Regular maintenance and adherence to best practices are crucial to ensure its effectiveness over time and to truly maximize the lifespan of your valuable power tool batteries.
Regular Cleaning and Inspection
A clean and well-maintained storage system directly contributes to battery longevity.
- Dust Removal: Dust can accumulate on chargers and batteries, potentially impacting performance and creating fire hazards. Regularly use compressed air or a soft brush to remove dust from charger vents and battery terminals.
- Cable Check: Periodically inspect all charging cables for fraying, cuts, or damaged insulation. Replace any compromised cables immediately.
- Structural Integrity: Check the storage unit itself for any loose screws, cracked wood, or signs of wear. Tighten fasteners and repair any damage to ensure the unit remains sturdy and safe.
- Ventilation Pathways: Ensure that ventilation holes or louvered sections are not blocked by dust or debris. Clear any obstructions to maintain proper airflow.
Optimizing Battery Health Through Storage Practices
Beyond the physical structure, how you interact with your storage system impacts battery life.
- The 30-50% Rule for Long-Term Storage: If a battery will not be used for an extended period (more than a month), charge or discharge it to approximately 30-50% before storing it in a cool, dry place. This significantly reduces stress on the Li-ion cells.
- Avoid Extreme Temperatures: Even with excellent ventilation, avoid placing your storage unit in areas prone to extreme temperature fluctuations, such as direct sunlight, near heaters, or in uninsulated sheds during winter.
- Rotate Batteries: If you have multiple batteries for the same tool, try to rotate their usage. This ensures a more even wear cycle across your collection.
- Don’t Store Dead Batteries: Always charge a completely depleted battery as soon as possible. Leaving a Li-ion battery at zero charge for too long can lead to irreversible damage.
- Mind the Charger: Only use chargers specifically designed for your batteries. Generic chargers might not have the correct voltage or charging algorithms, potentially damaging batteries.

Upgrades and Future-Proofing
As technology evolves and your tool collection grows, your storage system should adapt.
- Modular Expansion: If you designed your system with modularity, adding new sections for new tool brands or battery voltages should be straightforward.
- Smart Charger Integration: Consider upgrading to chargers with built-in smart features, such as trickle charging or auto-shutoff, if your current ones lack them.
- Environmental Monitoring: For workshops with fluctuating conditions, adding a simple humidity sensor can help you identify and mitigate moisture issues that could harm electronics.
- Power Tool Integration: Think about extending your custom storage to include the power tools themselves. For instance, creating dedicated holsters or slots next to their respective batteries can further streamline your workflow, similar to how one might plan for DIY smart workshop upgrades.
- Rechargeable Battery Recycling: Integrate a designated bin within or near your storage system for dead batteries awaiting proper recycling. This promotes environmental responsibility.
By following these maintenance routines and best practices, your DIY Custom Storage Solutions for Power Tool Batteries and Chargers: Maximizing Efficiency and Longevity will not only keep your workshop organized but also genuinely extend the working life of your expensive power tool batteries, ensuring they are always ready for your next project.

Conclusion
The investment in power tools and their accompanying batteries is significant for any woodworker or DIY enthusiast. Neglecting their proper storage and charging can lead to premature battery degradation, frustrating disorganization, and potential safety hazards. By embracing the principles of DIY Custom Storage Solutions for Power Tool Batteries and Chargers: Maximizing Efficiency and Longevity, you take a critical step towards safeguarding these assets and enhancing your overall workshop productivity.
From understanding the unique needs of Li-ion batteries to meticulously designing and constructing a tailored storage system, every effort contributes to a more efficient, safer, and ultimately more enjoyable crafting experience. Whether you opt for a sleek wall-mounted charging station, a protected drawer organizer, or a comprehensive cabinet integration, the benefits of custom storage are undeniable: reduced downtime, extended battery life, and a clutter-free environment.
Remember to prioritize ventilation, cable management, and accessibility in your design. Regular cleaning, structural checks, and adhering to optimal charging/storage levels will ensure your custom solution continues to serve you well for years to come. Start planning your personalized system today and transform the way you manage your power tool batteries and chargers. The longevity of your tools, and your peace of mind, depend on it.
References
- Plett, G. L. (2004). Battery management systems for large lithium-ion battery packs. IEEE Industrial Electronics Society News, 51(2), 16-24.
- Lithium-Ion Battery Storage (2022). Battery University. Retrieved from https://batteryuniversity.com/article/bu-702-how-to-store-batterium
SEO Meta Title: DIY Custom Battery Storage: Maximize Tool Longevity SEO Meta Description: Build DIY custom storage solutions for power tool batteries & chargers in 2026. Maximize efficiency, extend battery life, and keep your workshop organized.
