


Less than 1% of woodworking shops in North America have air quality levels considered truly safe during active operations. This startling statistic highlights a pervasive and often overlooked health hazard. While saw blades and routers present immediate dangers, the insidious threat of airborne dust and fumes can lead to chronic respiratory issues, allergies, and even more severe conditions over time. Fortunately, modern technology, combined with traditional woodworking ingenuity, offers a powerful solution. This article explores how to construct a DIY Smart Workshop Air Filtration System: Building an Automated Dust and Fume Extractor for Healthier Woodworking, empowering artisans to create a significantly safer and more comfortable workspace in 2026.
Key Takeaways
- Understanding the Threat: Fine wood dust (PM2.5) and chemical fumes are serious health hazards requiring effective filtration.
- Smart Automation Benefits: Integrating sensors and smart controls allows for reactive, efficient, and hands-free air purification.
- Core Components: A robust system requires a powerful fan, multi-stage filtration (pre-filter, MERV 13/HEPA), and a microcontroller for automation.
- Custom Build Advantage: DIY construction offers tailored performance and cost savings compared to commercial units.
- Continuous Monitoring & Maintenance: Regular filter changes and system checks are crucial for sustained air quality.
Understanding Workshop Air Quality and the Need for a DIY Smart Workshop Air Filtration System
The air in an active woodworking shop is often teeming with particulate matter. Beyond the visible sawdust that settles on surfaces, microscopic particles, particularly those under 2.5 micrometers (PM2.5), pose the greatest risk. These particles are small enough to bypass the body’s natural defenses and penetrate deep into the lungs, causing irritation, inflammation, and contributing to conditions like asthma, bronchitis, and even certain cancers over prolonged exposure. In addition to wood dust, fumes from glues, finishes, and solvents introduce volatile organic compounds (VOCs) that further degrade air quality and present their own set of health risks.

Traditional dust collection systems, while vital for capturing larger chips and shavings at the source, often fall short in trapping these ultrafine particles. Ambient air cleaners are designed to circulate and filter the entire workshop volume, but many are manually operated, meaning they only run when someone remembers to turn them on. This is where a DIY Smart Workshop Air Filtration System: Building an Automated Dust and Fume Extractor for Healthier Woodworking comes into its own. By integrating smart sensors and automated controls, the system can react in real-time to changes in air quality, providing continuous, demand-driven purification without constant manual intervention. This proactive approach ensures a consistently healthier environment, protecting your most valuable assets: your lungs and overall well-being.

Health Risks of Poor Air Quality
- Respiratory Illnesses: Asthma, chronic bronchitis, reduced lung function.
- Allergies: Aggravation of existing allergies, development of new sensitivities.
- Irritation: Eye, nose, and throat irritation.
- Systemic Effects: Exposure to certain chemicals can impact organs beyond the lungs.
Why Go Smart and Automated?
An automated system offers several distinct advantages over traditional, manually operated units:
- Real-time Response: Sensors detect air quality degradation instantly and activate filtration without delay.
- Energy Efficiency: The system only runs when needed, saving electricity and extending filter life.
- Consistent Protection: Continuous monitoring ensures the workshop remains safe, even during intermittent operations.
- Convenience: No more forgetting to turn on the filter or leaving it running unnecessarily.
- Data Logging: Many smart systems can log air quality data, providing insights into peak pollution times and system effectiveness.
Designing Your DIY Smart Workshop Air Filtration System
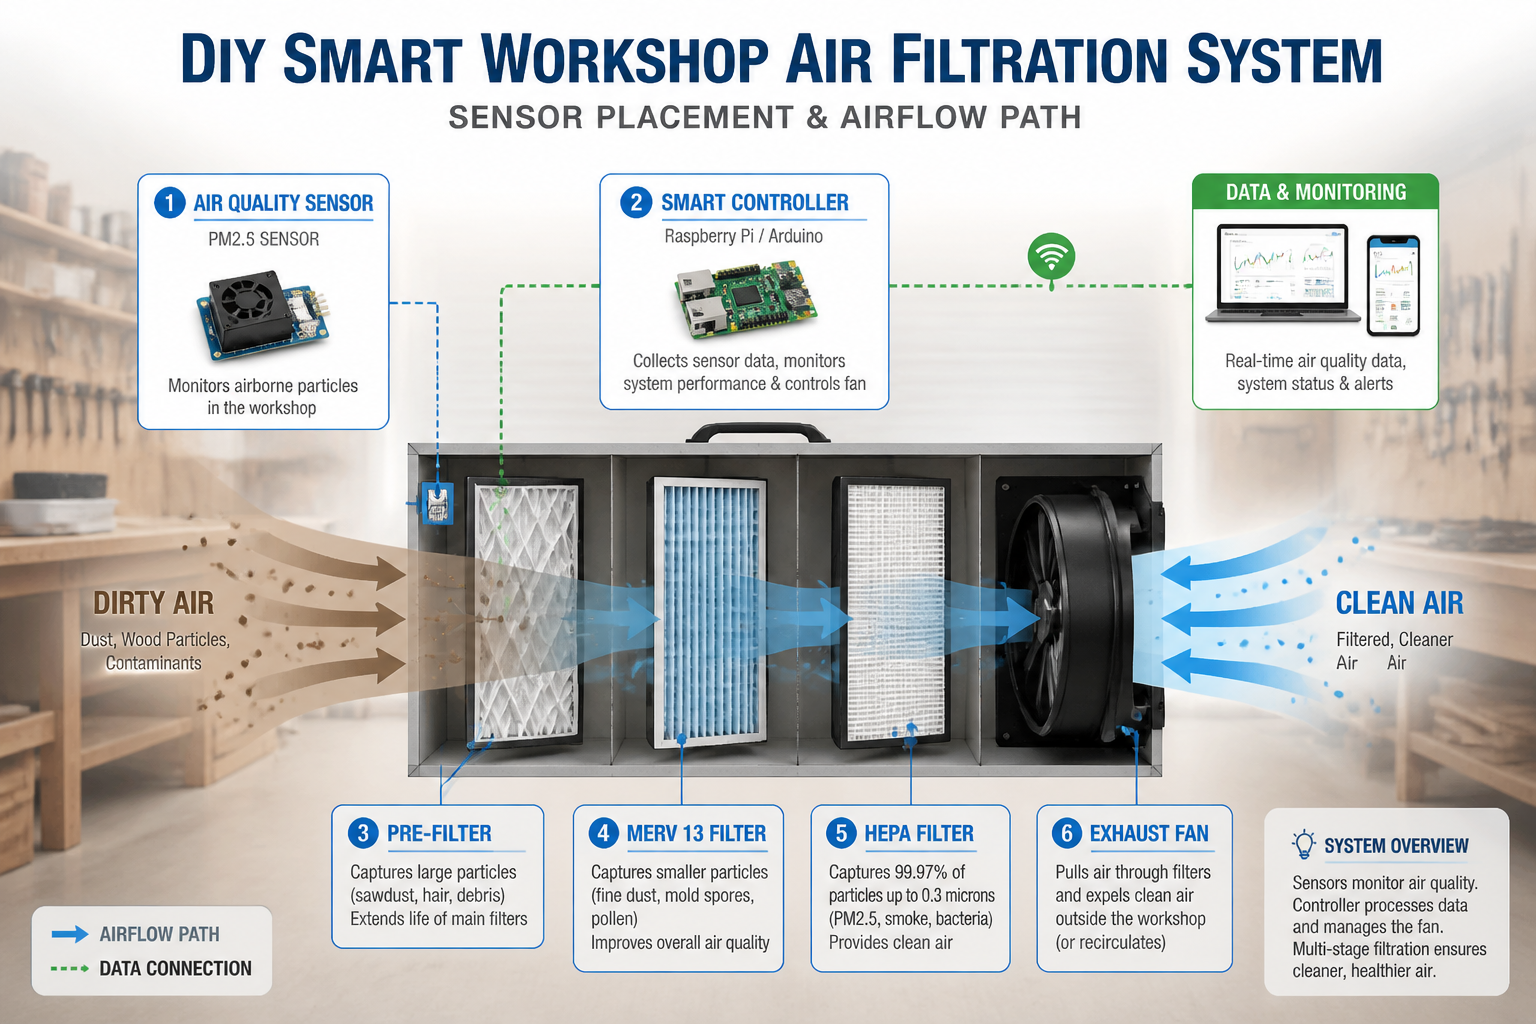
Building a truly effective DIY Smart Workshop Air Filtration System requires careful planning of its core components and how they interact. The goal is to move a significant volume of air through a series of filters efficiently and have that process triggered and managed intelligently.
Essential Components
- Air Mover (Fan): This is the heart of your system. A powerful centrifugal fan or an inline duct fan designed for continuous operation is crucial. Aim for a fan that can move at least 500-1000 cubic feet per minute (CFM) for a typical two-car garage sized workshop, ensuring adequate air changes per hour (ACH).
- Filtration Stages:
- Pre-filter (G4/MERV 8): Captures larger dust particles, saw shavings, and prolongs the life of finer filters. Easily cleanable or replaceable.
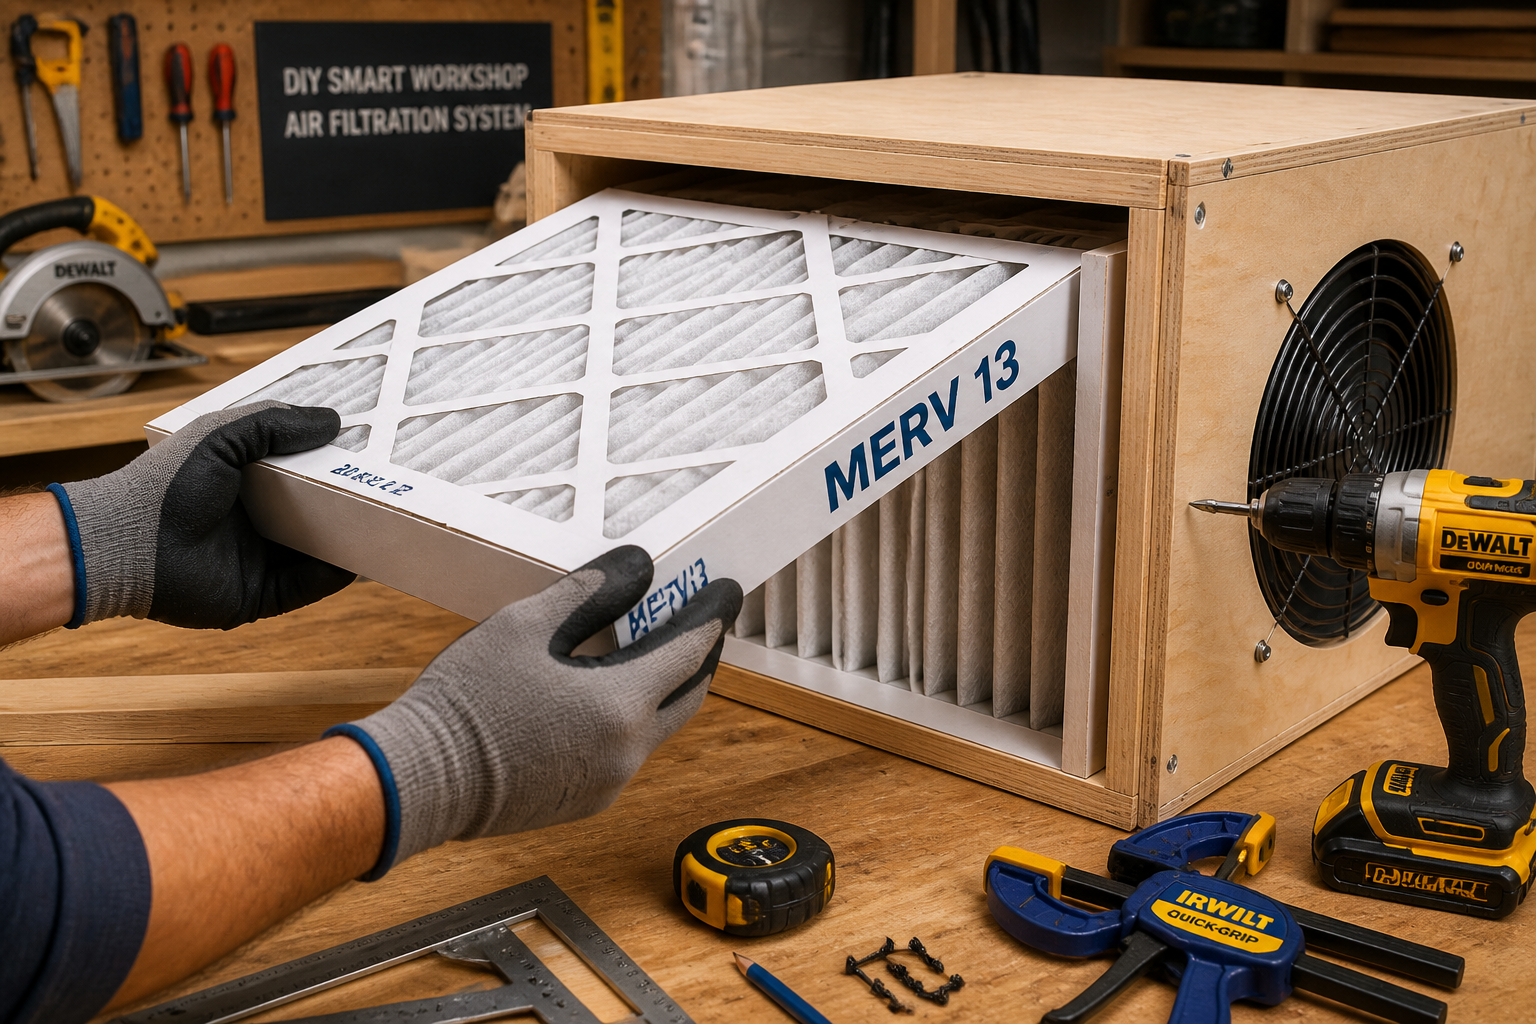
- Main Filter (MERV 13): Crucial for trapping fine dust particles (down to 0.3-1.0 microns), including many wood dust particles that pose health risks.
- Optional HEPA Filter: For ultimate air purity, a HEPA filter can capture 99.97% of particles 0.3 microns and larger. This is especially useful if working with materials that generate extremely fine dust or chemicals.
- Optional Activated Carbon Filter: Essential if dealing with VOCs or unpleasant odors from glues, finishes, or solvents.
- Smart Control Unit:
- Microcontroller: A Raspberry Pi or Arduino is ideal. These small computers can read sensor data, process logic, and control relays.
- Air Quality Sensor: A PM2.5 sensor (e.g., SDS011 or PMS5003) is vital for detecting fine particulate matter. Consider adding a VOC sensor if chemical fumes are a concern.
- Relay Module: To switch the high-power fan on and off based on the microcontroller’s commands.
- Power Supply: For the microcontroller and sensors.
- Networking Module: Wi-Fi or Ethernet for remote monitoring and control via a smartphone app.
- Enclosure/Ducting:
- Filter Housing: A custom-built wooden box or sheet metal enclosure designed to securely hold the filters and create an airtight seal.
- Ducting: Flexible or rigid ducting to connect the fan to the filter housing and route air effectively.
Step-by-Step Construction Plan
1. Frame and Filter Housing Construction
Begin by building a sturdy wooden box that will house your filters. The dimensions will depend on the size of your chosen filters. Design it with easy access for filter replacement.
- Materials: Plywood (¾” or ½”), wood screws, wood glue, weatherstripping or foam gasket material for airtight seals.
- Technique: Cut plywood panels to size. Assemble using pocket screws or dado joints for strength. Create a removable lid or side panel for filter access. Install internal supports to hold filters securely in place.
- For tips on constructing durable wooden structures, refer to our guide on Mastering Dovetail Joinery for Drawers.
2. Fan Integration
Mount your chosen fan securely. If using an inline duct fan, ensure it’s positioned to pull air through the filters and exhaust clean air. For centrifugal fans, ducting will connect it to the filter housing.
- Mounting: Use vibration-dampening mounts if possible to reduce noise. Ensure all connections are airtight.
3. Electrical Wiring
This step involves working with mains voltage and should only be undertaken if you are comfortable and knowledgeable about electrical safety. If not, consult a qualified electrician.
- Relay: Wire the fan’s power supply through a solid-state relay module controlled by your microcontroller. This allows the low-voltage microcontroller to switch the high-voltage fan.
- Microcontroller Power: Provide a stable 5V or 3.3V power supply for your Raspberry Pi/Arduino and sensors.
4. Sensor Integration and Software Development
- Sensor Placement: Mount the PM2.5 sensor in a location where it can accurately sample the ambient workshop air, away from direct dust sources or drafts.
- Microcontroller Setup: Install the operating system (if using Raspberry Pi) and necessary libraries for your chosen sensor.
- Programming Logic: Write code (e.g., Python for Raspberry Pi, C++ for Arduino) that:
- Reads data from the PM2.5 sensor.
- Compares readings against a user-defined threshold (e.g., if PM2.5 > 35 µg/m³).
- Activates the fan via the relay when the threshold is exceeded.
- Deactivates the fan when air quality improves and stays below the threshold for a set period.
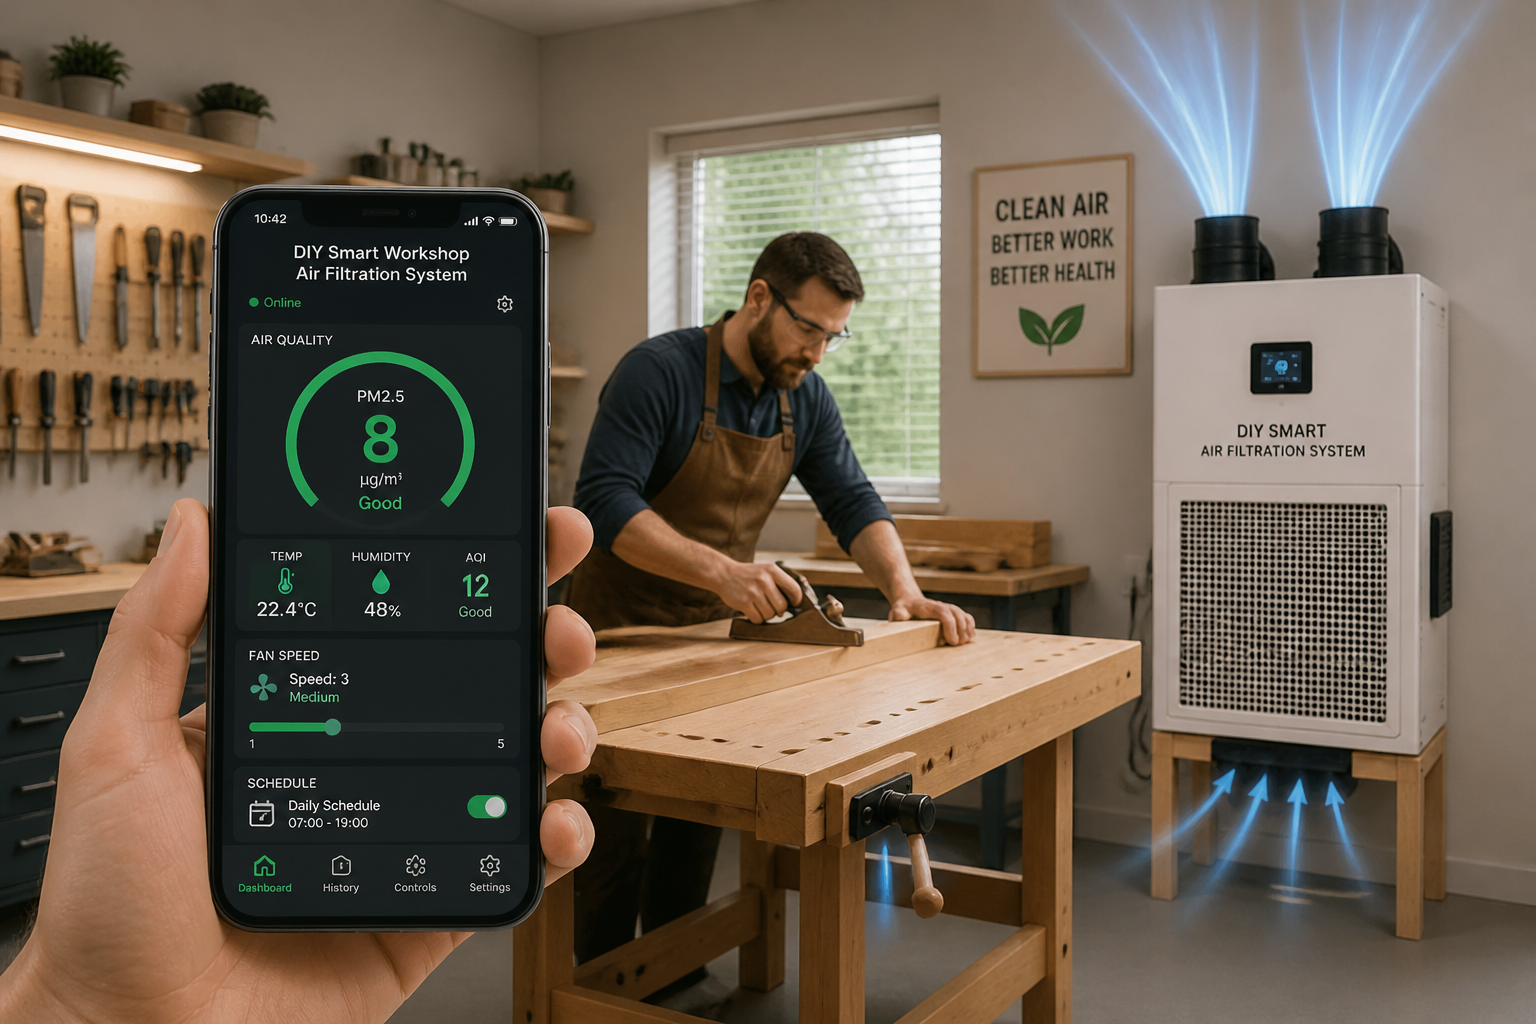
- Sends data to a cloud platform (e.g., Adafruit IO, Thingspeak) or local web server for app integration.
- App Development (Optional but Recommended): Create a simple web interface or use a mobile app builder (e.g., Blynk) to display air quality data, set thresholds, and manually control the system.

Customization and Advanced Features
- Scheduled Operations: Program the system to run at specific times, regardless of air quality, for general air circulation.
- Timer Functionality: Add a timer for manual operation, allowing the fan to run for a set duration before turning off.
- Filter Life Monitoring: Track fan run-time and alert users when it’s time to check or replace filters.
- Integration with Other Smart Home Systems: Connect to platforms like Home Assistant for more comprehensive automation. For instance, you could link it to lighting or other workshop devices.
- Variable Fan Speed: Implement a variable speed controller (VFD for AC motors, PWM for DC motors) to adjust airflow based on air quality levels.
Operating and Maintaining Your DIY Smart Workshop Air Filtration System
Once your DIY Smart Workshop Air Filtration System: Building an Automated Dust and Fume Extractor for Healthier Woodworking is built and configured, proper operation and routine maintenance are crucial for its long-term effectiveness and to ensure continuous clean air.
Calibration and Testing
Before regular use, it is essential to calibrate and thoroughly test your system.
- Initial Run: Turn on the system manually and check for proper airflow through all filter stages. Listen for any unusual noises or vibrations.
- Sensor Validation: Generate some fine dust (e.g., sanding a piece of wood) and observe if the PM2.5 sensor accurately detects the spike and triggers the fan. Note how quickly the system reduces the dust levels.
- Threshold Adjustment: Experiment with different PM2.5 thresholds in your software. A common starting point is to activate the fan when PM2.5 levels exceed 25-35 µg/m³, and deactivate when they fall below 10-15 µg/m³.
- App Functionality: Verify that your smartphone app or web interface correctly displays data and allows for control.
Regular Maintenance Schedule
Filters are the consumable heart of your filtration system. Neglecting them will quickly reduce efficiency and can put a strain on your fan.
| Component | Frequency | Action |
|---|---|---|
| Pre-filter | Weekly/Bi-weekly | Inspect, vacuum, or wash (if washable). Replace when visibly clogged or damaged. |
| MERV 13 Filter | Every 2-4 months | Inspect. Replace when pressure drop across the filter is significant, indicated by reduced airflow, or after heavy usage. |
| HEPA/Carbon Filter | Every 6-12 months | Inspect. HEPA filters typically last longer but lose efficiency over time. Carbon filters’ lifespan depends on chemical exposure. Replace as needed. |
| Fan & Motor | Annually/Bi-annually | Inspect for dust buildup on blades (clean if necessary). Check bearings for wear. Lubricate if required (check manufacturer guidelines). |
| Sensors | Monthly | Gently clean sensor inlet with compressed air (away from sensor elements). Verify readings against known good air quality if possible. |
| Ducting & Seals | Monthly | Check for leaks, cracks, or loose connections. Repair with duct tape or sealant to maintain system efficiency. |
Keeping your workshop organized can also contribute to better air quality, as it reduces surfaces where dust can accumulate. Consider implementing Building Modular Wood Storage Systems for Small Workshops.


Maximizing System Efficiency
- Source Collection: Your DIY smart air filtration system is for ambient air. Always prioritize direct dust collection at the source of your tools first. A mobile dust collection cart can significantly reduce the load on your ambient filter.
- Airflow Optimization: Position your system to create a natural air circulation pattern that pulls dusty air from the active work area and returns clean air. Avoid placing it in a corner where it might create dead zones.
- Cleanliness: Regularly sweep and vacuum your workshop floor and surfaces with a shop vac equipped with a HEPA filter. This prevents settled dust from becoming airborne again.
- Ventilation: While your system filters, occasional fresh air ventilation (opening a door or window) can help exchange air and reduce CO2 levels, but ensure it doesn’t introduce more outdoor pollutants than it removes.
By following these operational and maintenance guidelines, your automated dust and fume extractor will continue to provide a healthy and enjoyable woodworking environment for years to come.
Conclusion
The pursuit of healthier woodworking is a journey, not a destination, and building a DIY Smart Workshop Air Filtration System: Building an Automated Dust and Fume Extractor for Healthier Woodworking represents a significant leap forward. By leveraging readily available components and embracing smart technology, you can transform your workshop into an environment that proactively protects your long-term health from insidious dust and chemical threats.
This comprehensive guide has equipped you with the knowledge to design, construct, and maintain an intelligent air purification system that not only clears the air but also adds an element of modern convenience to your craft. Remember, your health is paramount. Investing time in this project is an investment in years of enjoyable, unhindered woodworking. Take the first step today towards a cleaner, safer, and smarter workshop.
Actionable Next Steps:
- Assess Your Needs: Determine your workshop size, primary dust/fume sources, and desired filtration level.
- Gather Components: Compile a shopping list for your fan, filters, microcontroller, sensors, and construction materials.
- Plan Your Layout: Sketch out where your unit will be placed and how ducting will route airflow.
- Start Building: Tackle the construction of the filter housing and fan integration first, ensuring a sturdy and airtight build.
- Code and Calibrate: Begin programming your microcontroller, integrating sensors, and testing the automation logic.
- Regular Maintenance: Commit to a consistent filter inspection and replacement schedule to ensure peak performance.
Meta Title: DIY Smart Workshop Air Filtration: Automated Dust & Fume Extraction Meta Description: Build a DIY Smart Workshop Air Filtration System for healthier woodworking in 2026. Automated dust and fume extraction for a safer craft space.
