

The average cost of a new dining table can easily exceed $800, often reaching into the thousands for quality pieces, making the prospect of acquiring a sturdy, stylish one a significant investment for many households in 2026. However, what if you could craft a beautiful, functional dining table yourself, even if you’ve never picked up a chisel before? This comprehensive guide focuses on helping beginners build their very first dining table with confidence, using simple joinery techniques, practical wood choices, and easy finishing methods. Building your own table not only saves money but also instills a profound sense of accomplishment and provides a truly custom piece for your home. This article, “DIY Dining Table for Beginners: Simple Joinery, Wood Selection, and Finishing for Your First Build,” will demystify the process, making it accessible and enjoyable.
Key Takeaways
- Start Simple with Joinery: Embrace basic but strong joinery like butt joints with screws, pocket holes, and basic mortise and tenon for your first project.
- Choose the Right Wood: Opt for beginner-friendly, stable, and affordable wood species such as pine, poplar, or common oak.
- Plan Your Design: Keep your initial design straightforward. Rectangular tables with four legs and a simple apron are ideal for learning.
- Focus on Safety: Always prioritize safety. Wear protective gear and understand how to use your tools correctly before starting.
- Finish for Durability: Select an appropriate finish that protects the wood and enhances its natural beauty, such as wipe-on polyurethanes or natural oils.
Simple Joinery Techniques for Your First DIY Dining Table
Building a durable dining table requires strong joints, but “strong” does not automatically mean “complicated.” For your first build, focusing on accessible, robust joinery methods will ensure success without overwhelming you. The goal is a stable table that can withstand daily use.
Butt Joints with Screws
The most fundamental joint in woodworking, the butt joint, simply involves butting two pieces of wood together and securing them. For a dining table, especially the apron-to-leg connections, reinforcing these with screws is a straightforward and effective method.
- How it works: Two pieces of wood are brought together, typically at a 90-degree angle. Pilot holes are drilled, and screws are driven through one piece into the other.
- Advantages for beginners:
- Requires minimal specialized tools.
- Easy to measure and cut.
- Provides strong mechanical fastening.
- Tips for success:
- Always drill pilot holes to prevent splitting the wood.
- Use appropriate screw length and gauge for the wood thickness.
- Consider wood glue in addition to screws for extra strength.
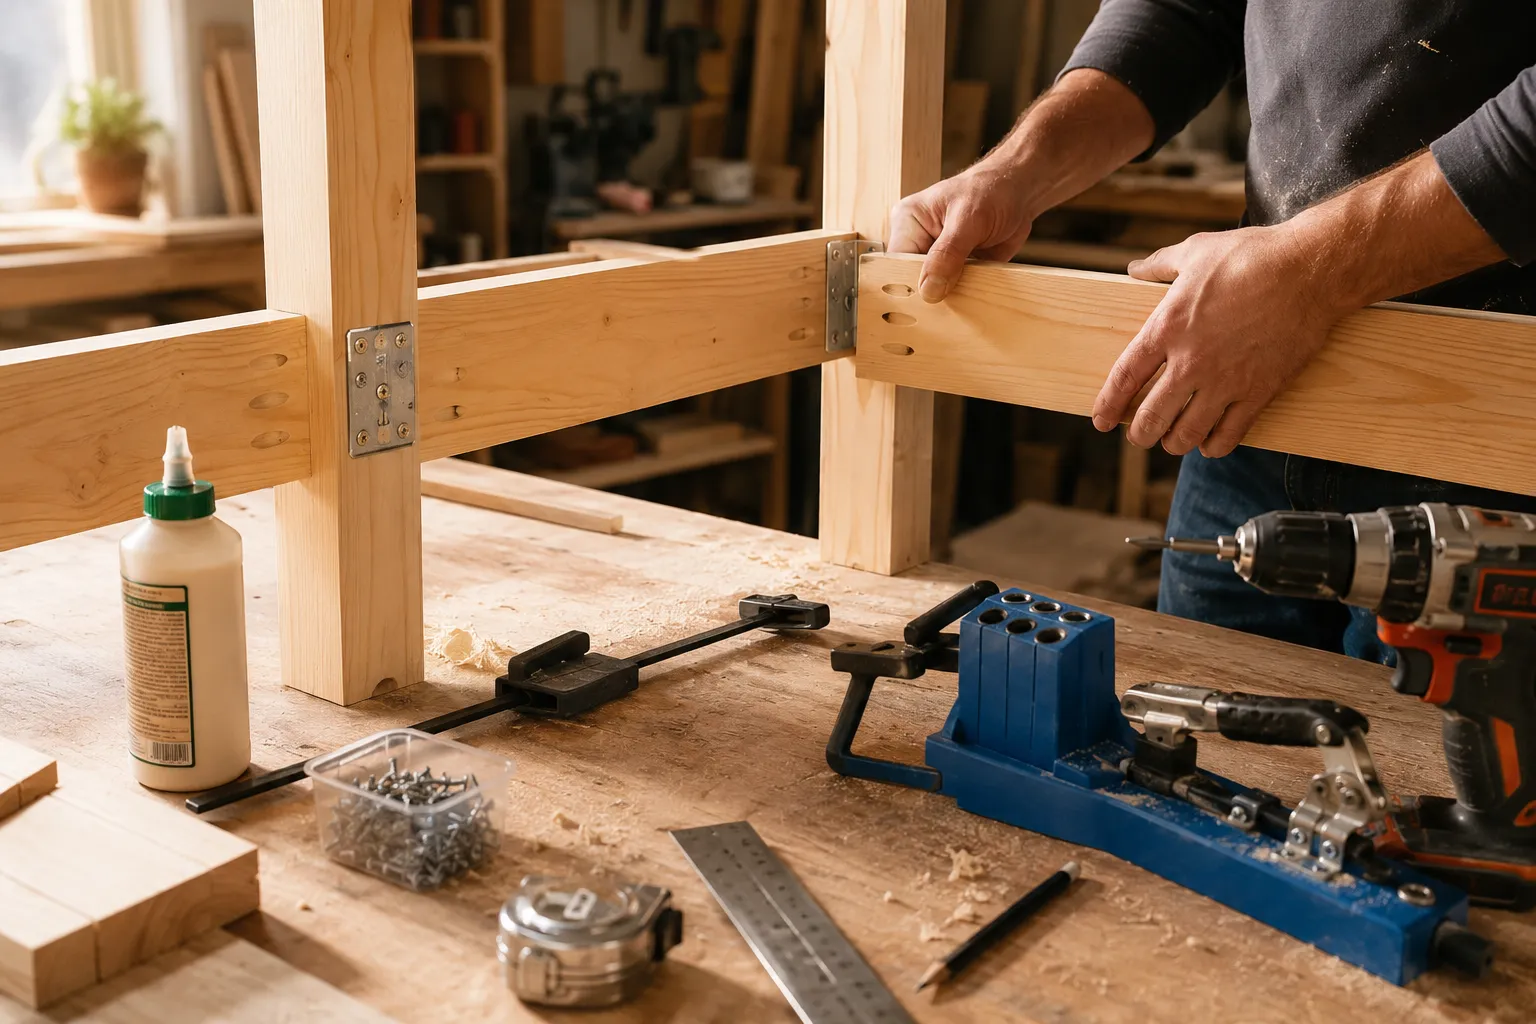
Pocket Hole Joinery
Pocket hole joinery is a popular technique for beginners due to its hidden fasteners and strong, tight joints. It involves drilling angled holes into one piece of wood and then joining it to another piece with self-tapping screws. This method is excellent for attaching table aprons to legs, and for connecting tabletop planks.
- Tools required: A pocket hole jig, clamps, and pocket hole screws.
- Process:
- Set the jig to the correct wood thickness.
- Clamp the jig to the workpiece.
- Drill the angled pocket holes.
- Apply wood glue to the joint surfaces.
- Clamp the pieces together.
- Drive the pocket hole screws to secure the joint.
- Why it’s great for tables: It creates very strong joints, resists racking, and the screws are concealed, leading to a clean aesthetic. You can learn more about various joinery options in “Beginners Guide To Dining Tables Standard Sizes Joinery Options And Wood Choices For Your First Build” which covers various construction methods.
Dowel Joints
Dowel joints offer a clean appearance with no visible fasteners and provide good alignment. They involve drilling corresponding holes in two pieces of wood and inserting fluted dowel pins with glue.
- Tools: Doweling jig, drill, dowel pins, wood glue.
- Steps:
- Mark the exact locations for dowel holes on both pieces.
- Use a doweling jig to ensure perfectly aligned holes.
- Drill the holes to the correct depth.
- Apply wood glue into the holes and onto the dowels.
- Insert dowels and join the pieces, clamping firmly.
- Application: Ideal for attaching tabletop planks together or for reinforcing leg-to-apron connections.
Mortise and Tenon (Simplified)
While traditional mortise and tenon can be complex, a simplified version using a router or even carefully with a drill and chisel can be achievable for beginners. This joint is incredibly strong and traditional.
- Concept: A “tenon” (a projecting piece) from one board fits snugly into a “mortise” (a corresponding hole) in another.
- Simplified approach: Use a router with a straight bit to cut shallow mortises and tenons, or create through-tenons that are secured with wedges.
- Benefits: Exceptional strength and durability, especially for structural components like legs and aprons.
“For your first dining table, don’t aim for perfection with complex joinery. Focus on precise cuts and strong, reliable fasteners. The confidence gained from a successful build is invaluable.”
Wood Selection for Your First DIY Dining Table
Choosing the right wood is crucial for the success, aesthetics, and longevity of your DIY dining table. For beginners, the focus should be on readily available, stable, and forgiving wood species that are easier to work with.
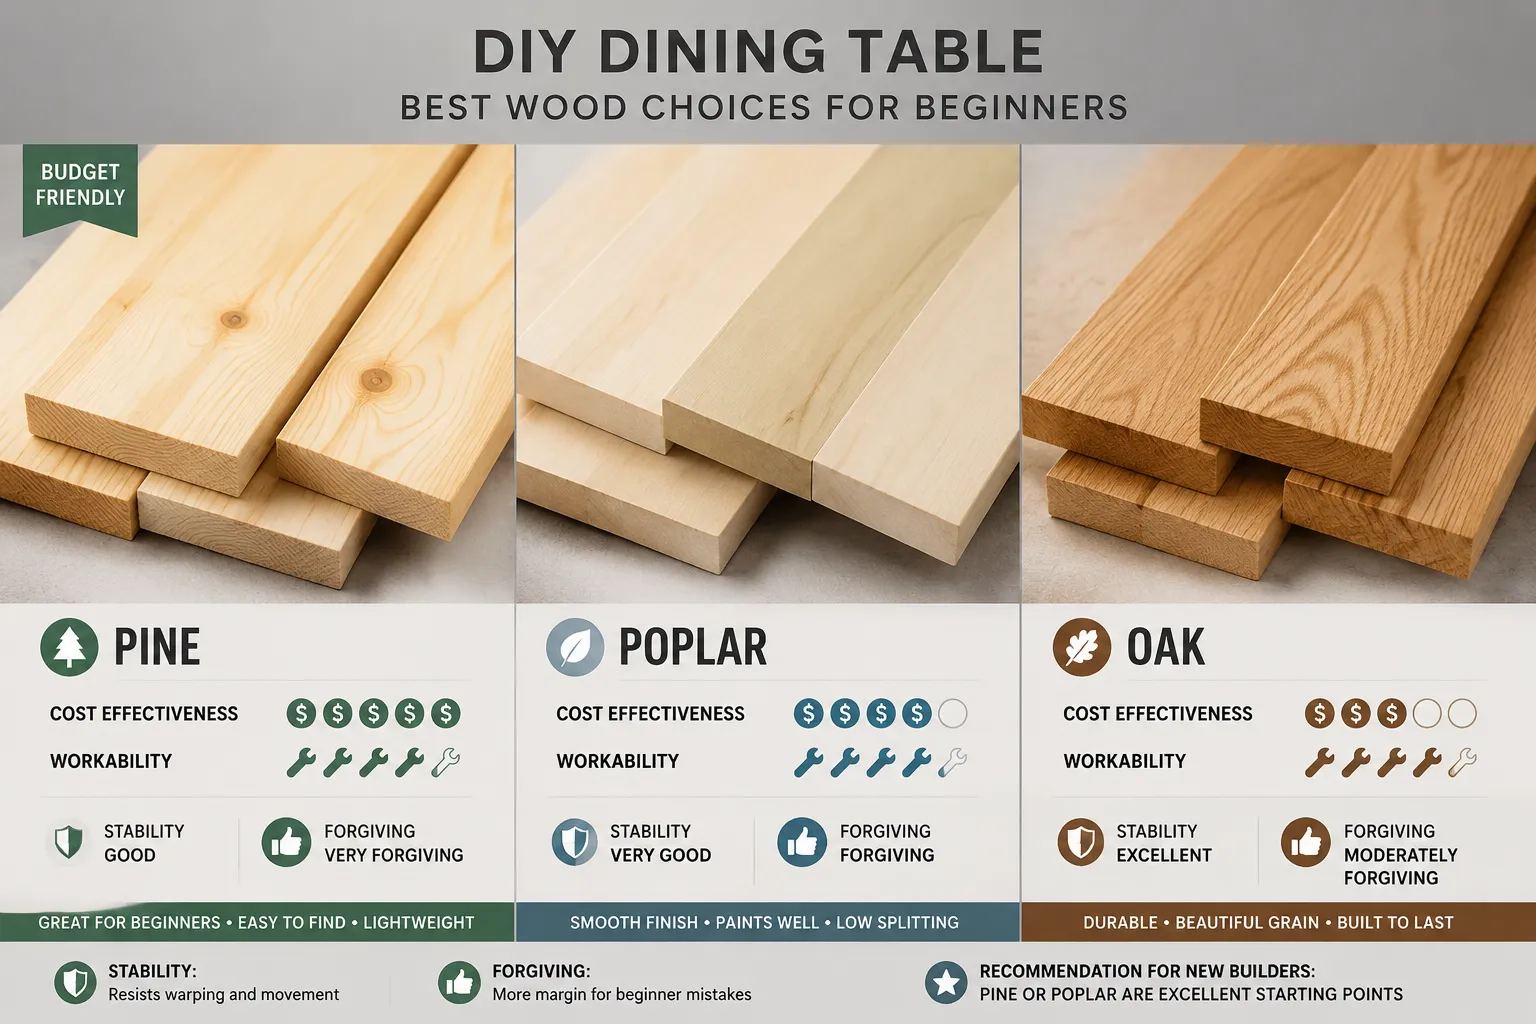
Softwoods: Pine and Poplar
Softwoods are often the most budget-friendly and accessible options, making them excellent choices for a beginner’s project.
- Pine:
- Pros: Inexpensive, widely available, easy to cut and sand, takes paint well, and can be stained to mimic hardwoods.
- Cons: Softer, so it’s prone to dents and scratches. Can sometimes have knots that need to be addressed.
- Best for: A rustic or farmhouse-style table where minor imperfections add character.
- Poplar:
- Pros: Slightly harder than pine, very stable, takes paint exceptionally well, and is relatively affordable.
- Cons: Can have a greenish tint that might show through lighter stains, but this usually mellows over time.
- Best for: Painted tables or where a slightly harder surface than pine is desired, especially if you plan to stain it a darker color.
Hardwoods: Oak and Maple
If your budget allows and you want a more durable surface, certain hardwoods are still beginner-friendly.
- Red Oak:
- Pros: Strong, durable, stable, and has a distinctive open grain that takes stain beautifully. Widely available.
- Cons: Harder to cut and sand than softwoods, and can be more expensive.
- Best for: A classic, robust dining table that will see heavy use. Its characteristic grain is forgiving for minor build imperfections.
- Maple:
- Pros: Very hard, dense, and durable with a fine, even grain. Excellent for a smooth, sleek finish.
- Cons: Can be challenging to stain evenly due to its density; harder to work with than oak. More expensive.
- Best for: Modern or contemporary designs where durability and a clean look are paramount.
For an in-depth understanding of various wood types and their properties, refer to “The Essential Guide To Wood Species For Beginner Furniture Makers Selection Properties And Best Uses”.
Sourcing Your Wood
When purchasing lumber, look for pieces that are:
- Straight and flat: Avoid boards with significant warps, twists, or bows.
- Free of major defects: Minimize knots, cracks, and excessive sapwood.
- Kiln-dried: This ensures the wood is stable and less likely to warp after you bring it home.
Consider buying slightly more wood than your plans require to allow for mistakes or to select the best pieces. For a comprehensive guide on building a table, including specific wood recommendations, check out “Craft Your Dream Farmhouse Dining Table The Ultimate 2025 Diy Guide”.
Finishing Your DIY Dining Table for Beginners: Protection and Beauty
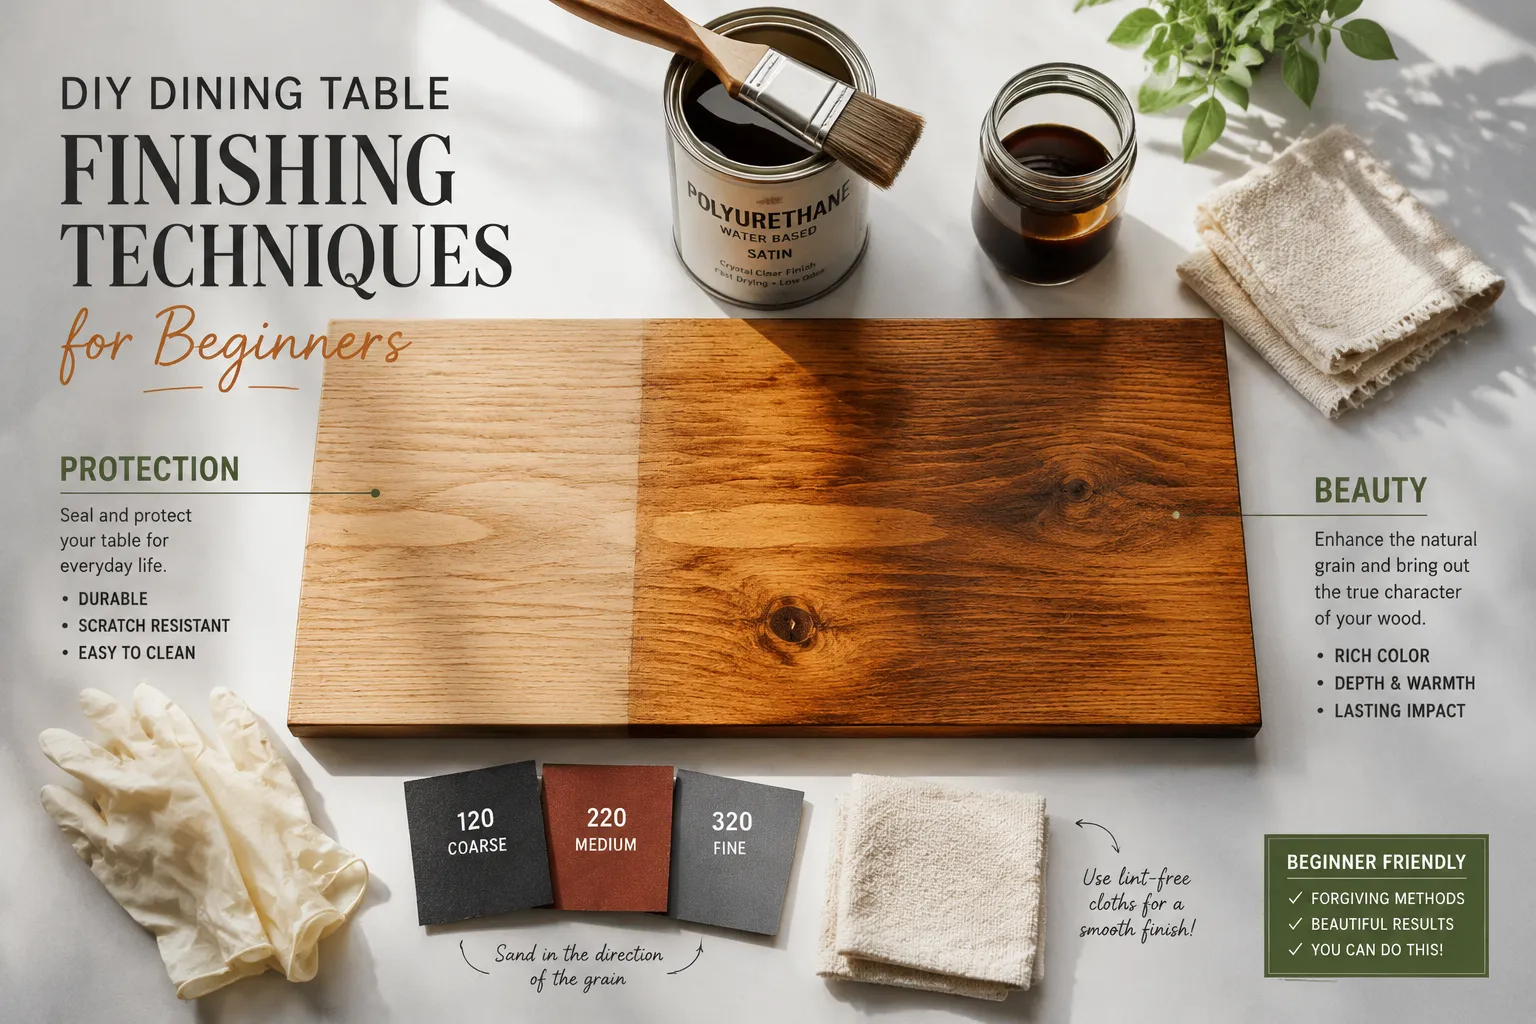
The finishing stage is where your DIY dining table truly comes to life. A proper finish not only enhances the wood’s natural beauty but also provides crucial protection against spills, scratches, and daily wear and tear. For beginners, the key is to choose finishes that are easy to apply and forgiving of minor imperfections.
Preparing the Surface
Before any finish is applied, meticulous surface preparation is essential.
- Sanding: Start with a coarser grit sandpaper (e.g., 80 or 100 grit) to remove any saw marks or imperfections. Gradually work your way up to finer grits (e.g., 150, 180, 220 grit). The final sanding pass should always be with the grain of the wood.
- Dust Removal: After each sanding stage, thoroughly remove all dust. A shop vacuum followed by a tack cloth works best. Any dust left behind will be trapped under the finish, creating an undesirable bumpy texture.
- Conditioning (Optional but Recommended for Stains): If you plan to stain a softwood like pine or poplar, applying a pre-stain wood conditioner is highly recommended. This helps the wood absorb the stain more evenly, preventing blotchiness.
Choosing Your Finish
There are numerous wood finishes available, but for a beginner’s dining table, some are much easier to apply and still offer excellent results.
1. Wipe-On Polyurethane
This is arguably the most beginner-friendly and durable finish for a dining table. Wipe-on polyurethane is simply diluted oil-based polyurethane, making it thin and easy to apply with a cloth.
- Pros: Very durable, water-resistant, easy to apply evenly, forgiving of application marks, and builds a protective film.
- Cons: Requires multiple thin coats (typically 3-5 or more) and longer drying times between coats.
- Application:
- Apply a thin, even coat with a lint-free cloth, wiping with the grain.
- Allow to dry completely (check product instructions, usually 4-6 hours).
- Lightly sand with 320-grit sandpaper between coats to smooth out any dust nibs and ensure adhesion. Clean thoroughly.
- Repeat until desired protection is achieved.
2. Penetrating Oils (e.g., Tung Oil, Linseed Oil, Rubio Monocoat)
Oil finishes penetrate the wood fibers, enhancing the natural grain and providing a more “natural” feel to the table. They don’t form a film on top like polyurethane.
- Pros: Brings out the wood’s natural beauty, easy to repair scratches, non-toxic options available. Offers a tactile, natural wood feel. Check out Sustainable Wood Finishing Eco Friendly Oils Waxes And Natural Stains For Healthier Projects for more on eco-friendly options.
- Cons: Less protective against impact and liquids than polyurethane, requires more frequent reapplication, and may take longer to fully cure.
- Application:
- Apply a generous coat with a cloth or brush.
- Allow the oil to soak in (usually 15-30 minutes).
- Wipe off all excess oil completely to prevent a gummy surface. Crucially, oil-soaked rags can spontaneously combust; always lay them flat to dry or immerse them in water before disposal.
- Repeat for 2-3 coats, allowing adequate drying time between each.
3. Paint
For those looking for a pop of color or to conceal less-than-perfect wood, paint is an excellent choice.
- Pros: Offers unlimited color options, conceals wood grain and minor defects, durable with the right topcoat.
- Cons: Hides the natural beauty of the wood.
- Application:
- Apply a good quality primer, especially if using pine or poplar.
- Apply 2-3 thin coats of high-quality furniture paint.
- For dining tables, always finish with a durable clear topcoat (like water-based polyurethane or a polyacrylic) for protection.
Important Finishing Tips
- Work in a clean, dust-free environment: This prevents dust particles from settling on your wet finish.
- Test on scrap wood: Always test your chosen stain and finish on a scrap piece of the same wood species you’re using for your table.
- Allow ample curing time: While finishes may feel dry to the touch in hours, they need days or even weeks to fully cure and achieve maximum durability. Be gentle with your new table during this period.
- Read product instructions: Every finish is different. Always follow the manufacturer’s specific instructions for application, drying times, and safety precautions.
Finishing is often the most rewarding part of building a DIY dining table. With patience and careful application, you can achieve a professional-looking result that protects your craftsmanship for years to come.
Designing Your Beginner-Friendly Dining Table
Before you even pick up a saw, a solid design plan is essential. For your first DIY dining table, simplicity is key. A rectangular table with four sturdy legs and a simple apron (the frame connecting the legs and supporting the tabletop) is the most manageable design.
Essential Design Considerations
- Size: Determine the ideal dimensions based on your space and the number of people you want to seat. Standard dining table heights are typically around 29-30 inches (74-76 cm).
- Seating for 4: Roughly 48-60 inches (122-152 cm) long, 30-36 inches (76-91 cm) wide.
- Seating for 6: Roughly 60-72 inches (152-183 cm) long, 36-40 inches (91-102 cm) wide.
- Leg Placement: Position legs at the corners or slightly inset to avoid interfering with seating. Consider the thickness of your chosen leg material for stability.
- Apron Depth: A deeper apron (e.g., 3-4 inches) adds visual weight and structural rigidity. Ensure there’s enough clearance for chairs.
- Top Thickness: A tabletop made from 3/4 inch to 1 1/2 inch thick material is common. Thicker tops often look more substantial but require more robust base construction.
Drawing Your Plan
Sketch your table design, noting all dimensions. This doesn’t need to be a professional blueprint; even a rough drawing helps visualize the project. Consider using graph paper to maintain proportion.
- Cut List: Create a detailed cut list that breaks down every piece of wood you’ll need, including its dimensions. This will streamline your material purchasing and cutting process.
- Assembly Sequence: Plan the order of assembly. Typically, you’ll build the leg-and-apron base first, then attach the tabletop.
Essential Tools for Your First Build
You don’t need a professional workshop to build a dining table. Many tools are readily available and affordable.
- Measuring and Marking: Tape measure, ruler, square, pencil.
- Cutting:
- Hand Saw: For basic crosscuts.
- Circular Saw: Excellent for straight, fast cuts on larger panels and planks. A straight edge guide is highly recommended.
- Miter Saw (Optional but Recommended): For precise angle cuts and consistent length cuts.
- Drilling: Cordless drill/driver for pilot holes, driving screws, and using pocket hole jigs.
- Clamping: Bar clamps or pipe clamps are indispensable for holding pieces together during glue-up. Have several on hand.
- Sanding: Orbital sander or sanding block with various grits of sandpaper.
- Safety Gear: Safety glasses, ear protection, and dust mask are non-negotiable.
Step-by-Step Construction Overview
This section outlines a general construction sequence for your DIY dining table. Always refer to detailed plans specific to your chosen design.
- Cut all components: Using your cut list, carefully cut all legs, apron pieces, and tabletop planks to size. Prioritize accuracy.
- Assemble the apron frames: Create two short apron assemblies (two legs connected by a short apron piece) and two long apron assemblies (two legs connected by a long apron piece). Use your chosen joinery method (e.g., pocket holes, butt joints with screws and glue).
- Join the apron frames: Connect the two short assemblies to the two long assemblies using your chosen joinery to form the complete base frame. Ensure the frame is square and clamp firmly.
- Prepare tabletop planks: If your tabletop is made from multiple planks, edge-glue them together using dowels, biscuits, or simply edge-to-edge glue joints with clamps. Allow ample drying time.
- Attach the tabletop: Once the base is dry and sturdy, attach the tabletop. Wood moves with changes in humidity, so it’s critical to allow for this movement. Use “figure-8” fasteners, Z-clips, or expansion blocks that allow the tabletop to expand and contract without cracking.
- Sanding and Finishing: Follow the detailed steps outlined in the “Finishing Your DIY Dining Table” section above.
This process, while simplified, offers a solid foundation for your first build. Remember that patience, precision, and adherence to safety guidelines are your most valuable tools. Building a dining table is a rewarding experience that culminates in a functional centerpiece for your home.
Conclusion
Embarking on your first DIY dining table build is an incredibly rewarding journey. You’ve learned about choosing simple, robust joinery techniques like pocket holes and reinforced butt joints, making the structural integrity of your table achievable for any beginner. We’ve explored practical wood selections, from the forgiving pine and poplar to the durable oak and maple, empowering you to pick materials that suit both your skill level and aesthetic preferences. Finally, we’ve covered the essential steps in finishing, ensuring your creation is not only beautiful but also protected for years of enjoyment.
The journey of creating a “DIY Dining Table for Beginners: Simple Joinery, Wood Selection, and Finishing for Your First Build” is more than just constructing furniture; it’s about gaining confidence, learning new skills, and crafting a unique piece that tells a story. The satisfaction of gathering around a table you built with your own hands is unparalleled.
Actionable Next Steps:
- Refine Your Design: Based on your space and desired seating, finalize your table dimensions and sketch out a detailed plan.
- Create a Cut List: Generate a precise list of all wood components needed for your chosen design.
- Source Your Materials: Visit your local lumberyard or home improvement store to select your wood, prioritizing straight, defect-free boards.
- Gather Your Tools: Ensure you have all the necessary safety gear, measuring tools, cutting tools, and clamping equipment.
- Practice on Scraps: Before making final cuts or applying finish to your table, practice your joinery and finishing techniques on scrap pieces of the same wood.
- Start Building: Follow your plan, take your time, and enjoy the process of bringing your first DIY dining table to life.
By following these steps, you’ll be well on your way to building a durable, beautiful, and deeply personal dining table for your home in 2026.
SEO Meta Title: DIY Dining Table for Beginners: Simple Build & Finish SEO Meta Description: Build your first DIY dining table in 2026! Learn simple joinery, wood selection, and easy finishing techniques for a beautiful and durable result.