


The distinct aroma of freshly sawn timber, usually reserved for traditional woodworking, now mingles with the subtle, warm scent of extruded wood filament. This fascinating confluence embodies the essence of a DIY Wood Filament 3D Printer Enclosure: Integrating Digital Fabrication with Traditional Craft. In an age where technology often feels disparate from time-honored artisanal methods, constructing a custom wooden enclosure for your 3D printer not only optimizes printing with wood filament and manages fumes but also seamlessly integrates this powerful tool into your woodworking shop or home, bridging the gap between digital precision and tactile beauty.
Key Takeaways:

- A custom wooden enclosure significantly improves 3D printing results with wood filament by stabilizing temperature and humidity.
- Integrating traditional woodworking techniques like joinery enhances the enclosure’s durability and aesthetic appeal.
- Effective fume management and sound dampening are crucial for a safe and comfortable printing environment, especially when using wood filament.
- Digital fabrication tools like CNC routers and laser cutters can be employed to create precise components for the wooden enclosure.
- The project allows for a beautiful fusion of high-tech 3D printing with classic woodworking craftsmanship, elevating the entire workshop aesthetic.
The Synergy of Woodworking and Digital Fabrication: Why Build a DIY Wood Filament 3D Printer Enclosure?
The proliferation of desktop 3D printers has opened new avenues for creators, but the challenges associated with specific filaments, particularly wood filament, often go unaddressed. Wood filament, a composite material containing real wood particles, can be susceptible to warping and inconsistent extrusion if not printed in a stable environment. A custom-built enclosure made from wood addresses these issues head-on, offering a controlled microclimate for your printer. This project is more than just building a box; it’s a statement piece, a functional improvement, and a demonstration of the powerful combination of digital and traditional craftsmanship.
Building a DIY Wood Filament 3D Printer Enclosure: Integrating Digital Fabrication with Traditional Craft allows you to:
- Regulate Temperature and Humidity: Wood filament, like natural wood, reacts to environmental changes. A sealed enclosure helps maintain a consistent temperature and humidity level, crucial for preventing warping, delamination, and nozzle clogs.
- Contain Fumes and Particulates: While wood filament is generally considered safe, the printing process can release fine wood particles and volatile organic compounds (VOCs). An enclosure, when properly ventilated, can direct these away from your workspace, ensuring better air quality. For more on air quality in a workshop, consider how one might build a DIY Smart Workshop Dust Collection System.
- Reduce Noise: 3D printers can be noisy. A sturdy wooden enclosure acts as a sound dampener, making your workshop or home a more pleasant environment. Acoustic considerations are similar to crafting acoustic diffusers and absorbers from scrap wood.
- Enhance Aesthetics: Forget unsightly plastic covers. A handcrafted wooden enclosure elevates the appearance of your 3D printer, transforming it into a piece of integrated workshop furniture that complements your existing woodworking projects.
- Protect from Dust and Debris: Workshops are dusty places. An enclosure shields your printer’s delicate components from sawdust and other contaminants, extending its lifespan and maintaining print quality.
- Integrate Smart Features: The wooden structure provides an ideal platform for integrating smart home elements, such as temperature/humidity sensors, automated ventilation, and smart lighting, creating a truly modern and efficient workspace. This aligns well with general principles of DIY Smart Home Integration with Custom Woodwork.
Choosing the right wood for your enclosure is a critical first step. Plywood, MDF, or solid hardwoods like pine or maple are excellent choices. Plywood offers stability and cost-effectiveness, while hardwoods provide superior aesthetics and durability. Consider sourcing sustainable wood for your project to align with eco-conscious practices.
| Wood Type | Pros | Cons | Ideal Use |
|---|---|---|---|
| Baltic Birch Plywood | Stable, strong, attractive edges, good for laser cutting | Higher cost | Premium aesthetic, precise component creation |
| MDF | Cost-effective, very stable, good for painting | Heavy, dulls tools, dust can be an issue | Budget-friendly, painted finishes |
| Pine | Affordable, easy to work with, lightweight | Softer, less dent-resistant | Basic, functional enclosures |
| Maple | Durable, beautiful grain, stable | More expensive, harder to work | High-end, heirloom-quality enclosures |
Design and Fabrication: Blending Digital Precision with Traditional Craftsmanship
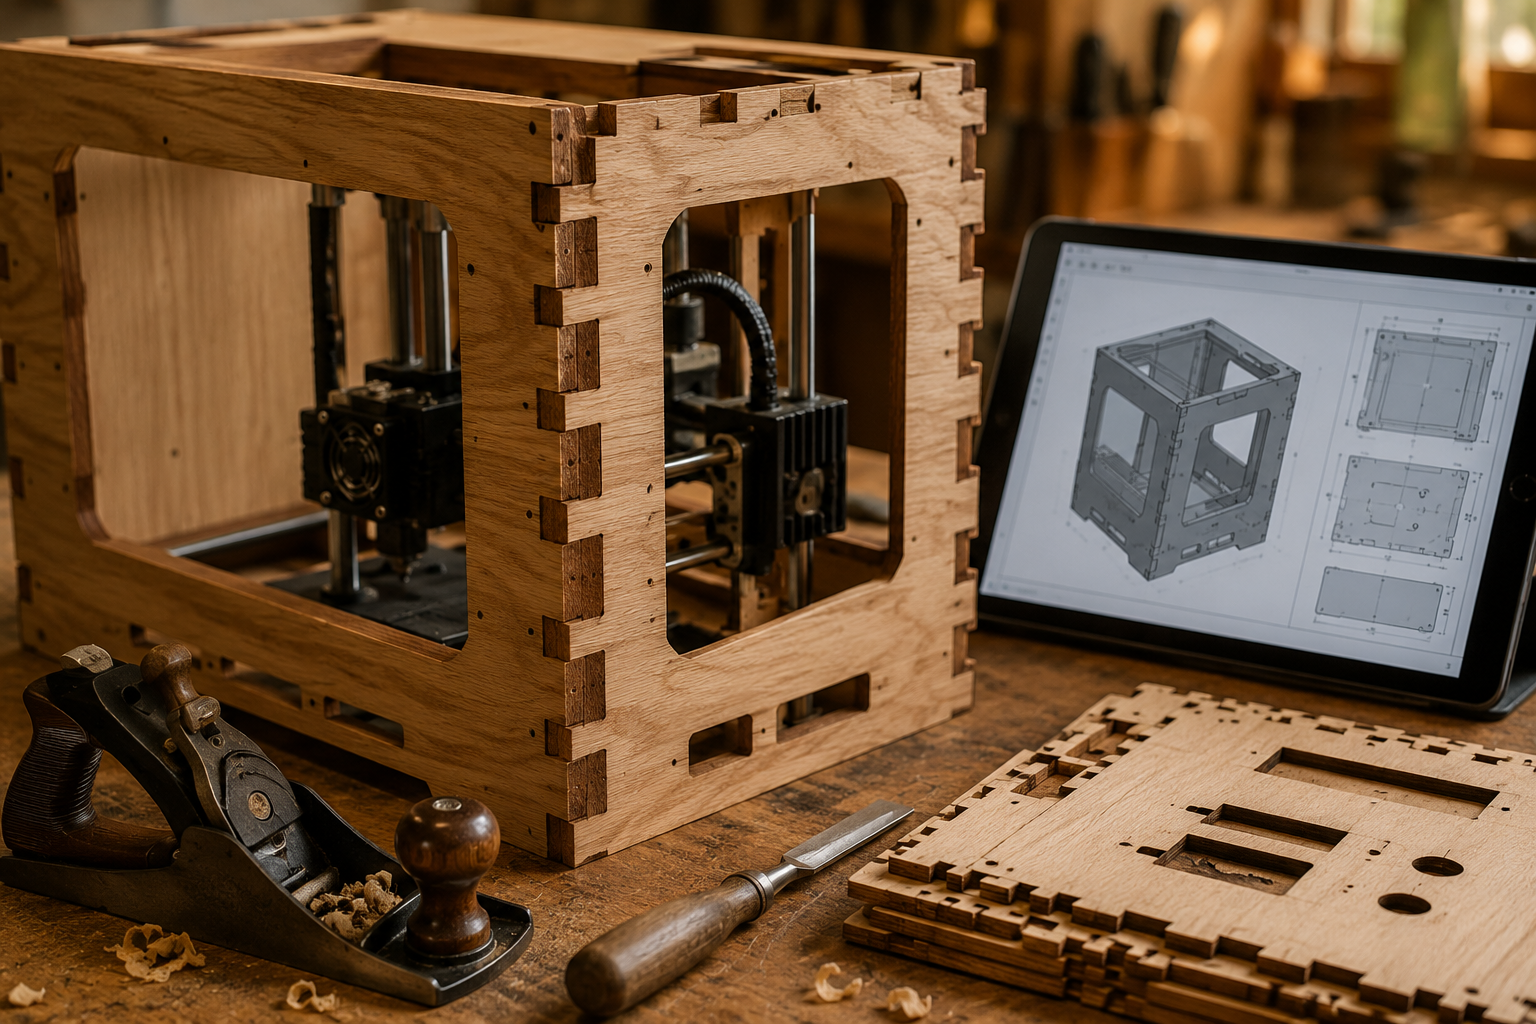
The core of this project lies in the thoughtful design and execution, where digital tools inform traditional woodworking techniques. Begin by meticulously measuring your 3D printer and planning for adequate internal space, including clearance for moving parts, filament spools, and any internal accessories.
Digital Design Phase (CAD/CAM): Utilize CAD (Computer-Aided Design) software to create a precise 3D model of your enclosure. This allows you to plan joint types, material thicknesses, ventilation routes, and component placement digitally. For intricate parts or ventilation grilles, CAM (Computer-Aided Manufacturing) software can then generate toolpaths for CNC routers or laser cutters. This allows for unparalleled precision, especially when creating interlocking components.
Traditional Woodworking Techniques: While digital tools provide the blueprints, traditional woodworking skills bring the enclosure to life.
- Joinery: Employ robust joinery techniques for structural integrity and aesthetic appeal. Dovetail joints are an excellent choice for their strength and beauty, perfect for a lasting piece. Box joints or dadoes can also be effective. For those newer to woodworking, a beginner’s guide to essential woodworking joints can provide a solid foundation.
- Cutting and Shaping: Use a table saw for accurate panel cuts. A router table can be invaluable for creating dados, rabbets, or decorative edges. Mastering the router table for precision joinery will significantly enhance the quality of your enclosure.
- Assembly and Finishing: Carefully assemble your components, using high-quality wood glue and appropriate fasteners. Sanding to a smooth finish is crucial before applying a protective and aesthetically pleasing finish, such as polyurethane, Danish oil, or a natural wax.
Key Design Considerations:
- Access: Plan for easy access to the printer’s build plate, controls, and filament loading mechanism. Hinged doors, removable panels, or lift-off tops are common solutions.
- Ventilation: Incorporate an exhaust fan and filter system to draw out fumes and maintain air circulation. Design an intake vent, ideally with a filter, to prevent dust ingress.
- Cable Management: Route power and USB cables neatly to prevent tangles and hazards. Integrated cable channels or grommets are effective.
- Lighting: Consider adding internal LED lighting for better visibility of prints.
- Monitoring: Leave space for a camera or environmental sensors (temperature, humidity, air quality) if desired.
- Footprint: Design the enclosure to fit your available space. Consider making it part of a larger smart workshop storage solution.
For a truly integrated experience, you might even consider carving custom logos or designs onto the enclosure using a CNC router or laser engraver, showcasing your brand or personal flair. This level of customization allows the DIY Wood Filament 3D Printer Enclosure: Integrating Digital Fabrication with Traditional Craft to become a unique expression of your creative skills.
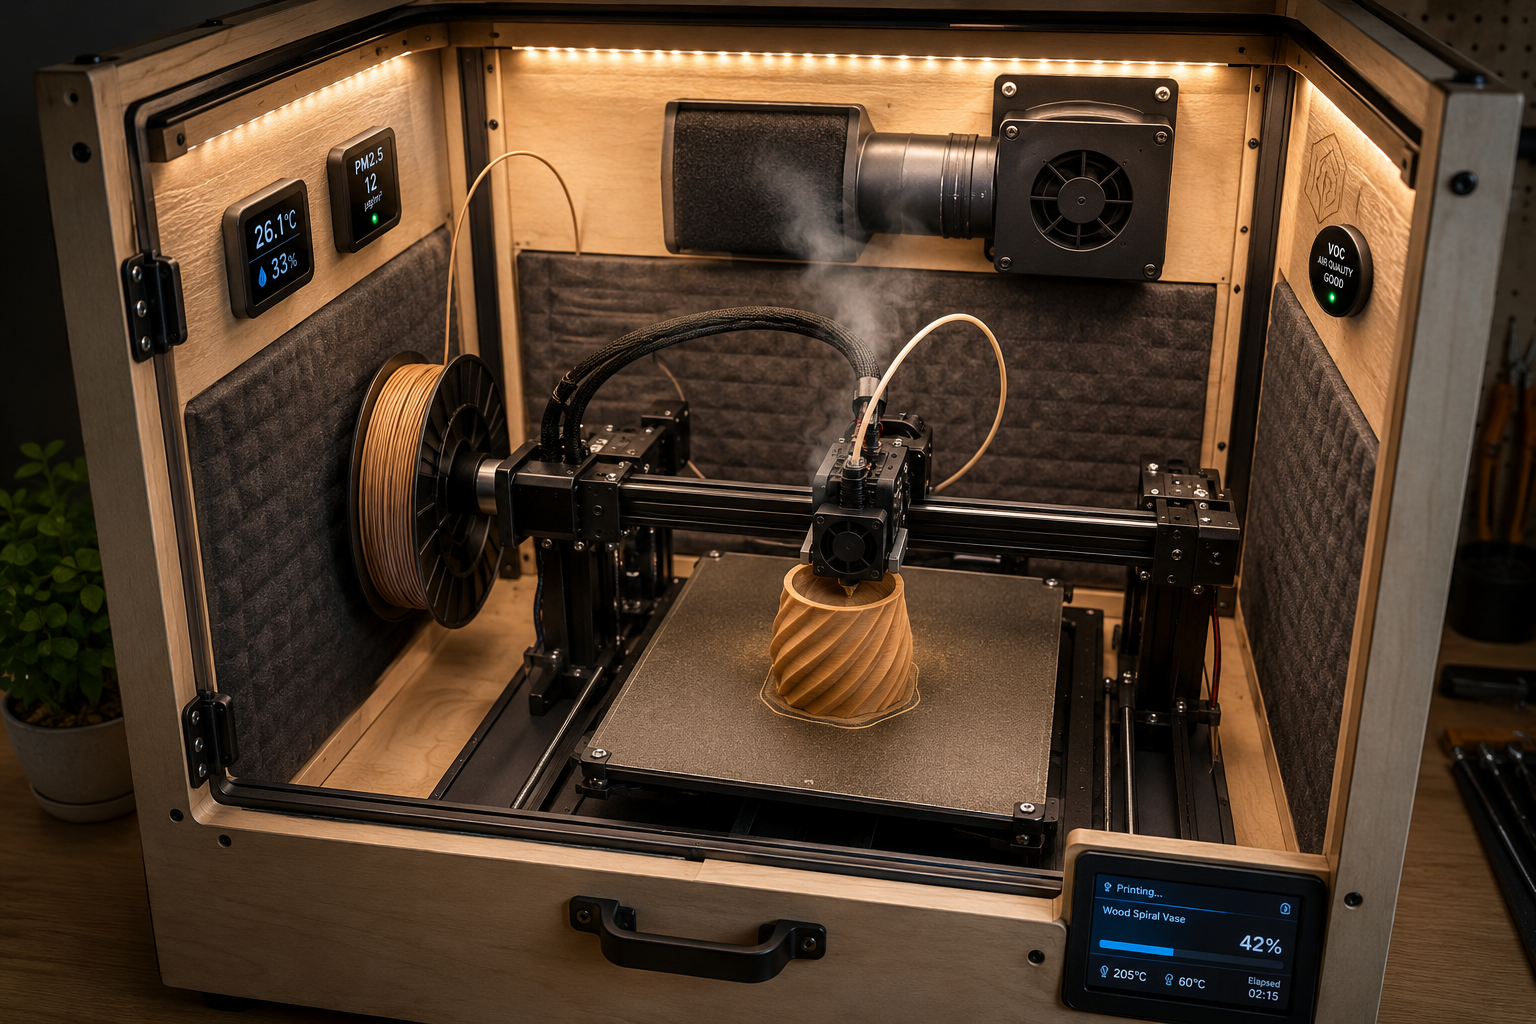
Optimizing for Wood Filament Printing and Workshop Integration
Once the physical structure of your DIY Wood Filament 3D Printer Enclosure is complete, the focus shifts to optimizing its functionality for wood filament and seamlessly integrating it into your workspace.
Environmental Control:
- Temperature Stability: While the wooden walls provide insulation, consider adding internal insulation panels (e.g., rigid foam board) for enhanced temperature stability, especially in fluctuating workshop environments. A small, low-wattage reptile heater controlled by a smart thermostat can maintain consistent internal temperatures for optimal wood filament printing.
- Humidity Management: Wood filament absorbs moisture. Integrating a desiccant pack or a small, fan-driven dehumidifier can keep humidity levels low within the enclosure, preventing issues like stringing and brittleness. Monitor with a hygrometer.
- Air Filtration: Beyond basic exhaust, consider a HEPA filter combined with an activated carbon filter for comprehensive removal of fine particulates and VOCs. This is particularly important when printing with wood-based materials.
Ergonomics and Accessibility:
- Integrated Filament Storage: Design a compartment within or alongside the enclosure for storing filament spools, keeping them dry and easily accessible. A pass-through hole for the filament ensures a smooth feed directly into the printer.
- Tool Storage: Incorporate small shelves, hooks, or drawers into the enclosure’s design to store frequently used 3D printing tools like spatulas, pliers, and nozzle cleaning kits. This aligns with maximizing small spaces in your smart workshop storage solutions.
- Vibration Dampening: Place anti-vibration feet or pads under the printer within the enclosure to further reduce noise and prevent printing artifacts caused by movement.
Aesthetic and Workflow Integration:
- Matching Finishes: Stain or paint your enclosure to match existing workshop furniture or cabinetry. This creates a cohesive look, making the 3D printer a natural extension of your woodworking space. For ideas, explore different unique wood finishing techniques.
- Ergonomic Height: Position the enclosure at a comfortable working height, whether on a sturdy workbench or a custom stand. Consider building a custom wood workbench designed to accommodate your new setup.
- Digital Integration: Install a small monitor or tablet on the exterior of the enclosure, connected to a Raspberry Pi or other single-board computer, to display printer status, print progress, or even stream video from an internal camera. This is another example of DIY Smart Home Integration with Custom Wooden Enclosures.
By thoughtfully addressing these optimization points, your DIY Wood Filament 3D Printer Enclosure: Integrating Digital Fabrication with Traditional Craft will not only be a functional asset but also a testament to the elegant possibilities when cutting-edge technology is embraced and enhanced by the timeless beauty of handcrafted wood. The result is a printing experience that is more consistent, safer, and aesthetically integrated into your creative environment.

Conclusion
The journey of creating a DIY Wood Filament 3D Printer Enclosure: Integrating Digital Fabrication with Traditional Craft is a rewarding endeavor that transcends mere utility. It’s an opportunity to apply the enduring principles of woodworking—precision joinery, careful material selection, and thoughtful finishing—to a modern digital fabrication tool. The outcome is an environment optimized for the nuances of wood filament printing, ensuring consistent results, managing airborne particulates, and significantly reducing operational noise. More profoundly, it transforms a utilitarian machine into an integrated piece of your workspace, reflecting a harmonious blend of technological advancement and artisanal heritage.
This project stands as a testament to the idea that innovation doesn’t always mean abandoning tradition; often, the most elegant solutions emerge from their thoughtful fusion. By investing the time and skill to construct such an enclosure, you enhance your printing capabilities and elevate your workshop’s aesthetic and functional coherence.
Actionable Next Steps:
- Measure and Plan: Accurately measure your 3D printer and begin sketching preliminary designs, considering internal space, access, and ventilation.
- Select Materials: Choose your preferred wood type, considering cost, aesthetics, and ease of workability.
- Design Digitally: Create a CAD model of your enclosure to refine dimensions and plan joinery.
- Gather Tools: Ensure you have the necessary woodworking tools, including a table saw, router, and hand tools for joinery.
- Build and Refine: Construct the enclosure, paying close attention to joinery and assembly, then sand and apply your chosen finish.
- Integrate Systems: Install ventilation, lighting, and any smart monitoring systems, optimizing for wood filament printing conditions.
- Test and Enjoy: Load your 3D printer into its new home, run some test prints, and appreciate the improved printing environment and aesthetic appeal.
SEO Meta Title: DIY Wood Filament 3D Printer Enclosure: Digital Craft Fusion SEO Meta Description: Build a DIY Wood Filament 3D Printer Enclosure in 2026. Integrate digital fabrication with traditional craft for optimal prints, fume management, and stunning workshop aesthetics.
