


The average piece of mass-produced furniture often lacks a soul, a distinctive mark that speaks of artistry and dedication. However, by mastering marquetry and inlay techniques, woodworkers can transform ordinary wooden surfaces into captivating canvases, embedding intricate wooden art into furniture and boxes that tells a story and exudes unparalleled elegance. This ancient craft, far from being confined to historical artifacts, is experiencing a renaissance among modern artisans seeking to elevate their creations with unique decorative embellishments. In 2026, the pursuit of bespoke, handcrafted items continues to grow, making marquetry and inlay more relevant than ever for those aiming to infuse their work with exceptional character and lasting beauty.
Key Takeaways
- Marquetry involves creating a picture or pattern by arranging small pieces of veneer, while inlay embeds solid pieces of wood (or other materials) into a routed recess.
- Achieving mastery requires a deep understanding of wood properties, precise cutting tools, and meticulous assembly techniques.
- Both techniques offer immense creative potential, allowing for complex designs ranging from geometric patterns to detailed pictorial scenes.
- Careful selection of contrasting wood species is crucial for visual impact and defining the intricate artwork.
- Patience, precision, and continuous practice are fundamental to successfully adding intricate wooden art to furniture and boxes.
Understanding Marquetry: The Art of Veneer Pictures
Marquetry, derived from the French word “marqueter” meaning “to inlay,” is the art of creating patterns, designs, or pictures by applying pieces of veneer to a structure, typically a piece of furniture. Unlike simple veneering, which covers an entire surface with a single sheet of wood, marquetry utilizes multiple pieces of different woods, and sometimes other materials like shell, ivory, or metal, to form intricate decorative motifs. The beauty of marquetry lies in its ability to harness the diverse colors, grains, and textures of various wood species to create stunning visual effects.

Historically, marquetry flourished in Europe from the 16th century onwards, adorning grand furniture in palaces and stately homes. Today, the principles remain the same, but modern tools and adhesives make the craft more accessible. When embarking on mastering marquetry and inlay techniques, understanding the nuances of veneer is paramount. Veneer is essentially a thin slice of wood, usually less than 3mm thick, and its thinness allows for intricate cutting and efficient use of rare or expensive woods.
Essential Tools and Materials for Marquetry
To begin your journey into marquetry, a specific set of tools and materials is required. Precision is key, so investing in quality instruments will significantly enhance your results.
- Veneers: A diverse selection of wood veneers is crucial. Consider a range of colors, from light maple and birch to rich walnut, mahogany, and darker wenge or ebony. Exotic woods like purpleheart, bloodwood, and padauk offer vibrant hues.
- Cutting Tools:
- Marquetry Knife or Scalpel: For fine, precise cuts. A sharp blade is non-negotiable.
- Scroll Saw or Fret Saw: Ideal for cutting complex curves and internal shapes, especially when using the “packet cutting” method. A beginner’s guide to CNC routers for small woodshops might also be helpful for those considering automated precision.
- Chisels and Gouges: For minor adjustments and cleaning edges. Refer to hand tool mastery for detail work: chisels, hand planes, and for more information on these essential tools.
- Adhesive: High-quality wood glue, specifically veneer glue, designed for minimal squeeze-out and strong, lasting bonds. Traditional hot hide glue is also an option for its reversibility and long open time.
- Substrate: A stable, flat base material, such as plywood or MDF, onto which the veneer design is glued. This provides structural integrity to the marquetry panel.
- Clamps and Presses: To apply even pressure during the gluing process, ensuring a flat, bubble-free adhesion.
- Sanding Supplies: Fine-grit sandpaper for smoothing the finished surface without damaging the delicate veneers.
- Finishing Products: Varnish, lacquer, or oil to protect and enhance the beauty of the completed marquetry. For guidance on appropriate finishes, explore articles on natural wood finishing techniques or dark wood finishing techniques.
Key Marquetry Techniques
There are several techniques for assembling marquetry, each with its own advantages:
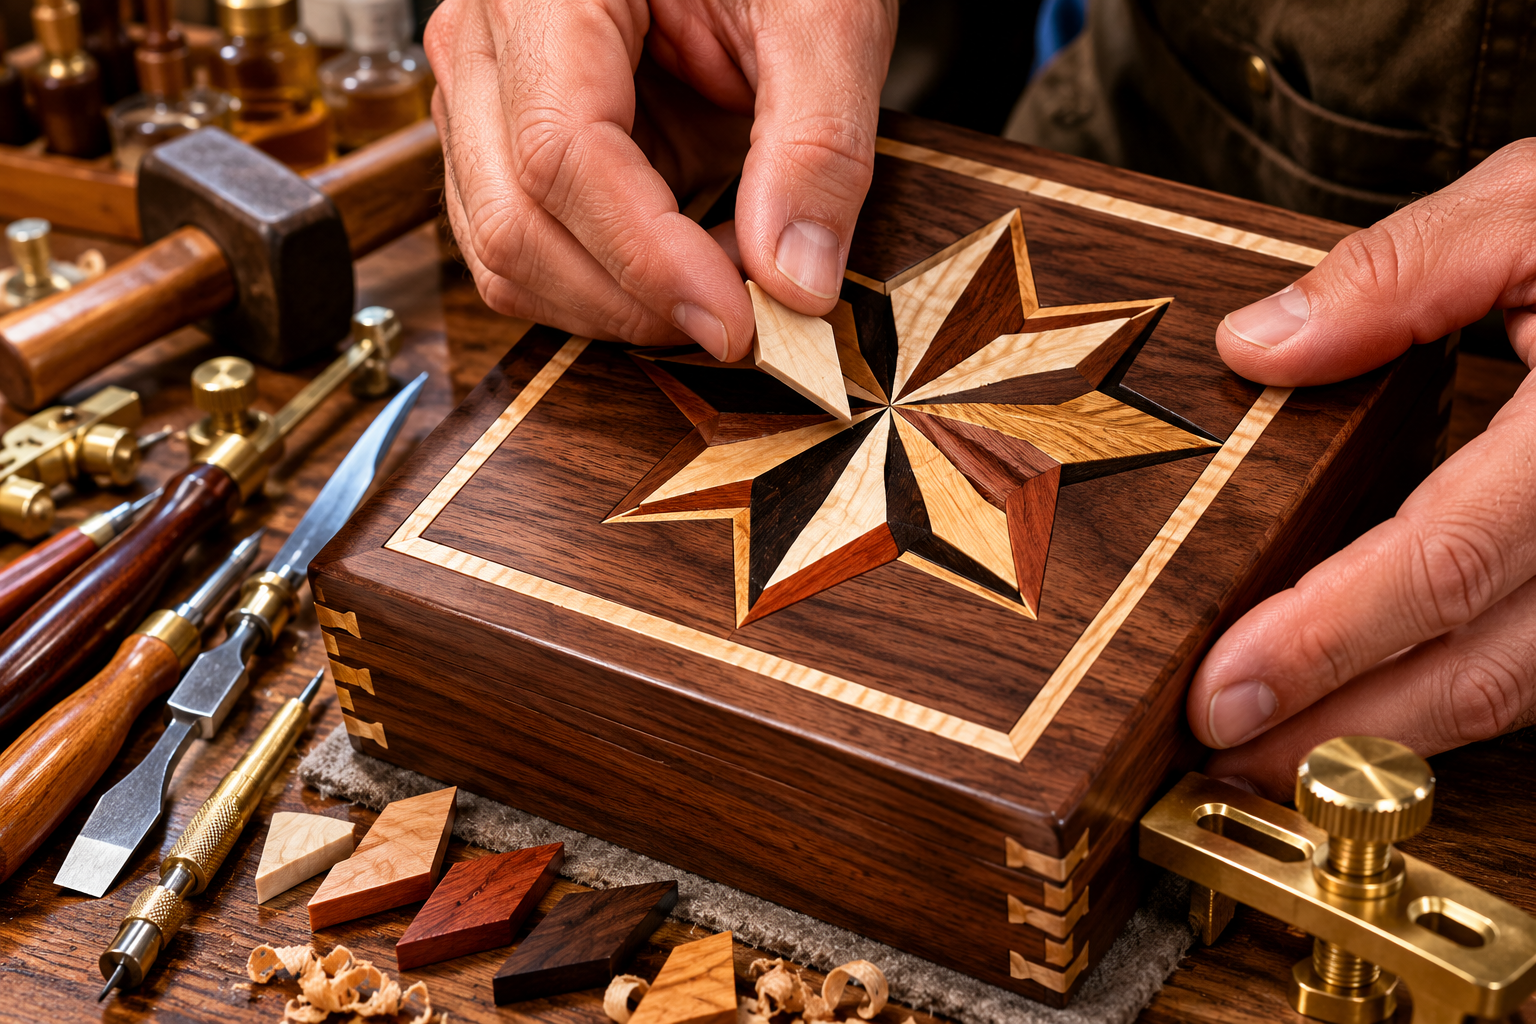
“Fretwork” or “Scroll Saw” Method (Packet Cutting): This popular method involves stacking multiple veneers (usually three or more) and gluing them together with a temporary adhesive. The design is then cut through the entire packet using a scroll saw or fret saw. By strategically arranging the veneers, multiple identical positive and negative pieces can be cut simultaneously. This method is efficient for producing mirrored or repeating elements.
“Piece by Piece” Method (Boulle Work): Named after the French cabinetmaker André-Charles Boulle, this technique involves cutting each piece of veneer individually and fitting it directly into the design. It’s more time-consuming but allows for greater precision and the incorporation of intricate details and shading through sand scorching.
“Marquetry is not merely gluing wood; it is painting with wood, using nature’s palette to create lasting beauty.”
Sand Scorching: A technique used to add depth and shading to individual veneer pieces. Edges are lightly touched with hot sand, creating a burnt effect that mimics shadows or contours, giving the marquetry a three-dimensional appearance.
Engraving and Filling: For exceptionally fine lines or details, small areas of the marquetry can be engraved and then filled with contrasting wood dust mixed with glue, or even colored resins.
Mastering Inlay: Embedding Solid Wood into Surfaces
While closely related to marquetry, inlay fundamentally differs in its execution. Inlay involves embedding pieces of solid wood, or other materials, directly into a routed recess within a solid wood surface. Instead of building a design on a separate substrate and then applying it, inlay integrates the decorative elements into the primary material of the furniture or box. This creates a seamlessly smooth surface where the inlaid elements are flush with the surrounding wood. When learning about mastering marquetry and inlay techniques, understanding this distinction is crucial for choosing the right approach for your project.
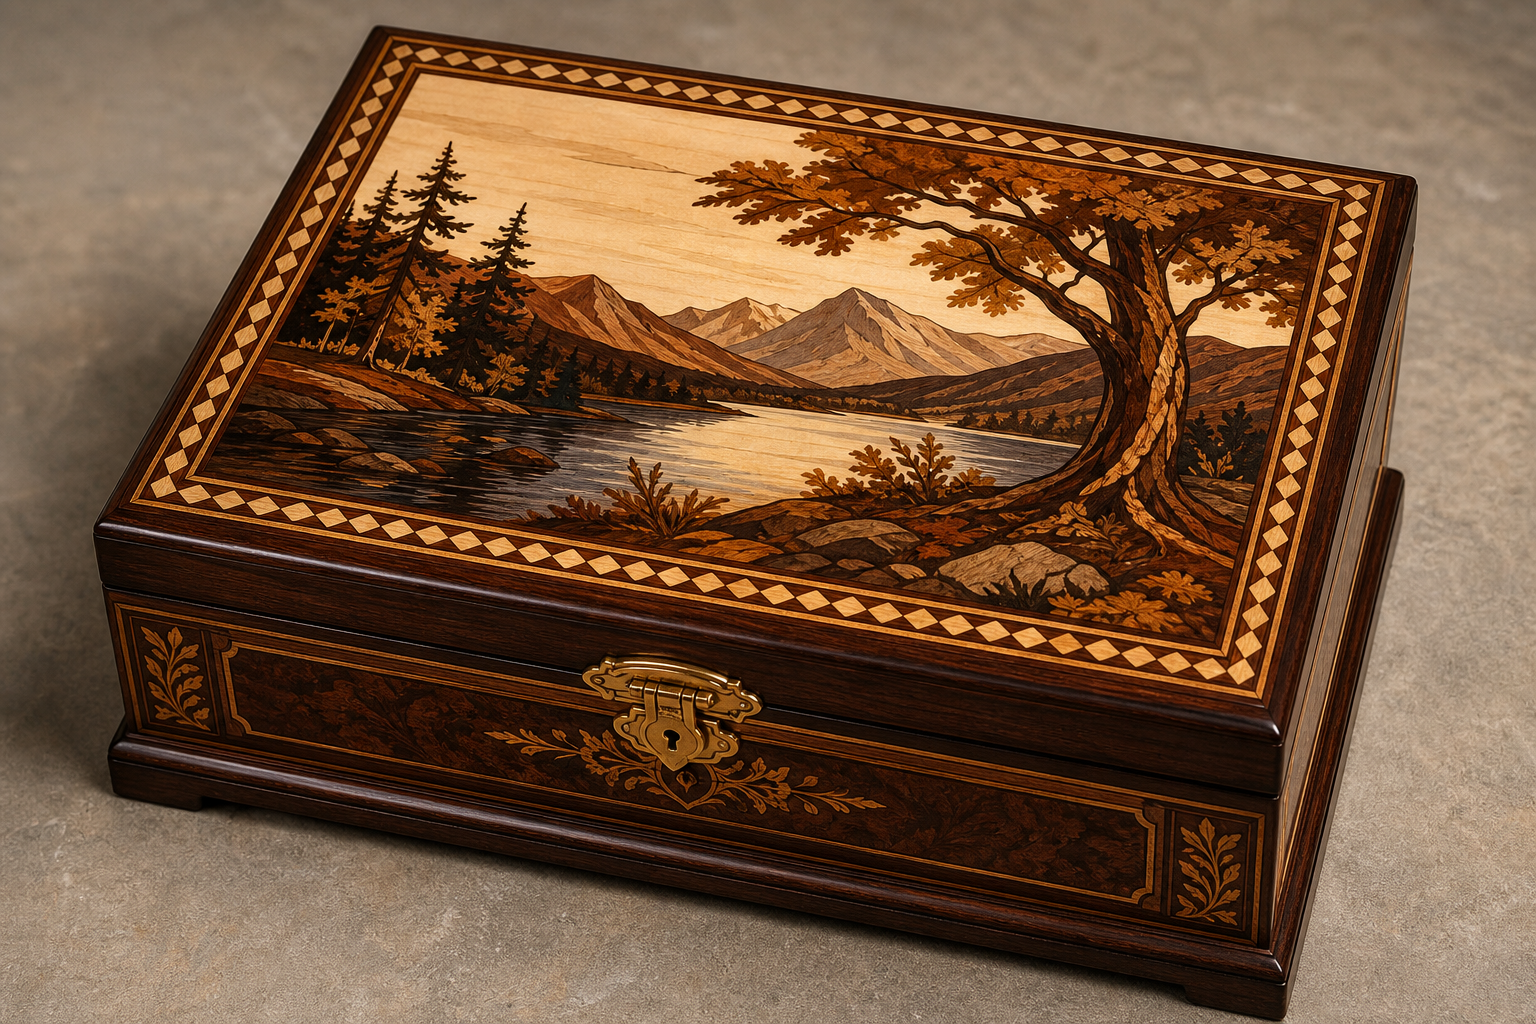
Inlay often features bolder, more geometric patterns compared to the typically finer, pictorial nature of marquetry. It’s common to see intricate borders, rosettes, or crests inlaid into tabletops, cabinet doors, or the lids of decorative boxes. The permanence and durability of inlay make it a favored choice for surfaces that experience more wear.
Tools and Techniques for Effective Inlay
Executing precise inlay requires a steady hand, accurate measuring, and the right tools.
- Routing Tools:
- Router with a Fine Bit: A plunge router with a straight bit or a specialized inlay kit is essential for cutting the precise recesses. For more on router bits, see the essential guide to router bits: choosing the right profile.
- Chisels and Mallets: For cleaning out corners and fine-tuning the recesses.
- Measuring and Marking Tools: Precision squares, marking knives, and calipers are vital for accurate layout.
- Clamping: Essential for holding the workpiece securely during routing and the inlaid pieces during gluing.
- Inlay Materials: Solid wood pieces of contrasting color and grain are most common. Other materials like mother-of-pearl, abalone, or even metals can also be used.
- Adhesive: A strong wood glue that dries clear is preferred.
Steps for Successful Inlay
- Design and Layout: Carefully draw your design directly onto the workpiece or create a template. Accuracy at this stage is critical.
- Cutting the Inlay Pieces: Cut your inlay pieces slightly oversized. This allows for fine-tuning to achieve a perfect fit. Use a scroll saw or band saw for larger shapes, and precision cutting tools for smaller, intricate elements.
- Routing the Recess: This is the most critical step.
- Secure your workpiece firmly.
- Using a router with a template guide or a specialized inlay kit, carefully rout the recess to match the shape of your inlay piece. The depth of the recess should exactly match the thickness of your inlay material.
- For geometric shapes, straight edges can be cut with a marking knife and then pared with chisels.
- Fitting the Inlay: Dry-fit the inlay piece into the recess. It should fit snugly without forcing. Adjust with fine files or sandpaper until a perfect, gap-free fit is achieved.
- Gluing: Apply a thin, even coat of wood glue to both the recess and the back of the inlay piece. Press the inlay firmly into place.
- Clamping and Drying: Clamp the inlaid piece securely, ensuring even pressure across the entire surface. Allow ample drying time.
- Sanding and Finishing: Once the glue is dry, carefully sand the surface until the inlay is perfectly flush with the surrounding wood. Start with a medium grit and progress to finer grits. The final steps involve applying a protective finish, much like any other fine woodworking project. For more on wood movement and design, consider understanding wood movement: how to design and build furniture that.
Integrating Marquetry and Inlay into Furniture and Boxes
The true artistry of mastering marquetry and inlay techniques lies in their seamless integration into functional and decorative pieces. Whether you are crafting a small jewelry box, a grand dining table, or a custom console, these techniques can elevate your project from functional to extraordinary. In 2026, personalized and unique items are highly sought after, and marquetry and inlay offer an unparalleled way to achieve this.
Project Ideas and Applications
- Furniture Surfaces: Tabletops, cabinet doors, drawer fronts, and even chair backs can be transformed with intricate marquetry or bold inlays. Imagine a dining table with a central marquetry medallion or a sideboard with inlaid geometric borders. For related projects, consider crafting custom wooden record player consoles: integrating modern or custom floating shelves: design, fabrication, and installation of substantial solid wood shelving.
- Decorative Boxes: Small wooden boxes are excellent starting points for practicing marquetry and inlay. A simple box lid can become a focal point with a detailed floral pattern or a stylized initial. Check out wooden jewelry organizers: tiered stands and drawer inserts for inspiration.
- Wall Art and Panels: Marquetry can be created as standalone art pieces or integrated into wall panels, adding a touch of sophisticated elegance to any room.
- Musical Instruments: Many high-end musical instruments feature exquisite marquetry and inlay, demonstrating the pinnacle of these crafts.
- Accent Pieces: Even smaller items like handcrafted wooden wall clocks or wooden napkin holders can benefit from subtle inlays or marquetry details.
Design Considerations for Seamless Integration
- Scale and Proportion: Ensure the marquetry or inlay design is appropriately scaled to the size of the furniture piece. A busy pattern on a small item can be overwhelming, while a minimalist design on a large surface might appear lost.
- Wood Choice and Contrast: Select woods for your designs that offer sufficient contrast in color and grain to make the pattern stand out. Consider how different woods will age and whether their colors will deepen or lighten over time. For example, the contrast between a light maple and a dark wenge can be striking.
- Grain Direction: Pay attention to the grain direction of both the background and the inlaid pieces. Consistent grain direction can create a harmonious flow, while contrasting directions can add dynamic interest.
- Durability: For surfaces that will see heavy use (like tabletops), ensure your inlay is perfectly flush and well-protected by a durable finish. The wear resistance of the inlay wood should also be considered.
- Finishing: The final finish plays a crucial role in highlighting the intricate details of marquetry and inlay. A clear, high-quality finish will protect the wood and enhance its natural beauty. Learn more about various wood finishing techniques.
Advanced Tips for Refining Your Craft
- Practice Templates: Before committing to a large project, create smaller practice templates to hone your cutting and fitting skills.
- Source Quality Materials: The beauty of marquetry and inlay heavily relies on the quality of your veneers and solid woods. Seek out suppliers known for their premium materials. For inspiration, consider sourcing reclaimed and salvaged wood.
- Learn from Masters: Study historical examples of marquetry and inlay. Many museums and online resources showcase masterpieces that can inspire your own designs.
- Document Your Process: Keep a journal of your projects, noting which wood combinations worked well, what challenges you faced, and how you overcame them. This is invaluable for continuous improvement.
- Patience is Key: Both marquetry and inlay are time-intensive crafts. Rushing through steps will inevitably lead to errors. Embrace the process and enjoy the journey of creation.
Conclusion
Mastering marquetry and inlay techniques is a rewarding endeavor that allows woodworkers to transcend basic construction and create pieces of unparalleled artistic merit. By carefully selecting veneers and solid woods, employing precise cutting and fitting methods, and paying meticulous attention to detail, you can transform ordinary furniture and boxes into extraordinary works of art. The journey requires patience, dedication, and a passion for craftsmanship, but the ability to add intricate wooden art to furniture and boxes offers immense creative satisfaction and produces truly heirloom-quality pieces. As we move through 2026, the demand for unique, handcrafted items continues to grow, positioning these timeless skills at the forefront of fine woodworking.
Actionable Next Steps
- Gather Essential Tools: Invest in a high-quality marquetry knife, scroll saw, precision router, and a selection of chisels.
- Source Diverse Veneers: Begin acquiring a range of contrasting wood veneers and solid wood pieces to build your material palette.
- Start Small: Practice with simple geometric inlay patterns on small boxes or panels before tackling larger furniture pieces.
- Study Designs: Explore historical and contemporary marquetry and inlay designs to develop your aesthetic and understanding of composition.
- Refine Your Cuts: Continuously work on improving your precision in cutting and fitting, as this is the foundation of successful marquetry and inlay.
