

For centuries, artisans have elevated ordinary wooden objects into extraordinary works of art, not with paint, but with wood itself. This ancient craft, known as marquetry and inlay, transforms plain surfaces into captivating canvases through the meticulous arrangement of varied wood veneers. In 2026, as interest in handcrafted, personalized items continues its strong resurgence, an Introduction to Marquetry and Inlay: Adding Decorative Wood Veneer Designs to Furniture offers both a meditative pastime and a path to creating truly unique pieces that blend history with personal expression. Far from being an arcane practice, modern tools and readily available materials make this intricate art form accessible to any dedicated woodworker or hobbyist looking to infuse their projects with unparalleled elegance and narrative.
Key Takeaways
- Marquetry and inlay involve adding decorative wood veneer designs to furniture, creating intricate patterns and images using different wood species.
- The primary distinction lies in how the decorative elements interact with the base material: marquetry builds designs on the surface, while inlay seats them within cut recesses.
- Selecting the right veneers, tools, and understanding essential techniques like cutting, fitting, and gluing are crucial for successful projects.
- With patience and practice, beginners can create stunning, personalized furniture pieces, from small boxes to large tabletops.
- This craft offers immense creative freedom, allowing for diverse designs from geometric patterns to complex pictorial scenes.
Understanding Marquetry and Inlay: Adding Decorative Wood Veneer Designs to Furniture
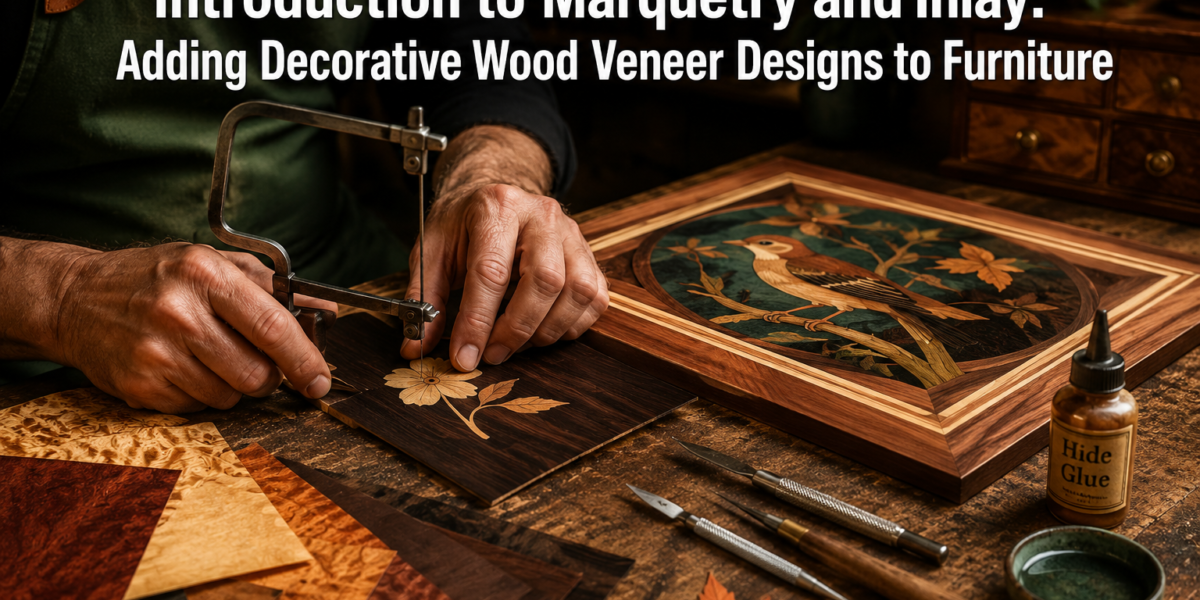
At its heart, marquetry is the art of applying pieces of veneer to a structure to form decorative patterns, designs, or pictures. Inlay, a closely related technique, involves embedding pieces of different materials, typically wood, into the surface of an object so that the new pieces are flush with the surface. Both methods are distinct yet often used in conjunction, enhancing the aesthetic appeal of furniture, boxes, and other wooden items.

The key difference lies in their application:
- Marquetry: This technique uses veneers to cover the entire surface of an object. The design is assembled first, often on a paper backing, and then applied as a single unit to the substrate. The base material is usually a less expensive wood or substrate, completely hidden by the veneer mosaic.
- Inlay: With inlay, the decorative pieces are set into recesses routed or carved directly into the solid wood surface of the furniture itself. The surrounding material remains visible, and the inlaid pieces sit flush within it.
Historically, both techniques have adorned furniture from ancient Egypt to the elaborate palaces of European royalty, reaching their zenith during the Renaissance and Baroque periods. Today, they remain a testament to fine craftsmanship and an enduring way to personalize woodworking projects.
Why Choose Marquetry and Inlay?
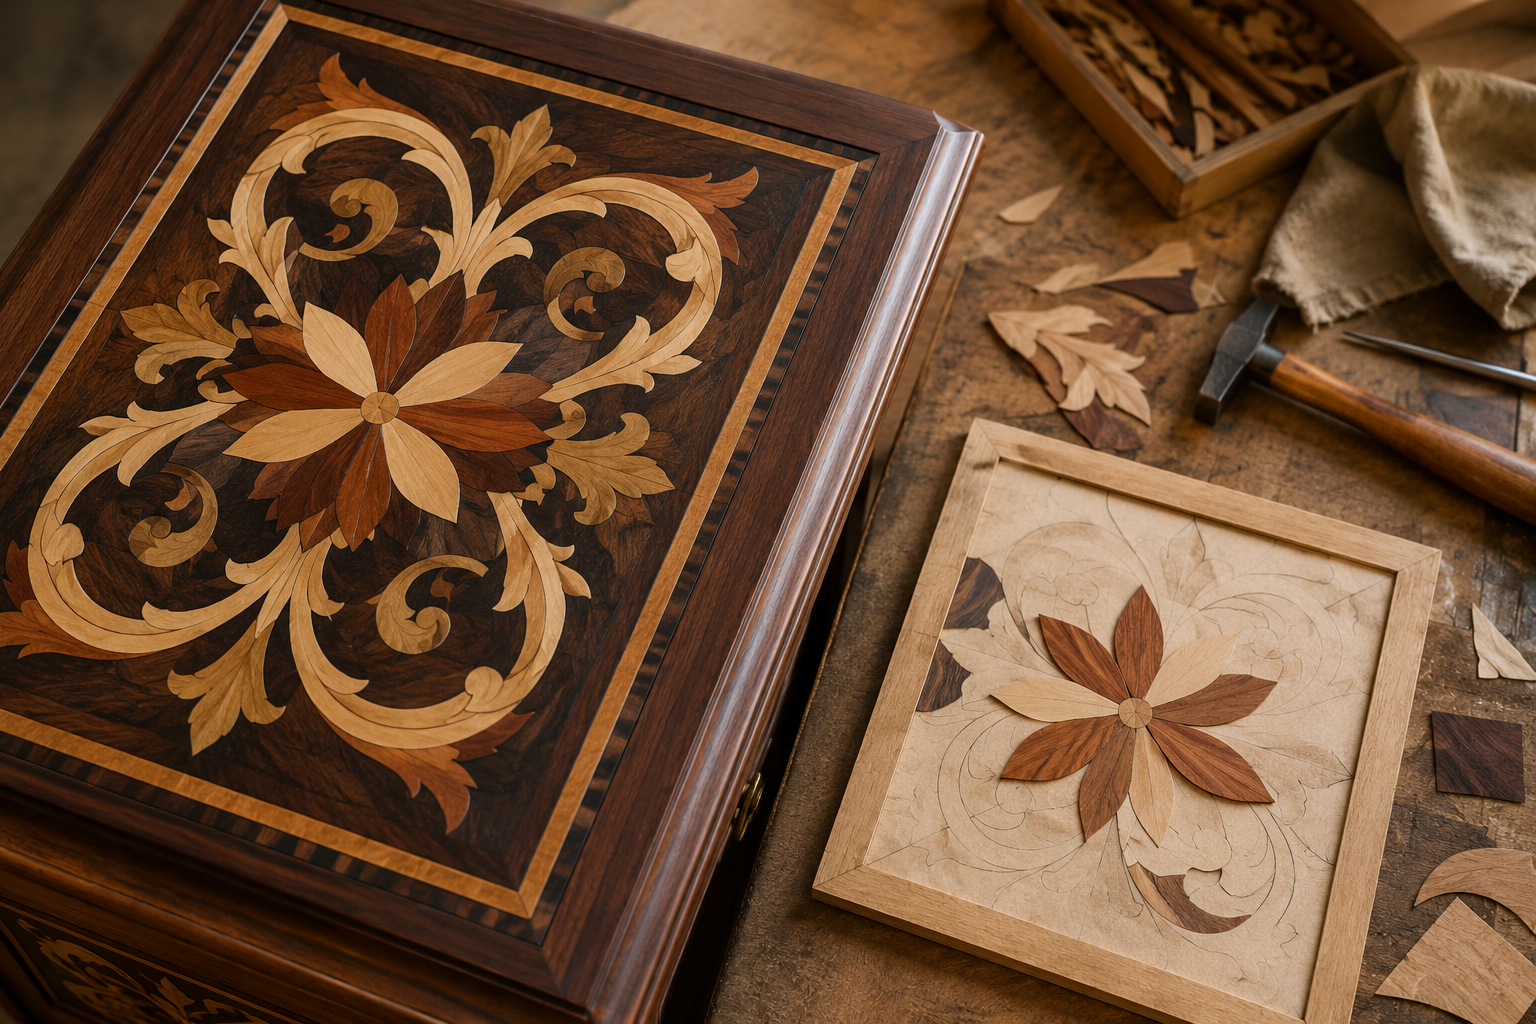
- Aesthetic Appeal: The primary reason is beauty. The contrasting colors, grains, and textures of different wood species create visual depth and intricate patterns impossible with solid wood construction alone.
- Personalization: It allows for highly customized designs, from monograms and family crests to landscapes and abstract art, making each piece unique.
- Value Enhancement: Expertly executed marquetry and inlay significantly increase the perceived and actual value of a furniture piece.
- Creative Expression: For the woodworker, it offers an engaging outlet for artistic expression, combining woodworking skills with design and fine motor control.
Choosing to delve into an Introduction to Marquetry and Inlay: Adding Decorative Wood Veneer Designs to Furniture is to embark on a journey that blends precision, patience, and artistic vision.
Essential Materials and Tools for Marquetry and Inlay Projects

Embarking on marquetry and inlay requires a specific set of materials and tools. While some specialized equipment can be acquired, many essential items are common woodworking tools or can be easily found.
Selecting Your Veneers
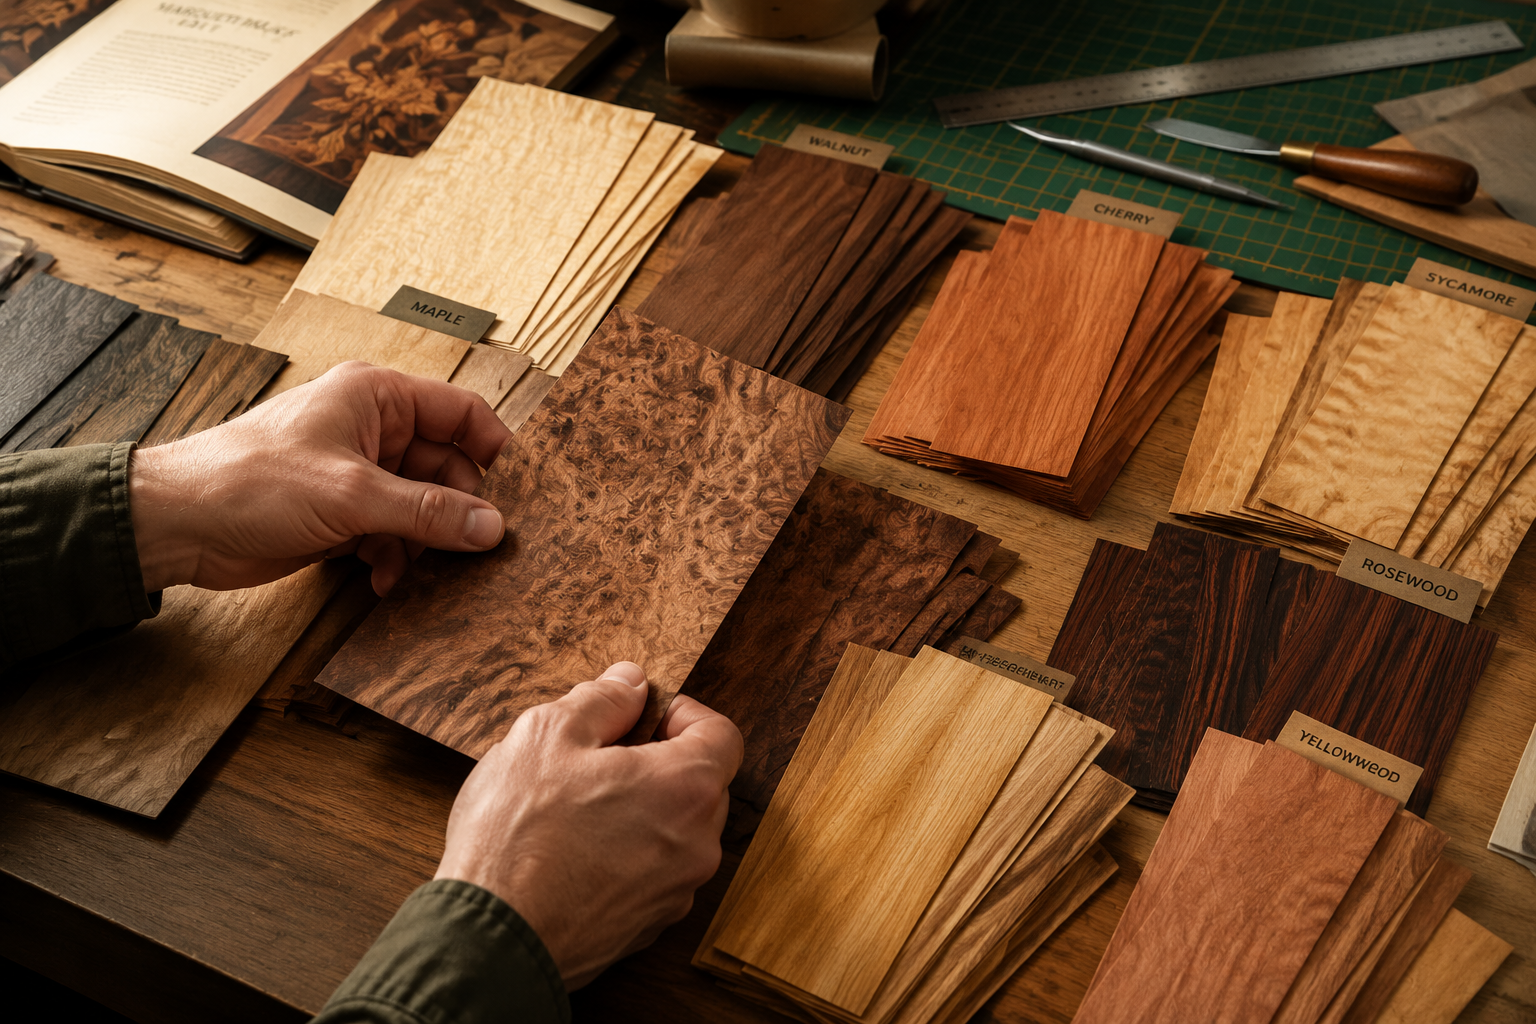
The quality and variety of your wood veneers are paramount. Veneer is thinly sliced wood, typically 0.6mm (1/42 inch) thick, available in hundreds of species.
- Wood Species: Choose veneers with contrasting colors and grain patterns to create visual interest. Common choices include:
- Light Woods: Maple, Holly, Sycamore
- Medium Woods: Walnut, Cherry, Mahogany
- Dark Woods: Wenge, Ebony, Rosewood
- Colored Woods: Dyed veneers offer a broader palette, as do burls and figured woods for unique textures.
- Veneer Sheets: Purchase veneers in sheets large enough for your design. Look for “bookmatched” or “slip-matched” sets for symmetrical patterns.
- Thickness: Standard thickness is generally suitable. For inlay, consistency in thickness is crucial for a flush finish.
When considering sustainable practices in woodworking, selecting ethically sourced veneers is also an important factor. For more on this, you might explore “Sustainable Wood Sourcing for the Modern Woodworker: Beyond Reclaimed to Urban Logging Certified Forests” to ensure your beautiful creations also align with environmental responsibility.
Key Tools
The right tools are essential for precision cutting and fitting.
Cutting Tools:
- Scalpel or Craft Knife: For fine, intricate cuts. Blades should be kept exceptionally sharp.
- Fretsaw or Scroll Saw: Ideal for cutting intricate curves and internal cutouts. A fine-toothed blade designed for veneer is necessary.
- Veneer Saw: A specialized saw with a knife-edge for cutting straight lines in veneer.
- Straightedge and Square: For accurate straight cuts and checking angles.
- Cutting Mat: Protects your workbench and provides a stable surface for cutting.
Adhesives and Clamping:
- Veneer Glue: Typically a liquid hide glue or a specialized veneer adhesive that allows for a longer open time and easy cleanup.
- Cauls: Flat, rigid boards used with clamps to apply even pressure over the entire veneered surface.
- Clamps: A variety of clamps are needed to apply consistent pressure during gluing.
- Veneer Tape: Water-activated paper tape used to hold veneer pieces together during assembly and gluing.
Other Essentials:
- Sandpaper: Various grits for smoothing surfaces.
- Scrapers: For final surface preparation before finishing.
- Pencil and Tracing Paper: For transferring designs.
- Router (for inlay): A small trim router or Dremel with a plunge base and appropriate bits is invaluable for routing precise recesses for inlay work. For those new to woodworking tools, a “Beginner’s Guide to Essential Woodworking Jigs: Improve Accuracy and Safety for Common Cuts” can provide foundational knowledge.
Techniques and Processes: Adding Decorative Wood Veneer Designs to Furniture
Mastering marquetry and inlay involves a series of precise steps, from design transfer to final finishing. Patience and attention to detail are paramount.
Design and Pattern Transfer
- Develop Your Design: Start with simple geometric patterns or basic motifs. As your skills grow, you can tackle more complex pictorial scenes. Sketch your design or print it out to scale.
- Prepare a Master Pattern: Create a clean, accurate master pattern on sturdy paper or thin cardboard. This will be your guide for cutting.
- Trace Onto Veneer: Securely tape or lightly adhere your pattern to the veneer sheet you intend to cut. Carbon paper or spray adhesive can be used. For intricate designs, multiple copies of the pattern might be needed, each for a different veneer color.
Cutting and Fitting Veneers
This is where the magic happens, and precision is key.
- The Window Method (for Marquetry): This common technique involves cutting a “window” in one veneer sheet and then cutting a contrasting piece to fit perfectly into that opening. The two pieces are then taped together. This is repeated for each color or element in the design.
- The Sand Shading Technique: For adding depth and dimension, carefully dip the edges of veneer pieces into hot sand. The scorching creates a gradient effect, mimicking natural shadows or contours.
- Double Bevel Cutting: When using a fretsaw, stack the background veneer and the inlay veneer together, securing them with tape. Cut through both simultaneously at a slight angle (bevel). This ensures a perfectly tight fit when the pieces are interchanged.
- Inlay Routing: For inlay, once your design is on the solid wood surface, carefully use a trim router or Dremel to rout out the recess. Go slowly, and test the fit frequently. The depth should exactly match the veneer thickness for a flush finish. Consider using jigs for accuracy, as detailed in our “Beginner’s Guide to Essential Woodworking Jigs: Improve Accuracy and Safety for Common Cuts.”
Assembly and Gluing
Once all pieces are cut and fitted:
- Dry Fit: Arrange all the veneer pieces of your marquetry design on a flat surface to ensure everything fits perfectly.
- Tape Together: Use veneer tape to hold the individual pieces of your marquetry panel together from the front. Ensure seams are tight.
- Prepare the Substrate: The surface of your furniture piece where the marquetry will be applied (the substrate) must be clean, flat, and sanded smooth.
- Apply Glue: Spread an even, thin layer of veneer glue over the substrate and the back of your assembled veneer panel.
- Pressing: Carefully place the veneer panel onto the glued substrate. Cover it with a plastic sheet (to prevent sticking to cauls), then place cauls on top. Use clamps to apply firm, even pressure across the entire surface. Allow ample drying time, typically 12-24 hours, depending on the glue and environmental conditions.
- Removing Tape: Once dry, gently moisten the veneer tape and peel it off. Any glue residue can be carefully scraped or sanded away.
Finishing Your Project
The finishing stage brings out the true beauty of the wood veneers.
- Sanding: Begin with fine-grit sandpaper (e.g., 220 grit) and gradually move to higher grits (320-400) to achieve a silky-smooth surface. Be extremely careful not to sand through the thin veneer.
- Filling Gaps: For any minor gaps, a mixture of fine sanding dust and glue can be used as a filler, carefully applied and sanded smooth once dry.
- Applying Finish: Choose a finish that enhances the natural beauty of the wood without obscuring the intricate design. Options include:
- Oil Finishes: Penetrate the wood, offering a natural look and feel (e.g., tung oil, Danish oil).
- Varnish or Lacquer: Provide a durable, protective layer with varying sheen levels.
- Shellac: A traditional finish that offers a warm glow and is easy to repair.
For a deeper dive into enhancing the final look, exploring different finishing techniques can be highly beneficial. Our article on “Cool Wood Finishing Techniques” provides additional insights that can make your marquetry and inlay projects truly shine.
Integrating Marquetry and Inlay into Furniture Projects
Once you’ve grasped the fundamental techniques, the possibilities for incorporating marquetry and inlay into your woodworking projects are vast. These decorative elements can elevate simple pieces into heirlooms.

Small Projects for Beginners
Start small to build confidence and refine your skills.
- Coasters or Trivets: Excellent for practicing geometric patterns or simple motifs.
- Small Boxes or Jewelry Boxes: Ideal for a central decorative panel on the lid.
- Picture Frames: Inlay a border or a corner accent around the opening.
- Wooden Candle Holders: Add a small marquetry element to the base or side. Learn more about creating such functional art in “Wooden Candle Holders for Ambient Decor: From Tealights to Pillar Stands with Safety and Style.”
These smaller items allow you to experiment with different veneers and techniques without committing to a large, complex piece.
Medium to Large Furniture Applications
As your expertise grows, consider integrating marquetry and inlay into larger furniture.
- Tabletops: A classic application for intricate marquetry scenes or geometric patterns. Consider a border inlay combined with a central motif.
- Cabinet Doors or Drawer Fronts: Transform plain panels into focal points with decorative veneer work. For guidance on constructing the base, you might refer to our article on “Mastering Dovetail Drawers for Cabinets: Hand-Cut and Router Jigs for Seamless Furniture Integration.”
- Chair Backs or Armrests: Add smaller, refined details that enhance the overall elegance of the seating.
- Wall Panels or Decorative Screens: Create large-scale artistic statements.
When designing for furniture, consider the scale of your marquetry relative to the piece. A subtle inlay can complement a minimalist design, while a bold marquetry panel can become the centerpiece of a more elaborate item. The interplay between the wood’s natural grain and your decorative additions creates a powerful visual impact. Even projects like building custom wooden planters can benefit from subtle inlaid details, adding a touch of sophistication.
Design Considerations
- Contrast: Use woods with significant color and grain contrast to make your designs pop.
- Symmetry vs. Asymmetry: Decide if your design will be perfectly symmetrical or have a more organic, asymmetric flow.
- Scale: Ensure the size of your marquetry or inlay is appropriate for the scale of the furniture piece. Too small, and it might be overlooked; too large, and it could overwhelm.
- Durability: For surfaces that will see a lot of wear, like tabletops, ensure your finish is robust to protect the delicate veneer work.
- Narrative Interiors: Think about how the decorative elements contribute to the overall story or aesthetic of the piece and the room it occupies. This aligns with the principles discussed in “Handcrafted Wooden Wall Clocks: Designs That Blend Narrative.”
By carefully planning and executing your marquetry and inlay, you can transform ordinary woodworking into extraordinary art, truly adding decorative wood veneer designs to furniture that will be cherished for generations.
Conclusion
The Introduction to Marquetry and Inlay: Adding Decorative Wood Veneer Designs to Furniture is a journey into an ancient craft that continues to captivate and inspire. From selecting the perfect contrasting veneers to the meticulous precision of cutting and fitting, each step in this process offers a unique blend of technical challenge and artistic reward. Whether you’re enhancing a small keepsake box or adorning a grand dining table, the ability to embed intricate patterns and images using wood veneers elevates a simple piece of furniture into a personalized masterpiece. In 2026, as the appreciation for handcrafted excellence grows, mastering these techniques offers woodworkers an unparalleled avenue for creative expression and value creation.
To begin your own marquetry and inlay journey, start with simple projects and readily available materials. Invest in sharp tools, practice your cutting techniques, and above all, cultivate patience. The beauty of this craft lies in its details, and with each successful cut and perfectly fitted piece, you’ll gain confidence and skill. Explore different wood species, experiment with designs, and allow your creativity to flourish. The world of decorative wood veneer designs awaits your unique touch, promising to transform your woodworking projects into truly memorable creations.
