

Over 70% of wild bird nesting attempts fail due to predation, habitat loss, or harsh environmental conditions (Bird Conservancy of the Rockies, 2020). For outdoor enthusiasts keen on attracting and protecting local avian populations, a standard birdhouse simply isn’t enough. Elevating a basic nesting box into a true sanctuary requires a meticulous approach to design, focusing on predator deterrence, optimal ventilation, and durable finishing. This comprehensive guide delves into constructing Predator-Proof Advanced Birdhouses: Ventilation, Mounting, and Finishing for Outdoor Enthusiasts, transforming simple structures into resilient havens for our feathered friends and desirable garden decor.
Key Takeaways
- Integrated Predator Defense: Design elements like extended roofs, baffled entrance holes, and specialized mounting hardware are crucial for protecting nestlings from common predators like raccoons, snakes, and cats.
- Optimal Ventilation Systems: Proper airflow prevents overheating and moisture buildup, utilizing features such as recessed vents and strategic hole placement for healthy nest environments.
- Secure & Strategic Mounting: Choosing the right location and employing stable, predator-resistant mounting techniques are as vital as the birdhouse’s construction itself.
- Durable & Non-Toxic Finishes: Selecting weather-resistant, non-toxic wood treatments extends the birdhouse’s lifespan and ensures the safety of its inhabitants.
- Craftsmanship for Longevity: Employing advanced joinery and quality materials ensures structural integrity and aesthetic appeal, making the birdhouse a valuable addition to any garden.
Designing Advanced Birdhouses for Predator Protection and Optimal Ventilation
Crafting an advanced birdhouse goes beyond simple aesthetics; it involves thoughtful engineering to create a safe, healthy environment. The primary goal of Predator-Proof Advanced Birdhouses: Ventilation, Mounting, and Finishing for Outdoor Enthusiasts is to safeguard the inhabitants from external threats while maintaining optimal internal conditions.

Incorporating Predator-Proof Features
Predators are opportunistic, and a well-designed birdhouse anticipates their tactics. Here are key features to integrate:
- Entrance Hole Protection:
- Hole Reducers/Guards: Attach a metal plate or a sturdy wooden block with a precisely sized hole over the entrance. This prevents squirrels from enlarging the hole and blocks larger predators from reaching inside. The depth of the entrance tunnel should be at least 1.5 inches to deter raccoons.
- Extended Landing Perch (Avoid): While seemingly helpful, a prominent perch can give predators a foothold. Recessed or nonexistent perches are generally safer. If a perch is desired for certain species, ensure it’s very short (less than 1 inch) and not easily gripped by larger paws.
- Extended Roof Overhang: A roof that extends at least 3-4 inches beyond the entrance hole makes it difficult for climbing predators to reach over and into the box. A pitched roof also aids in shedding rain and snow, protecting the interior from moisture.
- Smooth Exterior Surfaces: Avoid any ledges, rough textures, or decorative elements that could provide a grip for climbing predators. Sand the exterior smooth and consider adding metal flashing around the base if mounting on a post.
- Internal Baffles: For very determined predators, an internal baffle—a small wooden panel placed inside the birdhouse just beyond the entrance hole—can block a predator’s arm or paw from reaching the nestlings, forcing them to navigate a corner.
Achieving Superior Ventilation
Proper ventilation is critical for regulating temperature and preventing the buildup of humidity, which can lead to mold and bacterial growth harmful to birds.
- Recessed Vents: Instead of drilling holes directly, create small, baffled vents near the top and bottom of the birdhouse, ideally under the eaves or behind a decorative trim. These vents should be protected by mesh to keep insects out but allow air to flow.
- Upper Vents: Positioned high to allow hot air to escape.
- Lower Vents: Positioned low to draw in cooler air.
- Drainage Holes: Drill several small (1/4 inch) holes in the floor of the birdhouse to allow any accumulated moisture to drain out. This prevents standing water and keeps nesting material dry.
- Roof Design: A properly pitched roof with an air gap between the roof and the main box body can act as an attic, further aiding in thermal regulation by allowing hot air to dissipate.
- Material Selection: Using natural, breathable wood like cedar or cypress (avoiding treated lumber) further supports good air circulation and temperature stability. For advanced joinery techniques that contribute to a robust structure, explore resources like “Beyond the Basic Box: Advanced Joinery for Unique Wooden Gift Boxes” at https://woodcraftwiz.com/beyond-the-basic-box-advanced-joinery-for-unique-wooden-gift-boxes-and-keepsakes/.

Secure Mounting Strategies for Predator-Proof Advanced Birdhouses
The most predator-proof birdhouse design can fail if mounted incorrectly. Strategic placement and robust mounting techniques are paramount for Predator-Proof Advanced Birdhouses: Ventilation, Mounting, and Finishing for Outdoor Enthusiasts.
Optimal Location Considerations
Choosing the right spot is the first line of defense.
- Height: Mount birdhouses at an appropriate height for the target species, generally 5 to 15 feet off the ground. Higher placements often deter ground predators.
- Clearance: Ensure there are no branches or structures close enough for predators to leap from. Maintain at least 10 feet of clear space around the mounting post or tree.
- Orientation: Face the entrance hole away from prevailing winds and direct afternoon sun to prevent overheating and rain entry. A north or east-facing orientation is often ideal.
- Visibility: While privacy for birds is good, ensure the birdhouse is visible enough from your home for occasional monitoring, but not so exposed that it becomes an easy target for human disturbance or theft.
Predator-Resistant Mounting Techniques
Here are several advanced mounting methods that actively deter predators:
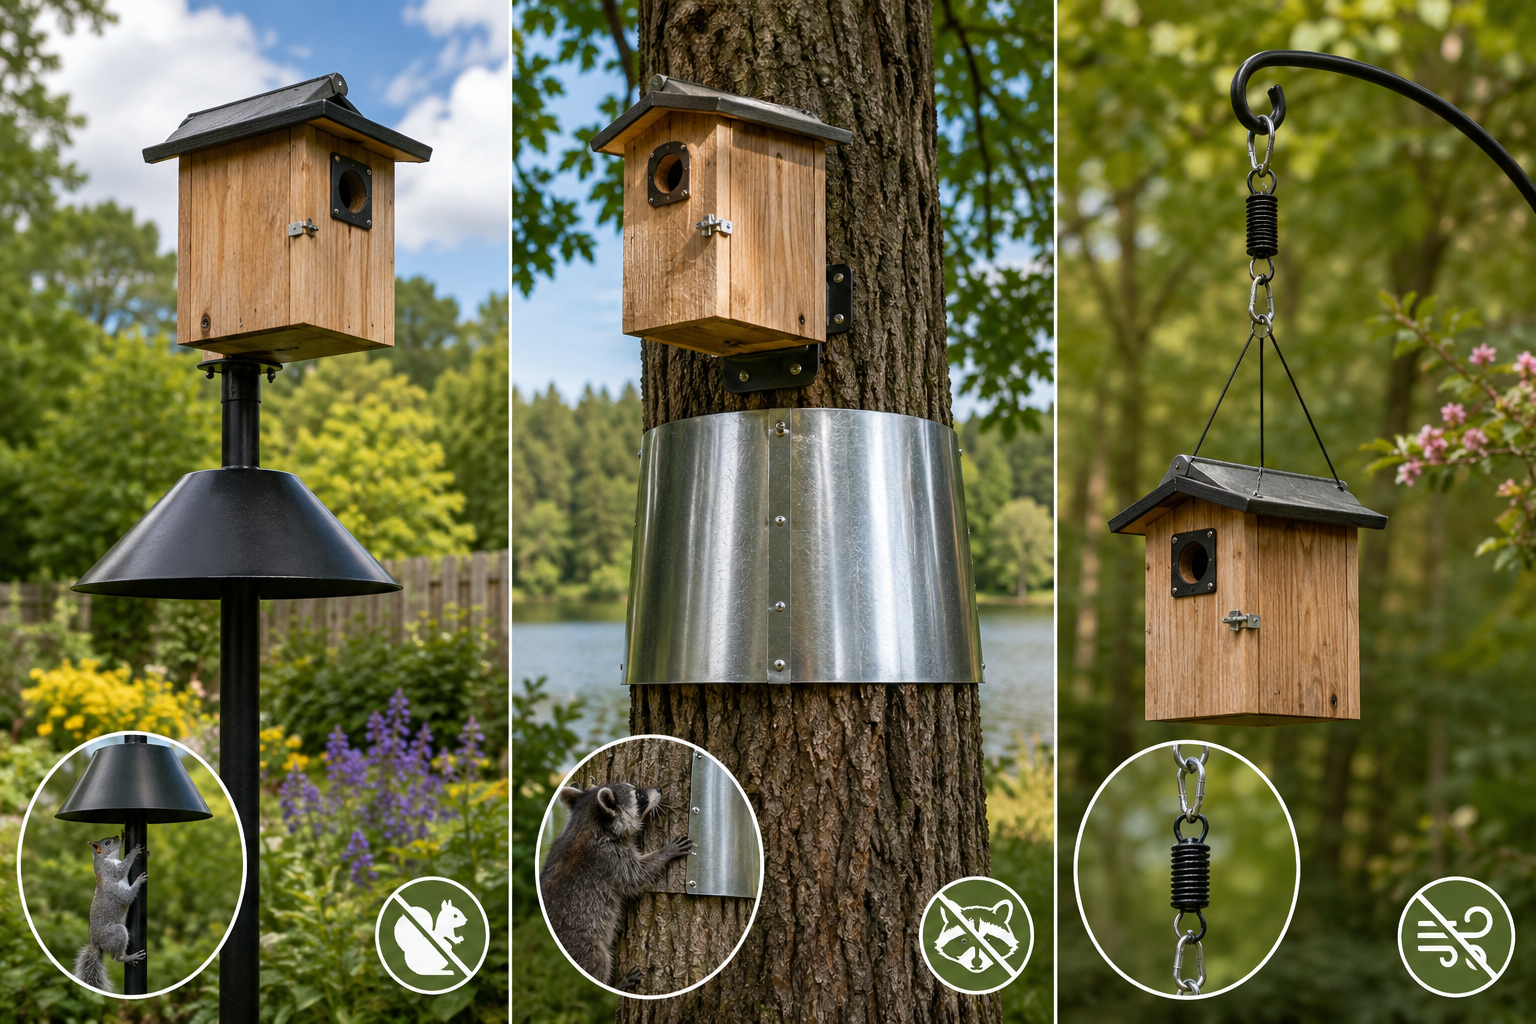
- Pole Mounting with Baffles:
- Sturdy Pole: Use a robust metal pole (e.g., 1-inch galvanized pipe) or a pressure-treated 4×4 post.
- Conical or Stovepipe Baffle: Install a metal baffle around the pole, at least 6 feet off the ground. These conical or stovepipe-shaped barriers prevent climbing predators like raccoons, snakes, and cats from reaching the birdhouse. The baffle should be at least 8 inches wide and smooth.
- Post-Cap Protection: If using a wooden post, ensure the top is covered to prevent water damage and provide a smooth, difficult-to-grip surface directly below the birdhouse.
- Tree Mounting with Wraps/Collars:
- Smooth Trunk: Select a tree with a smooth, unbranched trunk for at least 6-8 feet below the birdhouse.
- Metal Predator Wrap: Wrap a wide band of sheet metal (e.g., aluminum flashing) around the trunk, secured firmly to prevent climbing. Ensure it’s wide enough that predators cannot bypass it.
- Avoid Nails/Screws Directly into Tree: Use lag screws with spacers or hang the birdhouse using wire threaded through eye hooks, allowing for tree growth and preventing damage.
- Hanging Systems:
- Cable/Wire Suspension: Hang smaller birdhouses from a sturdy, horizontal branch using galvanized wire or cable.
- Anti-Sway Design: Incorporate a two-point suspension system or a lower anchor point to prevent the birdhouse from swinging excessively in the wind, which can distress nesting birds and allow predators to gain purchase.
- Shepherd’s Hooks with Baffles: If using shepherd’s hooks, select heavy-duty models and combine them with pole baffles as described above.
When attaching the birdhouse to its mounting structure, use corrosion-resistant hardware like stainless steel screws or galvanized bolts. Regular inspection of mounting hardware for looseness or wear is also essential. For larger, more complex wooden projects, understanding various securing techniques, such as those discussed in “Building Robust Knife Blocks: Custom Slots, Safety Features,” available at https://woodcraftwiz.com/building-robust-knife-blocks-custom-slots-safety-features-and-kitchen-display-designs-for-2026/, can provide valuable insights into creating stable, long-lasting structures.
Finishing Touches: Durability and Safety in Predator-Proof Advanced Birdhouses
The final stage of creating Predator-Proof Advanced Birdhouses: Ventilation, Mounting, and Finishing for Outdoor Enthusiasts involves applying finishes that enhance durability and ensure the safety of the avian residents. The right finish extends the birdhouse’s life, protects it from the elements, and maintains its aesthetic appeal without harming the birds.
Selecting Non-Toxic and Durable Finishes
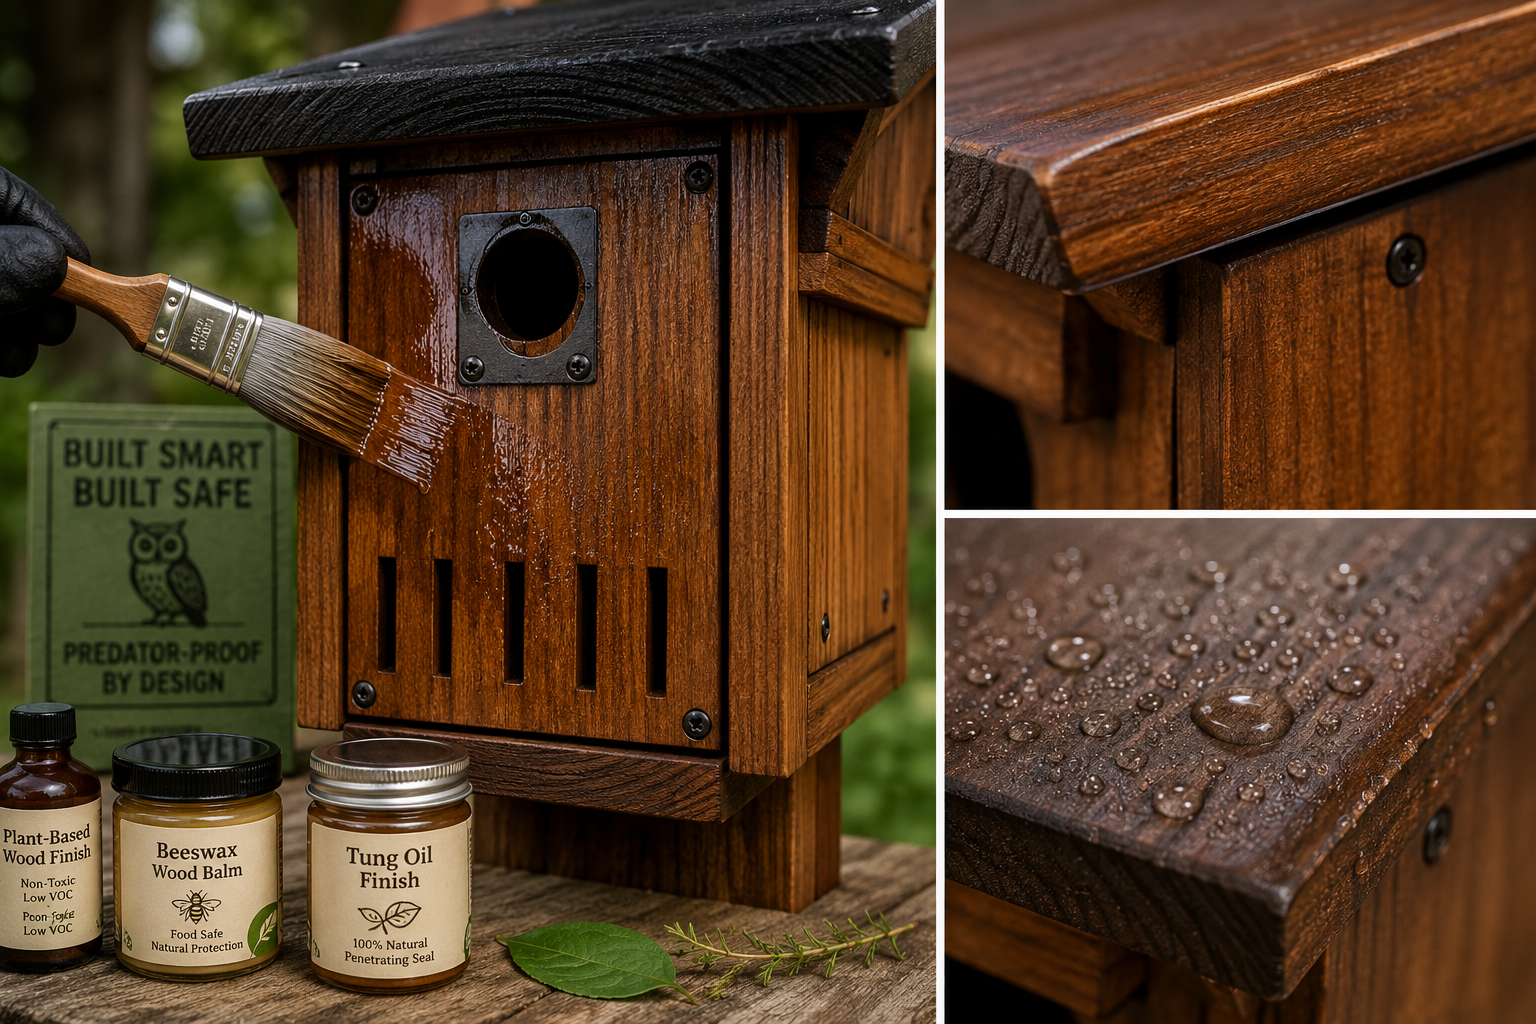
Chemicals present in many paints and stains can be harmful to birds. Prioritize non-toxic, eco-friendly options.
- Exterior Stains:
- Water-Based Stains: These are generally preferred as they contain fewer volatile organic compounds (VOCs) and are safer once cured. Look for stains specifically labeled as “low VOC” or “zero VOC.”
- Natural Oil Finishes: Options like linseed oil or tung oil, when pure and non-toxic, penetrate the wood, offering water resistance and a natural look. Ensure they are 100% natural, not oil-modified urethanes. These often require reapplication every few years.
- Exterior Paints:
- Latex Paints: Choose exterior-grade, low-VOC latex paints. Lighter colors can help reflect heat, keeping the interior cooler.
- Avoid Lead-Based Paints: This is a critical safety concern for wildlife. Always use modern, lead-free paints.
- Sealants/Topcoats:
- Marine-Grade Varnishes (with caution): While highly durable, traditional marine varnishes often contain strong solvents. If used, ensure it’s a non-toxic variety and allow for a very long curing time in a well-ventilated area before installation.
- Water-Based Polyurethanes: These are increasingly available in exterior formulations and offer good protection. Again, choose low-VOC versions. For guidance on applying such finishes, especially in challenging conditions, refer to “Applying Polyurethane in High Humidity: Tips and Techniques” at https://woodcraftwiz.com/applying-polyurethane-in-high-humidity-tips-and-techniques/.
- Natural Wood: For woods with natural resistance to rot and insects, like cedar, redwood, or cypress, no finish may be required, allowing the wood to weather naturally. However, a light coat of natural oil can extend its lifespan. For specific instructions on finishing durable woods, consider exploring “How to Finish Mahogany for Outdoor Use: Best Tips and Techniques” at https://woodcraftwiz.com/how-to-finish-mahogany-for-outdoor-use-best-tips-and-techniques/.
Application Techniques for Longevity
Proper application ensures the finish performs as intended.
- Preparation is Key:
- Sanding: Smooth all surfaces to ensure good adhesion of the finish and prevent splinters. Start with a coarser grit and progressively move to finer grits (e.g., 80-120-220).
- Cleaning: Remove all dust and debris before applying any finish. A tack cloth or damp rag works well.
- Multiple Thin Coats: Apply several thin coats rather than one thick coat. This provides better penetration, a more durable finish, and reduces the chance of peeling or cracking. Lightly sand between coats if recommended by the product manufacturer.
- Thorough Drying/Curing: Allow each coat to dry completely according to manufacturer instructions. Crucially, allow the entire birdhouse to cure fully, often several weeks, in a well-ventilated area before placing it outdoors. This allows all solvents to off-gas, making it safe for birds.
- Interior Unfinished: Do not apply any finishes to the interior of the birdhouse. Birds do not require a finished interior, and any chemicals could be harmful. The rough wood surface also provides a better grip for nestlings to fledge.
Maintenance for Extended Life
Even the best finishes require periodic maintenance.
- Annual Cleaning: Clean out old nesting material annually, typically after the breeding season, to prevent parasitic buildup and prepare for new nests.
- Inspect and Repair: Regularly inspect the birdhouse for any signs of wear, rot, or damage to the finish. Touch up or reapply finishes as needed. Check for loose screws or damaged predator guards.
- Reapplication: Depending on the chosen finish and local weather conditions, reapplication may be necessary every 2-5 years to maintain protection.
By carefully considering these finishing touches, outdoor enthusiasts can ensure their advanced birdhouses are not only beautiful additions to their landscape but also safe, durable homes for generations of birds.
Conclusion
Creating Predator-Proof Advanced Birdhouses: Ventilation, Mounting, and Finishing for Outdoor Enthusiasts is a rewarding endeavor that significantly contributes to local bird conservation and enriches any outdoor space. From meticulously engineered predator deterrents and innovative ventilation systems to secure mounting strategies and non-toxic, durable finishes, every aspect of design plays a crucial role. By applying these advanced techniques, you move beyond simple aesthetics, providing a genuinely safe, healthy, and long-lasting sanctuary for birds.
For woodworkers, this project offers an excellent opportunity to refine skills in joinery, weatherproofing, and material selection, contributing both to nature and to the beauty of a garden. The effort invested in a truly predator-proof and well-ventilated birdhouse will be repaid manifold by the vibrant life it attracts and protects, standing as a testament to thoughtful craftsmanship and environmental stewardship.

