

In 2026, the pursuit of truly bespoke and visually captivating furniture pieces is a hallmark of distinguished craftsmanship. While solid wood construction has its undeniable appeal, the ancient arts of veneering and marquetry offer an unparalleled avenue for creating intricate decorative inlays and stunning surface designs that elevate furniture from functional to art. Mastering Veneering and Marquetry: Adding Decorative Inlays and Surface Designs to Furniture is not merely about covering a surface; it’s about harnessing the aesthetic potential of exotic woods, grain patterns, and intricate geometric or pictorial designs to produce heirloom-quality pieces. This comprehensive guide will explore the essential techniques, tools, and considerations for successfully integrating these decorative arts into your woodworking projects.
Key Takeaways
- Veneering is crucial for large, stable surfaces: It allows for the use of rare woods, creates visually striking grain matches, and significantly improves dimensional stability compared to solid wood panels.
- Marquetry adds intricate beauty: By cutting and assembling small pieces of veneer, marquetry creates elaborate patterns and images, offering limitless design possibilities for furniture decoration.
- Precision is paramount: Both techniques demand meticulous cutting, accurate glue application, and careful pressing to achieve seamless, professional results.
- Adhesives and pressing methods vary: Understanding the right glue (e.g., hide glue, PVA, epoxy) and pressing technique (e.g., vacuum press, cauls, clamps) is critical for durable bonds.
- Finishing enhances the artistry: Proper sanding and finishing bring out the depth, color, and luster of the veneer and marquetry, protecting the intricate designs.
The Art of Veneering: Crafting Exquisite Surfaces
Veneering, at its core, involves bonding thin slices of wood (veneers) to a thicker, often less expensive substrate. This technique allows woodworkers to utilize rare and exotic wood species economically, create dramatic grain patterns that would be impossible with solid lumber, and construct panels that are exceptionally stable and resistant to warping or cracking. For large surfaces, such as tabletops, cabinet doors, or furniture panels, veneering is often the superior choice for achieving a flawless, visually continuous aesthetic.

Understanding Veneer Types and Selection
Veneer comes in various cuts, each yielding a distinct grain pattern:
- Rotary Cut: Produces a broad, often wavy grain pattern, ideal for achieving large, consistent sheets.
- Flat Cut (Plain Sliced): Creates a “cathedral” or flame pattern, mimicking solid lumber.
- Quarter Sawn: Results in a straighter, linear grain with prominent ray fleck in woods like oak.
- Rift Cut: Similar to quarter sawn but at a slightly different angle, producing a very straight, uniform grain.
When selecting veneers, consider not only the species but also the thickness, grain consistency, and any natural defects. Thicker veneers (e.g., 1/28″ or 1/32″) are more forgiving for beginners, while thinner veneers (e.g., 1/40″ or 1/64″) require more delicate handling. Matching grain and color across sheets is critical for achieving a cohesive look on large projects.
Substrate Preparation: The Foundation of Flawless Veneering
A stable, flat substrate is fundamental to successful veneering. Common substrates include:
- MDF (Medium Density Fiberboard): Excellent stability, smooth surface, and uniform density.
- Plywood (Baltic Birch, Cabinet Grade): Offers good stability and strength, but ensure void-free layers.
- Particleboard: Economical but generally less stable and prone to crumbling at edges.
The substrate must be perfectly flat, smooth, and clean. Any imperfections will telegraph through the thin veneer. Sanding the substrate to a fine grit (e.g., 150-180) and ensuring it is free of dust, oils, or waxes is crucial for optimal adhesion. It’s also vital to veneer both sides of the substrate (balancing veneer) to prevent warping caused by differential moisture absorption.
Essential Tools for Veneering
- Veneer Saw or Knife: For precise, clean cuts.
- Straightedge: Essential for accurate cutting.
- Taping Gummed Tape: Used for temporarily holding veneer pieces together during assembly.
- Adhesive: Hide glue, PVA veneer glue, or epoxy.
- Pressing System: Vacuum press, cauls and clamps, or veneer press.
- Scrapers and Sandpaper: For surface preparation and finishing.
Techniques for Large Surface Application
Applying veneer to large surfaces requires careful planning and execution:
- Cut and Size Veneer: Cut veneer sheets slightly oversized (1/8″ to 1/4″ per edge) to allow for trimming.
- Edge Joining: If your surface requires multiple veneer pieces, they must be perfectly edge-joined. This is often done with a veneer saw and straightedge, then taped together with gummed veneer tape.
- Adhesive Application: Apply an even, consistent layer of adhesive to both the substrate and the back of the veneer. The type of glue dictates open time and clamping pressure. Hide glue offers a longer open time and allows for repositioning, while PVA glues cure faster.
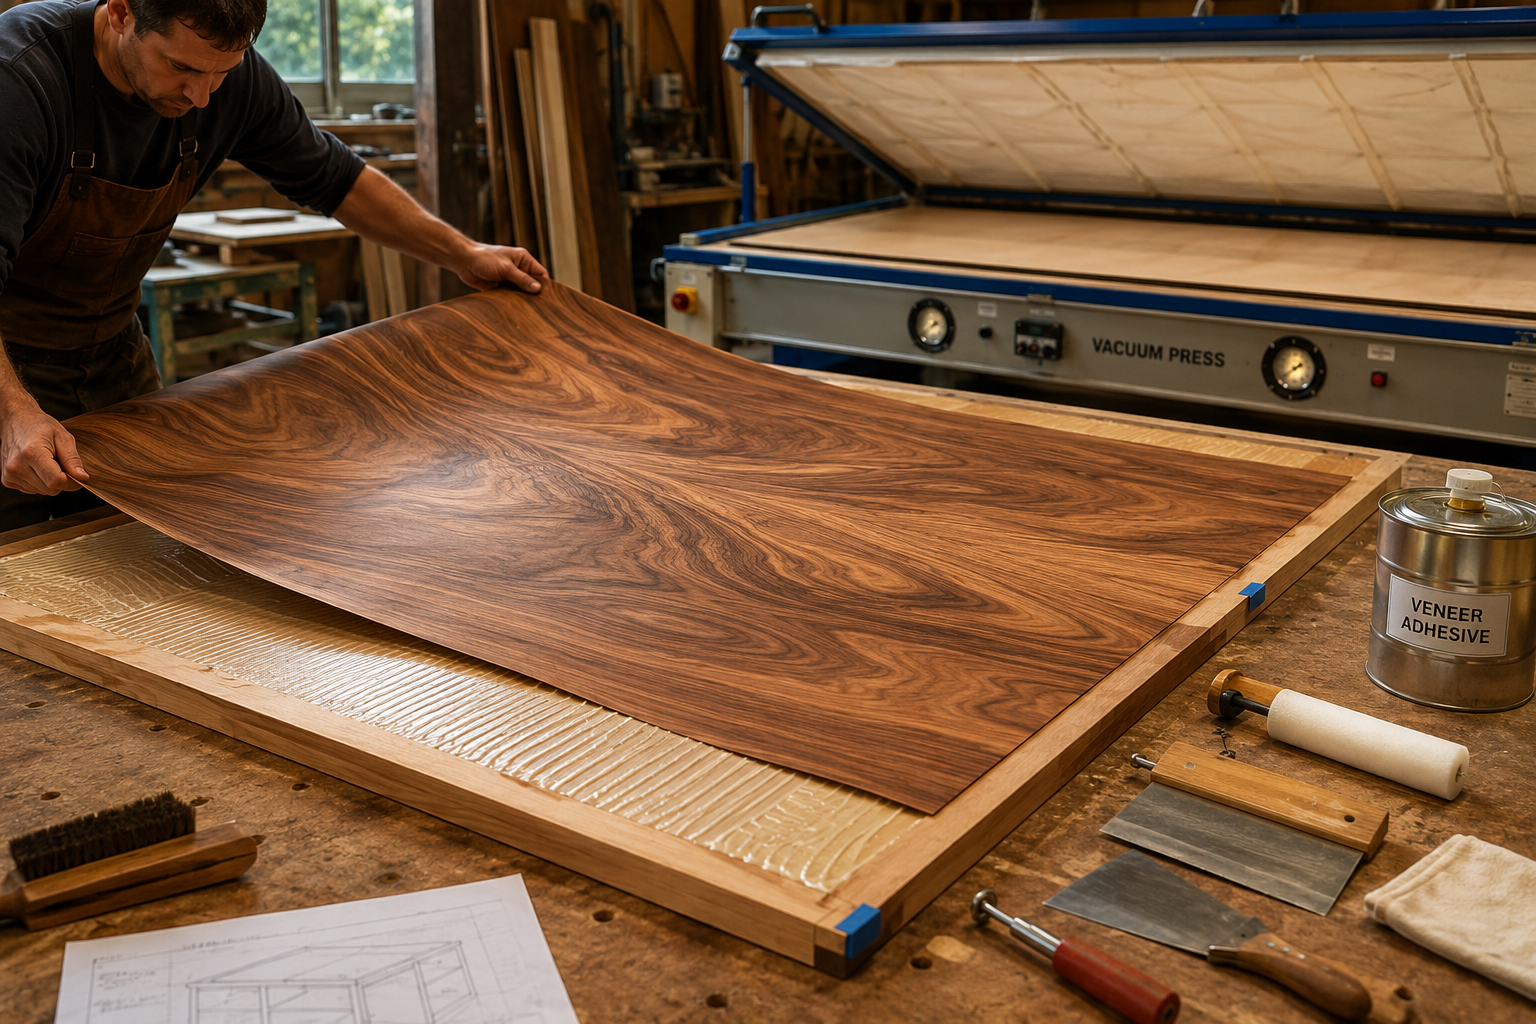
- Positioning and Pressing: Carefully place the veneer onto the substrate. For large surfaces, a vacuum press is ideal as it provides uniform pressure across the entire surface, ensuring excellent adhesion and preventing bubbles or delamination. If using cauls and clamps, ensure even pressure distribution and use a protective barrier between the caul and veneer.
- Curing: Allow the glue to cure completely according to the manufacturer’s instructions.
- Trimming and Sanding: Once cured, trim the excess veneer flush with the substrate edges using a router with a flush trim bit or a sharp veneer saw/knife. Lightly sand the veneered surface, moving through grits from 220 up to 320 or 400.

Mastering Marquetry: Adding Decorative Inlays to Furniture
Marquetry is the art of creating intricate pictorial or geometric designs by inlaying pieces of veneer into a surface. Unlike parquetry (which uses geometric patterns to create mosaic-like surfaces), marquetry often involves complex shapes and contrasting wood species to form images or elaborate decorative elements. This technique brings an extraordinary level of detail and artistry to furniture pieces.
Design Principles for Marquetry
Successful marquetry begins with a well-conceived design.
- Simplicity vs. Complexity: Start with simpler designs (e.g., geometric patterns, stylized leaves) before attempting highly detailed images.
- Contrast: Utilize woods with contrasting colors, grains, and textures to make your designs stand out.
- Flow and Balance: Ensure the inlay design complements the overall furniture piece and does not overwhelm it. Consider the placement and scale of the marquetry in relation to the furniture’s form.
Essential Tools and Materials for Marquetry
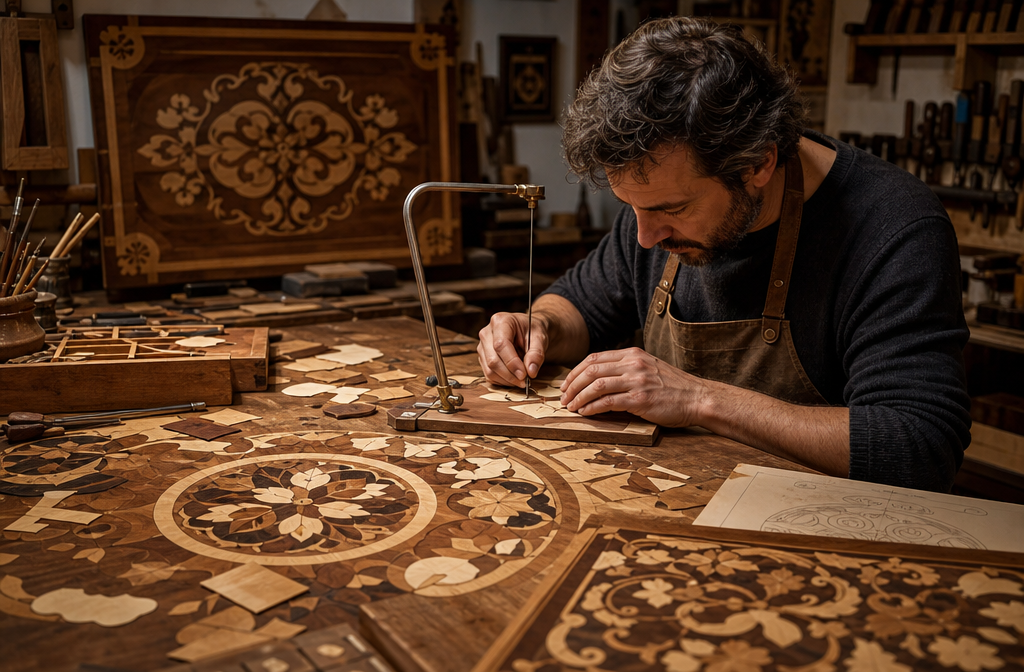
- Chevalet (Marquetry Saw): A specialized foot-powered saw for precise cutting of veneer packets. A scroll saw or jeweler’s saw can also be used.
- Veneer Sheets: Various species, chosen for color and grain.
- Pattern or Design Template: Printed or drawn.
- Adhesive: Often hide glue or PVA.
- Pressing System: Small cauls and clamps are typically sufficient for individual marquetry panels.
- Sandpaper and Scrapers: For preparation and finishing.
- Light Box (optional): For tracing and assembly.
Cutting Techniques: The Foundation of Intricate Designs
The precision of your cuts is paramount in marquetry.
- Packet Method: This common technique involves stacking several veneer sheets (the design veneer, background veneer, and a waste sheet) and taping them together. The pattern is attached to the top. When cutting, the blade’s kerf (thickness) creates a perfect fit for the inlay.
- “Piece by Piece” Method: Each piece of veneer is cut individually, and the corresponding recess is cut into the background veneer. This method is more time-consuming but allows for greater control over individual elements.
- Scribing and Piercing: Using a sharp knife or scalpel, carefully scribe the design onto the veneer. Then, using a small drill or piercing saw, remove the waste material.
- Grain Direction: Pay close attention to the grain direction of each veneer piece. Aligning the grain with the design elements can enhance realism and prevent splitting.
For projects with intricate designs, consider how advanced wood carving techniques might complement your marquetry, adding depth and texture to certain elements.
Assembly and Inlaying
- Fitting Pieces: Once all pieces are cut, dry-fit them meticulously. Any gaps will be noticeable.
- Gluing: Apply a thin, even coat of glue to the back of each marquetry piece and carefully press it into its recess. Hide glue is often preferred due to its reversibility and ability to fill small gaps.
- Pressing: Use flat cauls and clamps, or a vacuum press for larger marquetry panels, to ensure consistent pressure while the glue dries.
- Leveling: After the glue cures, the surface will likely be uneven. Carefully scrape and sand the entire surface until the inlay is perfectly flush with the surrounding veneer. This is where the true beauty of marquetry emerges, with a seamless transition between the different wood elements.

Finishing Your Decorative Inlays and Surface Designs
The final finishing steps are critical to protect your veneered and marquetry surfaces and to enhance their aesthetic appeal. Proper finishing brings out the natural beauty of the wood, adds depth to the grain, and ensures the longevity of your decorative efforts.
Sanding: The Path to a Smooth Surface
After trimming and leveling, thorough sanding is essential.
- Gradual Grit Progression: Start with 220-grit sandpaper and progress through finer grits (320, 400, or even higher for very fine finishes).
- Even Pressure: Maintain even pressure to avoid creating depressions or “dishing out” softer areas of veneer or inlay.
- Dust Removal: Meticulously remove all sanding dust between grits. Dust left on the surface can embed in the finish or scratch subsequent sanding.
Choosing the Right Finish
The choice of finish depends on the desired look, durability, and ease of application.
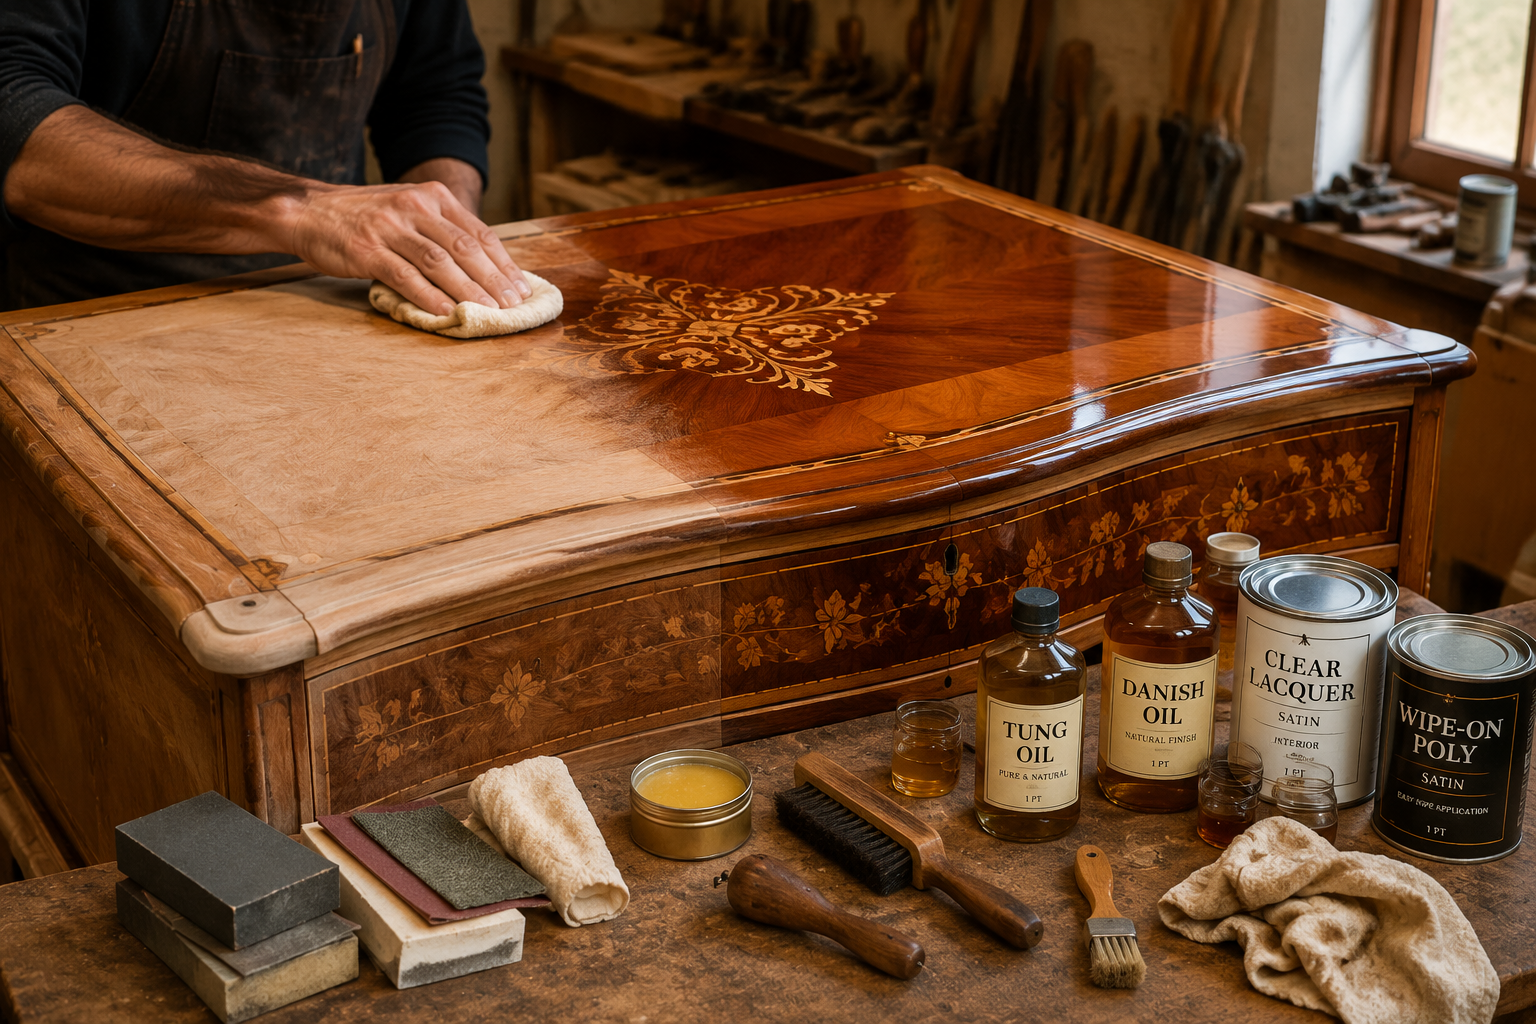
- Oil Finishes (e.g., Tung Oil, Linseed Oil): Penetrate the wood, offering a natural, low-sheen look and enhancing grain depth. They are relatively easy to repair but offer less protection against moisture and abrasion.
- Varnish (e.g., Polyurethane, Spar Varnish): Create a durable surface film that is resistant to moisture, chemicals, and abrasion. Available in various sheens, from matte to high gloss. Polyurethane is a popular choice for furniture.
- Lacquer: Dries quickly and builds a smooth, clear film. Often used for fine furniture due to its ability to be rubbed out to a high gloss. Requires specialized spray equipment for best results.
- Shellac: A traditional finish that provides a beautiful amber tone and seals the wood effectively. Often used as a sealer coat under other finishes or as a French polish.
Consider also how understanding wood movement plays a role, as different finishes can affect how the wood breathes and reacts to environmental changes. This is especially important for large veneered panels.

Application Techniques
- Cleanliness: Work in a dust-free environment.
- Thin Coats: Apply multiple thin coats rather than a few thick ones. This promotes better curing, adhesion, and a smoother final appearance.
- Sanding Between Coats: Lightly sand between coats (using 320-400 grit) to de-nib the surface and improve adhesion for subsequent layers.
- Dust Control: Use tack cloths or compressed air to remove dust before each coat.
Polishing and Buffing
For a truly exquisite finish, especially with high-gloss varnishes or lacquers, polishing and buffing can create a mirror-like sheen. This involves using very fine abrasive compounds (polishing and rubbing compounds) applied with soft cloths or buffing wheels. This final step truly showcases the intricate details of your veneering and marquetry, making the decorative inlays pop.
Integrating these techniques with profitable small-batch woodworking can lead to the creation of high-value items like decorative boxes, small tables, or wall art that command premium prices. Similarly, applying these skills to larger custom pieces can result in building statement furniture pieces that are both functional and artistic masterpieces.

Conclusion
Mastering Veneering and Marquetry: Adding Decorative Inlays and Surface Designs to Furniture offers a rewarding path for woodworkers to transcend conventional craftsmanship and create truly unique, artistic pieces. From the expansive elegance of a perfectly veneered tabletop to the minute detail of a marquetry flower, these techniques empower you to infuse furniture with unparalleled beauty and character. The process demands patience, precision, and an eye for design, but the results are undeniably worth the effort.
As you embark on your journey into veneering and marquetry in 2026, remember that practice is key. Start with smaller projects to hone your skills, experiment with different wood combinations, and gradually tackle more complex designs. The world of decorative wood surfaces is vast and inspiring, ready for your creative touch.
Actionable Next Steps:
- Invest in Quality Tools: Acquire a sharp veneer saw or knife, a reliable straightedge, and the appropriate adhesive for your first project.
- Practice on Scraps: Before committing to a large furniture piece, practice cutting, joining, and pressing veneer on scrap material.
- Start Simple with Marquetry: Begin with basic geometric marquetry patterns to develop your cutting and fitting skills.
- Research Wood Species: Familiarize yourself with different wood veneers, their colors, grains, and how they contrast or complement each other.
- Explore Design Inspiration: Look at historical and contemporary examples of veneered and marquetry furniture to spark your own creative ideas.
References
- Jackson, A. (2002). The Encyclopedia of Woodworking Techniques. Quarto Publishing Group.
- Kappele, A. (1995). The Veneering Book. Taunton Press.
- Vandebroek, B. (2014). Marquetry: The Art of Inlaid Wood. Sterling Publishing Co., Inc.
SEO Meta Title: Mastering Veneering & Marquetry: Decorative Inlays SEO Meta Description: Learn to master veneering and marquetry techniques for stunning decorative inlays and surface designs on furniture in 2026. Elevate your woodworking projects.
