
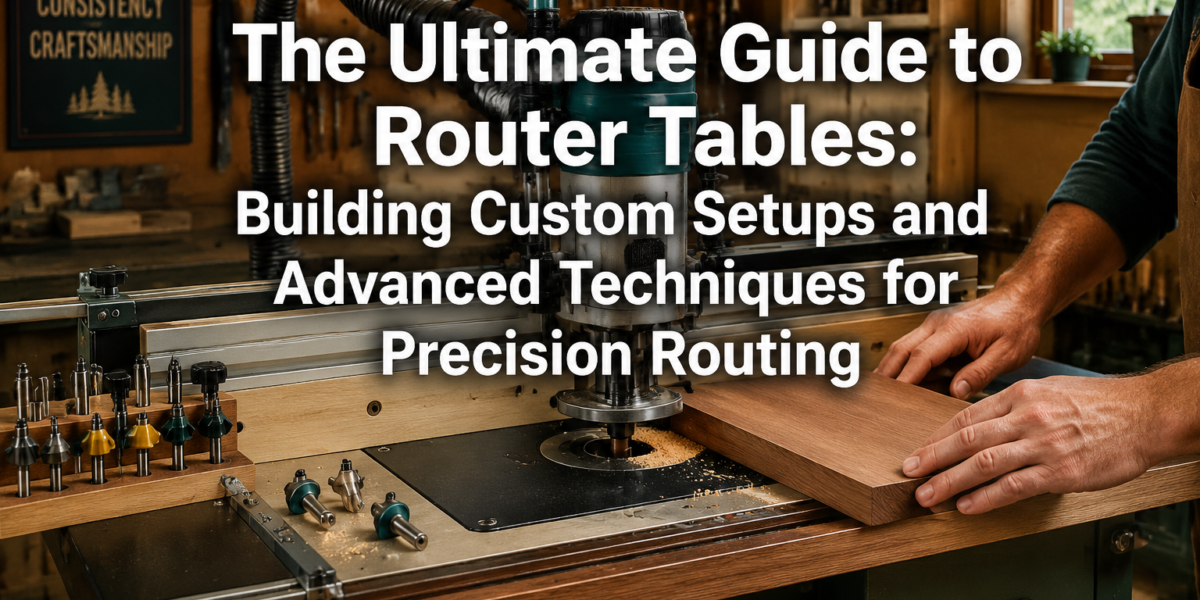

The difference between acceptable and exceptional woodworking often hinges on precision. While a handheld router offers versatility, its true potential for consistent, repeatable accuracy is unlocked when paired with a router table. Going beyond simply mounting a router, this guide, “The Ultimate Guide to Router Tables: Building Custom Setups and Advanced Techniques for Precision Routing,” delves into constructing bespoke systems tailored to your specific needs, enhancing every routing operation from simple edge profiles to complex joinery.
Key Takeaways
- Customization is Key: Building your own router table, fence, and accessories allows for unparalleled control and adaptability to your specific woodworking projects.
- Precision is Paramount: Advanced techniques and specialized jigs are essential for achieving consistent, high-quality results in all routing operations.
- Safety and Dust Collection: Integrating robust dust collection and safety features into your custom setup is crucial for a healthy and efficient workshop.
- Versatility Through Accessories: Router lifts, featherboards, and dedicated jigs transform a basic router table into a multi-functional precision machine.
- Beyond Basic Operations: Learn how to tackle advanced joinery, pattern routing, and custom profile creation with confidence and accuracy.
Building Custom Router Table Setups
The foundation of precision routing lies in a stable, well-designed router table. While commercial options exist, building a custom setup in 2026 allows for superior integration with your workshop, tailored features, and often, better performance.

Designing Your Router Table
Consider these crucial elements when designing your custom router table:
- Tabletop Material: A flat, durable, and low-friction surface is essential. ¾-inch or 1-inch thick MDF (Medium-Density Fiberboard) or Baltic birch plywood are popular choices, often topped with a high-pressure laminate for even greater durability and slickness. The size should accommodate your typical workpiece and allow for various jigs.
- Router Plate: This is where the router mounts. It must be perfectly flat, level with the tabletop, and made from a sturdy material like phenolic resin or aluminum. A good router plate will have interchangeable insert rings to reduce the opening size around different router bits, improving dust collection and workpiece support.
- Base Cabinet: A sturdy base is critical for stability and vibration dampening. A cabinet design offers invaluable storage for router bits, wrenches, and jigs, keeping them dust-free and organized. Integrating wheels or casters can make your router table mobile, a significant advantage in smaller workshops. For ideas on creating ergonomic workshop solutions, see our guide on Creating Ergonomic Workshop Furniture: Building Custom Workbenches.
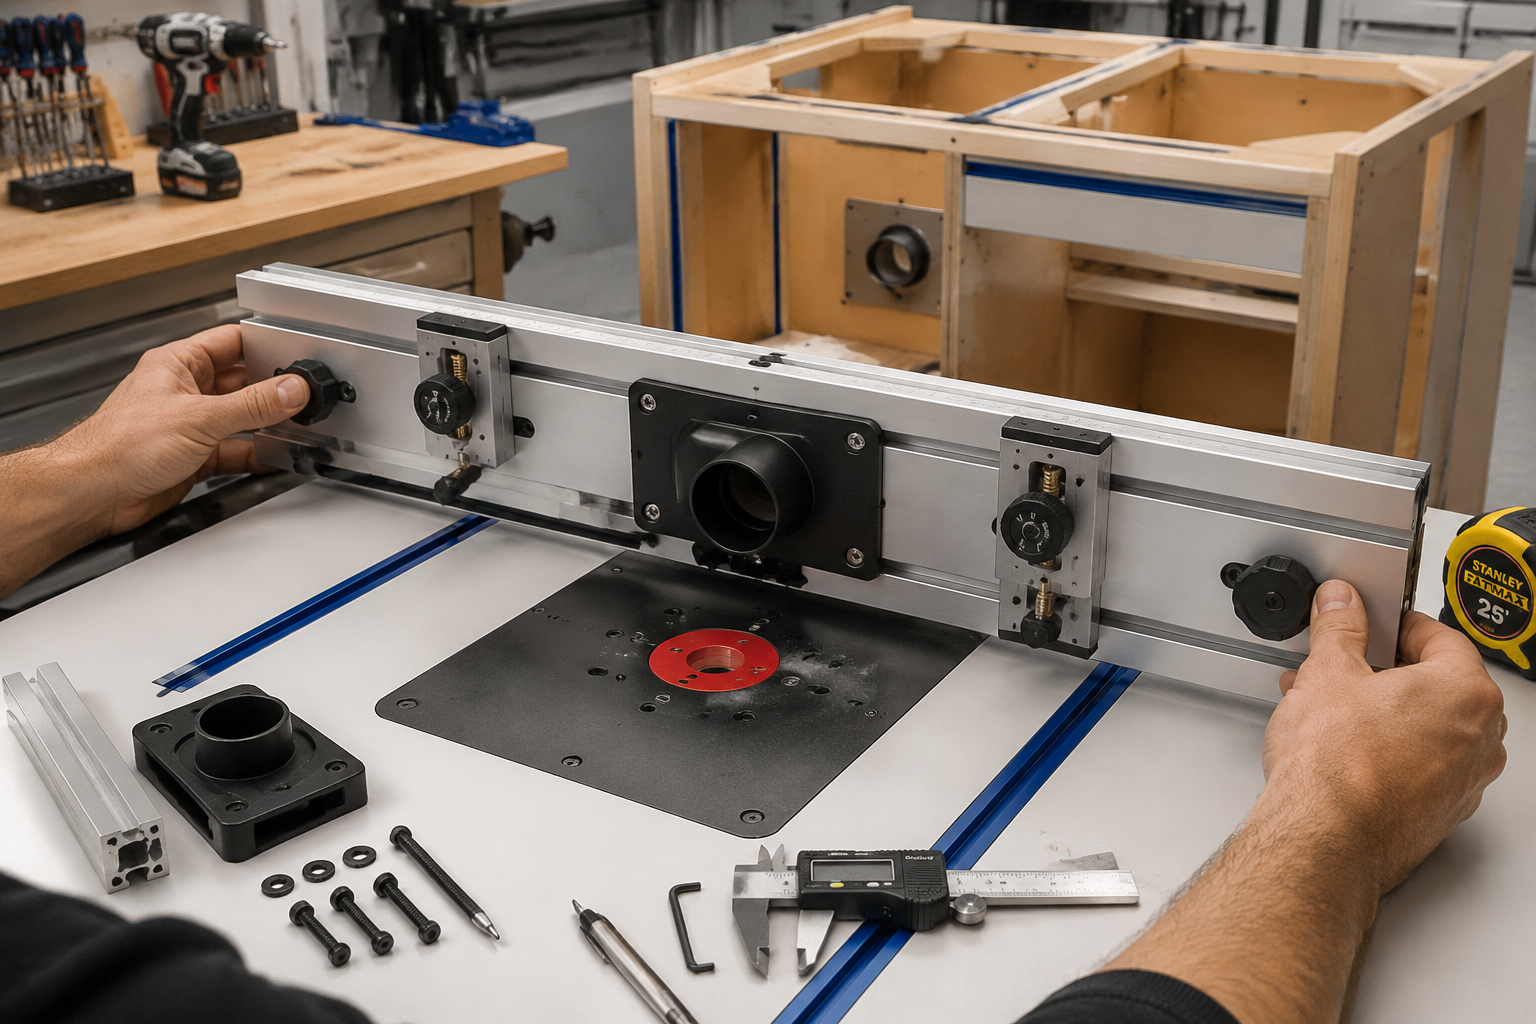
Crafting a Precision Router Fence
A fence is arguably the most critical component after the tabletop itself. A custom fence allows for greater accuracy and flexibility than many off-the-shelf options.
- Split Fence Design: A split fence, consisting of two adjustable halves, is ideal for jointing operations. This allows the outfeed fence to be shimmed slightly forward, mimicking a jointer for perfectly straight edges.
- Dust Collection Integration: Build a dedicated dust collection port directly into the fence. A 2.5-inch or 4-inch port connected to your shop vacuum or dust collector dramatically improves visibility and reduces cleanup.
- T-Tracks and Clamping: Integrate T-tracks into the fence face and the tabletop. These are invaluable for mounting featherboards, stop blocks, and other accessories securely.
“A well-designed router table setup is not just an assembly of components; it’s a carefully engineered system that elevates precision, enhances safety, and expands the creative possibilities for any woodworker.”
Incorporating Effective Dust Collection
Routing generates a tremendous amount of fine dust. An effective dust collection system is paramount for health, safety, and workpiece visibility.
- Dual-Point Collection: Aim for dust collection at two points:
- Fence Port: Captures dust directly at the source as the bit cuts.
- Cabinet Port: A port at the bottom of the router cabinet, connected to a separate hose, pulls dust from around the router motor and through the plate opening.
- Sealed Cabinet: Ensure your router cabinet is well-sealed to maximize the efficiency of the dust collector. This also helps contain noise.
Router Lifts and Motor Mounting
While a router plate allows for mounting, a router lift offers unparalleled convenience and precision for bit changes and height adjustments from above the table. If building a custom table, consider incorporating space for a commercial lift or even designing a simple screw-drive mechanism. For fixed-base routers, directly mounting the motor beneath the table, possibly with a custom jig for height adjustment, can be an economical alternative.
Advanced Techniques for Precision Routing
Once your custom router table is built, mastering advanced techniques will unlock its full potential for intricate joinery, flawless profiles, and specialized operations.
Essential Accessories and Jigs
Beyond the basic fence, several accessories are indispensable for precision:
- Featherboards: These apply constant, even pressure to the workpiece against the fence and table, preventing kickback and ensuring consistent cuts. Use them for both horizontal and vertical pressure.
- Push Blocks and Sticks: Always use appropriate push devices to keep your hands safely away from the spinning bit, especially with smaller workpieces.
- Miter Gauge: A good miter gauge with an extended fence allows for accurate cross-cutting, tenoning, and other operations where angular precision is needed.
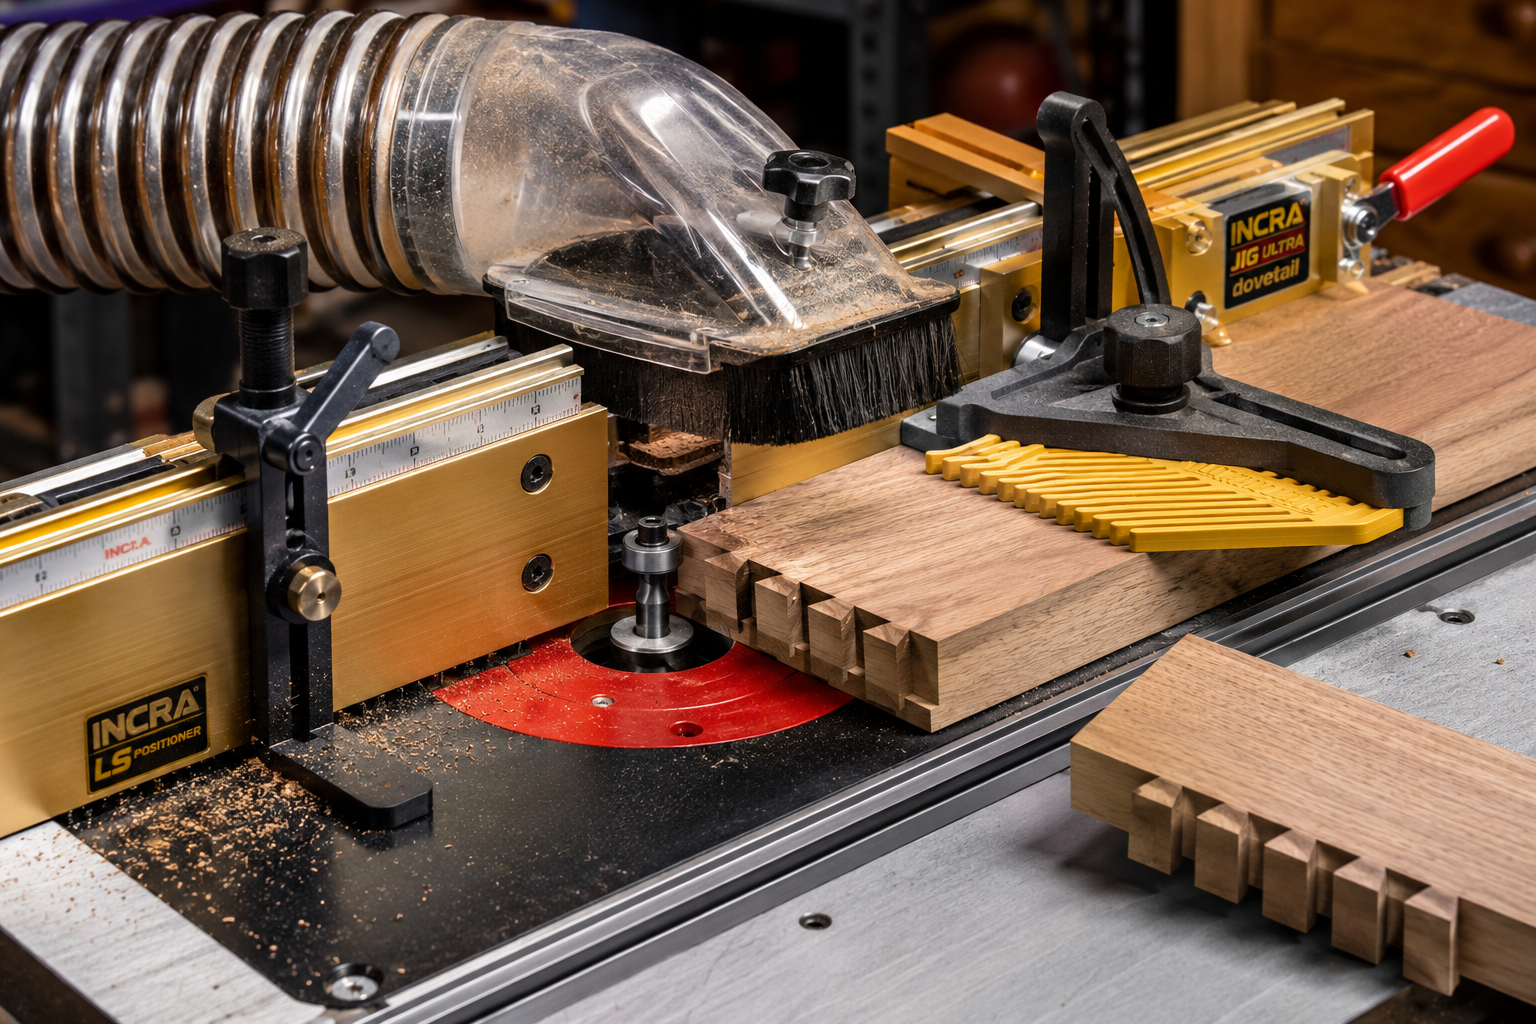
- Router Table Coping Sled: Essential for making cope and stick door frames, a coping sled holds the workpiece vertically and guides it safely past the router bit.
- Dovetail Jigs: For creating strong and decorative dovetail joints, router table dovetail jigs are a game-changer. These can produce repeatable, precise results much faster than hand-cutting. Explore our guide on Mastering Dovetail Drawers for Cabinets for more details.
Techniques for Flawless Edge Profiling
Achieving perfect edge profiles requires attention to detail:
- Multiple Passes: For large or deep profiles, make several shallow passes instead of one deep pass. This reduces tear-out, improves cut quality, and is safer.
- Climb Cutting (Controlled): In specific situations, a very light climb cut (feeding against the bit’s rotation) can reduce tear-out on difficult grain, but it requires extreme caution and a firm grip on the workpiece.
- Backer Boards: When routing end grain, use a sacrificial backer board to prevent blow-out at the end of the cut.
Mastering Router Table Joinery
The router table excels at various types of joinery:
- Dadoes and Rabbets: Use straight bits with your fence to cut precise dadoes (grooves across the grain) and rabbets (grooves along the edge).
- Tenons: By using a tenoning jig or coping sled, you can cut precise tenons for mortise and tenon joints.
- Raised Panels: Router tables are perfect for creating raised panels for cabinet doors, using specialized panel-raising bits.
- Finger Joints (Box Joints): With a dedicated jig, the router table can produce strong, decorative finger joints ideal for boxes and drawers. For more on essential joints, consider our Beginner’s Guide to Essential Woodworking Joints: When to Use Which.
Template and Pattern Routing
For curved or irregular shapes, template routing is invaluable.
- Bearing Bits: Use router bits with a bearing either at the top or bottom. The bearing follows a template, while the cutting edge duplicates the template’s shape onto your workpiece.
- Flush Trim Bits: Ideal for trimming laminates or making a workpiece precisely match a template.
- Pattern Bits: Similar to flush trim, but the bearing can be positioned to cut around the inside or outside of a template.
Router Table Safety Checklist
Always prioritize safety when working with a router table:
- Read Manuals: Understand your router and accessories.
- Wear PPE: Eye protection and hearing protection are non-negotiable.
- Unplug for Bit Changes: Always unplug the router before changing bits or making adjustments.
- Secure Workpiece: Use featherboards, push blocks, and clamps to keep your workpiece stable and your hands safe.
- Proper Feed Direction: Always feed the workpiece against the rotation of the router bit (conventional cutting), unless performing a controlled climb cut with extreme caution.
- Clear Work Area: Keep your table free of clutter.
Custom Setups and Advanced Techniques: Maximizing Router Table Versatility
“The Ultimate Guide to Router Tables: Building Custom Setups and Advanced Techniques for Precision Routing” extends beyond basic operations, encouraging woodworkers to view their router table as a versatile platform for innovation. Expanding your custom setup with specialized jigs and thoughtful storage solutions can dramatically increase efficiency and the range of projects you can tackle.
Designing Specialized Jigs
Custom jigs are the secret weapon for advanced router table work, enabling repeatable accuracy for complex tasks.
- Cove and Bead Jigs: Create specialized profiles on edges or faces with precision.
- Panel Raising Jigs: If you don’t have a dedicated panel raiser bit, a jig can help you achieve custom panel profiles safely.
- Mortising Jigs: While dedicated mortisers exist, a clever jig can transform your router table into an effective mortising station.
- Circle Cutting Jigs: Easily create perfect circles or arcs for tabletops, speaker cutouts, or decorative elements.
- Box Joint Sleds: While dovetail jigs are popular, a simple box joint sled can create strong, interlocking joints for drawers and boxes.
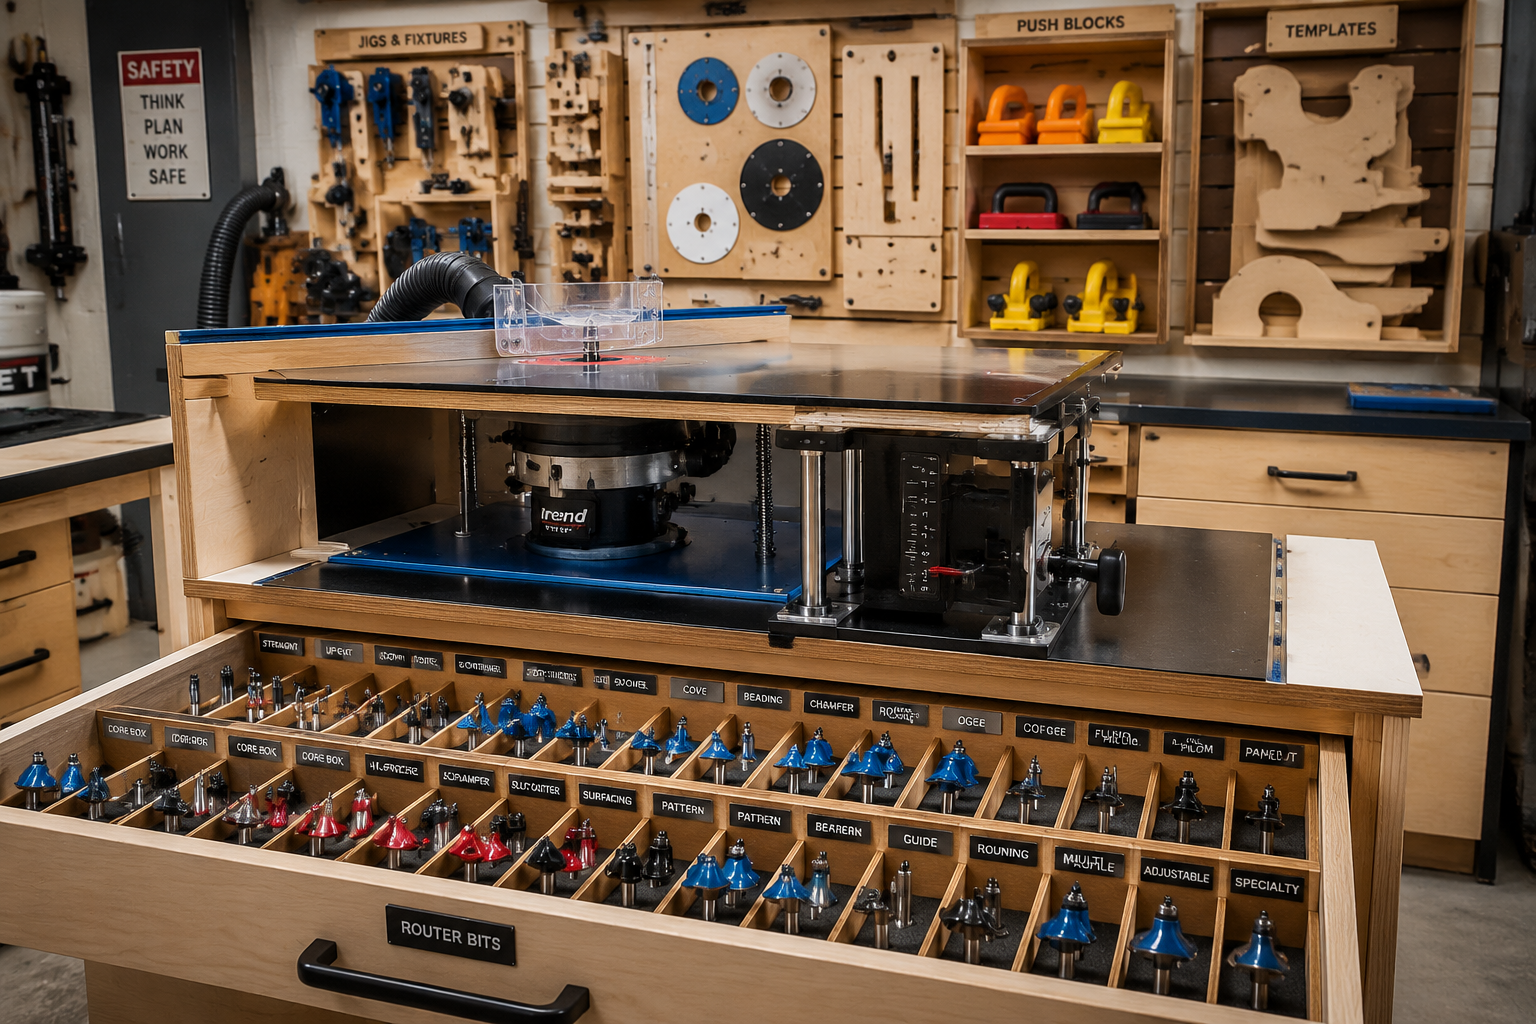
Optimizing Router Table Storage and Organization
An organized workspace is an efficient and safer one. For a custom router table, think about integrated storage solutions:

- Bit Storage: Create custom drawers or wall-mounted racks to organize router bits by type (e.g., straight, roundover, specialized joinery) and shank size. Labeling is key.
- Jig Caddies: Design dedicated storage for your custom jigs, ensuring they are protected and easily accessible. This could be shelves within your router cabinet or a dedicated wall-mounted system above the table.
- Push Block/Featherboard Storage: Have a designated spot for safety accessories, so they are always at hand.
- Wrench and Accessory Holders: Small magnets or hooks within the cabinet can keep router wrenches, insert rings, and other small tools from getting lost.
A well-organized router table setup contributes significantly to productivity and reduces the time spent searching for tools. For broader workshop organization ideas, consider “Master Your Craft: Building The Ultimate Woodworking Storage Bench in 2026.”
Expanding Beyond Basic Operations
With a fully customized setup and a grasp of advanced techniques, your router table becomes capable of much more than just edge treatments.
- Fluting and Reeding: Use a jig and indexing pin to create decorative parallel grooves (fluting) or rounded ridges (reeding) on table legs or pilasters.
- Router Table Planing: With a wide straight bit and a sled, you can effectively “plane” wider boards or flatten small slabs that are too wide for your jointer. This technique is particularly useful for achieving perfectly flat surfaces on live edge pieces. For relevant information on this, check out our guide to Live Edge Slab Selection and Preparation.
- Panel Door Construction: Beyond raised panels, router tables are central to crafting full frame-and-panel doors for cabinets and furniture, using matched rail and stile bit sets. This is vital for projects like “Console Tables That Wow: Build Sleek Entryway and TV Stand A”.
- Creating Custom Moldings: Instead of buying expensive custom moldings, you can make your own unique profiles using stacked bits and multiple passes, perfectly matching existing architectural elements or designing new ones.
Investing time in building and refining your router table setup, and then dedicating effort to mastering advanced techniques, will pay dividends in the quality, consistency, and complexity of your woodworking projects for years to come.
Conclusion
The journey to precision routing begins with understanding the capabilities of a router table and extends into the realm of custom setups and advanced techniques. “The Ultimate Guide to Router Tables: Building Custom Setups and Advanced Techniques for Precision Routing” has explored how tailoring your router table, fence, and dust collection system to your specific needs can unlock unparalleled accuracy and versatility. From fabricating intricate joinery like dovetails and tenons to creating custom moldings and flawlessly profiled edges, a well-equipped and understood router table is an indispensable asset in any serious woodworker’s shop. Prioritizing safety, investing in quality accessories, and continuously experimenting with advanced techniques will elevate your craftsmanship and expand your creative horizons. Take these insights and transform your woodworking, achieving results you might have previously thought impossible.
Actionable Next Steps:
- Evaluate Your Needs: Assess your current router table (if you have one) and identify its limitations.
- Plan Your Custom Build: Sketch out a design for a custom router table base, tabletop, and fence that addresses your specific requirements, focusing on stability and integrated dust collection.
- Invest in Essential Jigs: Prioritize acquiring or building key jigs like featherboards, a miter gauge extension, and a coping sled.
- Practice Techniques: Start with simpler edge profiles and gradually work your way up to more complex joinery or template routing on scrap material.
- Focus on Safety: Make a habit of reviewing your safety checklist before every routing operation.
SEO Meta Title: Ultimate Guide to Router Tables: Custom Builds & Advanced Routing SEO Meta Description: Unlock precision woodworking in 2026 with our ultimate guide to router tables. Learn custom setups, advanced techniques, jigs, and safety for flawless routing.
