


Woodworkers often face a critical challenge: creating robust, professional-grade furniture like cabinets, tables, and chairs within the confines of a small workshop. Traditional joinery methods, while celebrated, can demand extensive space for jigs, clamps, and intricate setups. This article delves into Pocket Hole Mastery: Fast Joinery for Cabinets, Tables, and Chairs in Tight Workshops, offering an in-depth guide to utilizing this efficient technique. By focusing on precision jigs, optimal angles, and effective plug concealment, you can achieve hidden strength and aesthetic appeal, transforming your furniture builds in 2026. This method allows for rapid assembly and strong joints, making it an invaluable skill for maximizing output in limited spaces, without compromising on quality or the evolving modular furniture trends.
Key Takeaways
- Pocket hole joinery offers a rapid, strong, and space-efficient alternative to traditional methods, ideal for tight workshops.
- Selecting the right jig and understanding drilling angles are fundamental to achieving robust and aesthetically pleasing joints.
- Proper screw selection, glue application, and clamping are critical steps for maximizing joint strength and durability.
- Effective plug concealment techniques can hide pocket holes completely, resulting in a clean, professional finish.
- Pocket holes are versatile for various projects, from cabinet frames to table bases and chair assemblies, aligning with 2026 modular trends.
Understanding Pocket Hole Joinery and Its Advantages
Pocket hole joinery involves drilling a precisely angled hole into one workpiece, then joining it to a second piece with a self-tapping screw. This creates a strong, hidden mechanical joint that is remarkably efficient. For those operating in compact spaces, this technique significantly reduces the need for large clamping areas and complex jig setups often required by dovetails or mortise and tenon joints.

In a small workshop where every inch counts, speed and simplicity are paramount. Pocket holes deliver on both fronts. Unlike the meticulous, multi-step process of cutting a traditional mortise and tenon or the careful handwork of dovetails, pocket holes allow for quick, repeatable drilling and assembly. This translates directly to faster project completion times and less clutter.
Why Pocket Holes Excel in Tight Workshops
- Reduced Footprint: Pocket hole jigs are compact, requiring minimal bench space compared to larger dado stacks or router table setups for complex joints.
- Faster Assembly: Joints can often be assembled in minutes, not hours, using a drill and a few clamps. This speed is invaluable when working on multiple components simultaneously.
- Strong, Reliable Joints: When executed correctly with the right screws and glue, pocket hole joints are incredibly strong, resisting racking and shear forces effectively.
- Hidden Strength: The beauty of pocket holes is that the screws are typically concealed on the underside or inside of a project, or by using plugs, maintaining a clean exterior aesthetic.
- Versatility: They are suitable for a vast array of woodworking applications, including face frames, carcases, panel glue-ups, and even basic frame-and-panel constructions.
Compared to traditional joinery like mastering dovetail joinery for drawers or intricate mortise and tenon joints, pocket holes offer a streamlined approach. While traditional joints are celebrated for their craftsmanship and heirloom quality, they demand a higher skill level and often more time and specialized tools, which might not be practical in a small, bustling shop focused on fast production or modular furniture components.
Essential Tools for Pocket Hole Mastery
To effectively employ pocket hole joinery, a few key tools are necessary:
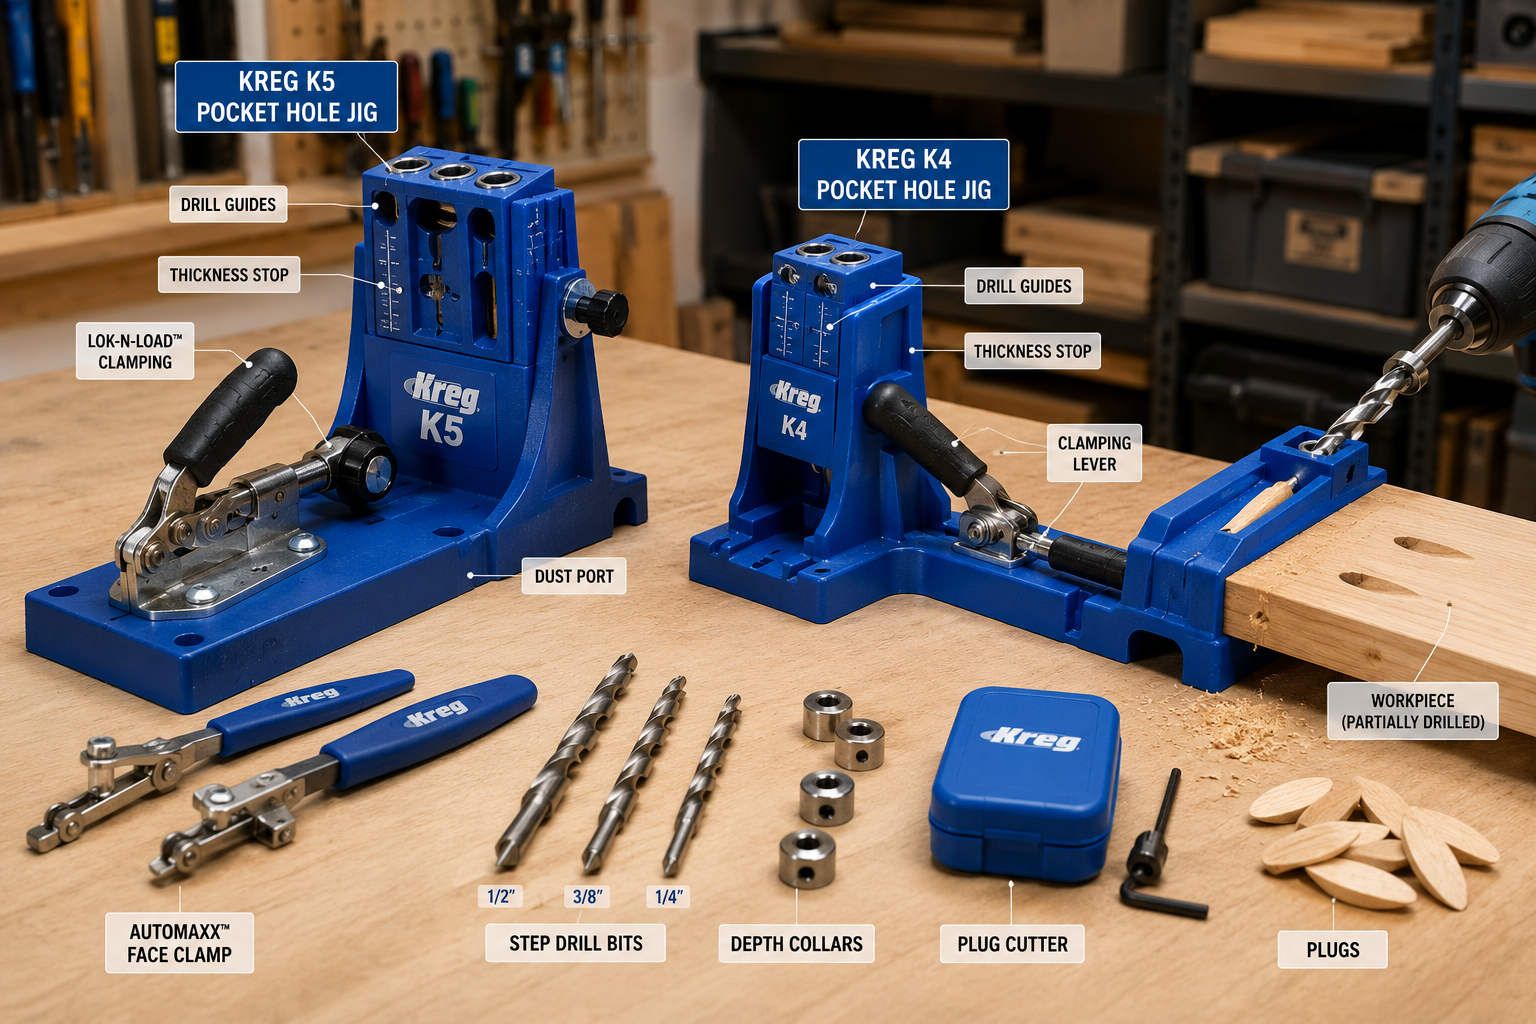
- Pocket Hole Jig: The cornerstone of the system. Jigs range from simple, single-hole guides to advanced benchtop systems with integrated clamping. Popular brands include Kreg and Milescraft.
- Specialized Step Drill Bit: Designed to drill a pilot hole and a flat-bottomed counterbore for the screw head in a single operation.
- Depth Collar: Ensures consistent drilling depth, critical for strong joints.
- Square Drive (Robertson) Screws: These screws have a unique head design that provides excellent grip and prevents cam-out, offering superior driving power compared to Phillips heads. They are specifically designed for pocket hole joinery.
- Clamps: Essential for holding workpieces securely while drilling and assembling. Face clamps or C-clamps are highly recommended.
- Drill: A cordless drill is preferred for mobility and ease of use.
- Wood Glue: While screws provide immediate strength, wood glue significantly enhances joint integrity and longevity.
Using the correct woodworking screws is paramount for achieving maximum strength and preventing blow-out. Different wood types and joint applications require specific screw lengths and thread types.
Mastering the Techniques: Jigs, Angles, and Assembly for Pocket Hole Mastery: Fast Joinery for Cabinets, Tables, and Chairs in Tight Workshops
Achieving professional results with pocket holes requires more than just owning a jig; it demands an understanding of proper setup, drilling angles, and assembly techniques. This section will guide you through the process, ensuring your projects – be they cabinet frames, sturdy tables, or comfortable chairs – benefit from the inherent strength and speed of this joinery method.
Setting Up Your Pocket Hole Jig
Each pocket hole jig has its own nuances, but the core setup principles remain consistent:
- Set the Depth Collar: This is perhaps the most critical step. The depth collar must be set according to the thickness of your material. Most jigs come with a gauge or clear instructions. For instance, if you’re using 3/4-inch material, the collar will be set to expose only a specific length of the drill bit. Incorrect depth setting can lead to screws breaking through the face of the mating piece or not achieving full engagement.
- Adjust the Jig Stop: For benchtop jigs, the material stop needs to be set to ensure the pocket holes are drilled consistently at the correct distance from the edge of your workpiece. This is especially important for repeated cuts.
- Secure the Workpiece: Always clamp your workpiece firmly into the jig. Movement during drilling can result in tear-out, inconsistent hole depth, or even damage to the drill bit. Integrated clamps on benchtop jigs are highly effective, but dedicated face clamps work just as well for simpler jigs.
Drilling Perfect Pocket Holes
With the setup complete, drilling is straightforward:
- Drill Speed: Use a medium to high drill speed for hardwoods and a slightly slower speed for softwoods to prevent burning.
- Clear Chips: As you drill, periodically withdraw the drill bit to clear wood chips. This prevents the bit from overheating and ensures a clean cut. Many pocket hole bits are designed with flutes that help evacuate chips, but assisting the process is always beneficial.
- Number of Holes: For most joints, two pocket holes per joint are sufficient. For wider boards or those under significant stress (like table aprons), three or more holes may be advisable. Space them evenly for balanced strength.
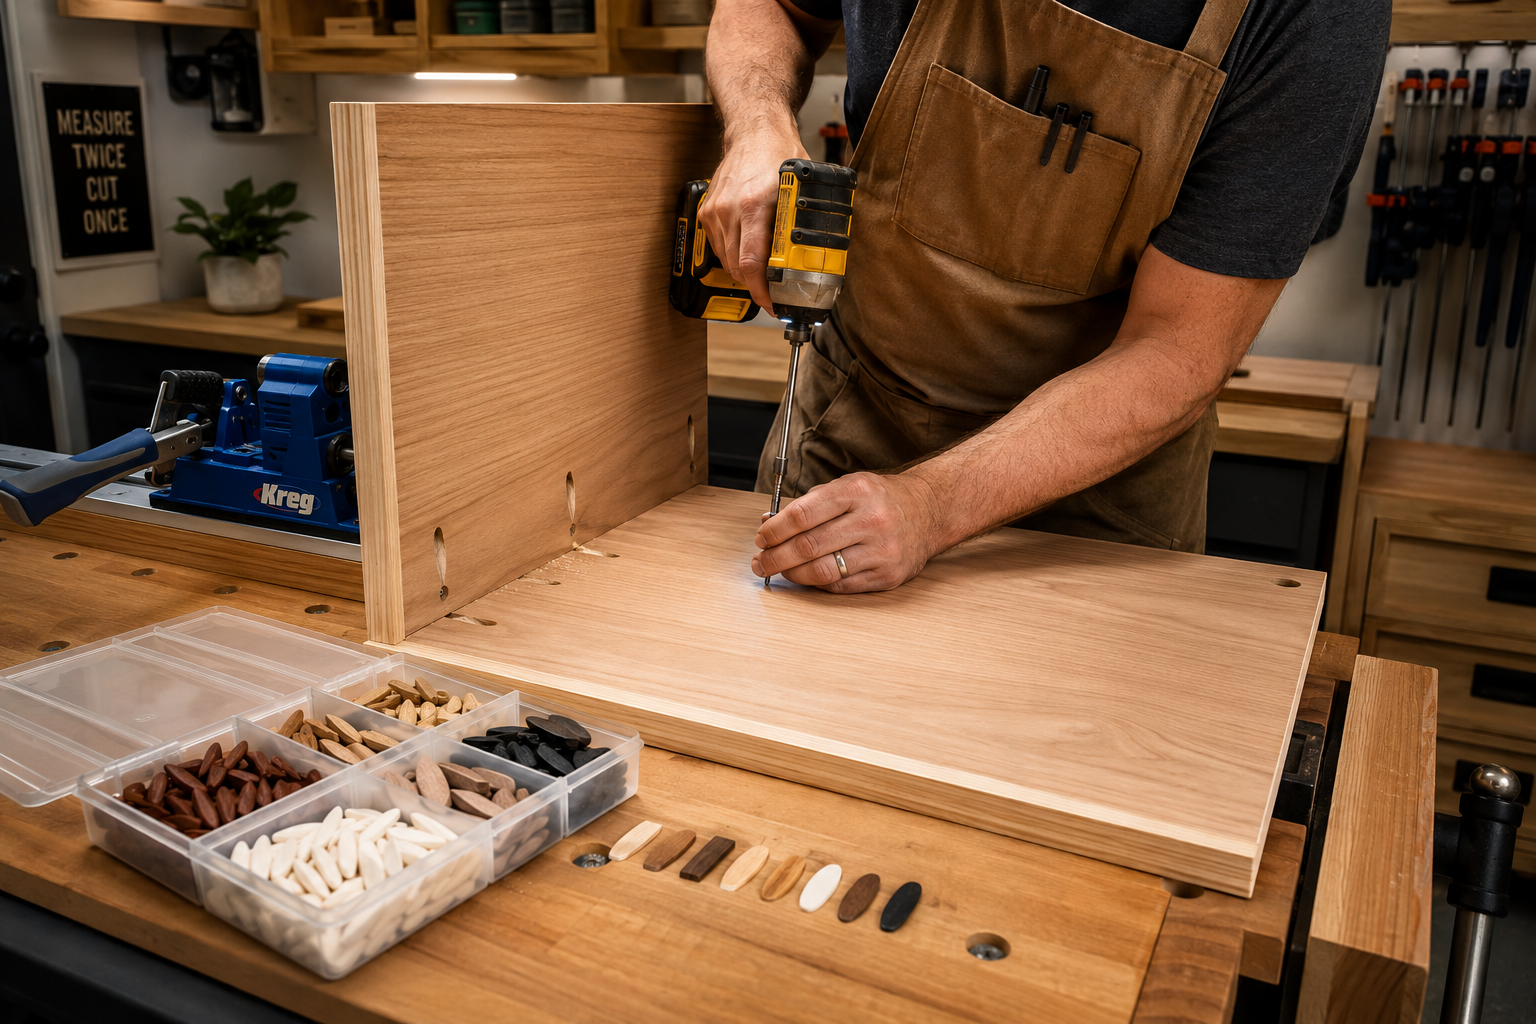
Assembly Best Practices
The assembly phase is where the “fast” aspect of pocket hole joinery truly shines.
- Glue Application: Apply a thin, even coat of wood glue to the mating surfaces of the joint. While screws provide initial clamping force, glue creates a stronger, more permanent bond.
- Clamp the Joint: Before driving screws, use a specialized face clamp or C-clamp to pull the two workpieces tightly together, ensuring flush surfaces. This prevents any shifting or gapping during screw insertion. Without proper clamping, screws can sometimes cause the pieces to misalign slightly.
- Drive Screws: Using your drill and the appropriate square drive bit, drive the pocket hole screws until snug. Avoid over-tightening, which can strip the wood or cause the joint to bulge.
Table: Pocket Hole Screw Selection Guide
| Material Thickness | Screw Length | Application |
|---|---|---|
| 1/2 inch (12mm) | 1 inch | Small projects, thin panels, decorative items |
| 3/4 inch (19mm) | 1 1/4 inch | Most common applications: cabinet frames, tabletops, chairs |
| 1 1/2 inch (38mm) | 2 1/2 inch | Framing lumber, large table legs, workbench components |
For more details on drilling techniques and troubleshooting common issues, consider exploring guides on shank hole basics. Combining pocket holes with other fundamental joints, as outlined in a beginner’s guide to essential woodworking joints, can yield exceptionally strong and versatile projects.
Concealment and Applications: Professional Finishes for Your Projects
Once the joints are securely fastened, the final touch for many projects is to conceal the pocket holes for a clean, professional appearance. This is particularly important for visible parts of cabinets, tables, and chairs where the “hidden” aspect of the joinery contributes significantly to the aesthetic. Pocket Hole Mastery: Fast Joinery for Cabinets, Tables, and Chairs in Tight Workshops isn’t just about speed and strength; it’s also about delivering a polished product, especially for the streamlined designs popular in 2026.
Techniques for Hiding Pocket Holes
There are several effective ways to conceal pocket holes:
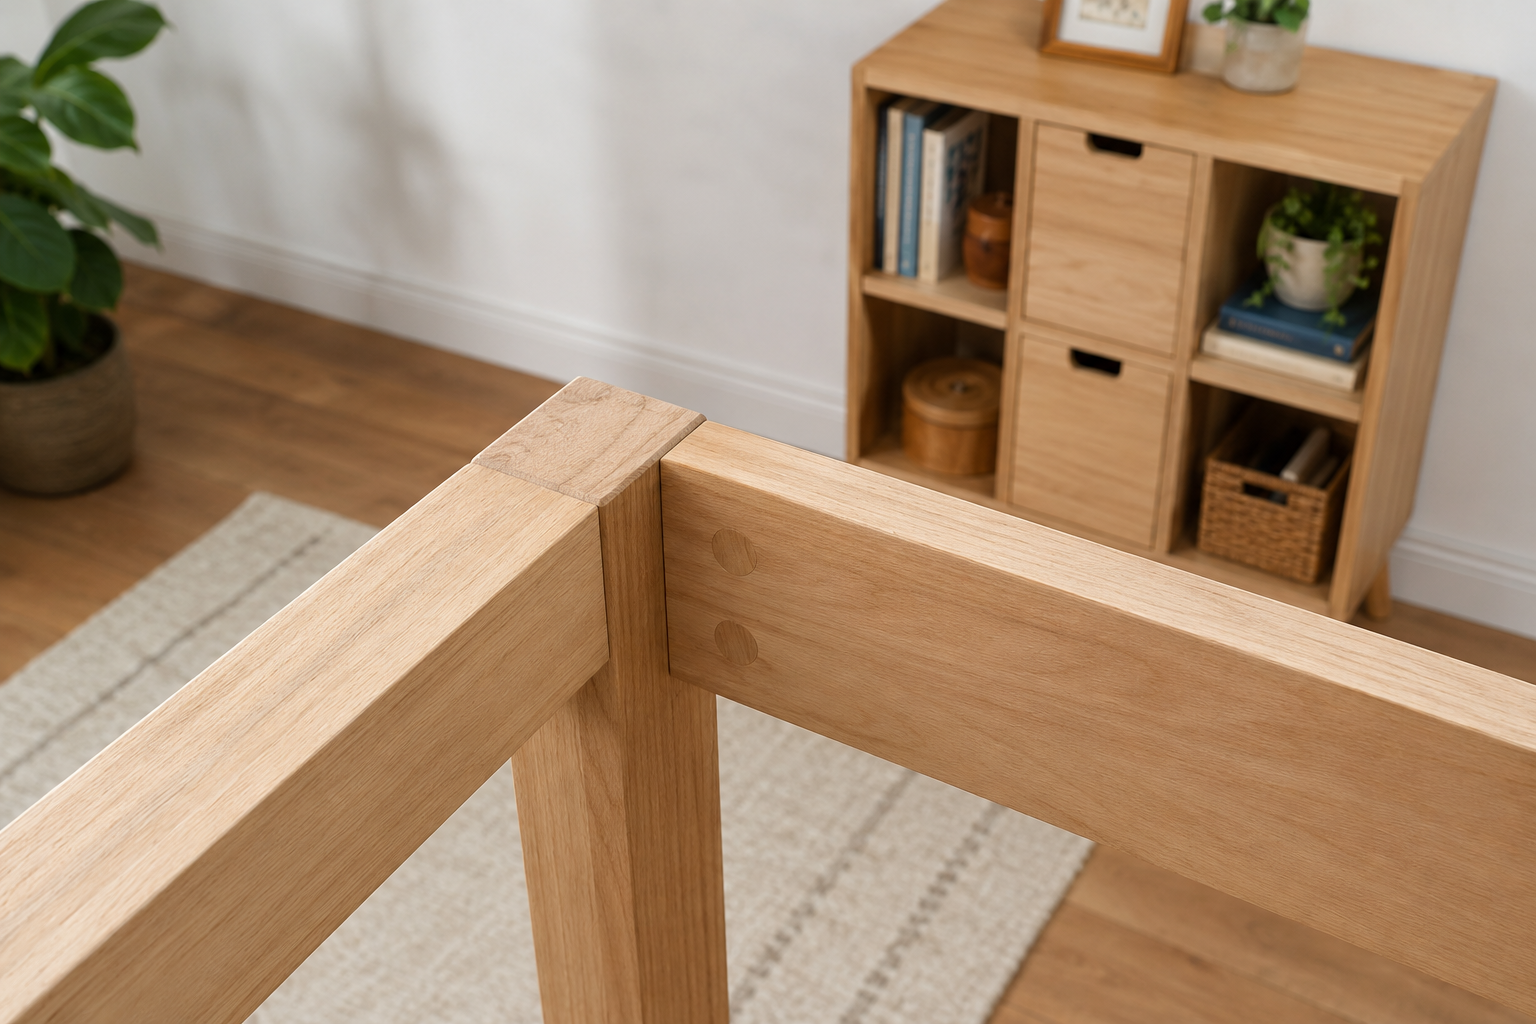
- Wood Plugs: The most common and professional method. Pre-made solid wood plugs, often tapered, are available in various wood species. They are glued into the pocket holes, allowed to dry, and then sanded flush. This creates a nearly invisible repair, especially if the grain direction of the plug matches the workpiece.
- Plastic Plugs: For less visible areas or painted projects, plastic plugs offer a quick and easy solution. They simply snap into place and can be painted over. While not as seamless as wood plugs, they are functional and cost-effective.
- Strategic Placement: The simplest form of concealment is to position your pocket holes strategically on the underside, inside, or back of your project components. For example, when building a cabinet, drill holes from the inside of the face frame so they are hidden once the cabinet is installed.
- Filler: Wood filler can be used, but it’s generally less durable and less visually appealing than wood plugs, especially under clear finishes. It’s best reserved for painted projects where the filler will be fully covered.
Versatile Applications in Your Workshop
Pocket hole joinery is incredibly adaptable, making it a go-to method for a wide range of woodworking projects, especially for modular and space-saving furniture designs popular in 2026.

- Cabinets: Ideal for constructing face frames, attaching internal shelves, and assembling cabinet boxes. The speed of pocket holes allows for rapid production of multiple cabinet components. For detailed cabinet construction, consider how this method complements techniques for building 12 plywood cabinets.
- Tables: Perfect for attaching aprons to legs, joining tabletop panels, and building sturdy bases. For building a compact workbench for a small workshop, pocket holes offer a quick and strong solution for joining the frame components. This can be critical when working on a compact and ergonomic workbench.
- Chairs: While traditional chair joinery often involves mortise and tenon for ultimate strength, pocket holes can be used for less stressed joints or in conjunction with traditional methods for added stability in frames and stretchers.
- Shelving Units: Quickly assemble sturdy shelves and shelf supports.
- Panel Glue-ups: Use pocket holes to clamp and align boards for tabletops or larger panels, supplementing the strength of wood glue.
Consider how building modular wood storage systems can greatly benefit from the speed and efficiency of pocket hole joinery. The ease of assembly and disassembly, if needed, makes pocket holes an excellent choice for dynamic workshop setups. For projects like DIY wooden plant stands, pocket holes provide robust joints without the need for complex jigs, allowing for quick, custom creations.
The adaptability and ease of use make pocket hole joinery a cornerstone for efficient woodworking, particularly within the constraints of a small shop. By mastering these techniques, you can produce high-quality, durable furniture pieces that look professionally finished, ready for the demands of 2026 design aesthetics.
Conclusion
Pocket Hole Mastery: Fast Joinery for Cabinets, Tables, and Chairs in Tight Workshops stands as a testament to efficient, strong, and aesthetically pleasing woodworking. For woodworkers navigating the limitations of a compact workspace, this technique offers an unparalleled blend of speed, structural integrity, and ease of concealment. From understanding the core principles and selecting the right jig to mastering drilling angles and seamlessly hiding your joinery, the path to professional-grade results is clear and accessible.
Embracing pocket hole joinery in 2026 means equipping yourself with a powerful skill set that maximizes output without sacrificing quality. Whether you’re constructing custom cabinets, assembling a robust table, or building a sturdy chair, the ability to create hidden, strong joints rapidly transforms your capabilities. It allows you to focus more on design and execution and less on the arduous demands of traditional joinery, making it an essential technique for any modern woodworker.
Actionable Next Steps:
- Invest in a Quality Jig: If you haven’t already, acquire a reliable pocket hole jig (e.g., Kreg K4 or K5) along with appropriate screws and a face clamp.
- Practice on Scraps: Before tackling a project, practice drilling and joining on scrap wood of varying thicknesses to get a feel for the setup and technique.
- Experiment with Concealment: Try different plug types and wood fillers to see which provides the most satisfactory finish for your project needs.
- Start a Small Project: Begin with a simple project like a small shelf or a basic storage box to build confidence and apply your newfound skills.
- Explore Modular Designs: Consider how pocket holes can simplify building modular components for your workshop or home, aligning with contemporary trends in furniture design.
References:
- Kreg Tool Company. (n.d.). Pocket-Hole Jig Owners Manuals. Retrieved from https://www.kregtool.com/support/owners-manuals/jigs-and-fixtures.aspx (Accessed on November 15, 2025).
- Fine Woodworking. (2018). Pocket-Hole Joinery: Strong and Versatile. Fine Woodworking, (267), 62-67.
- Wood Magazine. (2020). The Pros and Cons of Pocket Holes. Wood Magazine, (264), 48-51.
