


The average vintage woodworking hand tool, often dismissed as scrap or decor, holds an astonishing secret: it frequently surpasses modern equivalents in material quality, craftsmanship, and ergonomic design. These tools, forged in eras where durability and precision were paramount, represent a tangible link to woodworking history. Yet, many lie dormant, shrouded in rust and grime. This article offers a comprehensive, step-by-step guide to Restoring Vintage Woodworking Hand Tools: Bring Old Tools Back to Life, transforming neglected relics into high-performance instruments ready for the demands of 2026’s discerning woodworkers.
Key Takeaways
- Vintage hand tools often possess superior material quality and design compared to modern counterparts.
- Restoration involves a systematic approach: assessment, disassembly, cleaning, rust removal, sharpening, and handle repair.
- Proper rust removal techniques, from mechanical abrasion to electrolysis, are crucial for preserving metal integrity.
- Sharpening is a critical skill, requiring the right abrasives and consistent angles to achieve optimal cutting edges.
- Handle repair and refinishing not only improve ergonomics but also protect the wood for future use.
The Allure of Vintage Hand Tools and Initial Assessment
Many woodworkers in 2026 are rediscovering the profound satisfaction and superior results achievable with vintage hand tools. Unlike many mass-produced items today, older tools were built to last generations, often using higher carbon steel for blades and denser, more stable woods for handles. Restoring Vintage Woodworking Hand Tools: Bring Old Tools Back to Life isn’t merely a hobby; it’s an investment in quality, a journey into craftsmanship, and a sustainable practice that prevents valuable resources from ending up in landfills.

Why Restore?
- Superior Quality: Older tools often feature better steel, casting, and joinery.
- Ergonomics: Many vintage designs prioritized user comfort and efficiency.
- Cost-Effectiveness: A restored vintage tool can outperform a new high-end tool at a fraction of the price.
- Historical Connection: Holding a tool used by woodworkers generations ago offers a unique sense of connection to the past.
- Sustainability: Giving old tools a new lease on life reduces waste.
Essential Tools for Restoration
Before diving into the process, gather your restoration toolkit:
- Safety Gear: Gloves, eye protection, dust mask.
- Cleaning: Wire brushes (brass/steel), scrub pads, rags, degreaser, mineral spirits.
- Rust Removal: Electrolysis setup, rust-converting gels, oxalic acid, various grits of sandpaper (220-2000), Scotch-Brite pads.
- Disassembly: Screwdrivers, wrenches, punches, mallet.
- Sharpening: Sharpening stones (waterstones, oilstones, diamond stones), honing guide, leather strop, buffing compound.
- Handle Repair: Wood glue, clamps, rasps, files, sandpaper, wood finish (linseed oil, shellac).
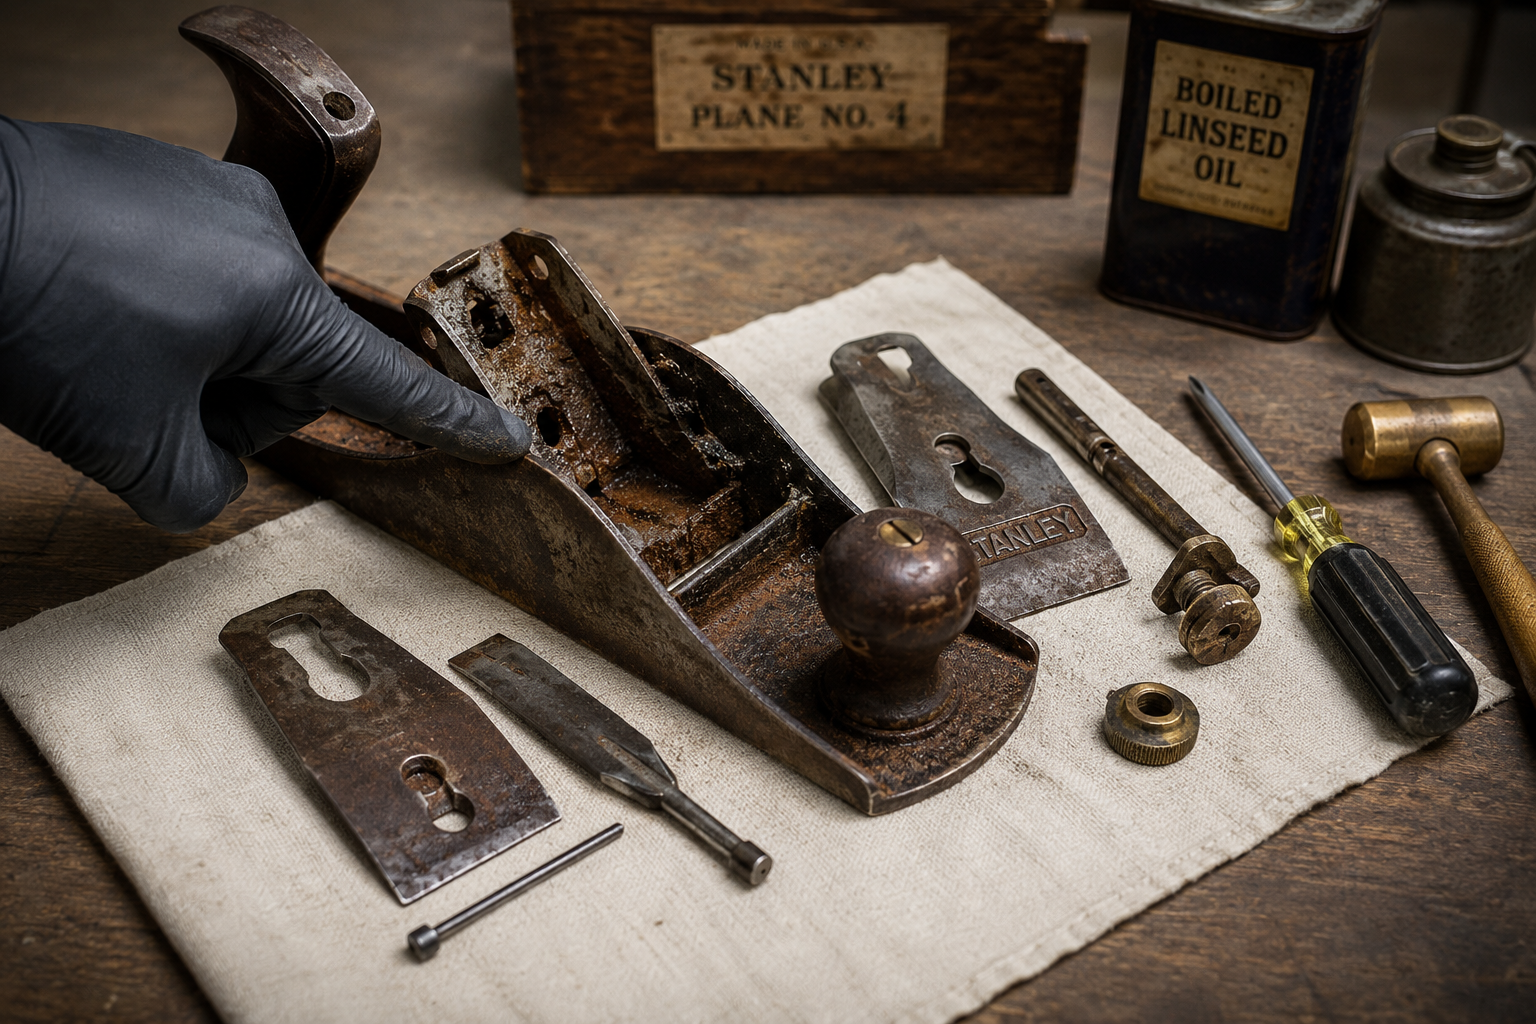
Initial Assessment and Disassembly
The first step in Restoring Vintage Woodworking Hand Tools: Bring Old Tools Back to Life is a thorough assessment. Examine the tool for missing parts, severe damage (cracks in castings, deep pitting), or irreparable wear. Not every tool is salvageable, but most can be brought back to a functional state.
Once assessed, carefully disassemble the tool. Take photos or draw diagrams if you are unsure about reassembly. For planes, this involves removing the cap iron, blade, lever cap, and frog. Chisels typically only require handle removal, while saws might need the handle scales detached. Store all small parts in a labeled container.
Cleaning, Rust Removal, and Metal Rejuvenation
With the tool disassembled, the focus shifts to cleaning and rust removal. This is often the most time-consuming part but yields the most dramatic results.
Deep Cleaning the Components
Start by cleaning away grease, old oil, and grime. A degreaser or mineral spirits with a stiff brush or scrub pad works well. For stubborn deposits, a brass wire brush can be effective on metal parts without scratching. Clean all parts thoroughly before addressing the rust.
Rust Removal Techniques
Rust is the primary enemy of vintage metal tools. Several methods exist, each with its advantages:
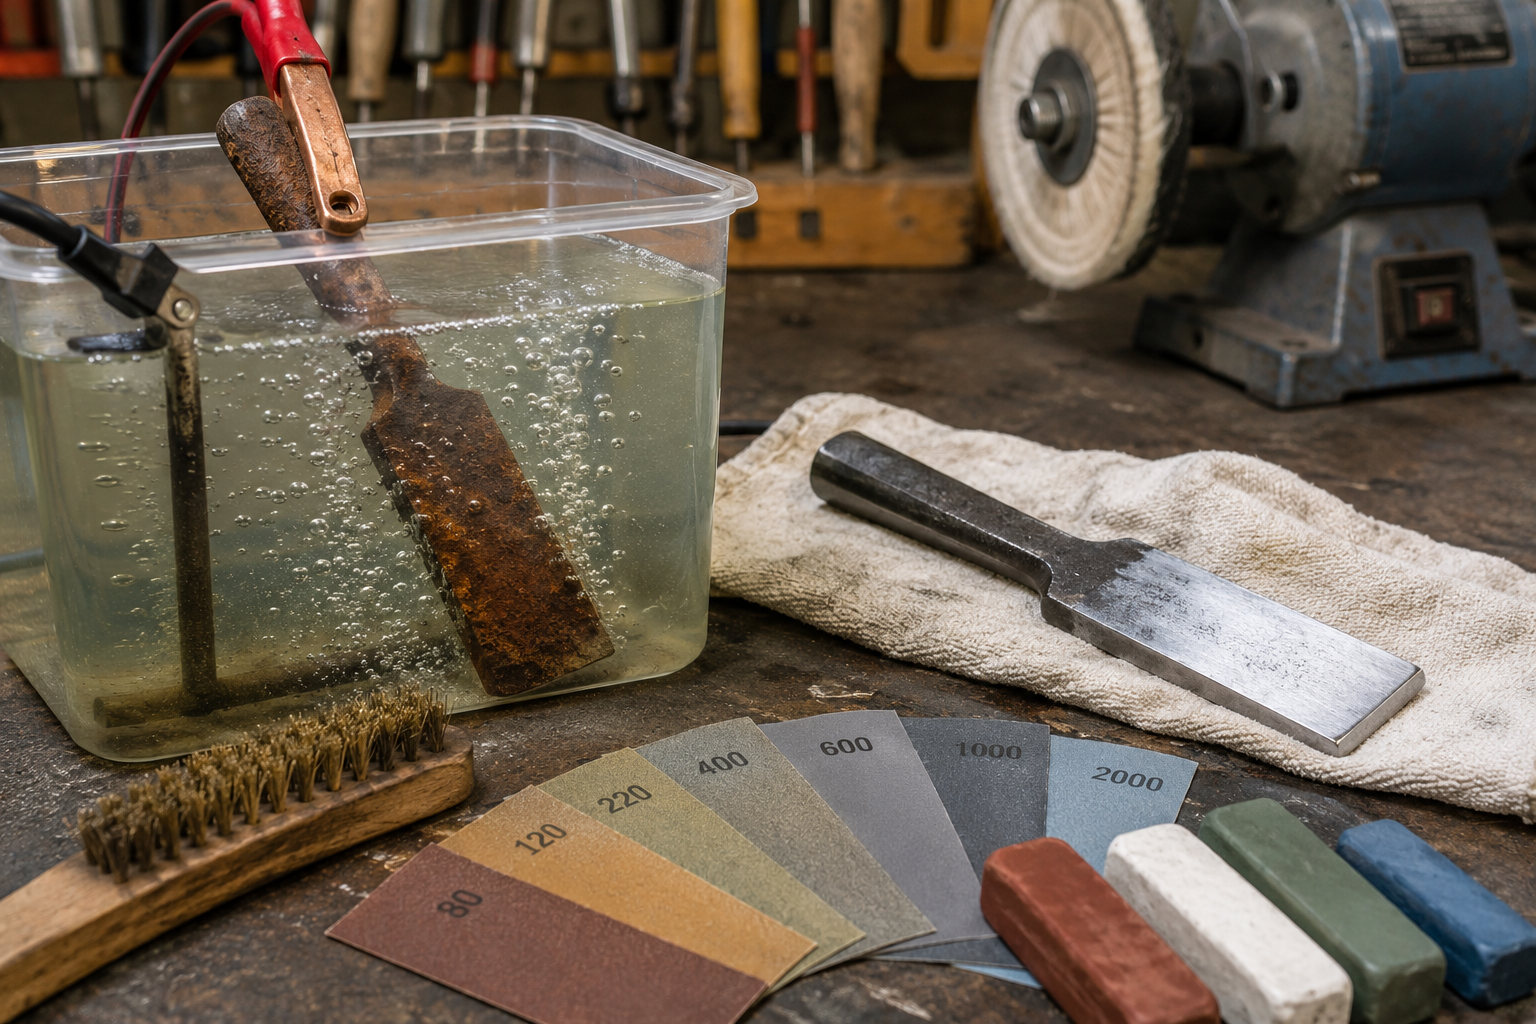
- Mechanical Abrasion: For light rust, steel wool, Scotch-Brite pads, or fine-grit sandpaper (starting around 220 and moving up to 600-800) can manually remove rust. This is labor-intensive but precise.
- Chemical Rust Removers: Products containing phosphoric acid or oxalic acid can dissolve rust. Always follow manufacturer instructions and wear appropriate PPE. Oxalic acid, often used as a wood bleach, is also effective for rust. For a detailed guide on specific rust removal techniques, consult “Restoring Vintage Woodworking Hand Tools: A Guide to Rust Removal,” available on Wood Craft Wiz.
- Electrolysis: This is arguably the most effective and least damaging method for heavy rust. It uses an electric current to convert rust back into iron oxide, which can then be brushed off. It requires a power supply, a sacrificial anode (rebar), washing soda, and a non-conductive container. This method preserves the tool’s original metal and details.
- Vinegar Soak: A simpler, though less potent, option is to soak parts in white vinegar for 24-48 hours. This acid will dissolve rust, but requires careful monitoring to prevent etching the metal. Neutralize with baking soda and water afterward.
| Rust Level | Recommended Method(s) | Pros | Cons |
|---|---|---|---|
| Light Surface | Mechanical Abrasion, Vinegar Soak | Simple, low cost | Labor-intensive, can etch metal if not careful |
| Moderate | Chemical Rust Removers, Extended Vinegar Soak, Mild Electrolysis | More effective than abrasion alone | Chemicals can be harsh, potential for etching |
| Heavy/Pitted | Electrolysis | Very effective, preserves metal, minimal effort | Requires setup and supplies, takes time |
After rust removal, dry all metal parts immediately and apply a light coat of oil (e.g., camellia oil, mineral oil) to prevent flash rust.
Sharpening, Tuning, and Handle Restoration
With the metal components clean and rust-free, the final stages involve sharpening, tuning, and restoring the wooden handles. These steps are crucial to make the tools fully functional.
Sharpening Blades to Razor Sharpness
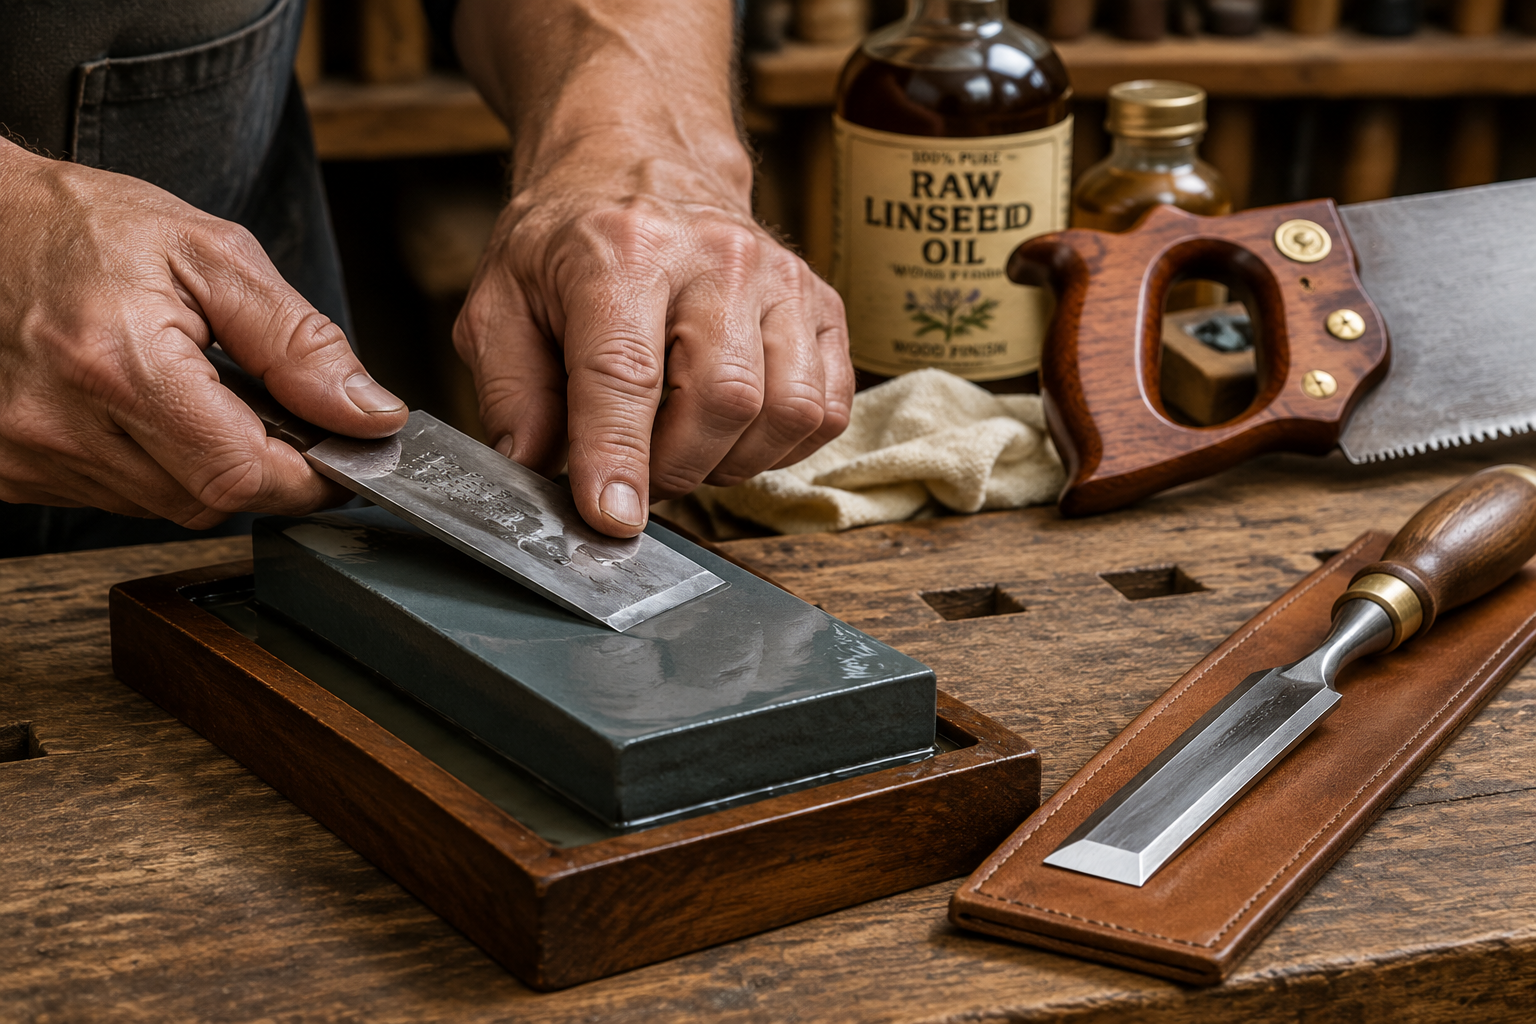
A sharp edge is the hallmark of a functional woodworking tool. For chisels and plane irons, start by flattening the back of the blade. This is often overlooked but critical for a truly sharp edge. Use increasingly finer grits of sandpaper on a flat surface or sharpening stones.
Next, establish the bevel. For most chisels and plane irons, a primary bevel of 25-30 degrees is standard, with a micro-bevel of 1-2 degrees higher at the very edge. Use a honing guide to maintain a consistent angle. Work through your sharpening stones from coarse (e.g., 1000 grit) to fine (e.g., 6000-8000 grit). Finish by stropping the blade on a leather strop loaded with buffing compound to remove the burr and achieve a polished, razor-sharp edge. For a deeper dive into maintaining your tools, explore “Essential Hand Tools for Every Woodworker: A Comprehensive Guide to Selection, Sharpening, and Maintenance.”
Saws require a different sharpening approach, involving filing individual teeth and setting them appropriately. This is a more advanced skill and might be best left to a professional for very fine saws or for beginners, but general cleanup of teeth can be done with a small file.
Tuning and Reassembly
For tools like planes, tuning is essential. Ensure the sole is flat. This can be done by lapping it on a flat surface with sandpaper. The frog, the part that holds the blade, needs to be adjusted for a tight fit against the plane body and correctly positioned. Reassemble all components, applying a light coat of oil to mating surfaces to ensure smooth operation and prevent future rust. Adjust the blade for proper depth and lateral alignment.
Handle Repair and Refinishing
Wooden handles on vintage tools often suffer from cracks, dings, or dried-out finishes.

- Cleaning: Clean the handle with mineral spirits to remove old grime and oil.
- Repairing Cracks: For minor cracks, apply wood glue and clamp tightly. For significant damage, custom-making a new handle might be necessary.
- Sanding: Sand the handle with progressively finer grits of sandpaper (150, 220, 320) to smooth out imperfections and old finish.
- Refinishing: Apply a protective finish. Linseed oil (boiled or raw) is a traditional choice, penetrating the wood and providing a durable, natural feel. Apply several thin coats, wiping off excess after each application. Shellac or a clear varnish can also be used for a more protective, glossy finish. A well-restored handle not only looks better but also greatly improves the tool’s ergonomics and longevity.
By diligently following these steps, you will successfully be Restoring Vintage Woodworking Hand Tools: Bring Old Tools Back to Life, turning forgotten treasures into highly functional and beautiful instruments for your woodworking endeavors in 2026.
Conclusion
Restoring Vintage Woodworking Hand Tools: Bring Old Tools Back to Life is a deeply rewarding endeavor that transcends mere utility. It’s a respectful nod to the craftsmanship of the past, an act of sustainability, and a practical way to equip your workshop with tools that often outperform their modern counterparts. From the careful initial assessment and meticulous disassembly to the satisfying process of rust removal, precise sharpening, and thoughtful handle restoration, each step contributes to transforming a neglected relic into a cherished, high-performance instrument. The patience and skill invested in this process yield not just a sharp edge or a smooth handle, but a tool imbued with history, ready to create new masterpieces. Embrace the journey of restoration, and discover the unparalleled joy of working with tools that truly sing.
Actionable Next Steps:
- Start Small: Begin with a less complex tool, such as a chisel or a small block plane, to gain experience.
- Gather Resources: Invest in the necessary cleaning agents, sharpening stones, and safety gear.
- Document Your Process: Take photos before, during, and after restoration to track your progress and learn from your work.
- Practice Sharpening: Consistent practice is key to mastering sharpening techniques for all your hand tools.
- Explore Advanced Techniques: Once comfortable, research more complex restoration methods like heat treating or tool making.
