


Only 2% of woodworkers master dovetail joinery within their first year, often intimidated by its perceived complexity. Yet, this classic joint is the cornerstone of robust, beautiful woodworking, a true hallmark of craftsmanship. This article, “The Essential Guide to Dovetail Joinery for Beginners: Hand-Cut vs. Router Jig Techniques,” aims to demystify this revered joint, offering clear, actionable steps for novices to confidently create strong, elegant dovetails, whether by traditional hand-cut methods or modern router jig approaches. By comparing and contrasting these techniques, beginners can choose the path best suited to their aspirations and workshop setup in 2026.
Key Takeaways
- Dovetail joints offer superior mechanical strength and aesthetic appeal, making them ideal for drawer boxes and fine furniture.
- Hand-cut dovetails provide immense satisfaction and develop fundamental woodworking skills, prioritizing precision and patience over speed.
- Router jigs offer speed, consistency, and a lower barrier to entry for beginners, making uniform dovetails more accessible.
- Choosing between hand-cut and router jig techniques depends on personal preference, project requirements, desired aesthetic, and tool availability.
- Regardless of the method, proper layout, sharp tools, and practice are crucial for achieving tight, well-fitted dovetail joints.
Understanding the Dovetail Joint: A Foundation for Beginners
The dovetail joint is celebrated for its incredible strength and distinctive appearance. It consists of interlocking “pins” on one board and “tails” on another, shaped like a dove’s tail. When glued, the flared shape of the tails resists pulling apart, making it one of the strongest joints for casework and drawers. Its beauty also makes it a popular decorative feature, showcasing a woodworker’s skill. For beginners, understanding why dovetails are so strong and beautiful is the first step towards mastering them.

The primary function of a dovetail joint is to resist tensile stress – the force trying to pull two pieces of wood apart. The angled sides of the pins and tails create a mechanical interlock that, when combined with wood glue, forms an exceptionally durable bond. This makes them perfect for applications like:
- Drawer boxes: The most common use, preventing the front and back of the drawer from separating from the sides.
- Case construction: Joining the sides of cabinets or chests where strength and aesthetics are paramount.
- Small boxes and keepsakes: Adding a touch of elegance and durability to smaller projects.
Mastering dovetails significantly elevates a woodworker’s craft, opening doors to more sophisticated projects and greater woodworking proficiency. Learn more about essential woodworking joints in our Beginner’s Guide to Essential Woodworking Joints: When to Use Which.


Hand-Cut Dovetails: The Traditional Path to Precision and Craftsmanship
For many, hand-cutting dovetails represents the pinnacle of woodworking skill and a deeply satisfying challenge. It is a process that demands patience, precision, and sharp hand tools, offering a unique connection to the craft.
Essential Hand Tools for Dovetail Joinery
To embark on the hand-cut journey, a few key tools are indispensable:
- Dovetail Saw: A fine-toothed backsaw designed for precise cross-grain and rip cuts.
- Chisels: A set of sharp chisels, particularly a 1/4″ or 1/2″ chisel for paring waste. Razor-sharp edges are non-negotiable. Check out The Ultimate Guide to Sharpening Woodworking Chisels and Planes for mastering your sharpening technique.
- Marking Gauge: For accurately marking shoulder lines.
- Marking Knife: Essential for scoring precise lines, providing a cleaner reference for sawing and chiseling.
- Bevel Gauge: To transfer the dovetail angle (typically 1:6 for hardwoods, 1:8 for softwoods).
- Mallet: For driving chisels, especially when clearing out waste.
- Clamps: To securely hold your workpieces.
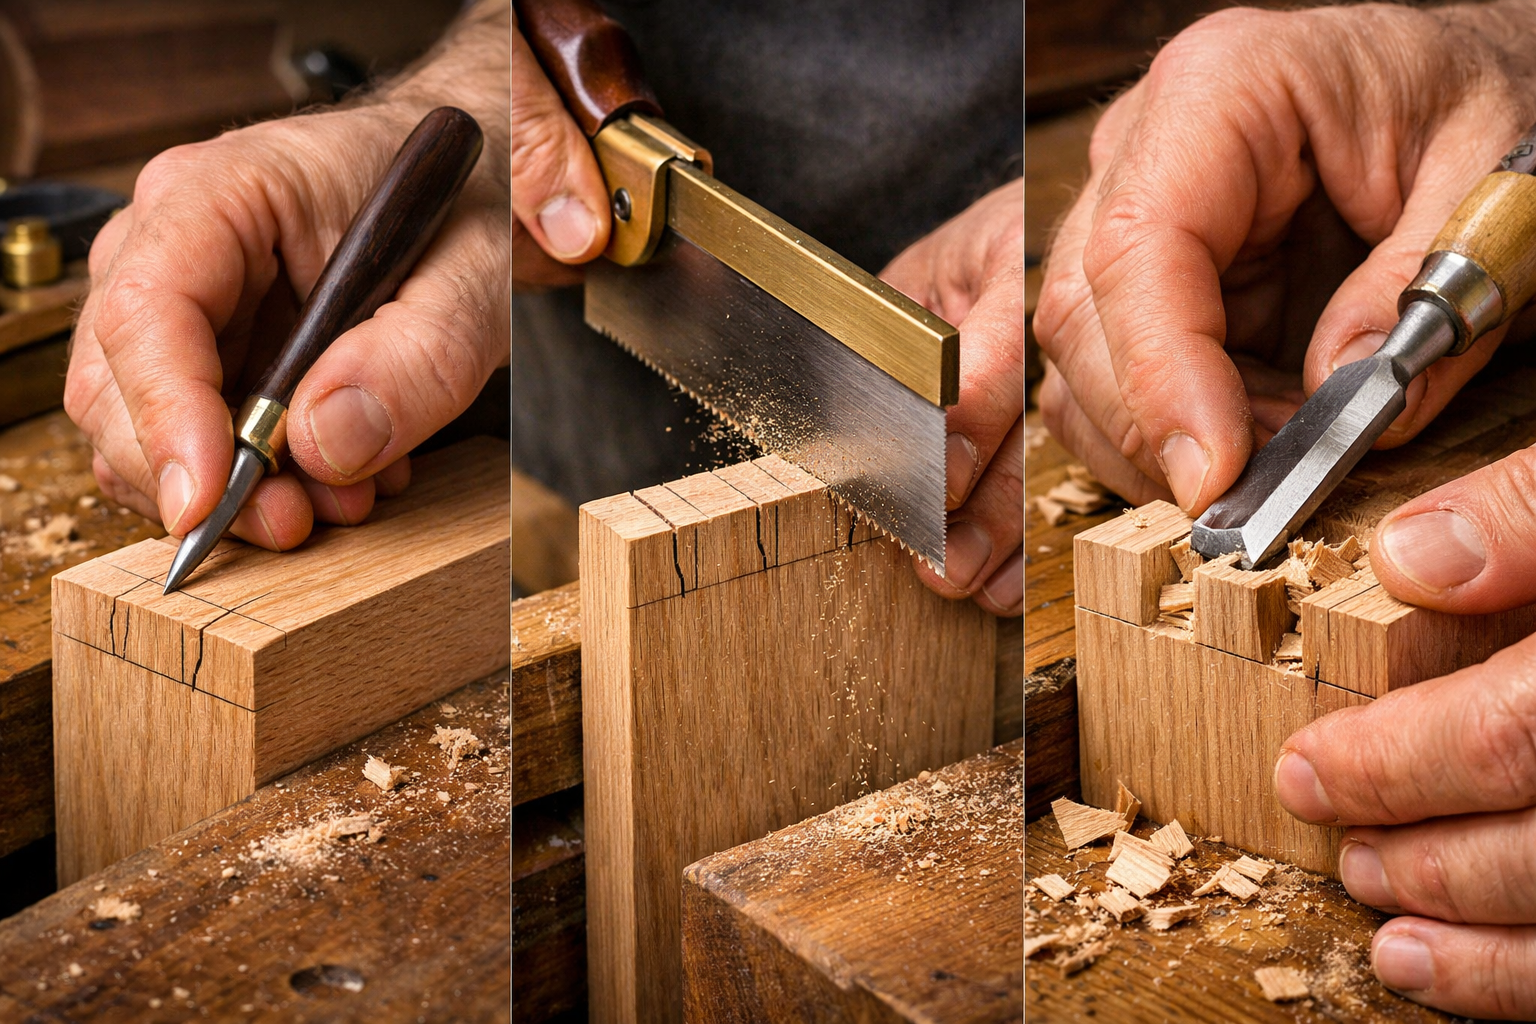
Step-by-Step Hand-Cutting Process (Tails First Method)
While there are “pins first” and “tails first” methods, many beginners find the “tails first” approach more intuitive.
- Prepare Your Stock: Ensure your boards are perfectly square and accurately cut to length. This is paramount for tight joints.
- Mark the Shoulder Lines: Using a marking gauge, scribe a line across the end grain on both faces and edges of both boards. This line represents the depth of the joint.
- Layout the Tails: On the end grain of the “tail” board, mark the spacing and angle of your tails. Use a bevel gauge set to your desired angle (e.g., 1:6).
- Cut the Tails: Carefully saw along your marked lines, ensuring your saw blade stays on the waste side of the line. Cut the cheeks of the tails first, then remove the waste between them using a coping saw or by chiseling.
- Transfer the Tails to the Pin Board: Place the tail board onto the end of the pin board, aligning the shoulder lines perfectly. Use a marking knife to accurately transfer the outline of the tails onto the pin board.
- Mark the Pin Waste: Square down the pin lines from the transferred marks using a square and marking knife. Mark the waste areas clearly.
- Cut the Pins: With your dovetail saw, cut along the pin lines, again staying on the waste side. Then, carefully chisel out the waste between the pins down to the shoulder line. Start by cutting relief cuts, then chop from both sides of the board to prevent tear-out.
- Test Fit and Refine: Gently test fit the joint. It should be snug but not require excessive force. Use a sharp chisel to pare away any high spots or refine the fit.
- Glue Up: Once satisfied with the fit, apply a thin, even coat of wood glue (see our Ultimate Guide to Wood Glue) and clamp the joint.
Pull Quote: “Hand-cutting dovetails is more than just making a joint; it’s a meditative practice that hones your focus, develops precision, and deeply connects you to the natural material of wood.”

Router Jig Techniques: Speed, Consistency, and Accessibility
For those prioritizing speed, consistency, or who prefer power tools, router jigs offer an excellent alternative to hand-cutting dovetails. Modern jigs make creating precise, repeatable dovetail joints significantly easier for beginners.
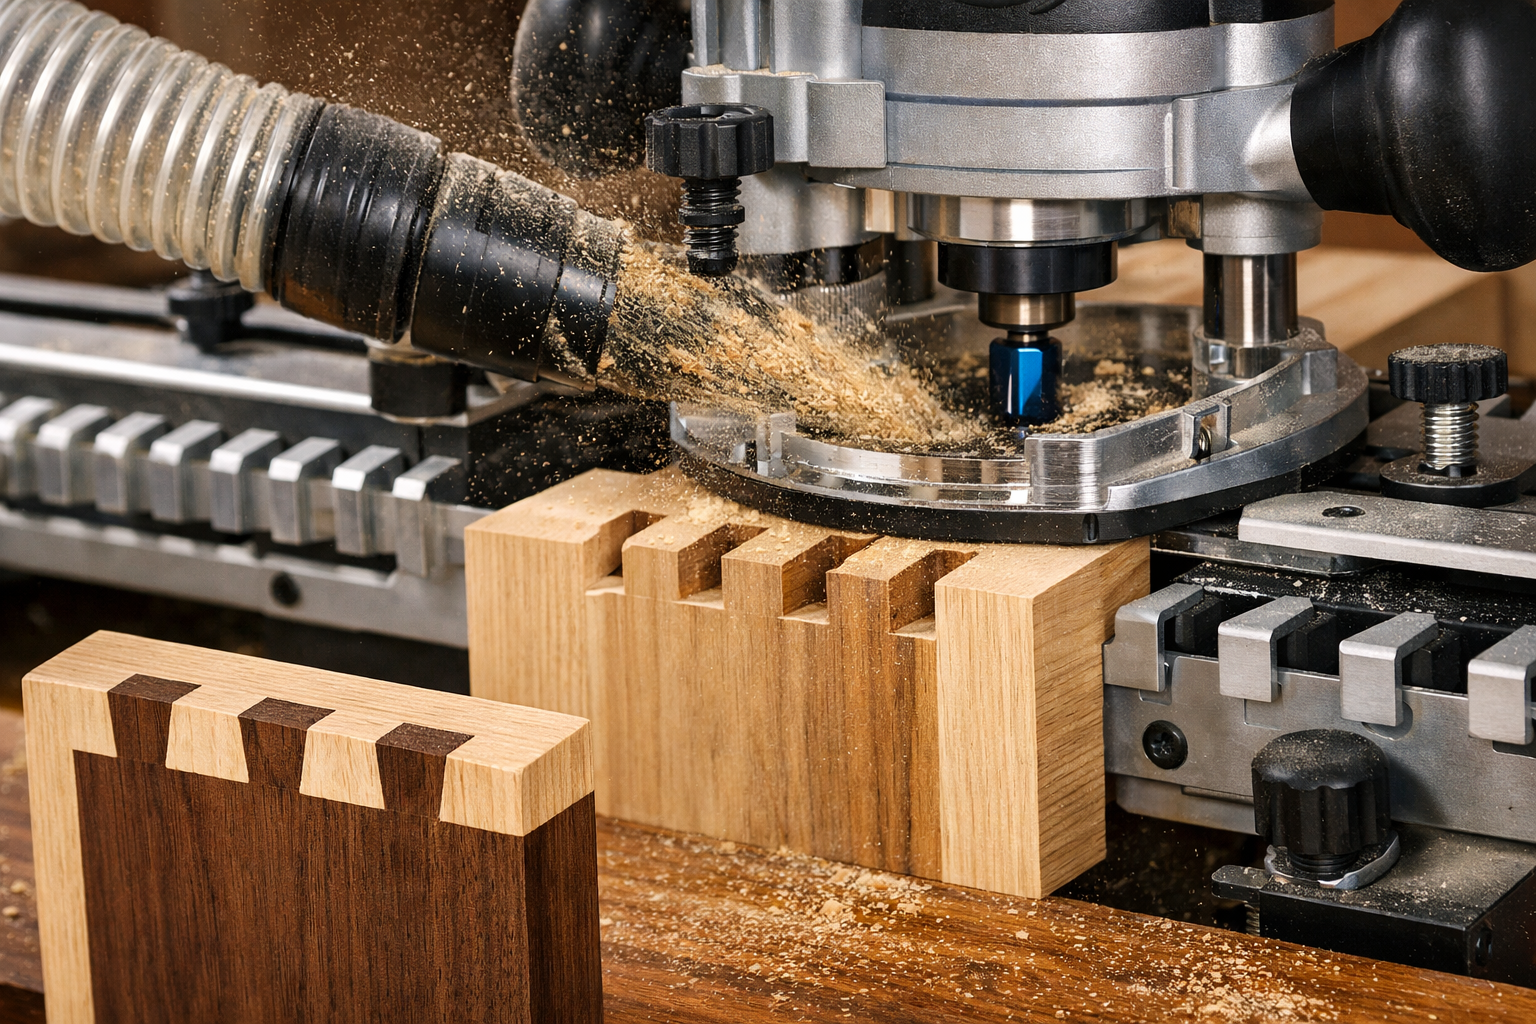
Understanding Router Dovetail Jigs
Router dovetail jigs typically consist of a metal template with finger-like guides that control the path of a router fitted with a specific dovetail bit and a guide bushing. The jig holds both workpieces securely, ensuring accurate pin and tail cuts. There are several types:
- Half-Blind Dovetail Jigs: Most common, these jigs cut half-blind dovetails (where the pins don’t show on the drawer front), often in a single setup.
- Through Dovetail Jigs: Designed for through dovetails (where both pins and tails are visible), these usually require two separate setups: one for tails, one for pins.
- Variable Spacing Jigs: More advanced jigs that allow customization of pin and tail spacing, offering greater design flexibility.
Required Tools for Router Jig Dovetails
- Router: A plunge router is often preferred for its control, but a fixed-base router can also work.
- Dovetail Bit: Specifically designed for dovetail joinery, with an angle matching the jig’s template (e.g., 1/2″ 14-degree dovetail bit).
- Guide Bushing (Template Guide): A collar that fits into your router’s baseplate and rides against the jig’s template.
- Dovetail Jig: The core component, specific to the type of dovetail you want to cut.
- Clamps: To secure the jig and workpieces.
- Dust Collection: Essential for maintaining visibility and a clean workspace. Our article on Building a Mobile Dust Collection Cart for Any Workshop might be helpful.
Step-by-Step Router Jig Process (Half-Blind Dovetails)
The exact steps vary slightly between jig manufacturers, but the general process for half-blind dovetails is:
- Set Up the Jig: Securely mount the jig to your workbench. Refer to your jig’s manual for specific setup instructions, including router bit height and guide bushing selection.
- Prepare and Clamp Workpieces: Accurately cut your drawer sides and fronts to size. The jig will have specific requirements for workpiece thickness and positioning. Clamp the drawer side (the pin board) vertically and the drawer front (the tail board) horizontally into the jig’s clamps. Ensure flush alignment.
- Install Router Bit and Bushing: Insert the correct dovetail bit into your router and install the appropriate guide bushing. Adjust the bit depth according to your jig’s instructions.
- Route the Joint: With the router turned on and plunge locked, guide the router along the jig’s template fingers, cutting both the pins and tails simultaneously. Work slowly and steadily, making multiple passes if necessary, especially with harder woods, to prevent burning and tear-out.
- Test Fit and Adjust: Carefully remove the workpieces from the jig and test fit the joint. If it’s too loose, the bit depth might need adjustment. If too tight, the jig’s setup might need tweaking or you might be using the wrong size bit/bushing.
- Repeat for Remaining Joints: Once you achieve a perfect fit, repeat the process for all remaining dovetail joints in your project.
Using a router table can further enhance precision and safety for various joinery tasks, as detailed in Choosing and Using Router Tables: Maximizing Precision and Safety for Edge Profiling and Joinery.

Hand-Cut vs. Router Jig: Which Method is Right for You?
Choosing between hand-cut and router jig dovetail techniques is a personal decision for beginners in 2026. Both methods produce strong, beautiful joints, but they offer distinct advantages and disadvantages.

| Feature | Hand-Cut Dovetails | Router Jig Dovetails |
|---|---|---|
| Learning Curve | Steep, requires significant practice and patience | Moderate, mastering jig setup is key |
| Speed | Slower, meticulous process, especially for multiples | Faster, highly efficient for batch production |
| Consistency | Varies with skill, each joint unique | Highly consistent, repeatable results |
| Cost (Initial) | Lower (chisels, saws, marking tools) | Higher (router, jig, bits, bushings) |
| Skill Developed | Deep understanding of grain, precision, tool control | Precision with power tools, setup, and measurement |
| Aesthetic | Organic, slight imperfections add character | Uniform, machine-perfect appearance |
| Project Type | Fine furniture, heirloom pieces, bespoke work | Production work, multiple drawers, consistent projects |
| Portability | Highly portable, hand tools only | Requires power and a more substantial setup |
For beginners, the Essential Guide to Dovetail Joinery isn’t about declaring one method superior, but understanding which aligns best with your goals. If you cherish the journey, the development of fundamental hand skills, and the unique character of hand-made objects, hand-cutting is immensely rewarding. If efficiency, consistency across multiple pieces, and a preference for power tools are your priorities, a quality router jig will serve you well. Many woodworkers eventually embrace both, using jigs for production work and hand-cutting for special showpiece projects.
Tips for Success, Regardless of Method
- Start with Practice Wood: Don’t use your best stock for your first few joints. Pine or poplar are excellent for practice.
- Sharp Tools are Non-Negotiable: Dull chisels and bits lead to frustration and poor results. Maintain your edges!
- Accurate Layout is Crucial: “Measure twice, cut once” is especially true for dovetails.
- Take Your Time: Rushing leads to mistakes. Patience is your greatest ally.
- Dust Management: Keep your workspace clean for better visibility and health, particularly with routers.
Conclusion
Dovetail joinery, whether achieved by the timeless art of hand-cutting or the modern precision of a router jig, remains a fundamental skill that every aspiring woodworker can master in 2026. This “Essential Guide to Dovetail Joinery for Beginners” has provided a roadmap to understanding both paths, highlighting the tools, techniques, and considerations for each.
By starting with a solid understanding of the joint’s purpose, embracing the learning curve, and committing to sharp tools and meticulous layout, beginners can confidently produce strong, beautiful dovetails. The choice between hand-cut and router jig techniques is yours to make, driven by your personal woodworking philosophy and project needs. Whichever method you choose, the satisfaction of creating a perfectly fitted dovetail joint is a truly rewarding experience, marking a significant milestone in your woodworking journey.
Actionable Next Steps:
- Choose Your Path: Decide whether you’ll start with hand-cutting or a router jig based on the comparison provided.
- Gather Your Tools: Invest in the necessary quality hand tools or a reliable router and dovetail jig.
- Practice on Scrap: Dedicate time to practicing on inexpensive wood until you achieve consistent, tight joints.
- Start a Small Project: Apply your newfound skill to a simple project like a small box or a single drawer for a cabinet. Consider exploring Profitable Woodworking for Beginners: Building and Selling H for project ideas.
Mastering dovetails is a journey, not a destination. Enjoy the process, celebrate your successes, and learn from every joint you create!
References
- Schwarz, C. (2010). The Anarchist’s Tool Chest. The Lost Art Press.
- Fine Woodworking Magazine. (Various Issues). Techniques and Tools for Dovetail Joints. Taunton Press.
- Tage Frid. (1979). Tage Frid Teaches Woodworking: Book 1 – Joinery. Taunton Press.
SEO Meta Title: Dovetail Joinery for Beginners: Hand-Cut vs. Router Jig Guide SEO Meta Description: Master dovetail joinery in 2026! This guide for beginners covers hand-cut vs. router jig techniques, tools, and step-by-step methods for strong, beautiful joints.
