


The notion that high-volume production requires vast industrial spaces is a common misconception. In reality, a meticulously planned small workshop can rival larger facilities in efficiency for certain product lines. This article provides a comprehensive guide to Workshop Organization for High-Volume Small Project Production: Space-Efficient Layouts, Tool Placement, and Jig Systems for Batch Building Coasters, Holders, and Organizers within confined areas. By embracing intelligent design, strategic tool management, and specialized jig systems, even hobbyist woodworkers and small businesses can achieve remarkable output without compromising on quality or succumbing to workshop chaos.
Key Takeaways
- Optimize workshop layouts for flow, creating distinct zones for specific tasks to minimize wasted movement.
- Implement vertical and mobile storage solutions to maximize every inch of available space, ensuring tools and materials are accessible.
- Strategically place tools based on frequency of use and the sequence of operations for specific batch projects.
- Develop versatile and repeatable jig systems crucial for consistent quality and accelerated production of small items.
- Regularly evaluate and refine your organizational systems to adapt to new projects and improve efficiency.
Space-Efficient Layouts for High-Volume Small Project Production
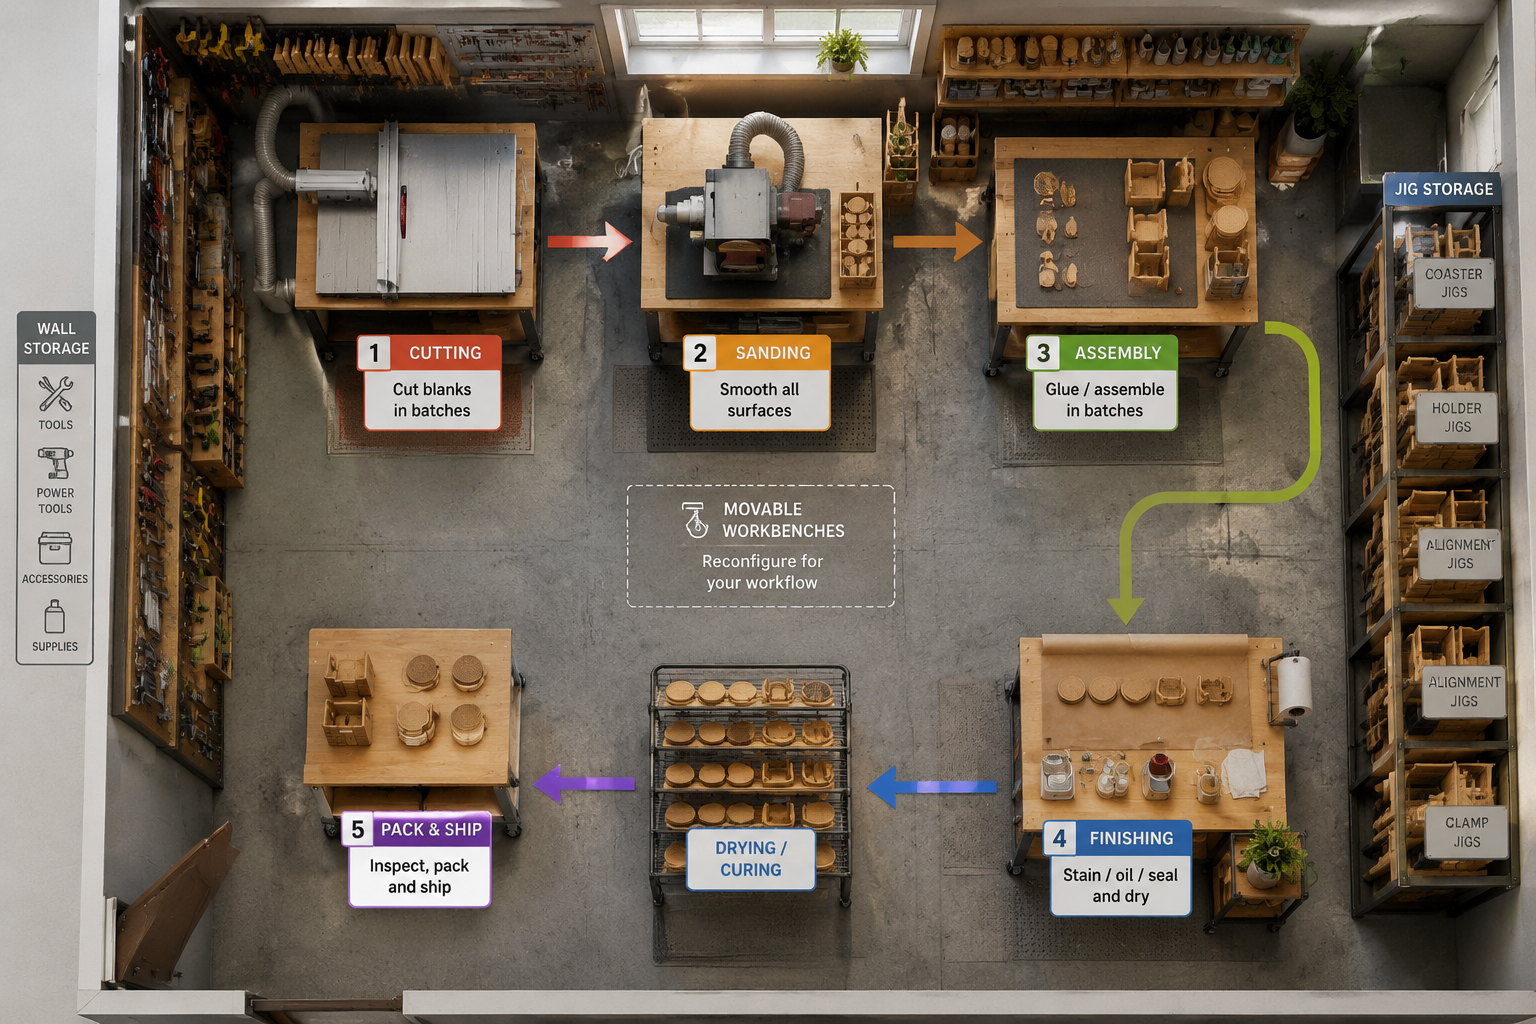
Efficient workshop organization begins with the layout. For high-volume production of small items like coasters, holders, and organizers, the goal is to create a workflow that minimizes steps and maximizes output within a limited footprint. This means moving away from a general-purpose workshop design and towards a more specialized, production-line approach, even if it’s a “line” of one person.

Designing for Workflow and Zones
The most effective small workshops are divided into functional zones. These zones don’t need permanent walls; they can be defined by the placement of equipment, benches, and storage. Consider the following common zones for small project batching:
- Material Storage/Rough Cut Zone: This is where raw materials (lumber, sheet goods) are stored and initially cut to approximate sizes. This zone should ideally be near the entry or a dust collection system.
- Milling/Precision Cut Zone: Dedicated to more precise operations like planing, jointing, and final cuts with a table saw or miter saw. Dust collection is paramount here.
- Shaping/Detailing Zone: For operations like routing edges, sanding, drilling, or engraving. This area often requires a dedicated workbench.
- Assembly Zone: Where components are glued, fastened, and initial fit-up occurs. A clean, flat surface is essential.
- Finishing Zone: A separate, well-ventilated area for sanding, staining, painting, or applying protective coats. It should be as dust-free as possible.
The key is to arrange these zones to facilitate a logical flow of materials from raw stock to finished product. For example, materials move from rough cut to milling, then to shaping, assembly, and finally finishing, with minimal backtracking.
Example Flow for Coaster Production:
- Rough Cut: Lumber cut into oversized blanks.
- Milling: Blanks planed and jointed to final thickness, then crosscut into individual coaster squares.
- Shaping/Detailing: Edges routed, holes drilled (if applicable), surfaces sanded.
- Finishing: Sanding, oiling/sealing.
- Packaging: Finished coasters bundled and prepared for sale.
Maximizing Vertical Space and Mobility
In a small workshop, gravity and wheels are your best friends.
- Vertical Storage: Walls are invaluable. Use pegboards, slatwall, shelves, and cabinets to store tools, jigs, and materials. This keeps floor space clear for movement and larger equipment. Building modular wood storage systems for small workshops can drastically improve organization.
- Mobile Workstations: Many operations, especially for small projects, do not require a permanently fixed bench. Consider building or buying mobile workbenches, tool carts, and dust collectors on wheels. This allows you to reconfigure your shop layout on the fly, creating space for specific tasks or larger projects when needed. A compact and ergonomic workbench for small workshops on casters is an excellent investment.
- Folding and Collapsible Surfaces: If space is extremely tight, work surfaces that fold down from walls or collapse can provide temporary workspace when needed and disappear when not.
<code>Table: Space-Saving Workshop Layout Strategies
| Strategy           | Description                                                        | Benefit                                                    |
| :----------------- | :----------------------------------------------------------------- | :--------------------------------------------------------- |
| **Zonal Planning** | Divide shop into distinct, interconnected work areas.              | Reduces movement, improves focus, defines workflow.        |
| **Vertical Storage** | Utilize walls for tools, jigs, and material storage (pegboards, shelves). | Frees up floor space, keeps items accessible.              |
| **Mobile Bases**   | Put heavy machinery and workbenches on locking casters.            | Flexible layout, easy cleaning, temporary open space.      |
| **Dedicated Benches** | Build specific benches for assembly or finishing, potentially folding. | Optimizes surfaces for specific tasks, saves space.        |
| **Overhead Storage** | Store long lumber or less-used items above head height.            | Maximizes cubic volume, clears lower areas.                |
</code>
Strategic Tool Placement for Batch Production
Once your layout is designed, the next critical step for Workshop Organization for High-Volume Small Project Production: Space-Efficient Layouts, Tool Placement, and Jig Systems for Batch Building Coasters, Holders, and Organizers is the strategic placement of your tools. “A place for everything, and everything in its place” is more than a cliché; it’s a productivity mantra for batch production.
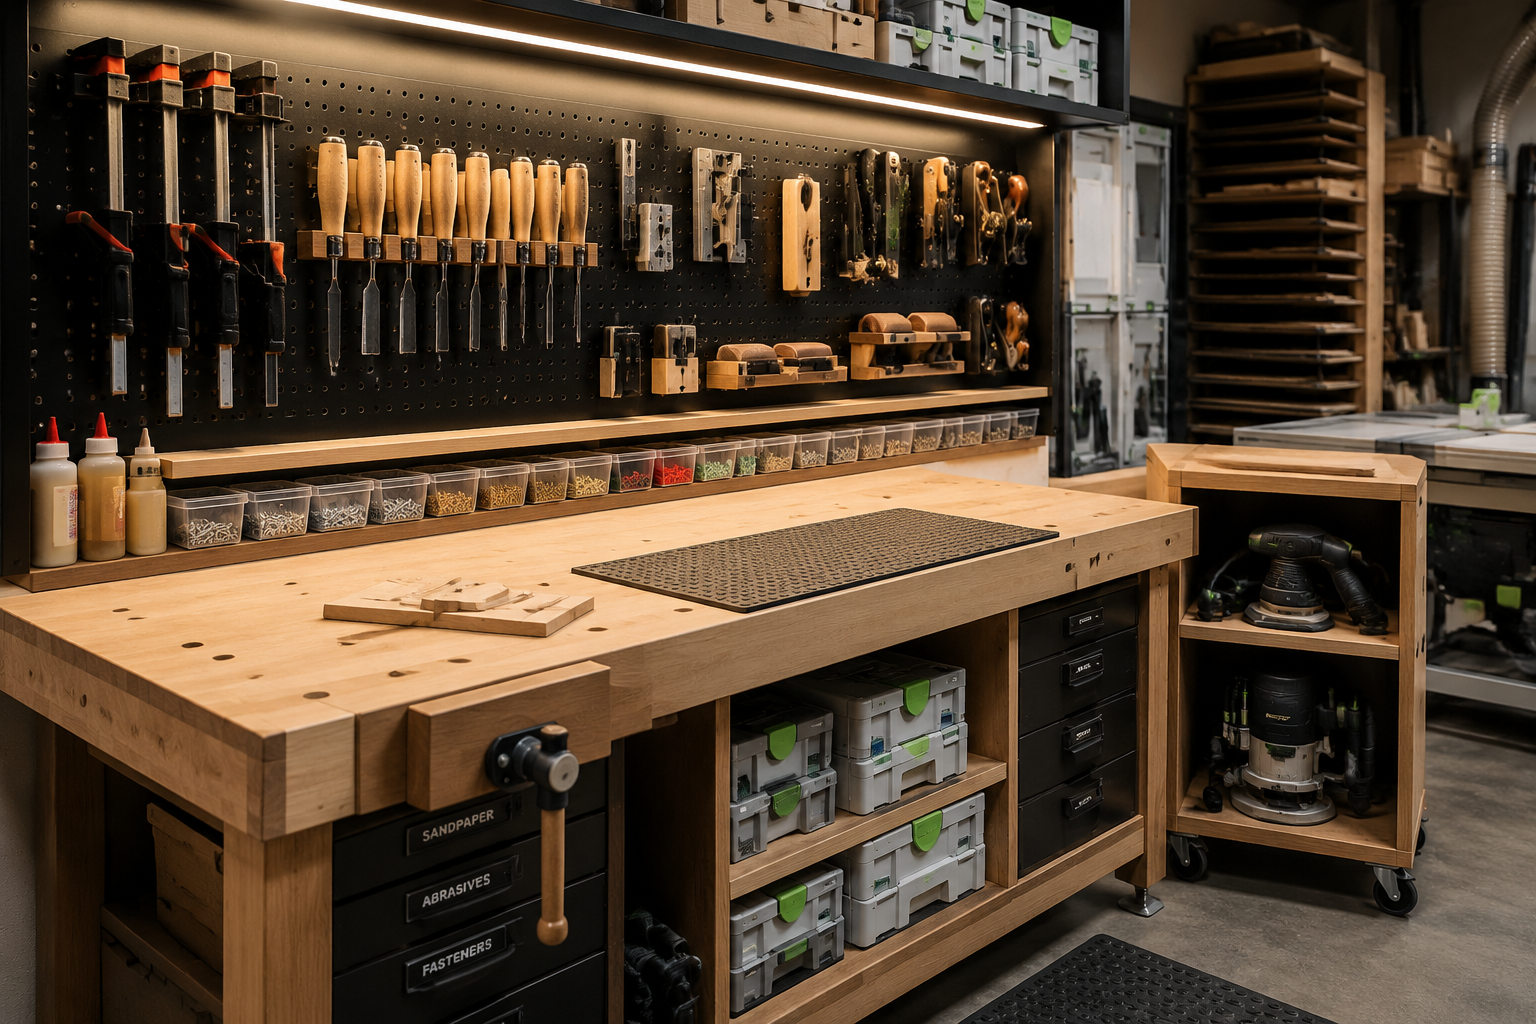
Point-of-Use Storage
Tools should be stored as close as possible to where they are used. If you have a dedicated sanding station for coasters, all your sanding blocks, abrasives, and palm sander should be right there. This reduces time spent walking, searching, and fetching.
- Hand Tools: Group hand tools by function and store them openly on pegboards or magnetic strips directly above or beside their primary workstation. For example, chisels and mallets near the carving area, squares and marking gauges near the measurement station. Refer to our guide on essential hand tools for every woodworker for more ideas.
- Power Tools: Frequently used power tools (e.g., a router for edge profiling) should be readily accessible. If used daily, consider having them permanently mounted or on a dedicated cart. Less frequently used tools can be stored in cabinets or on shelves. Ensure power cords are managed to prevent tripping hazards. Our article on power tool mastery for decorative wood projects highlights the tools vital for these types of small projects.
- Consumables and Fasteners: Small bins, drawer organizers, and clear containers are essential for screws, sandpaper, glue, and other small items. Label everything clearly. These should also be at their point of use.
Shadow Boards and Visual Cues
For tools frequently used, consider shadow boards. Tracing the outline of a tool onto a pegboard ensures that it is always returned to its designated spot. This visual cue makes it immediately obvious if a tool is missing and encourages good habits. Color-coding tools or their storage locations can also aid in quick identification.
Dust Collection Integration
Dust collection is not just a safety measure; it’s an organizational one. A cleaner shop is an organized shop. Integrate your dust collection system with your layout, ensuring ports are available at all major dust-producing tools. A mobile dust collection cart can be moved between tools, adapting to your workflow without permanent ducting taking up valuable space.
Jig Systems for Batch Building Coasters, Holders, and Organizers
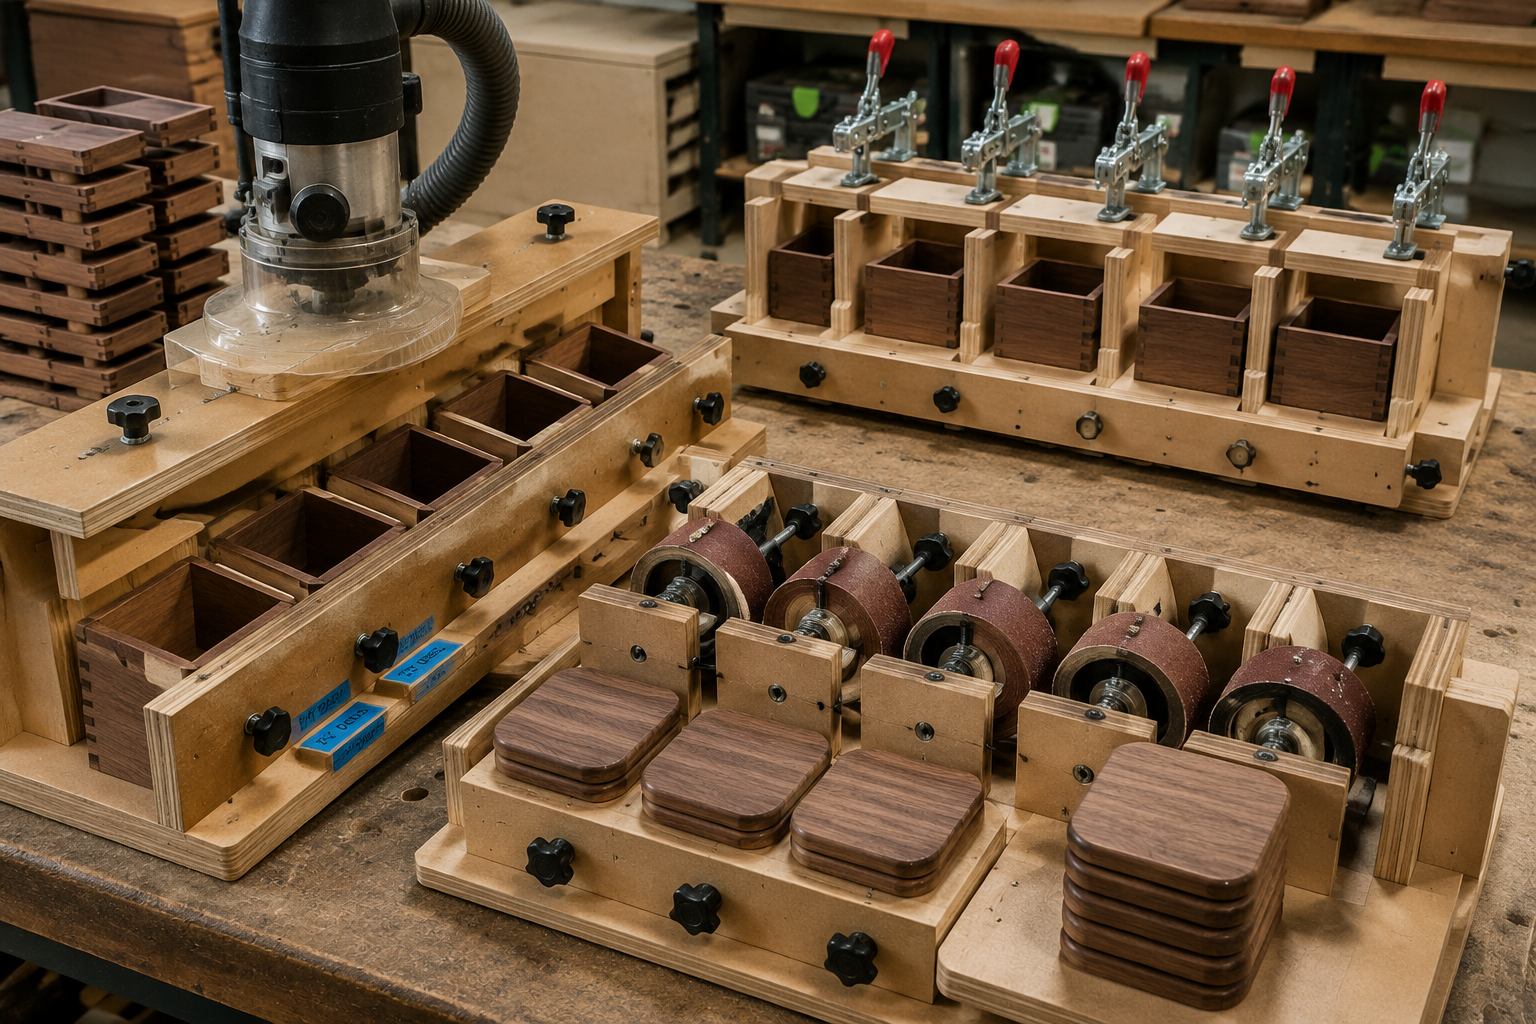
The true secret to high-volume small project production, especially in a compact workshop, lies in the intelligent design and implementation of jig systems. Jigs transform repetitive tasks into precise, consistent, and quick operations, ensuring every coaster, holder, or organizer meets the same quality standard. This is the cornerstone of effective Workshop Organization for High-Volume Small Project Production: Space-Efficient Layouts, Tool Placement, and Jig Systems for Batch Building Coasters, Holders, and Organizers.
The Power of Repetition and Consistency
Jigs allow you to repeat a specific cut, drill a hole at an exact location, or shape an edge uniformly across dozens, even hundreds, of identical pieces. This eliminates measurement errors, reduces setup time for each piece, and significantly speeds up production.
Key Characteristics of Effective Jigs:
- Repeatability: Designed to produce identical results every time.
- Accuracy: Ensures precise cuts, shapes, or holes.
- Safety: Often guides tools more securely than freehand methods.
- Efficiency: Reduces setup time and speeds up the work.
- Durability: Built to withstand repeated use.
Essential Jig Types for Small Projects
For items like coasters, small holders, and organizers, several types of jigs prove invaluable:
- Crosscut Sleds: While not strictly for small projects, a well-tuned crosscut sled (or dedicated small-piece sled) ensures perfectly square and consistent lengths for components like coaster blanks or box sides.
- Router Jigs:
- Edge Profiling Jigs: Simple fences or templates that guide a router to apply consistent edge profiles (e.g., chamfer, round-over) to multiple coasters or box lids.
- Dado and Rabbet Jigs: Guides for routing consistent dadoes for shelves in small organizers or rabbets for box joints.
- Template Routing Jigs: Use a template to create complex shapes or recessed areas (e.g., a dish for a coaster, a phone slot in a holder). Customization strategies for mass-producing small woodcraft details how jigs fit into customized production.
- Drilling Jigs:
- Drill Press Fences and Stops: For consistent hole placement and depth when batch drilling, for example, holes for pens in an organizer.
- Pocket Hole Jigs: While not always a jig in the traditional sense, a good pocket hole jig system allows for fast and strong joinery in small box constructions.
- Sanding Jigs: Simple platforms or guides that hold a workpiece securely while sanding, ensuring flat surfaces and consistent edges, especially crucial for final finishing.
- Assembly Jigs: Frameworks that hold multiple components square and in alignment while glue dries or fasteners are applied. This is particularly useful for small boxes or multi-compartment organizers.
- Finishing Jigs/Racks: Systems for holding multiple pieces during the finishing process, allowing for efficient application of oils or finishes and proper drying without contact points.
Storing and Managing Jigs
Just like tools, jigs need their own organized storage.

- Dedicated Jig Storage: Create specific shelves, wall racks, or even mobile carts solely for jigs. This prevents damage, allows for quick retrieval, and keeps them from cluttering your main workspaces.
- Labeling: Clearly label each jig with its purpose and the project it’s used for. This is crucial as your collection of jigs grows.
- Modular Design: Design jigs to be modular where possible, allowing components to be reconfigured for different projects or sizes. For instance, adjustable fences or interchangeable templates.
Building and integrating these jig systems is an investment of time and material, but the returns in terms of increased production speed, consistent quality, and reduced frustration are substantial for anyone engaged in high-volume small project production.
Conclusion
Mastering Workshop Organization for High-Volume Small Project Production: Space-Efficient Layouts, Tool Placement, and Jig Systems for Batch Building Coasters, Holders, and Organizers is an ongoing process of refinement and adaptation. It is not about acquiring the largest or most expensive equipment, but about intelligently structuring your workspace and processes to maximize every available resource. By prioritizing workflow in your layout, strategically placing your tools for immediate access, and leveraging precision jig systems, you can transform a compact workshop into a highly efficient production powerhouse.
Start by evaluating your current workspace and identifying bottlenecks. Sketch out potential layouts, observe your movements during production, and identify where a simple jig could replace a tedious, repetitive task. Invest in mobile solutions, vertical storage, and robust dust collection. The goal for 2026 is a workshop where efficiency is built into its very fabric, allowing you to produce high-quality, consistent small projects with speed and satisfaction.
